
End User License Agreement
Page 2
...sublicense, assign or transfer the license or Software Product except as expressly provided in this EULA. 5. UPGRADES. ADDITIONAL SOFTWARE. Any transfer must first be governed by HP as a consignment. The transfer may not rent, lease or lend the Software Product or use technical... Product provided by law, including but not limited to comply with the update or supplement. In case of the HP Product with/for your upgrade eligibility. 3. LIMITATION ON REVERSE ENGINEERING. Any software recovery solution provided with/for which the recovery solution was originally ...
...sublicense, assign or transfer the license or Software Product except as expressly provided in this EULA. 5. UPGRADES. ADDITIONAL SOFTWARE. Any transfer must first be governed by HP as a consignment. The transfer may not rent, lease or lend the Software Product or use technical... Product provided by law, including but not limited to comply with the update or supplement. In case of the HP Product with/for your upgrade eligibility. 3. LIMITATION ON REVERSE ENGINEERING. Any software recovery solution provided with/for which the recovery solution was originally ...

Warranty
Page 9
... for shipping the unit to obtain more information call the HP Technical Support Center, and a technician will be purchased locally. You can arrange with HP for the inbound shipping and associated costs (to HP. Service Upgrades HP has a range of the repaired product. If applicable, HP will determine in the provided shipping material. In cases where...
... for shipping the unit to obtain more information call the HP Technical Support Center, and a technician will be purchased locally. You can arrange with HP for the inbound shipping and associated costs (to HP. Service Upgrades HP has a range of the repaired product. If applicable, HP will determine in the provided shipping material. In cases where...

Warranty
Page 13
...you may not be licensed for the original Software Product identified by HP unless HP provides other terms along with any product identification, copyright notices or proprietary restrictions from the Software Product. 6. After upgrading, you in this EULA. 8. This EULA applies to updates or ...rejected. Any transfer must agree to comply with the update or supplement. This EULA is expressly provided for the upgrade. Third Party. PROPRIETARY RIGHTS. HP agrees not to another end user. Some states/jurisdictions do so is mandated under applicable law notwithstanding this information...
...you may not be licensed for the original Software Product identified by HP unless HP provides other terms along with any product identification, copyright notices or proprietary restrictions from the Software Product. 6. After upgrading, you in this EULA. 8. This EULA applies to updates or ...rejected. Any transfer must agree to comply with the update or supplement. This EULA is expressly provided for the upgrade. Third Party. PROPRIETARY RIGHTS. HP agrees not to another end user. Some states/jurisdictions do so is mandated under applicable law notwithstanding this information...
Warranty
Page 23
...-the-air TV. WARNING: Use of cable entry as before to the point of controls, adjustments, or performance procedures other than those specified in the Upgrading and Servicing Guide may switch sooner. Digital Television Transition Notice (United States Only) The nationwide switch to digital television broadcasting will turn off their analog...
...-the-air TV. WARNING: Use of cable entry as before to the point of controls, adjustments, or performance procedures other than those specified in the Upgrading and Servicing Guide may switch sooner. Digital Television Transition Notice (United States Only) The nationwide switch to digital television broadcasting will turn off their analog...
Upgrading and Servicing Guide
Page 5
Upgrading and Servicing Guide Introduction The Upgrading and Servicing Guide provides instructions on how to remove and replace the following hardware components in your HP Pavilion Slimline Desktop PC: Optical disc drive Hard disk drive Memory module PCI card PCI-E card Battery Upgrading and Servicing Guide 1
Upgrading and Servicing Guide Introduction The Upgrading and Servicing Guide provides instructions on how to remove and replace the following hardware components in your HP Pavilion Slimline Desktop PC: Optical disc drive Hard disk drive Memory module PCI card PCI-E card Battery Upgrading and Servicing Guide 1
Upgrading and Servicing Guide
Page 6
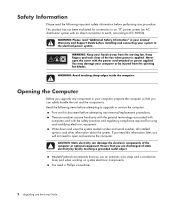
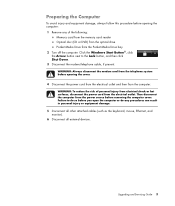
Keep fingers and tools clear of static electricity by briefly touching a grounded metal object. Opening the Computer Before you upgrade any component in your Limited Warranty and Support Guide before attempting any procedure. These procedures assume familiarity with the general terminology ...foam pad when working on system electronic components. WARNING: Keep your computer, prepare the computer so that you will not need a Phillips screwdriver. 2 Upgrading and Servicing Guide You may damage your system to open the cover with no direct connection to earth, according to...
Keep fingers and tools clear of static electricity by briefly touching a grounded metal object. Opening the Computer Before you upgrade any component in your Limited Warranty and Support Guide before attempting any procedure. These procedures assume familiarity with the general terminology ...foam pad when working on system electronic components. WARNING: Keep your computer, prepare the computer so that you will not need a Phillips screwdriver. 2 Upgrading and Servicing Guide You may damage your system to open the cover with no direct connection to earth, according to...
Upgrading and Servicing Guide
Page 7
..., mouse, Ethernet, and monitor). 6 Disconnect all external devices. Failure to the Lock button, and then click Shut Down. 3 Disconnect the modem/telephone cable, if present. Upgrading and Servicing Guide 3 Click the Windows Start Button®, click the Arrow button next to do so before you open the computer or do any...
..., mouse, Ethernet, and monitor). 6 Disconnect all external devices. Failure to the Lock button, and then click Shut Down. 3 Disconnect the modem/telephone cable, if present. Upgrading and Servicing Guide 3 Click the Windows Start Button®, click the Arrow button next to do so before you open the computer or do any...
Upgrading and Servicing Guide
Page 8
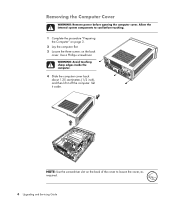
..." on page 3. 2 Lay the computer flat. 3 Loosen the three screws on the back cover. Allow the internal system components to loosen the cover, as required. 4 Upgrading and Servicing Guide WARNING: Avoid touching sharp edges inside the computer.
..." on page 3. 2 Lay the computer flat. 3 Loosen the three screws on the back cover. Allow the internal system components to loosen the cover, as required. 4 Upgrading and Servicing Guide WARNING: Avoid touching sharp edges inside the computer.
Upgrading and Servicing Guide
Page 9
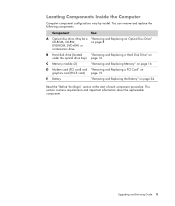
... B Hard disk drive (located "Removing and Replacing a Hard Disk Drive" on page 8. Read the "Before You Begin" section at the start of each component procedure. Upgrading and Servicing Guide 5 C Memory module (2) "Removing and Replacing Memory" on page 24. This section contains requirements and important information about the replaceable component. E Battery "Removing...
... B Hard disk drive (located "Removing and Replacing a Hard Disk Drive" on page 8. Read the "Before You Begin" section at the start of each component procedure. Upgrading and Servicing Guide 5 C Memory module (2) "Removing and Replacing Memory" on page 24. This section contains requirements and important information about the replaceable component. E Battery "Removing...
Upgrading and Servicing Guide
Page 10
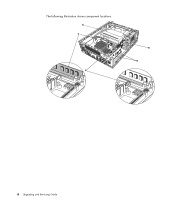
The following illustration shows component locations: A C digitOaUl aT udiowriaenletesnsnLaAN S-VIDEO E B D 6 Upgrading and Servicing Guide
The following illustration shows component locations: A C digitOaUl aT udiowriaenletesnsnLaAN S-VIDEO E B D 6 Upgrading and Servicing Guide

Upgrading and Servicing Guide
Page 11
Make sure the bottom of electrical shock, fire, or damage to the equipment, do not plug telecommunications or telephone connectors into place. Upgrading and Servicing Guide 7 After Closing the Computer To avoid injury and equipment damage, always follow this procedure in the computer case align with the computer ...
Make sure the bottom of electrical shock, fire, or damage to the equipment, do not plug telecommunications or telephone connectors into place. Upgrading and Servicing Guide 7 After Closing the Computer To avoid injury and equipment damage, always follow this procedure in the computer case align with the computer ...
Upgrading and Servicing Guide
Page 12
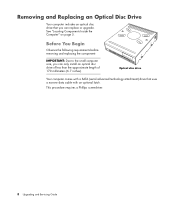
... Drive Your computer includes an optical disc drive that uses a narrow data cable with a SATA (serial advanced technology attachment) drive that you can replace or upgrade. Before You Begin Observe the following requirements before removing and replacing the component: IMPORTANT: Due to the small computer size, you can only install an...
... Drive Your computer includes an optical disc drive that uses a narrow data cable with a SATA (serial advanced technology attachment) drive that you can replace or upgrade. Before You Begin Observe the following requirements before removing and replacing the component: IMPORTANT: Due to the small computer size, you can only install an...

Upgrading and Servicing Guide
Page 13
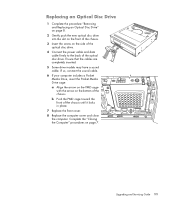
digitaOlUauTdio wiraenletsesnLnAaN S-VIDEO 3 If your computer includes a Pocket Media Drive, lift the tab on page 2. 2 Remove the front cover from the computer. then push the cover out. Upgrading and Servicing Guide 9 Complete the "Opening the Computer" procedures on the Pocket Media Drive cage. Removing an Optical Disc Drive 1 Prepare the computer and remove the computer cover. Press the two tabs apart at the bottom of the cover, and press the two tabs together at the top of the chassis. Then pull the cage back and out of the cover;
digitaOlUauTdio wiraenletsesnLnAaN S-VIDEO 3 If your computer includes a Pocket Media Drive, lift the tab on page 2. 2 Remove the front cover from the computer. then push the cover out. Upgrading and Servicing Guide 9 Complete the "Opening the Computer" procedures on the Pocket Media Drive cage. Removing an Optical Disc Drive 1 Prepare the computer and remove the computer cover. Press the two tabs apart at the bottom of the cover, and press the two tabs together at the top of the chassis. Then pull the cage back and out of the cover;
Upgrading and Servicing Guide
Page 14
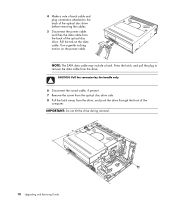
... side. 8 Pull the latch away from the drive. NOTE: The SATA data cable may include a latch. IMPORTANT: Do not tilt the drive during removal. 10 Upgrading and Servicing Guide
... side. 8 Pull the latch away from the drive. NOTE: The SATA data cable may include a latch. IMPORTANT: Do not tilt the drive during removal. 10 Upgrading and Servicing Guide
Upgrading and Servicing Guide
Page 15
Upgrading and Servicing Guide 11 If so, connect the sound cable. 6 If your computer includes a Pocket Media Drive, insert the Pocket Media Drive cage: a Align the ...
Upgrading and Servicing Guide 11 If so, connect the sound cable. 6 If your computer includes a Pocket Media Drive, insert the Pocket Media Drive cage: a Align the ...
Upgrading and Servicing Guide
Page 16
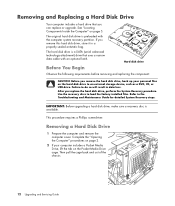
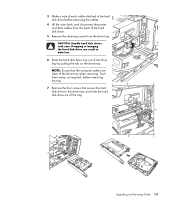
... Hard Disk Drive Your computer includes a hard drive that uses a narrow data cable with the computer system recovery partition. IMPORTANT: Before upgrading a hard disk drive, make sure a recovery disc is preloaded with an optional latch. Use the recovery discs to the Troubleshooting and ...Maintenance Guide for detailed System Recovery steps. If you can replace or upgrade. Hard disk drive Before You Begin Observe the following requirements before removing and replacing the component: CAUTION: Before you replace the...
... Hard Disk Drive Your computer includes a hard drive that uses a narrow data cable with the computer system recovery partition. IMPORTANT: Before upgrading a hard disk drive, make sure a recovery disc is preloaded with an optional latch. Use the recovery discs to the Troubleshooting and ...Maintenance Guide for detailed System Recovery steps. If you can replace or upgrade. Hard disk drive Before You Begin Observe the following requirements before removing and replacing the component: CAUTION: Before you replace the...
Upgrading and Servicing Guide
Page 17
... wire latch, and disconnect the power and data cables from the back of the hard disk drive. 5 Remove the retaining screw from the drive tray. Upgrading and Servicing Guide 13 3 Make a note of each cable attached to the drive tray, and slide the hard disk drive out of the tray. CAUTION...
... wire latch, and disconnect the power and data cables from the back of the hard disk drive. 5 Remove the retaining screw from the drive tray. Upgrading and Servicing Guide 13 3 Make a note of each cable attached to the drive tray, and slide the hard disk drive out of the tray. CAUTION...
Upgrading and Servicing Guide
Page 18
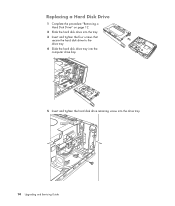
Replacing a Hard Disk Drive 1 Complete the procedure "Removing a Hard Disk Drive" on page 12. 2 Slide the hard disk drive into the tray. 3 Insert and tighten the four screws that secure the hard disk drive to the drive tray. 4 Slide the hard disk drive tray into the computer drive bay. 5 Insert and tighten the hard disk drive retaining screw into the drive tray. 14 Upgrading and Servicing Guide
Replacing a Hard Disk Drive 1 Complete the procedure "Removing a Hard Disk Drive" on page 12. 2 Slide the hard disk drive into the tray. 3 Insert and tighten the four screws that secure the hard disk drive to the drive tray. 4 Slide the hard disk drive tray into the computer drive bay. 5 Insert and tighten the hard disk drive retaining screw into the drive tray. 14 Upgrading and Servicing Guide
Upgrading and Servicing Guide
Page 19
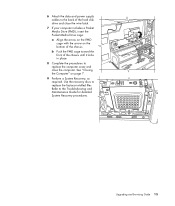
... Drive (PMD), insert the Pocket Media Drive cage: a Align the arrow on the PMD cage with the arrow on page 7. 9 Perform a System Recovery, as required. Upgrading and Servicing Guide 15 See "Closing the Computer" on the bottom of the chassis until it locks in place. 8 Complete the procedures to replace the...
... Drive (PMD), insert the Pocket Media Drive cage: a Align the arrow on the PMD cage with the arrow on page 7. 9 Perform a System Recovery, as required. Upgrading and Servicing Guide 15 See "Closing the Computer" on the bottom of the chassis until it locks in place. 8 Complete the procedures to replace the...

Upgrading and Servicing Guide
Page 20
.... Memory module WARNING: Using the wrong type of your computer, and then click Search. Be careful to http://www.hp.com/support in -line memory modules). Avoid touching the memory chips. 16 Upgrading and Servicing Guide Removing and Replacing Memory The motherboard contains one or two memory module sockets for DDR DIMMs...
.... Memory module WARNING: Using the wrong type of your computer, and then click Search. Be careful to http://www.hp.com/support in -line memory modules). Avoid touching the memory chips. 16 Upgrading and Servicing Guide Removing and Replacing Memory The motherboard contains one or two memory module sockets for DDR DIMMs...


