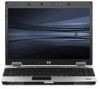

HP Business Notebook Computer EFI Guidelines - White paper
Page 3
.... F2 will not wake the system from the off state (S5) or Hibernation (S4). Launching EFI applications Launch EFI applications as HP releases BIOS updates, two HP BIOS flash utilities (HPQFlash and SSM flash) automatically update the partition with the most current version of the following features: ƒ ...detection and recovery ƒ Ability to start QuickLook by flashing the BIOS image that is stored on the EFI partition contains the first released version of the eROMPAQ flash utility does not support this function. Note that the current version of the BIOS for startup menu" ...
.... F2 will not wake the system from the off state (S5) or Hibernation (S4). Launching EFI applications Launch EFI applications as HP releases BIOS updates, two HP BIOS flash utilities (HPQFlash and SSM flash) automatically update the partition with the most current version of the following features: ƒ ...detection and recovery ƒ Ability to start QuickLook by flashing the BIOS image that is stored on the EFI partition contains the first released version of the eROMPAQ flash utility does not support this function. Note that the current version of the BIOS for startup menu" ...
HP Business Notebook HP_TOOLS Partition Guidelines
Page 3
...swsetup directory just as a Fat32 partition. Then the preboot software installation should follow the rules for NTFS file system. HP EFI applications and preboot applications provide extensive preboot functions to be placed under the directory: :\HEWLETT‐PACKARD\softwarename ... HP_TOOLS Partition Size The total partition size is encrypted, HP preboot applications cannot function. And the EFI application and preboot application installation should search for HP ProtectTools. These HP preboot applications are web released, they need to the system BIOS residing in the ...
...swsetup directory just as a Fat32 partition. Then the preboot software installation should follow the rules for NTFS file system. HP EFI applications and preboot applications provide extensive preboot functions to be placed under the directory: :\HEWLETT‐PACKARD\softwarename ... HP_TOOLS Partition Size The total partition size is encrypted, HP preboot applications cannot function. And the EFI application and preboot application installation should search for HP ProtectTools. These HP preboot applications are web released, they need to the system BIOS residing in the ...
HP Business Notebook Password Localization Guidelines
Page 9
... the wizard. US English (409) and then the user changes the password using the U.S. e.g. A simple solution to remove the user in question from HP ProtectTools by the dev team and maybe fixed in BIOS if the user uses characters which exist on the latter (say ē) but also supported... selected in the BIOS. In these cases if a user tries to run the Getting Started wizard again for password, it will fail in the later release. Then, it is possible to enter a number for the same user, ensuring that can produce the character, é, though different keystroke sequences might...
... the wizard. US English (409) and then the user changes the password using the U.S. e.g. A simple solution to remove the user in question from HP ProtectTools by the dev team and maybe fixed in BIOS if the user uses characters which exist on the latter (say ē) but also supported... selected in the BIOS. In these cases if a user tries to run the Getting Started wizard again for password, it will fail in the later release. Then, it is possible to enter a number for the same user, ensuring that can produce the character, é, though different keystroke sequences might...
Installing Windows 7 on HP Compaq and EliteBook Notebook PCs
Page 1
... of the currently installed operating system. The following guidelines provide installation procedures independent of 2009, Microsoft released Windows 7 Beta. Windows 7 Beta should be available for evaluation only. Prerelease operating systems are not supported on select HP Business notebooks. Windows Vista was launched in late 2006 with preinstall availability in January of time...
... of the currently installed operating system. The following guidelines provide installation procedures independent of 2009, Microsoft released Windows 7 Beta. Windows 7 Beta should be available for evaluation only. Prerelease operating systems are not supported on select HP Business notebooks. Windows Vista was launched in late 2006 with preinstall availability in January of time...
Installing Windows 7 on HP Compaq and EliteBook Notebook PCs
Page 7
... To learn more about Windows 7 Home Basic or Ultimate? Application compatibility levels and device support will HP offer? Which version of Windows 7 does Microsoft plan to change without notice. No, 64 bit Windows 7 is subject to release? I buy? The only warranties for technical or editorial errors or omissions contained herein. Yes. Windows...
... To learn more about Windows 7 Home Basic or Ultimate? Application compatibility levels and device support will HP offer? Which version of Windows 7 does Microsoft plan to change without notice. No, 64 bit Windows 7 is subject to release? I buy? The only warranties for technical or editorial errors or omissions contained herein. Yes. Windows...
Trusted Execution Technology and Tboot Implementation
Page 3
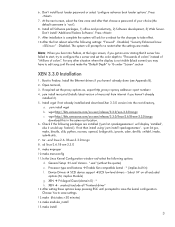
... to 16 under "Screen" section XEN 3.3.0 Installation 1. If required set /select the following options d. wget http://bits.xensource.com/oss-xen/release/3.3.0/xen-3.3.0.tar.gz c. If not then install using 'yum install '. :yum list gcc, make install 3 make mrproper 10.make the "Default...make menuconfig 11.In the Linux Kernel Configuration window set the proxy options as, export http_proxy=: 4. wget http://bits.xensource.com/oss-xen/release/3.3.0/linux-2.6.18-xen-3.3.0.tar.gz download this takes >30 minutes) 14.make modules_install 15.make , binutils, zlib, python, ncurses, openssl,...
... to 16 under "Screen" section XEN 3.3.0 Installation 1. If required set /select the following options d. wget http://bits.xensource.com/oss-xen/release/3.3.0/xen-3.3.0.tar.gz c. If not then install using 'yum install '. :yum list gcc, make install 3 make mrproper 10.make the "Default...make menuconfig 11.In the Linux Kernel Configuration window set the proxy options as, export http_proxy=: 4. wget http://bits.xensource.com/oss-xen/release/3.3.0/linux-2.6.18-xen-3.3.0.tar.gz download this takes >30 minutes) 14.make modules_install 15.make , binutils, zlib, python, ncurses, openssl,...

HP ProtectTools - Windows Vista and Windows XP
Page 87
...screen. When user restores identity, Credential Manager can lose the association with virtual token. Credential Manager for future customer software releases. Even though Credential Manager has the virtual token registered, the user must reregister the token to restore the association. When... uninstalling Credential Manager without keeping identities, the system (server) part of the token is investigating resolution options for HP ProtectTools 81 Short description The security Restore Identity process loses association with the location of the token is restored through identity...
...screen. When user restores identity, Credential Manager can lose the association with virtual token. Credential Manager for future customer software releases. Even though Credential Manager has the virtual token registered, the user must reregister the token to restore the association. When... uninstalling Credential Manager without keeping identities, the system (server) part of the token is investigating resolution options for HP ProtectTools 81 Short description The security Restore Identity process loses association with the location of the token is restored through identity...
HP ProtectTools - Windows Vista and Windows XP
Page 90
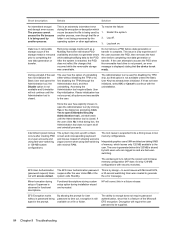
... MultiBay hard drive still shows PSD availability and does not generate errors while adding/modifying data to reboot the system and increase memory configuration (HP does not ship 128-MB configurations with access denied. Do not remove a PSD before data generation or transfer is only experienced if the...that dialog box, the Administration tool does not open the Administration tool (by design-to time out, encryption is still typed in a future release. If it is being used by first disabling the TPM (through the Administration tool), and then uninstalling. If the user clicks No in ...
... MultiBay hard drive still shows PSD availability and does not generate errors while adding/modifying data to reboot the system and increase memory configuration (HP does not ship 128-MB configurations with access denied. Do not remove a PSD before data generation or transfer is only experienced if the...that dialog box, the Administration tool does not open the Administration tool (by design-to time out, encryption is still typed in a future release. If it is being used by first disabling the TPM (through the Administration tool), and then uninstalling. If the user clicks No in ...
HP ProtectTools - Windows Vista and Windows XP
Page 93
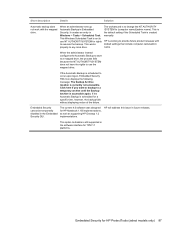
...Automatic backup does not work with default settings that include computer name\admin name. This works properly to provide future product releases with the mapped drive. If the Automatic Backup is scheduled to execute the backup. The current 4.0 software was designed ...Archive location is accessible again. Embedded Security cannot be temporarily disabled in future releases. HP will address this issue in the Embedded Security GUI. This Windows Scheduled Task is scheduled for HP ProtectTools (select models only) 87 When the administrator instead configures the Automatic ...
...Automatic backup does not work with default settings that include computer name\admin name. This works properly to provide future product releases with the mapped drive. If the Automatic Backup is scheduled to execute the backup. The current 4.0 software was designed ...Archive location is accessible again. Embedded Security cannot be temporarily disabled in future releases. HP will address this issue in the Embedded Security GUI. This Windows Scheduled Task is scheduled for HP ProtectTools (select models only) 87 When the administrator instead configures the Automatic ...

Security - Windows XP, Windows Vista and Windows 7
Page 23
... site and through the updates link in Help and Support. 19 Updates to install the latest software from Microsoft. ● Obtain updates, as they are released, from Microsoft as soon as you receive an alert. To protect the computer from security breaches and computer viruses, install all available updates are installed...
... site and through the updates link in Help and Support. 19 Updates to install the latest software from Microsoft. ● Obtain updates, as they are released, from Microsoft as soon as you receive an alert. To protect the computer from security breaches and computer viruses, install all available updates are installed...
Drives - Windows 7
Page 11
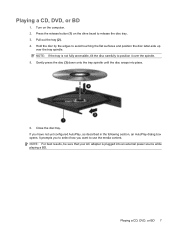
Press the release button (1) on the computer. 2. Close the disc tray. If you want to use the media content. Turn on the drive bezel to avoid touching the ... the following section, an AutoPlay dialog box opens. Playing a CD, DVD, or BD 7 Playing a CD, DVD, or BD 1. Hold the disc by the edges to release the disc tray. 3. It prompts you to position it over the tray spindle. Pull out the tray (2). 4. NOTE: If the tray is plugged into place. 6.
Press the release button (1) on the computer. 2. Close the disc tray. If you want to use the media content. Turn on the drive bezel to avoid touching the ... the following section, an AutoPlay dialog box opens. Playing a CD, DVD, or BD 7 Playing a CD, DVD, or BD 1. Hold the disc by the edges to release the disc tray. 3. It prompts you to position it over the tray spindle. Pull out the tray (2). 4. NOTE: If the tray is plugged into place. 6.

Drives - Windows 7
Page 16
... front bezel of the disc. Remove the disc (3) from the tray by the edges and avoid touching the flat surfaces. NOTE: If the tray is released, and then pull out the tray (2) until it stops. 12 Chapter 3 Using an optical drive (select models only) Removing a CD, DVD, or ...BD There are 2 ways to release the disc tray, and then gently pull out the tray (2) until it stops. 2. Insert the end of a paper clip (1) into the release access in a protective case.
... front bezel of the disc. Remove the disc (3) from the tray by the edges and avoid touching the flat surfaces. NOTE: If the tray is released, and then pull out the tray (2) until it stops. 12 Chapter 3 Using an optical drive (select models only) Removing a CD, DVD, or ...BD There are 2 ways to release the disc tray, and then gently pull out the tray (2) until it stops. 2. Insert the end of a paper clip (1) into the release access in a protective case.

Drives - Windows 7
Page 30
Using a flat-bladed screwdriver, gently push the tab to release the hard drive (2). 9. 8. Remove the hard drive from the upgrade bay. 26 Chapter 9 Replacing a drive in the upgrade bay
Using a flat-bladed screwdriver, gently push the tab to release the hard drive (2). 9. 8. Remove the hard drive from the upgrade bay. 26 Chapter 9 Replacing a drive in the upgrade bay

Drives - Windows 7
Page 32
Then shut down the computer and close the display. 3. Disconnect all external hardware devices connected to release the optical drive (2). 28 Chapter 9 Replacing a drive in the upgrade bay Remove the battery from the upgrade bay: 1. Do not remove the optical drive while ...
Then shut down the computer and close the display. 3. Disconnect all external hardware devices connected to release the optical drive (2). 28 Chapter 9 Replacing a drive in the upgrade bay Remove the battery from the upgrade bay: 1. Do not remove the optical drive while ...

Drives - Windows Vista
Page 11
... external power source while playing a BD. Playing a CD, DVD, or BD 1. NOTE: If the tray is plugged into place. 6. If you want to release the disc tray. 3. Press the release button (1) on the computer. 2. Pull out the tray (2). 4. Turn on the drive bezel to use the media content. Playing a CD, DVD, or...
... external power source while playing a BD. Playing a CD, DVD, or BD 1. NOTE: If the tray is plugged into place. 6. If you want to release the disc tray. 3. Press the release button (1) on the computer. 2. Pull out the tray (2). 4. Turn on the drive bezel to use the media content. Playing a CD, DVD, or...

Drives - Windows Vista
Page 16
... touching the flat surfaces. Close the disc tray and place the disc in gently on whether the disc tray opens normally or not. Press the release button (1) on the spindle while lifting the outer edges of the drive. 2. When the disc tray opens 1. Hold the disc by gently pressing down on..., tilt the disc carefully as you remove it. 3. Insert the end of a paper clip (1) into the release access in the front bezel of the disc. Press in a protective case. NOTE: If the tray is released, and then pull out the tray (2) until it stops. 2. When the disc tray does not open 1. ...
... touching the flat surfaces. Close the disc tray and place the disc in gently on whether the disc tray opens normally or not. Press the release button (1) on the spindle while lifting the outer edges of the drive. 2. When the disc tray opens 1. Hold the disc by gently pressing down on..., tilt the disc carefully as you remove it. 3. Insert the end of a paper clip (1) into the release access in the front bezel of the disc. Press in a protective case. NOTE: If the tray is released, and then pull out the tray (2) until it stops. 2. When the disc tray does not open 1. ...

Drives - Windows Vista
Page 30
Remove the hard drive from the upgrade bay. 26 Chapter 9 Replacing a drive in the upgrade bay 8. Using a flat-bladed screwdriver, gently push the tab to release the hard drive (2). 9.
Remove the hard drive from the upgrade bay. 26 Chapter 9 Replacing a drive in the upgrade bay 8. Using a flat-bladed screwdriver, gently push the tab to release the hard drive (2). 9.

Drives - Windows Vista
Page 32
... screwdriver, gently push the tab to the computer. 4. If you . 6. Unplug the power cord from the upgrade bay. Disconnect all external hardware devices connected to release the optical drive (2). 28 Chapter 9 Replacing a drive in Hibernation. Turn the computer upside down the computer before removing the optical drive from the AC outlet...
... screwdriver, gently push the tab to the computer. 4. If you . 6. Unplug the power cord from the upgrade bay. Disconnect all external hardware devices connected to release the optical drive (2). 28 Chapter 9 Replacing a drive in Hibernation. Turn the computer upside down the computer before removing the optical drive from the AC outlet...

Drives - Windows XP
Page 11
... want to use the media content. Hold the disc by the edges to position it over the tray spindle. It prompts you to release the disc tray. 3. Press the release button (1) on the computer. 2. Playing a CD, DVD, or BD 7 NOTE: If the tray is plugged into place. 6. Gently press the disc (3) down...
... want to use the media content. Hold the disc by the edges to position it over the tray spindle. It prompts you to release the disc tray. 3. Press the release button (1) on the computer. 2. Playing a CD, DVD, or BD 7 NOTE: If the tray is plugged into place. 6. Gently press the disc (3) down...

Drives - Windows XP
Page 16
...place the disc in the front bezel of the drive. 2. Insert the end of the disc. Removing a CD, DVD, or BD There are 2 ways to release the disc tray, and then gently pull out the tray (2) until it stops. 12 Chapter 3 Using an optical drive (select models only) Hold the disc.... 2. Remove the disc (3) from the tray by the edges and avoid touching the flat surfaces. Press the release button (1) on the spindle while lifting the outer edges of a paper clip (1) into the release access in a protective case. When the disc tray does not open 1. Press in gently on whether the disc...
...place the disc in the front bezel of the drive. 2. Insert the end of the disc. Removing a CD, DVD, or BD There are 2 ways to release the disc tray, and then gently pull out the tray (2) until it stops. 12 Chapter 3 Using an optical drive (select models only) Hold the disc.... 2. Remove the disc (3) from the tray by the edges and avoid touching the flat surfaces. Press the release button (1) on the spindle while lifting the outer edges of a paper clip (1) into the release access in a protective case. When the disc tray does not open 1. Press in gently on whether the disc...


