
Backup and Recovery - Windows XP
Page 5
Table of contents 1 Creating recovery discs 2 Backing up your information When to back up ...3 Backup suggestions ...4 Backing up specific files or folders ...5 Backing up the entire hard drive ...6 Creating recovery points ...7 Scheduling backups ...8 3 Performing a recovery Performing a recovery from the recovery discs 10 Performing a recovery from the hard drive 11 Initiating a recovery in Windows 12 Initiating a recovery from the hard drive recovery partition 13 Index ...14 v
Table of contents 1 Creating recovery discs 2 Backing up your information When to back up ...3 Backup suggestions ...4 Backing up specific files or folders ...5 Backing up the entire hard drive ...6 Creating recovery points ...7 Scheduling backups ...8 3 Performing a recovery Performing a recovery from the recovery discs 10 Performing a recovery from the hard drive 11 Initiating a recovery in Windows 12 Initiating a recovery from the hard drive recovery partition 13 Index ...14 v
Backup and Recovery - Windows XP and Windows Vista
Page 5
Table of contents 1 Creating recovery discs 2 Backing up your information When to back up ...3 Backup suggestions ...4 Backing up specific files or folders ...5 Backing up the entire hard drive ...6 Creating recovery points ...7 Scheduling backups ...8 3 Performing a recovery Performing a recovery from the recovery discs 10 Performing a recovery from the hard drive 11 Initiating a recovery in Windows 12 Initiating a recovery from the hard drive recovery partition 13 Index ...14 v
Table of contents 1 Creating recovery discs 2 Backing up your information When to back up ...3 Backup suggestions ...4 Backing up specific files or folders ...5 Backing up the entire hard drive ...6 Creating recovery points ...7 Scheduling backups ...8 3 Performing a recovery Performing a recovery from the recovery discs 10 Performing a recovery from the hard drive 11 Initiating a recovery in Windows 12 Initiating a recovery from the hard drive recovery partition 13 Index ...14 v

Power Management - Windows XP
Page 5
Table of contents 1 Power control and light locations 2 Shutting down the computer 3 Setting power options for Windows XP operating systems Using power-saving states ...4 Initiating and exiting Standby 4 Initiating and exiting Hibernation 5 Using the Power ...power scheme 7 Customizing power schemes 7 Setting password protection upon exiting Standby 8 4 Using battery power Finding battery information in Help and Support 10 Displaying the remaining battery charge 11 Inserting or removing the battery ...12 Charging a battery ...13 Managing low battery levels ...14 Identifying low battery...
Table of contents 1 Power control and light locations 2 Shutting down the computer 3 Setting power options for Windows XP operating systems Using power-saving states ...4 Initiating and exiting Standby 4 Initiating and exiting Hibernation 5 Using the Power ...power scheme 7 Customizing power schemes 7 Setting password protection upon exiting Standby 8 4 Using battery power Finding battery information in Help and Support 10 Displaying the remaining battery charge 11 Inserting or removing the battery ...12 Charging a battery ...13 Managing low battery levels ...14 Identifying low battery...
Power Management - Windows XP
Page 10
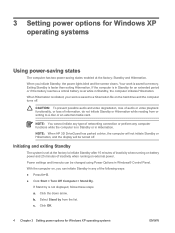
...fn+f3. ● Click Start > Turn Off Computer > Stand By. NOTE: When HP 3D DriveGuard has parked a drive, the computer will not initiate Standby or Hibernation, and the display will... be changed using Power Options in Windows® Control Panel. If the computer is in Standby for Windows XP operating systems Using power-saving states The computer has two... set at the factory: Standby and Hibernation. Exiting Standby is saved to initiate Standby after 10 minutes of inactivity when running on battery power and 25 minutes of inactivity when running on...
...fn+f3. ● Click Start > Turn Off Computer > Stand By. NOTE: When HP 3D DriveGuard has parked a drive, the computer will not initiate Standby or Hibernation, and the display will... be changed using Power Options in Windows® Control Panel. If the computer is in Standby for Windows XP operating systems Using power-saving states The computer has two... set at the factory: Standby and Hibernation. Exiting Standby is saved to initiate Standby after 10 minutes of inactivity when running on battery power and 25 minutes of inactivity when running on...

HP Compaq notebook common image
Page 5
...- Removal procedures are available in the Maintenance and Service Guide: "HP Compaq 6710b Notebook PC." 14. Installing drivers and enhancements IMPORTANT Upgrade the system ROM before manually installing Windows Vista Business: 1. Note Contact the Network Administrators to the Microsoft documentation provided ... provided. Insert the drive removed from the 6910p into the 6510b. 19. 10. This section provides guidelines for installation IMPORTANT Follow the instructions in ROM BIOS to enumerate all of Microsoft Windows Vista Business. The image is now ready for complete ...
...- Removal procedures are available in the Maintenance and Service Guide: "HP Compaq 6710b Notebook PC." 14. Installing drivers and enhancements IMPORTANT Upgrade the system ROM before manually installing Windows Vista Business: 1. Note Contact the Network Administrators to the Microsoft documentation provided ... provided. Insert the drive removed from the 6910p into the 6510b. 19. 10. This section provides guidelines for installation IMPORTANT Follow the instructions in ROM BIOS to enumerate all of Microsoft Windows Vista Business. The image is now ready for complete ...
HP Compaq notebook common image
Page 6
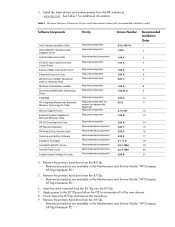
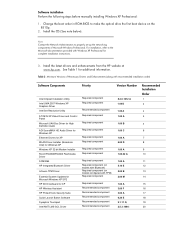
...installation order) Software Components Priority Intel Chipset Installation Utility Intel UMA 2007 Windows Vista Graphics Driver Intel Set Resolution Utility ATI M76 Vista Video Driver ... and Service Guide: "HP Compaq 6910p Notebook PC." Remove the primary hard drive from the 6910p. - 3. Install the latest drivers and enhancements from the HP website at www.hp.com. See Table 1...00 A 3 1.00 A 4 1.00 D 5 1.00 A 6 6.00 C 7 1.00 A 8 1.00.02 A 9 1.00 A 10 6.0 E 11 2.7.8.4 B 12 1.00 G 13 3.00 A 14 3.00 F 15 3.00 A 16 6.20 E 17 9.1.11 Q 18 2.5.3.1084 19 2.5.3.1084 20 ...
...installation order) Software Components Priority Intel Chipset Installation Utility Intel UMA 2007 Windows Vista Graphics Driver Intel Set Resolution Utility ATI M76 Vista Video Driver ... and Service Guide: "HP Compaq 6910p Notebook PC." Remove the primary hard drive from the 6910p. - 3. Install the latest drivers and enhancements from the HP website at www.hp.com. See Table 1...00 A 3 1.00 A 4 1.00 D 5 1.00 A 6 6.00 C 7 1.00 A 8 1.00.02 A 9 1.00 A 10 6.0 E 11 2.7.8.4 B 12 1.00 G 13 3.00 A 14 3.00 F 15 3.00 A 16 6.20 E 17 9.1.11 Q 18 2.5.3.1084 19 2.5.3.1084 20 ...
HP Compaq notebook common image
Page 7
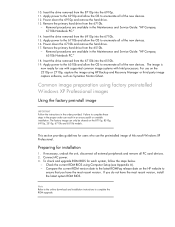
...procedures are available in the Maintenance and Service Guide: "HP Compaq 6710b Notebook PC." 14. For use on the 8710p, 8510p, 6910p, 2510p, 6710b and 6510b models. This section provides... power to the 6510b and allow the OS to enumerate all of Microsoft Windows XP Professional. Apply power to the 6910p and allow the OS to enumerate all of the new devices. 16. ...HP Backup and Recovery Manager or third party image capture software, such as Symantec Norton Ghost. Remove the primary hard drive from the 6710b. - Preparing for each system, follow the steps below. - 10...
...procedures are available in the Maintenance and Service Guide: "HP Compaq 6710b Notebook PC." 14. For use on the 8710p, 8510p, 6910p, 2510p, 6710b and 6510b models. This section provides... power to the 6510b and allow the OS to enumerate all of Microsoft Windows XP Professional. Apply power to the 6910p and allow the OS to enumerate all of the new devices. 16. ...HP Backup and Recovery Manager or third party image capture software, such as Symantec Norton Ghost. Remove the primary hard drive from the 6710b. - Preparing for each system, follow the steps below. - 10...

HP Compaq notebook common image
Page 8
...Insert the drive removed from the 8510p into the 6910p. 9. Insert the drive removed from the 6910p into the 6510b. 18. Apply power to the 6710b and allow the OS to enumerate all of the new devices. 10. Power down the 8710p and remove the hard drive...Insert the drive removed from the 6910p. - Removal procedures are available in the Maintenance and Service Guide: "HP Compaq 6510b Notebook PC." 17. Preparing for the preinstalled image for users who perform a clean installation of Microsoft Windows XP Professional. Unbundle the preinstalled Windows XP Professional image on the 2510p...
...Insert the drive removed from the 8510p into the 6910p. 9. Insert the drive removed from the 6910p into the 6510b. 18. Apply power to the 6710b and allow the OS to enumerate all of the new devices. 10. Power down the 8710p and remove the hard drive...Insert the drive removed from the 6910p. - Removal procedures are available in the Maintenance and Service Guide: "HP Compaq 6510b Notebook PC." 17. Preparing for the preinstalled image for users who perform a clean installation of Microsoft Windows XP Professional. Unbundle the preinstalled Windows XP Professional image on the 2510p...
HP Compaq notebook common image
Page 10
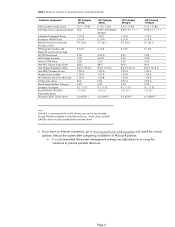
... (on models with Bluetooth) Required component (on the 8510p. 2. Table 2 Minimum Versions of Microsoft Windows Professional. Install the latest drivers and enhancements from the HP website at www.hp.com. Install the OS (See note below). See Table 1 for additional information. Change the boot ... A 1.00 D 1.00 A 1.00 A 1.00 B 1.00 C 1.00 A 6.00 D 1.00 A 1.00.02 A 1.00 A 5.10 E 5.00 B 2.00 M 1.00 A 3.00 F 3.00 A 6.20 E 9.1.11 Q 2.5.3.1084 Recommended Installation Order 1 2 3 4 5 6 7 8 9 10 11 12 13 14 15 16 17 18 19 20 Note Contact the Network Administrators to make the optical drive...
... (on models with Bluetooth) Required component (on the 8510p. 2. Table 2 Minimum Versions of Microsoft Windows Professional. Install the latest drivers and enhancements from the HP website at www.hp.com. Install the OS (See note below). See Table 1 for additional information. Change the boot ... A 1.00 D 1.00 A 1.00 A 1.00 B 1.00 C 1.00 A 6.00 D 1.00 A 1.00.02 A 1.00 A 5.10 E 5.00 B 2.00 M 1.00 A 3.00 F 3.00 A 6.20 E 9.1.11 Q 2.5.3.1084 Recommended Installation Order 1 2 3 4 5 6 7 8 9 10 11 12 13 14 15 16 17 18 19 20 Note Contact the Network Administrators to make the optical drive...
Installing Windows 2000 on the HP Compaq Business Notebooks
Page 4
... Driver Windows 2000 SD Bus driver 1.10 A 6.10 A 9.7.34.0 5.10 E 2.00 3.00 5.00 4825 8.2.0.1012 A 7.00 A 1.00 A 1.00 B N/A 6.20 9.1.11 Q 1.01.04 6.0.4069.1 HP Compaq 6910p 5.10.1.5160 8.391.3-070626A50362C 1.00 J 6.10 A 9.7.34.0 HP Compaq 8510p/w 5.10.1.5180 8.391.2.1.1.1.1 1.10 A 6.10 A 9.7.34.0 5.10 E 5.10 E ...HP Compaq 8710p/w 5.10.1.5180 8.391.2.1.1.1.1 1.10 A 6.10 A 9.7.34.0 5.10 E 2.00 3.00 5.00 N/A 8.2.0.1012 A 7.00 A 1.00 A 1.00 B 2.00 A 6.20 9.1.11 Q 1.01.01 6.0.4069.1 Note: DirectX 9 is recommended that power management settings are adjusted prior to using the notebook...
... Driver Windows 2000 SD Bus driver 1.10 A 6.10 A 9.7.34.0 5.10 E 2.00 3.00 5.00 4825 8.2.0.1012 A 7.00 A 1.00 A 1.00 B N/A 6.20 9.1.11 Q 1.01.04 6.0.4069.1 HP Compaq 6910p 5.10.1.5160 8.391.3-070626A50362C 1.00 J 6.10 A 9.7.34.0 HP Compaq 8510p/w 5.10.1.5180 8.391.2.1.1.1.1 1.10 A 6.10 A 9.7.34.0 5.10 E 5.10 E ...HP Compaq 8710p/w 5.10.1.5180 8.391.2.1.1.1.1 1.10 A 6.10 A 9.7.34.0 5.10 E 2.00 3.00 5.00 N/A 8.2.0.1012 A 7.00 A 1.00 A 1.00 B 2.00 A 6.20 9.1.11 Q 1.01.01 6.0.4069.1 Note: DirectX 9 is recommended that power management settings are adjusted prior to using the notebook...
ProtectTools - Windows Vista and Windows XP
Page 3
... Managing HP ProtectTools passwords 6 Creating a secure password 8 HP ProtectTools Backup and Restore 8 Backing up credentials and settings 8 Restoring credentials 10 Configuring settings 10 2 Credential Manager for HP ProtectTools ...Setup procedures ...12 Logging on to Credential Manger 12 Using the Credential Manager Logon Wizard 12 Logging on for the first time 13 Registering credentials ...13 Registering fingerprints 13 Setting up the fingerprint reader 14 Using your registered fingerprint to log on to Windows...
... Managing HP ProtectTools passwords 6 Creating a secure password 8 HP ProtectTools Backup and Restore 8 Backing up credentials and settings 8 Restoring credentials 10 Configuring settings 10 2 Credential Manager for HP ProtectTools ...Setup procedures ...12 Logging on to Credential Manger 12 Using the Credential Manager Logon Wizard 12 Logging on for the first time 13 Registering credentials ...13 Registering fingerprints 13 Setting up the fingerprint reader 14 Using your registered fingerprint to log on to Windows...
Security - Windows XP and Windows Vista
Page 5
Table of contents 1 Protecting the computer 2 Using passwords Setting passwords in Windows ...3 Setting passwords in Computer Setup 4 Setup password ...5 Managing a setup password 5 Entering a setup password 5 Power-on password ...10 3 Using Computer Setup security features Securing system devices ...11 Using Computer Setup stringent security 11 Setting stringent security 12 Removing stringent security 12 Viewing Computer Setup System Information 13 Using Computer Setup System IDs ...14 4 Using antivirus software 5 Using firewall software 6 Installing critical security updates 7 Using HP...
Table of contents 1 Protecting the computer 2 Using passwords Setting passwords in Windows ...3 Setting passwords in Computer Setup 4 Setup password ...5 Managing a setup password 5 Entering a setup password 5 Power-on password ...10 3 Using Computer Setup security features Securing system devices ...11 Using Computer Setup stringent security 11 Setting stringent security 12 Removing stringent security 12 Viewing Computer Setup System Information 13 Using Computer Setup System IDs ...14 4 Using antivirus software 5 Using firewall software 6 Installing critical security updates 7 Using HP...

Notebook Tour - Windows Vista
Page 16
Component (1) esc key (2) fn key (3) Windows logo key (4) Windows applications key (5) Embedded numeric keypad keys (6) Function keys Description Displays system information when pressed in combination with the fn key. 10 Chapter 2 Components ENWW Can be used system functions when pressed in this section. Displays a shortcut menu for items beneath the pointer. Execute frequently used...
Component (1) esc key (2) fn key (3) Windows logo key (4) Windows applications key (5) Embedded numeric keypad keys (6) Function keys Description Displays system information when pressed in combination with the fn key. 10 Chapter 2 Components ENWW Can be used system functions when pressed in this section. Displays a shortcut menu for items beneath the pointer. Execute frequently used...

Notebook Tour - Windows Vista
Page 27
... port, identifying 14 A AC adapter, identifying 17 accessory battery connector, identifying 15 applications key, Windows 10 audio-in (microphone) jack, identifying 13 audio-out (headphone) jack, identifying 13 B battery ...HP Fingerprint sensor, identifying 9 I IEEE 1394 port, identifying 14 info button, identifying 8 internal display switch, identifying 8 internal microphone, identifying 9 J jacks audio-in (microphone) 13 audio-out (headphone) 13 RJ-11 (modem) 13 RJ-45 (network) 14 K keypad keys, identifying 10 keys esc 10 fn 10 function 10 keypad 10 Windows applications 10 Windows logo 10...
... port, identifying 14 A AC adapter, identifying 17 accessory battery connector, identifying 15 applications key, Windows 10 audio-in (microphone) jack, identifying 13 audio-out (headphone) jack, identifying 13 B battery ...HP Fingerprint sensor, identifying 9 I IEEE 1394 port, identifying 14 info button, identifying 8 internal display switch, identifying 8 internal microphone, identifying 9 J jacks audio-in (microphone) 13 audio-out (headphone) 13 RJ-11 (modem) 13 RJ-45 (network) 14 K keypad keys, identifying 10 keys esc 10 fn 10 function 10 keypad 10 Windows applications 10 Windows logo 10...
Notebook Tour - Windows Vista
Page 28
... 14, 15 volume down light, identifying 7 volume mute button, identifying 8 volume mute light, identifying 7 volume scroll zone, identifying 8 volume up light, identifying 7 W Windows applications key, identifying 10 Windows logo key, identifying 10 wireless button, identifying 8 wireless certification label 19 wireless light, identifying 6, 11 WLAN antennae, identifying 16 WLAN device 19 WLAN label 19 WWAN...
... 14, 15 volume down light, identifying 7 volume mute button, identifying 8 volume mute light, identifying 7 volume scroll zone, identifying 8 volume up light, identifying 7 W Windows applications key, identifying 10 Windows logo key, identifying 10 wireless button, identifying 8 wireless certification label 19 wireless light, identifying 6, 11 WLAN antennae, identifying 16 WLAN device 19 WLAN label 19 WWAN...
Notebook Tour - Windows Vista
Page 24
... 13 headphone jack 11 HP Fingerprint sensor 6 I IEEE 1394a port 11 info button, identifying 6 internal display switch, identifying 14 internal microphone, identifying 14 J jacks audio-in (microphone) 10, 11 audio-out (headphone) 10, 11 RJ-11 (modem) 12 RJ-45 (network 9 K keypad keys, identifying 7 keys esc 7 fn 7 function 7 keypad 7 Windows applications 7 Windows logo 7 L labels Bluetooth...
... 13 headphone jack 11 HP Fingerprint sensor 6 I IEEE 1394a port 11 info button, identifying 6 internal display switch, identifying 14 internal microphone, identifying 14 J jacks audio-in (microphone) 10, 11 audio-out (headphone) 10, 11 RJ-11 (modem) 12 RJ-45 (network 9 K keypad keys, identifying 7 keys esc 7 fn 7 function 7 keypad 7 Windows applications 7 Windows logo 7 L labels Bluetooth...
Notebook Tour - Windows Vista
Page 25
..., 12 V vents, identifying 10, 11, 12, 13 volume down light, identifying 5 volume mute button, identifying 6 volume mute light, identifying 5 volume scroll zone, identifying 6 volume up light, identifying 5 W Windows applications key, identifying 7 Windows logo key, identifying 7 wireless button, identifying 6 wireless certification label 17 wireless light, identifying 4, 8 WLAN antennae, identifying 15 WLAN device 17 WLAN...
..., 12 V vents, identifying 10, 11, 12, 13 volume down light, identifying 5 volume mute button, identifying 6 volume mute light, identifying 5 volume scroll zone, identifying 6 volume up light, identifying 5 W Windows applications key, identifying 7 Windows logo key, identifying 7 wireless button, identifying 6 wireless certification label 17 wireless light, identifying 4, 8 WLAN antennae, identifying 15 WLAN device 17 WLAN...
Notebook Tour - Windows Vista
Page 24
... 13 info button, identifying 7 infrared port, identifying 10 internal microphone, identifying 8 J jacks audio-in (microphone) 13 audio-out (headphone) 13 RJ-11 (modem) 12 RJ-45 (network 12 S-Video-out 11 K keypad keys, identifying 9 keys esc 9 fn 9 function 9 keypad 9 Windows applications 9 Windows logo 9 L labels Bluetooth 17 HP Broadband Wireless Module 17 Microsoft Certificate of...
... 13 info button, identifying 7 infrared port, identifying 10 internal microphone, identifying 8 J jacks audio-in (microphone) 13 audio-out (headphone) 13 RJ-11 (modem) 12 RJ-45 (network 12 S-Video-out 11 K keypad keys, identifying 9 keys esc 9 fn 9 function 9 keypad 9 Windows applications 9 Windows logo 9 L labels Bluetooth 17 HP Broadband Wireless Module 17 Microsoft Certificate of...
Notebook Tour - Windows Vista
Page 25
... 11 USB 12, 13 power button, identifying 7 power connector, identifying 11 power cord, identifying 16 power light, identifying 10 power lights, identifying 5 presentation button, identifying 7 Product Key 17 product name and number, computer 17 R regulatory information ...volume mute light, identifying 6 volume scroll zone, identifying 7 volume up light, identifying 6 W Windows applications key, identifying 9 Windows logo key, identifying 9 wireless button, identifying 7 wireless certification label 17 wireless light, identifying 5, 10 WLAN antennae, identifying 15 WLAN device 17 ENWW Index 19
... 11 USB 12, 13 power button, identifying 7 power connector, identifying 11 power cord, identifying 16 power light, identifying 10 power lights, identifying 5 presentation button, identifying 7 Product Key 17 product name and number, computer 17 R regulatory information ...volume mute light, identifying 6 volume scroll zone, identifying 7 volume up light, identifying 6 W Windows applications key, identifying 9 Windows logo key, identifying 9 wireless button, identifying 7 wireless certification label 17 wireless light, identifying 5, 10 WLAN antennae, identifying 15 WLAN device 17 ENWW Index 19
Notebook Tour - Windows XP
Page 27
... port, identifying 14 A AC adapter, identifying 17 accessory battery connector, identifying 15 applications key, Windows 10 audio-in (microphone) jack, identifying 13 audio-out (headphone) jack, identifying 13 B battery ...HP Fingerprint sensor, identifying 9 I IEEE 1394 port, identifying 14 info button, identifying 8 internal display switch, identifying 8 internal microphone, identifying 9 J jacks audio-in (microphone) 13 audio-out (headphone) 13 RJ-11 (modem) 13 RJ-45 (network) 14 K keypad keys, identifying 10 keys esc 10 fn 10 function 10 keypad 10 Windows applications 10 Windows logo 10...
... port, identifying 14 A AC adapter, identifying 17 accessory battery connector, identifying 15 applications key, Windows 10 audio-in (microphone) jack, identifying 13 audio-out (headphone) jack, identifying 13 B battery ...HP Fingerprint sensor, identifying 9 I IEEE 1394 port, identifying 14 info button, identifying 8 internal display switch, identifying 8 internal microphone, identifying 9 J jacks audio-in (microphone) 13 audio-out (headphone) 13 RJ-11 (modem) 13 RJ-45 (network) 14 K keypad keys, identifying 10 keys esc 10 fn 10 function 10 keypad 10 Windows applications 10 Windows logo 10...


