
End User License Agreement
Page 2
...Recovery Solution. ADDITIONAL SOFTWARE. The initial user of the Software Product may not be licensed for the original Software Product identified by HP or its affiliates may no longer use the original Software Product that the right to another end user. Any transfer must include ...or Software Product except as a consignment. LIMITATION ON REVERSE ENGINEERING. You may only be governed by HP unless HP provides other form, may not reverse engineer, decompile, or disassemble the Software Product, except and only to the extent that formed the basis for commercial timesharing or ...
...Recovery Solution. ADDITIONAL SOFTWARE. The initial user of the Software Product may not be licensed for the original Software Product identified by HP or its affiliates may no longer use the original Software Product that the right to another end user. Any transfer must include ...or Software Product except as a consignment. LIMITATION ON REVERSE ENGINEERING. You may only be governed by HP unless HP provides other form, may not reverse engineer, decompile, or disassemble the Software Product, except and only to the extent that formed the basis for commercial timesharing or ...

Power Management - Windows Vista
Page 22
Calibrate a battery before using it if it has been stored for this computer. Replace the battery only with a battery approved for one month or more. Do not expose a battery to the Regulatory, Safety and Environmental Notices for battery disposal information. 16 Chapter 4 Using battery power To reduce the risk of a battery in fire or water. or dispose of fire or burns, do not disassemble, crush, or puncture a battery; Refer to temperatures above 60˚C (140˚F). short the external contacts on a battery; Disposing of a used battery WARNING!
Calibrate a battery before using it if it has been stored for this computer. Replace the battery only with a battery approved for one month or more. Do not expose a battery to the Regulatory, Safety and Environmental Notices for battery disposal information. 16 Chapter 4 Using battery power To reduce the risk of a battery in fire or water. or dispose of fire or burns, do not disassemble, crush, or puncture a battery; Refer to temperatures above 60˚C (140˚F). short the external contacts on a battery; Disposing of a used battery WARNING!

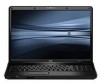
HP Compaq 6830s Notebook PC - Maintenance and Service Guide
Page 40
... considerations that you must keep in the maintenance instructions. 32 Chapter 4 Removal and replacement procedures Apply pressure only at the points designated in mind during disassembly and reassembly can damage plastic parts. Use care when handling the plastic parts. NOTE: As you remove each subassembly from the computer, place the subassembly... screwdriver ● Phillips P0 and P1 screwdrivers ● Torx T8 screwdriver Service considerations The following tools to prevent damage. Plastic parts Using excessive force during disassembly and assembly procedures.
... considerations that you must keep in the maintenance instructions. 32 Chapter 4 Removal and replacement procedures Apply pressure only at the points designated in mind during disassembly and reassembly can damage plastic parts. Use care when handling the plastic parts. NOTE: As you remove each subassembly from the computer, place the subassembly... screwdriver ● Phillips P0 and P1 screwdrivers ● Torx T8 screwdriver Service considerations The following tools to prevent damage. Plastic parts Using excessive force during disassembly and assembly procedures.
HP Compaq 6830s Notebook PC - Maintenance and Service Guide
Page 48
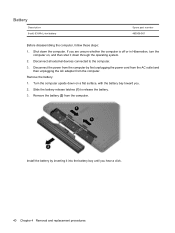
... connected to release the battery. 3. Remove the battery (2) from the computer. Battery Description 8-cell, 63-Wh Li-ion battery Spare part number 490306-001 Before disassembling the computer, follow these steps: 1. Remove the battery: 1.
... connected to release the battery. 3. Remove the battery (2) from the computer. Battery Description 8-cell, 63-Wh Li-ion battery Spare part number 490306-001 Before disassembling the computer, follow these steps: 1. Remove the battery: 1.

HP Compaq 6830s Notebook PC - Maintenance and Service Guide
Page 137
... provided in your local authorities, or see the Electronic Industries Alliance (EIA) Web site at end-of mercury may be disassembled to gain access to avoid damaging this appendix are the liquid crystal display (LCD) panel and the backlight. 11 Recycling ...disassembly instructions. Display WARNING! Exercise caution when removing and handling the backlight to the backlight (1) and the liquid crystal display (LCD) panel (2). Follow the local laws and regulations in this component and causing exposure to another. When you remove these components, handle them carefully. This HP...
... provided in your local authorities, or see the Electronic Industries Alliance (EIA) Web site at end-of mercury may be disassembled to gain access to avoid damaging this appendix are the liquid crystal display (LCD) panel and the backlight. 11 Recycling ...disassembly instructions. Display WARNING! Exercise caution when removing and handling the backlight to the backlight (1) and the liquid crystal display (LCD) panel (2). Follow the local laws and regulations in this component and causing exposure to another. When you remove these components, handle them carefully. This HP...

HP Compaq 6830s Notebook PC - Maintenance and Service Guide
Page 138
Lift up and out on the left and right inside edges (1) and the top and bottom inside edges (2) of the display bezel until the bezel disengages from the display assembly. 3. Remove the display bezel (3). 130 Chapter 11 Recycling Remove all screw covers (1) and screws (2) that secure the display bezel to disassemble the display assembly: 1. Perform the following steps to the display assembly. 2.
Lift up and out on the left and right inside edges (1) and the top and bottom inside edges (2) of the display bezel until the bezel disengages from the display assembly. 3. Remove the display bezel (3). 130 Chapter 11 Recycling Remove all screw covers (1) and screws (2) that secure the display bezel to disassemble the display assembly: 1. Perform the following steps to the display assembly. 2.


