HP LaserJet Printer Family - Print Media Specification Guide
Page 29
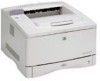
... The following table lists possible causes of talc and calcium carbonate. See your HP LaserJet printer user guide. Paper guides in the tray are not well-bound to remove build...been in "Guidelines for the correct output tray selection. q Replace the paper in the input tray, or problems with your printer. tray. Chapter 3 Troubleshooting 23 set incorrectly q Make sure... that is too smooth or too rough. Paper is not near a window or a heat or air vent. Paper is specified in the fuser...
... The following table lists possible causes of talc and calcium carbonate. See your HP LaserJet printer user guide. Paper guides in the tray are not well-bound to remove build...been in "Guidelines for the correct output tray selection. q Replace the paper in the input tray, or problems with your printer. tray. Chapter 3 Troubleshooting 23 set incorrectly q Make sure... that is too smooth or too rough. Paper is not near a window or a heat or air vent. Paper is specified in the fuser...
HP PCL/PJL reference - Printer Job Language Technical Reference Addendum
Page 122
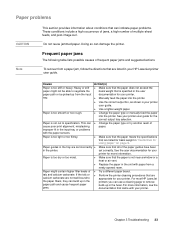
... TRANSFER KIT ORDER FUSER KIT PERFORM PRINTER MAINTENANCE ORDER SUPPLIES PAGES LEFT REPLACE BLACK TONER REPLACE CYAN TONER REPLACE MAGENTA TONER REPLACE YELLOW TONER REPLACE IMAGE DRUM REPLACE BLACK DRUM REPLACE CYAN DRUM REPLACE MAGENTA DRUM REPLACE YELLOW DRUM REPLACE BLACK CARTRIDGE REPLACE CYAN CARTRIDGE REPLACE MAGENTA CARTRIDGE REPLACE YELLOW CARTRIDGE REPLACE TRANSPORT KIT REPLACE CLEANING KIT REPLACE TRANSFER KIT REPLACE FUSER KIT PERFORM PRINTER MAINTENANCE REPLACE SUPPLIES NON-HP SUPPLIES IN USE...
... TRANSFER KIT ORDER FUSER KIT PERFORM PRINTER MAINTENANCE ORDER SUPPLIES PAGES LEFT REPLACE BLACK TONER REPLACE CYAN TONER REPLACE MAGENTA TONER REPLACE YELLOW TONER REPLACE IMAGE DRUM REPLACE BLACK DRUM REPLACE CYAN DRUM REPLACE MAGENTA DRUM REPLACE YELLOW DRUM REPLACE BLACK CARTRIDGE REPLACE CYAN CARTRIDGE REPLACE MAGENTA CARTRIDGE REPLACE YELLOW CARTRIDGE REPLACE TRANSPORT KIT REPLACE CLEANING KIT REPLACE TRANSFER KIT REPLACE FUSER KIT PERFORM PRINTER MAINTENANCE REPLACE SUPPLIES NON-HP SUPPLIES IN USE...
HP PCL/PJL reference - Printer Job Language Technical Reference Addendum
Page 140
... ORDER TRANFER KIT ORDER FUSER KIT PERFORM PRINTER MAINTENANCE ORDER SUPPLIES PAGES LEFT REPLACE BLACK TONER REPLACE CYAN TONER REPLACE MAGENTA TONER REPLACE YELLOW TONER REPLACE IMAGE DRUM REPLACE BLACK DRUM REPLACE CYAN DRUM REPLACE MAGENTA DRUM REPLACE YELLOW DRUM REPLACE BLACK CARTRIDGE REPLACE CYAN CARTRIDGE REPLACE MAGENTA CARTRIDGE REPLACE YELLOW CARTRIDGE REPLACE TRANSPORT KIT REPLACE CLEANING KIT REPLACE TRANFER KIT REPLACE FUSER KIT PERFORM PRINTER MAINTENANCE REPLACE SUPPLIES INSTALL BLACK TONER...
... ORDER TRANFER KIT ORDER FUSER KIT PERFORM PRINTER MAINTENANCE ORDER SUPPLIES PAGES LEFT REPLACE BLACK TONER REPLACE CYAN TONER REPLACE MAGENTA TONER REPLACE YELLOW TONER REPLACE IMAGE DRUM REPLACE BLACK DRUM REPLACE CYAN DRUM REPLACE MAGENTA DRUM REPLACE YELLOW DRUM REPLACE BLACK CARTRIDGE REPLACE CYAN CARTRIDGE REPLACE MAGENTA CARTRIDGE REPLACE YELLOW CARTRIDGE REPLACE TRANSPORT KIT REPLACE CLEANING KIT REPLACE TRANFER KIT REPLACE FUSER KIT PERFORM PRINTER MAINTENANCE REPLACE SUPPLIES INSTALL BLACK TONER...
HP PCL/PJL reference - Printer Job Language Technical Reference Addendum
Page 142
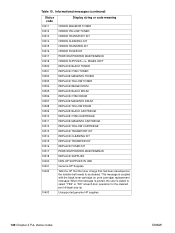
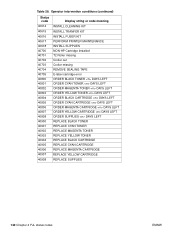
...40905 40906 40907 40908 Display string or code meaning INSTALL CLEANING KIT INSTALL TRANFER KIT INSTALL FUSER KIT PERFORM PRINTER MAINTENANCE INSTALL SUPPLIES NON-HP Cartridge Installed T2 Roller missing Croller out Croller missing REMOVE SEALING TAPE E-label cartridge error ORDER... CARTRIDGE DAYS LEFT ORDER YELLOW CARTRIDGE DAYS LEFT ORDER SUPPLIES DAYS LEFT REPLACE BLACK TONER REPLACE CYAN TONER REPLACE MAGENTA TONER REPLACE YELLOW TONER REPLACE BLACK CARTRIDGE REPLACE CYAN CARTRIDGE REPLACE MAGENTA CARTRIDGE REPLACE YELLOW CARTRIDGE REPLACE SUPPLIES 140 Chapter 4 PJL status codes ENWW
...40905 40906 40907 40908 Display string or code meaning INSTALL CLEANING KIT INSTALL TRANFER KIT INSTALL FUSER KIT PERFORM PRINTER MAINTENANCE INSTALL SUPPLIES NON-HP Cartridge Installed T2 Roller missing Croller out Croller missing REMOVE SEALING TAPE E-label cartridge error ORDER... CARTRIDGE DAYS LEFT ORDER YELLOW CARTRIDGE DAYS LEFT ORDER SUPPLIES DAYS LEFT REPLACE BLACK TONER REPLACE CYAN TONER REPLACE MAGENTA TONER REPLACE YELLOW TONER REPLACE BLACK CARTRIDGE REPLACE CYAN CARTRIDGE REPLACE MAGENTA CARTRIDGE REPLACE YELLOW CARTRIDGE REPLACE SUPPLIES 140 Chapter 4 PJL status codes ENWW
HP LaserJet 5100 Series - Printer Maintenance Kit
Page 5
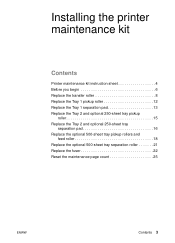
Installing the printer maintenance kit Contents Printer maintenance kit instruction sheet 4 Before you begin 6 Replace the transfer roller 8 Replace the Tray 1 pickup roller 12 Replace the Tray 1 separation pad 13 Replace the Tray 2 and optional 250-sheet tray pickup roller 15 Replace the Tray 2 and optional 250-sheet tray separation pad 16 Replace the optional 500-sheet tray pickup rollers and feed roller 18 Replace the optional 500-sheet tray separation roller 21 Replace the fuser 22 Reset the maintenance page count 25 ENWW Contents 3
Installing the printer maintenance kit Contents Printer maintenance kit instruction sheet 4 Before you begin 6 Replace the transfer roller 8 Replace the Tray 1 pickup roller 12 Replace the Tray 1 separation pad 13 Replace the Tray 2 and optional 250-sheet tray pickup roller 15 Replace the Tray 2 and optional 250-sheet tray separation pad 16 Replace the optional 500-sheet tray pickup rollers and feed roller 18 Replace the optional 500-sheet tray separation roller 21 Replace the fuser 22 Reset the maintenance page count 25 ENWW Contents 3
HP LaserJet 5100 Series - Printer Maintenance Kit
Page 7
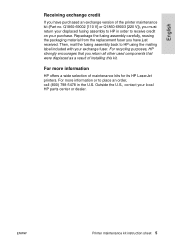
... assembly to HP in the U.S. ENWW Printer maintenance kit instruction sheet 5 Repackage the fusing assembly carefully, reusing the packaging material from the replacement fuser you return ...all other used components that were displaced as a result of the printer maintenance kit (Part no. For recycling purposes, HP strongly encourages that you have purchased an exchange version of installing this kit. Outside the U.S., contact your exchange fuser. For more information HP offers a wide selection of maintenance kits for its HP LaserJet printers...
... assembly to HP in the U.S. ENWW Printer maintenance kit instruction sheet 5 Repackage the fusing assembly carefully, reusing the packaging material from the replacement fuser you return ...all other used components that were displaced as a result of the printer maintenance kit (Part no. For recycling purposes, HP strongly encourages that you have purchased an exchange version of installing this kit. Outside the U.S., contact your exchange fuser. For more information HP offers a wide selection of maintenance kits for its HP LaserJet printers...

HP LaserJet 5100 Series - Printer Maintenance Kit
Page 8
... trays) and interface cables from the printer. If toner gets on the print cartridge. Replacing printer parts Replacement is included to provide direction for 30 minutes before removing it from the printer. 4 Remove the print cartridge and store it off the printer to allow the fuser to cool for difficult or critical replacement procedures. Occasionally, information is generally...
... trays) and interface cables from the printer. If toner gets on the print cartridge. Replacing printer parts Replacement is included to provide direction for 30 minutes before removing it from the printer. 4 Remove the print cartridge and store it off the printer to allow the fuser to cool for difficult or critical replacement procedures. Occasionally, information is generally...

HP LaserJet 5100 Series - Printer Maintenance Kit
Page 20
Feed roller removal Pinch the feed roller tab (Figure 12, item 1), and then slide the roller off of the shaft. Step 6 Replace the optional 500-sheet tray pickup rollers and feed roller Note If no optional 500-sheet tray is installed in the printer, skip this step and go to "Replace the fuser" on the work surface. Figure 12 Removing the optional 500-sheet tray feed roller 18 Installing the printer maintenance kit ENWW Remove the 500-sheet tray from the feeder and set the feeder upside down on page 22.
Feed roller removal Pinch the feed roller tab (Figure 12, item 1), and then slide the roller off of the shaft. Step 6 Replace the optional 500-sheet tray pickup rollers and feed roller Note If no optional 500-sheet tray is installed in the printer, skip this step and go to "Replace the fuser" on the work surface. Figure 12 Removing the optional 500-sheet tray feed roller 18 Installing the printer maintenance kit ENWW Remove the 500-sheet tray from the feeder and set the feeder upside down on page 22.
HP LaserJet 5100 Series - Printer Maintenance Kit
Page 23
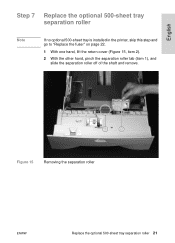
English Step 7 Replace the optional 500-sheet tray separation roller Note If no optional 500-sheet tray is installed in the printer, skip this step and go to "Replace the fuser" on page 22. 1 With one hand, lift the return cover (Figure 15, item 2). 2 With the other hand, pinch the separation roller tab (item 1), and slide the separation roller off of the shaft and remove. Figure 15 Removing the separation roller ENWW Replace the optional 500-sheet tray separation roller 21
English Step 7 Replace the optional 500-sheet tray separation roller Note If no optional 500-sheet tray is installed in the printer, skip this step and go to "Replace the fuser" on page 22. 1 With one hand, lift the return cover (Figure 15, item 2). 2 With the other hand, pinch the separation roller tab (item 1), and slide the separation roller off of the shaft and remove. Figure 15 Removing the separation roller ENWW Replace the optional 500-sheet tray separation roller 21
HP LaserJet 5100 Series - Printer Maintenance Kit
Page 24
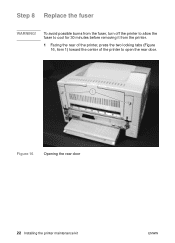
Figure 16 Opening the rear door 22 Installing the printer maintenance kit ENWW Step 8 Replace the fuser WARNING! To avoid possible burns from the fuser, turn off the printer to allow the fuser to cool for 30 minutes before removing it from the printer. 1 Facing the rear of the printer, press the two locking tabs (Figure 16, item 1) toward the center of the printer to open the rear door.
Figure 16 Opening the rear door 22 Installing the printer maintenance kit ENWW Step 8 Replace the fuser WARNING! To avoid possible burns from the fuser, turn off the printer to allow the fuser to cool for 30 minutes before removing it from the printer. 1 Facing the rear of the printer, press the two locking tabs (Figure 16, item 1) toward the center of the printer to open the rear door.
HP LaserJet 5100 Series - Printer Maintenance Kit
Page 25
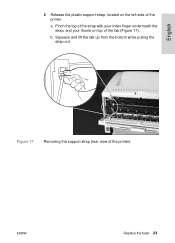
Pinch the top of the strap with your index finger underneath the strap, and your thumb on the left side of the printer. Figure 17 Removing the support strap (rear view of the printer) ENWW Replace the fuser 23 Squeeze and lift the tab up from the bottom while pulling the strap out. English 2 Release the plastic support strap, located on top of the tab (Figure 17). a. b.
Pinch the top of the strap with your index finger underneath the strap, and your thumb on the left side of the printer. Figure 17 Removing the support strap (rear view of the printer) ENWW Replace the fuser 23 Squeeze and lift the tab up from the bottom while pulling the strap out. English 2 Release the plastic support strap, located on top of the tab (Figure 17). a. b.
Service Manual
Page 8
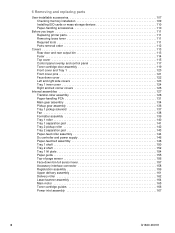
... or mass-storage devices 110 Paper-handling accessories 110 Before you begin 111 Replacing printer parts 111 Removing loose toner 111 Required tools 111 Parts removal order 112 Covers 113 Rear door and rear output bin 113 Fuser 114 Top cover 115 Control panel overlay and control panel 117 Toner cartridge ...page sensor 156 Face-down bin-full sensor lever 157 Accessory interface connector 158 Registration assembly 159 Upper delivery assembly 161 Delivery roller 162 Laser/scanner assembly 164 Main motor 165 Toner cartridge guides 166 Power inlet assembly 167 6 Q1860-90918
... or mass-storage devices 110 Paper-handling accessories 110 Before you begin 111 Replacing printer parts 111 Removing loose toner 111 Required tools 111 Parts removal order 112 Covers 113 Rear door and rear output bin 113 Fuser 114 Top cover 115 Control panel overlay and control panel 117 Toner cartridge ...page sensor 156 Face-down bin-full sensor lever 157 Accessory interface connector 158 Registration assembly 159 Upper delivery assembly 161 Delivery roller 162 Laser/scanner assembly 164 Main motor 165 Toner cartridge guides 166 Power inlet assembly 167 6 Q1860-90918
Service Manual
Page 16
... 222 HP Jetdirect configuration page categories 225 Sensors, switches, clutches, and solenoids 237 Motors, fans, and fuser heaters 243 PCAs 248 Clutches and solenoids 250 Paper-size detection 251 Technical support websites 259 Accessories and supplies 260 Screws used in the printer 261 Replaceable cables ... Registration roller assembly 276 250-sheet universal tray 277 Main gear assembly 278 Pickup gear assembly 279 PCA assembly locations 280 Printer controller assembly 281 Fuser 282 250-sheet feeder 283 250-sheet feeder 284 500-sheet feeder (1 of 2 285 500-sheet feeder (2 of...
... 222 HP Jetdirect configuration page categories 225 Sensors, switches, clutches, and solenoids 237 Motors, fans, and fuser heaters 243 PCAs 248 Clutches and solenoids 250 Paper-size detection 251 Technical support websites 259 Accessories and supplies 260 Screws used in the printer 261 Replaceable cables ... Registration roller assembly 276 250-sheet universal tray 277 Main gear assembly 278 Pickup gear assembly 279 PCA assembly locations 280 Printer controller assembly 281 Fuser 282 250-sheet feeder 283 250-sheet feeder 284 500-sheet feeder (1 of 2 285 500-sheet feeder (2 of...
Service Manual
Page 70
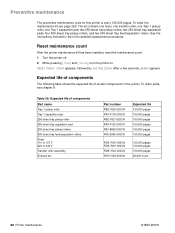
...COUNT appears, followed by INITIALIZING. After a few seconds, READY appears. To order parts, see page 260. See the instructions included in the printer. The kit contains one fuser, one transfer roller, one Tray 1 pickup roller, one Tray 1 separation pad, two 250-sheet tray pickup rollers, two 250-sheet tray ... 150,000 pages 150,000 pages 150,000 pages 150,000 pages 150,000 pages 150,000 pages 25,000 hours 68 Printer maintenance Q1860-90918 Preventive maintenance The preventive maintenance cycle for detailed replacement procedures. To order the maintenance kit see chapter 8.
...COUNT appears, followed by INITIALIZING. After a few seconds, READY appears. To order parts, see page 260. See the instructions included in the printer. The kit contains one fuser, one transfer roller, one Tray 1 pickup roller, one Tray 1 separation pad, two 250-sheet tray pickup rollers, two 250-sheet tray ... 150,000 pages 150,000 pages 150,000 pages 150,000 pages 150,000 pages 150,000 pages 25,000 hours 68 Printer maintenance Q1860-90918 Preventive maintenance The preventive maintenance cycle for detailed replacement procedures. To order the maintenance kit see chapter 8.
Service Manual
Page 107
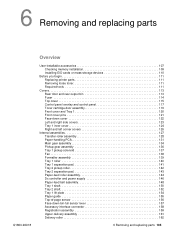
... Checking memory installation 109 Installing EIO cards or mass-storage devices 110 Before you begin 111 Replacing printer parts 111 Removing loose toner 111 Required tools 111 Covers 113 Rear door and rear output bin 113 Fuser 114 Top cover 115 Control panel overlay and control panel 117 Toner cartridge door assembly 119... sensor 156 Face-down bin-full sensor lever 157 Accessory interface connector 158 Registration assembly 159 Upper delivery assembly 161 Delivery roller 162 6 Removing and replacing parts 105
... Checking memory installation 109 Installing EIO cards or mass-storage devices 110 Before you begin 111 Replacing printer parts 111 Removing loose toner 111 Required tools 111 Covers 113 Rear door and rear output bin 113 Fuser 114 Top cover 115 Control panel overlay and control panel 117 Toner cartridge door assembly 119... sensor 156 Face-down bin-full sensor lever 157 Accessory interface connector 158 Registration assembly 159 Upper delivery assembly 161 Delivery roller 162 6 Removing and replacing parts 105
Service Manual
Page 113
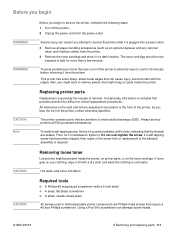
... the power cord from the power outlet. To avoid possible burns from the fuser, turn off the printer to allow the fuser to cool for difficult or critical replacement procedures. This printer has some sharp, sheet-metal edges that are seated. Occasionally, information is required. If a self-tapping screw-hole becomes stripped, then repair of...
... the power cord from the power outlet. To avoid possible burns from the fuser, turn off the printer to allow the fuser to cool for difficult or critical replacement procedures. This printer has some sharp, sheet-metal edges that are seated. Occasionally, information is required. If a self-tapping screw-hole becomes stripped, then repair of...
Service Manual
Page 114
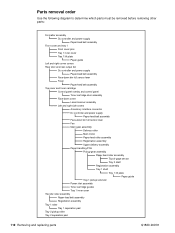
...output bin Dc controller and power supply Paper-feed belt assembly Face-down bin full sensor lever Fuser Paper-feed belt assembly Top cover and toner cartridge Control panel overlay and control panel Toner cartridge door assembly ...Face-down cover Laser/scanner assembly Left and right side covers Accessory interface connector Dc controller and power supply Paper-feed belt... assembly Tray 1 roller Tray 1 separation pad Tray 2 pickup roller Tray 2 separation pad 112 Removing and replacing parts Q1860-90918
...output bin Dc controller and power supply Paper-feed belt assembly Face-down bin full sensor lever Fuser Paper-feed belt assembly Top cover and toner cartridge Control panel overlay and control panel Toner cartridge door assembly ...Face-down cover Laser/scanner assembly Left and right side covers Accessory interface connector Dc controller and power supply Paper-feed belt... assembly Tray 1 roller Tray 1 separation pad Tray 2 pickup roller Tray 2 separation pad 112 Removing and replacing parts Q1860-90918
Service Manual
Page 116
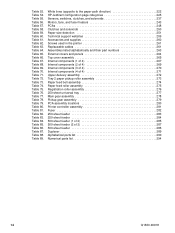
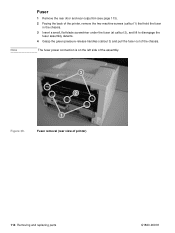
Fuser removal (rear view of the chassis. Note Fuser 1 Remove the rear door and rear output bin (see page 113). 2 Facing the back of the printer, remove the two machine screws (callout 1) that hold the fuser in the chassis. 3 Insert a small, flat-blade screwdriver under the fuser (at callout 2), and lift to disengage the fuser assembly detents. 4 Grasp the green pressure-release handles (callout 3) and pull the fuser out of printer) 114 Removing and replacing parts Q1860-90918 The fuser power connection is on the left side of the assembly. 32 2 12 Figure 39.
Fuser removal (rear view of the chassis. Note Fuser 1 Remove the rear door and rear output bin (see page 113). 2 Facing the back of the printer, remove the two machine screws (callout 1) that hold the fuser in the chassis. 3 Insert a small, flat-blade screwdriver under the fuser (at callout 2), and lift to disengage the fuser assembly detents. 4 Grasp the green pressure-release handles (callout 3) and pull the fuser out of printer) 114 Removing and replacing parts Q1860-90918 The fuser power connection is on the left side of the assembly. 32 2 12 Figure 39.
Service Manual
Page 222
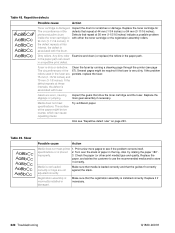
... correctly. Registration assembly is dirty or defective. photoconductive drum Defects that the registration assembly is not loaded correctly or trays are persists, replace the fuser. 75 mm (1-15/16 inches) and 79 mm (3-1/8 inches). If the defect repeats at 44 mm (1-3/4 inches) or 94 mm (3-11/...corrects itself. Also try rotating the paper 180°. Any dirty roller Examine and clean (or replace) the rollers in the tray. Clean the fuser by running a cleaning page through the printer (see page The circumferences of paper in the paper path. If the defect repeats at 50 mm...
... correctly. Registration assembly is dirty or defective. photoconductive drum Defects that the registration assembly is not loaded correctly or trays are persists, replace the fuser. 75 mm (1-15/16 inches) and 79 mm (3-1/8 inches). If the defect repeats at 44 mm (1-3/4 inches) or 94 mm (3-11/...corrects itself. Also try rotating the paper 180°. Any dirty roller Examine and clean (or replace) the rollers in the tray. Clean the fuser by running a cleaning page through the printer (see page The circumferences of paper in the paper path. If the defect repeats at 50 mm...
Service Manual
Page 223
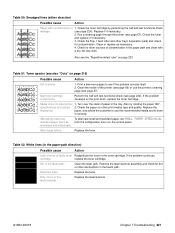
... it correctly. Print a few more pages to use the printer's cleaning page (see page 224). Bad toner cartridge components. Media does not meet printer 1. Check the paper (or other trays' separation pads and rollers for contamination. Worn fuser rollers. Replace the fuser. replace the toner cartridge. Replace the laser/scanner. Smudged lines (either direction) Possible cause Action Paper...
... it correctly. Print a few more pages to use the printer's cleaning page (see page 224). Bad toner cartridge components. Media does not meet printer 1. Check the paper (or other trays' separation pads and rollers for contamination. Worn fuser rollers. Replace the fuser. replace the toner cartridge. Replace the laser/scanner. Smudged lines (either direction) Possible cause Action Paper...


