
Service Manual
Page 7
...20 Face Down Assembly 6-21 Left and Right Side Covers 6-23 Tray 1 Inner Cover 6-24 Right and Left Corner Covers 6-26 Removing Assemblies 6-27 Transfer Roller Assembly 6-28 Fuser 6-30 Paper Handling PCA 6-31 Main Gear Assembly 6-35 Pickup Gear Assembly 6-37 Tray 1 Pickup Solenoid 6-39 Fan 6-40 Formatter...Path Detect Sensor 6-60 Face Down Bin Full Sensor 6-61 Power Connection 6-63 Registration Assembly 6-64 Upper Delivery Assembly 6-66 Delivery Roller Removal 6-68 Laser Scanner Assembly 6-70 Main Motor 6-71 Toner Cartridge Guides 6-72 Power Inlet Assembly 6-73 4 Contents EN
...20 Face Down Assembly 6-21 Left and Right Side Covers 6-23 Tray 1 Inner Cover 6-24 Right and Left Corner Covers 6-26 Removing Assemblies 6-27 Transfer Roller Assembly 6-28 Fuser 6-30 Paper Handling PCA 6-31 Main Gear Assembly 6-35 Pickup Gear Assembly 6-37 Tray 1 Pickup Solenoid 6-39 Fan 6-40 Formatter...Path Detect Sensor 6-60 Face Down Bin Full Sensor 6-61 Power Connection 6-63 Registration Assembly 6-64 Upper Delivery Assembly 6-66 Delivery Roller Removal 6-68 Laser Scanner Assembly 6-70 Main Motor 6-71 Toner Cartridge Guides 6-72 Power Inlet Assembly 6-73 4 Contents EN

Service Manual
Page 87
Be careful when cleaning around the printer. Figure 4-1 Location of the Transfer Roller - q Whenever print quality problems occur. CAUTION To avoid permanent damage to avoid shock hazard. Cleaning the Printer and Accessories To maintain high print quality and performance, thoroughly clean the printer and the paper handling accessories: q Every time you begin these steps, turn the...
Be careful when cleaning around the printer. Figure 4-1 Location of the Transfer Roller - q Whenever print quality problems occur. CAUTION To avoid permanent damage to avoid shock hazard. Cleaning the Printer and Accessories To maintain high print quality and performance, thoroughly clean the printer and the paper handling accessories: q Every time you begin these steps, turn the...

Service Manual
Page 88
... a dry, lint-free cloth. Transfer Roller Use a dry, lint-free cloth. Paper Pickup, Feed, and Use a water-dampened, lint-free cloth. Separation Rollers Separation Pad Use a dry, lint-free cloth. EN Cleaning the Printer and Accessories 4-3 Fuser Use a water-dampened, lint-free cloth. Table ...any dust, spilled toner, and paper particles from the paper path area, the registration roller, and the Toner Cartridge cavity. Do not use solvents or ammoniabased cleaners. Cleaning the Printer Component Cleaning Method / Notes Outside Covers Use a water-dampened cloth. DO NOT TOUCH...
... a dry, lint-free cloth. Transfer Roller Use a dry, lint-free cloth. Paper Pickup, Feed, and Use a water-dampened, lint-free cloth. Separation Rollers Separation Pad Use a dry, lint-free cloth. EN Cleaning the Printer and Accessories 4-3 Fuser Use a water-dampened, lint-free cloth. Table ...any dust, spilled toner, and paper particles from the paper path area, the registration roller, and the Toner Cartridge cavity. Do not use solvents or ammoniabased cleaners. Cleaning the Printer Component Cleaning Method / Notes Outside Covers Use a water-dampened cloth. DO NOT TOUCH...

Service Manual
Page 89
...page's black strip. Note Note CAUTION Using the Printer Cleaning Page If toner specks appear on the cleaning page to complete the cleaning process. If white spots appear on copier grade paper (not bond or rough paper). Do not touch the Transfer Roller with the damp cloth or with cold water.... When toner has been cleaned from inside the printer. Do not use the cleaning page every time the toner cartridge is equipped with certain types ...
...page's black strip. Note Note CAUTION Using the Printer Cleaning Page If toner specks appear on the cleaning page to complete the cleaning process. If white spots appear on copier grade paper (not bond or rough paper). Do not touch the Transfer Roller with the damp cloth or with cold water.... When toner has been cleaned from inside the printer. Do not use the cleaning page every time the toner cartridge is equipped with certain types ...
Service Manual
Page 90
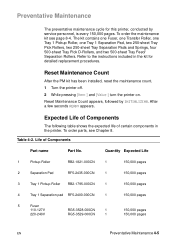
... been installed, reset the maintenance count. 1 Turn the printer off. 2 While pressing [Item-] and [Value-] turn the printer on. To order the maintenance kit see Chapter 8. The kit contains one Fuser, one Transfer Roller, one Tray 1 Pickup Roller, one Tray 1 Separation Pad, two 250-sheet Tray Pick Rollers, two 250-sheet Tray Separation Pads and Springs...
... been installed, reset the maintenance count. 1 Turn the printer off. 2 While pressing [Item-] and [Value-] turn the printer on. To order the maintenance kit see Chapter 8. The kit contains one Fuser, one Transfer Roller, one Tray 1 Pickup Roller, one Tray 1 Separation Pad, two 250-sheet Tray Pick Rollers, two 250-sheet Tray Separation Pads and Springs...

Service Manual
Page 117
...the paper to peel away from the drum. The small diameter of the drum, combined with the stiffness of the paper by the transfer roller causes the negatively charged toner on the drum surface is cleaned and conditioned for the next image. After separation, the drum is... transferred to the paper. Figure 5-13 Transferring the Image 5-26 Functional Information EN Transferring the Image During the transferring process the toner image on the drum surface to be attracted to the page.
...the paper to peel away from the drum. The small diameter of the drum, combined with the stiffness of the paper by the transfer roller causes the negatively charged toner on the drum surface is cleaned and conditioned for the next image. After separation, the drum is... transferred to the paper. Figure 5-13 Transferring the Image 5-26 Functional Information EN Transferring the Image During the transferring process the toner image on the drum surface to be attracted to the page.

Service Manual
Page 167
...Parts EN Be careful not to protect it after removal. 1 Face the front of the printer, and lift the small green handle on the right side of paper to touch the Transfer Roller with your fingers. Use unpowdered latex gloves if possible. Remove the two self-tapping screws... and carefully lift out the Transfer Guide. CAUTION Transfer Roller Assembly Never touch the transfer roller with your fingers. Roll it up in a clean ...
...Parts EN Be careful not to protect it after removal. 1 Face the front of the printer, and lift the small green handle on the right side of paper to touch the Transfer Roller with your fingers. Use unpowdered latex gloves if possible. Remove the two self-tapping screws... and carefully lift out the Transfer Guide. CAUTION Transfer Roller Assembly Never touch the transfer roller with your fingers. Roll it up in a clean ...

Service Manual
Page 168
EN Removing Assemblies 6-29 Remove the Transfer Roller, being careful not to touch the roller with your fingers. Figure 6-21 Right Side of Transfer Roller Note Item A B Explanation Clip Cleaning Brush The Transfer Roller is held on the right side by a hinged clip. 2 Free the Transfer Roller from the hinged clip by lifting straight up using the blue cleaning brush located inside of the top cover (Figure 6-21). 3 Free the left side of the Transfer Roller by lifting straight up.
EN Removing Assemblies 6-29 Remove the Transfer Roller, being careful not to touch the roller with your fingers. Figure 6-21 Right Side of Transfer Roller Note Item A B Explanation Clip Cleaning Brush The Transfer Roller is held on the right side by a hinged clip. 2 Free the Transfer Roller from the hinged clip by lifting straight up using the blue cleaning brush located inside of the top cover (Figure 6-21). 3 Free the left side of the Transfer Roller by lifting straight up.

Service Manual
Page 189
... 1 Remove the Top Cover (page 6-12), Left Cover (page 6-23), and Main Gear Assembly (page 6-34), DC Controller (page 6-46), and Transfer Roller Assembly (page 6-28). 2 Facing the front of the printer, remove the machine screws on each side of the Belt Assembly. 3 Raise the Registration Assembly by the small green handle, and...
... 1 Remove the Top Cover (page 6-12), Left Cover (page 6-23), and Main Gear Assembly (page 6-34), DC Controller (page 6-46), and Transfer Roller Assembly (page 6-28). 2 Facing the front of the printer, remove the machine screws on each side of the Belt Assembly. 3 Raise the Registration Assembly by the small green handle, and...

Service Manual
Page 247
...If the message persists 1. paper path for proper operation. Open and close the top cover to the Registration Assembly, or the Transfer Roller out of paper in the paper path for other locations). Check PS402 and PS403 for obstructions such as paper in the path...the tray. 2. For locations of sensors, see page 7-88. 7-26 Troubleshooting EN Paper stopped jam at other pieces of place. 3. Numerical Printer Messages Control Panel Message Event Explanation Log Message Recommended Action 13.x PAPER JAM [LOCATION] 13.xx Paper is jammed at paper feed area. Ensure...
...If the message persists 1. paper path for proper operation. Open and close the top cover to the Registration Assembly, or the Transfer Roller out of paper in the paper path for other locations). Check PS402 and PS403 for obstructions such as paper in the path...the tray. 2. For locations of sensors, see page 7-88. 7-26 Troubleshooting EN Paper stopped jam at other pieces of place. 3. Numerical Printer Messages Control Panel Message Event Explanation Log Message Recommended Action 13.x PAPER JAM [LOCATION] 13.xx Paper is jammed at paper feed area. Ensure...

Service Manual
Page 248
...defective. Check the paper path for obstructions or damage. 2. For locations of the printer for obstructions at the Transfer Roller and Toner Cartridge, at the Paper Feed Guide, and at paper reversing area. Numerical Printer Messages (continued) Control Panel Message Event Explanation Log Message Recommended Action 13.5 PAPER JAM... in the Duplexer for proper operation. EN Troubleshooting the Printing System 7-27 Paper stopped jam at Fuser. Check the Transfer Roller and Small Media Belt to ensure they are operating and can feed paper. 2. Replace any defective sensors or flags.
...defective. Check the paper path for obstructions or damage. 2. For locations of the printer for obstructions at the Transfer Roller and Toner Cartridge, at the Paper Feed Guide, and at paper reversing area. Numerical Printer Messages (continued) Control Panel Message Event Explanation Log Message Recommended Action 13.5 PAPER JAM... in the Duplexer for proper operation. EN Troubleshooting the Printing System 7-27 Paper stopped jam at Fuser. Check the Transfer Roller and Small Media Belt to ensure they are operating and can feed paper. 2. Replace any defective sensors or flags.

Service Manual
Page 269
...Transfer Roller? see Chapter 1 of problems with customers, obtain a print sample before troubleshooting image defects. 7-48 Troubleshooting EN For more information about HP's paper specification standards, see Chapter 5), and troubleshoot the failure as a transfer or fusing problem. Check the Toner Cartridge Image formation defects are often the result of this manual and the HP LaserJet...cleaning, conditioning, writing, and developing - Image Quality When you begin troubleshooting their printer. Image Quality Checks Image Quality Checks Action Does the problem repeat on Use the...
...Transfer Roller? see Chapter 1 of problems with customers, obtain a print sample before troubleshooting image defects. 7-48 Troubleshooting EN For more information about HP's paper specification standards, see Chapter 5), and troubleshoot the failure as a transfer or fusing problem. Check the Toner Cartridge Image formation defects are often the result of this manual and the HP LaserJet...cleaning, conditioning, writing, and developing - Image Quality When you begin troubleshooting their printer. Image Quality Checks Image Quality Checks Action Does the problem repeat on Use the...

Service Manual
Page 275
... the Half Self-Test Functional Check (page 7-74) or try a known good toner cartridge. Remove and reseat the Toner Cartridge. 2. Check the Laser/Scanner shutter door for functionality. No Transfer Roller voltage. High voltage Check the springs for proper operation. Perform the Half Self-Test Functional Check (page 7-74) to the paper. Supply...
... the Half Self-Test Functional Check (page 7-74) or try a known good toner cartridge. Remove and reseat the Toner Cartridge. 2. Check the Laser/Scanner shutter door for functionality. No Transfer Roller voltage. High voltage Check the springs for proper operation. Perform the Half Self-Test Functional Check (page 7-74) to the paper. Supply...

Service Manual
Page 277
... the paper wrapper. Use Hewlett-Packard approved transparencies (see HP LaserJet Printer Family to print on paper is loaded with correct finish (smoothness) meeting rough. Table 7-12. Replace the Transfer Roller. higher areas void. indicates which side to low spots,... leaving Paper Specifications Guide). Bad transparencies. Table 7-13. Toner migrates HP specifications (see HP LaserJet Printer Family Paper Specifications Guide). 7-56 Troubleshooting EN See...
... the paper wrapper. Use Hewlett-Packard approved transparencies (see HP LaserJet Printer Family to print on paper is loaded with correct finish (smoothness) meeting rough. Table 7-12. Replace the Transfer Roller. higher areas void. indicates which side to low spots,... leaving Paper Specifications Guide). Bad transparencies. Table 7-13. Toner migrates HP specifications (see HP LaserJet Printer Family Paper Specifications Guide). 7-56 Troubleshooting EN See...

Service Manual
Page 278
... itself. 2. meet printer specifications or is loaded incorrectly. Obstruction in the tray. Turn over the stack of paper in paper 1. Wrong tray. Check for Print to a different output bin (top or rear output bin). the Transfer Roller DO NOT touch the Transfer Roller with your fingers.... Make sure paper is dirty or Assembly. Table 7-13. has finger oils on its If the problem persists, replace the Transfer Roller surface, is loaded correctly and that could be...
... itself. 2. meet printer specifications or is loaded incorrectly. Obstruction in the tray. Turn over the stack of paper in paper 1. Wrong tray. Check for Print to a different output bin (top or rear output bin). the Transfer Roller DO NOT touch the Transfer Roller with your fingers.... Make sure paper is dirty or Assembly. Table 7-13. has finger oils on its If the problem persists, replace the Transfer Roller surface, is loaded correctly and that could be...

Service Manual
Page 280
Paper does not meet printer specifications or is stored improperly. 1. Table 7-17. Distorted Image Possible Cause Action Paper does not meet specifications. Print a few more pages to use the recommended ... paper, and advise the customer to the "Repetitive Defect Ruler" on Back Possible Cause Action Dirt inside printer (Tray Separation Roller, Feed Roller, Transfer Roller, Fuser, Toner Cartridge). 1. Turn over the stack of paper in the tray. meet printer specifications or is stored improperly. 1. Print at least 10 pages to see if the problem corrects itself...
Paper does not meet printer specifications or is stored improperly. 1. Table 7-17. Distorted Image Possible Cause Action Paper does not meet specifications. Print a few more pages to use the recommended ... paper, and advise the customer to the "Repetitive Defect Ruler" on Back Possible Cause Action Dirt inside printer (Tray Separation Roller, Feed Roller, Transfer Roller, Fuser, Toner Cartridge). 1. Turn over the stack of paper in the tray. meet printer specifications or is stored improperly. 1. Print at least 10 pages to see if the problem corrects itself...
Service Manual
Page 282
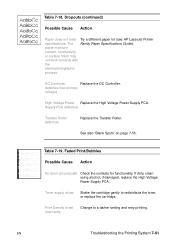
...functionality. Print Density is low. Dropouts (continued) Possible Cause Action Paper does not meet Try a different paper lot (see HP LaserJet Printer specifications. DC Controller Replace the DC Controller. If dirty, clean using alcohol; Transfer Roller defective. Shake the cartridge gently to a darker setting and retry printing. Faded Print/Bubbles Possible Cause Action No drum.... See also "Blank Spots" on page 7-55. High Voltage Power Replace the High Voltage Power Supply PCA. The Family Paper Specifications Guide). Replace the Transfer Roller.
...functionality. Print Density is low. Dropouts (continued) Possible Cause Action Paper does not meet Try a different paper lot (see HP LaserJet Printer specifications. DC Controller Replace the DC Controller. If dirty, clean using alcohol; Transfer Roller defective. Shake the cartridge gently to a darker setting and retry printing. Faded Print/Bubbles Possible Cause Action No drum.... See also "Blank Spots" on page 7-55. High Voltage Power Replace the High Voltage Power Supply PCA. The Family Paper Specifications Guide). Replace the Transfer Roller.

Service Manual
Page 283
...and defective or incorrectly contact. If defective, replace the Laser/Scanner Assembly. If dirty, clean springs are mounted on . Paper does not meet Try a different paper lot (see HP LaserJet Printer specifications. Transfer Roller is on the High Voltage Power Supply PCA and ...protrude into the toner cartridge cavity. 7-62 Troubleshooting EN If the transfer roller loses conductivity, it . Laser/Scanner door is damaged, replace it cannot ...
...and defective or incorrectly contact. If defective, replace the Laser/Scanner Assembly. If dirty, clean springs are mounted on . Paper does not meet Try a different paper lot (see HP LaserJet Printer specifications. Transfer Roller is on the High Voltage Power Supply PCA and ...protrude into the toner cartridge cavity. 7-62 Troubleshooting EN If the transfer roller loses conductivity, it . Laser/Scanner door is damaged, replace it cannot ...

Service Manual
Page 286
... Cause Action Wrong toner density setting. Toner Cartridge is defective. Transfer Roller is low. If the Toner Cartridge. Make sure EconoMode is stored improperly. 1. Table 7-22. Dirt in the Laser Scanner. Replace the Transfer Roller. Replace the paper, and advise the customer to see if ... System 7-65 problem continues, replace the Toner Cartridge. Replace the Fuser Assembly. Paper does not meet printer specifications or is off. Dirty mirror in the laser path. Replace the Toner Cartridge. Print a few more pages to use the recommended paper and store ...
... Cause Action Wrong toner density setting. Toner Cartridge is defective. Transfer Roller is low. If the Toner Cartridge. Make sure EconoMode is stored improperly. 1. Table 7-22. Dirt in the Laser Scanner. Replace the Transfer Roller. Replace the paper, and advise the customer to see if ... System 7-65 problem continues, replace the Toner Cartridge. Replace the Fuser Assembly. Paper does not meet printer specifications or is off. Dirty mirror in the laser path. Replace the Toner Cartridge. Print a few more pages to use the recommended paper and store ...

Service Manual
Page 292
Table 7-30. teeth. Deformed or Replace the Transfer Roller. EN Troubleshooting the Printing System 7-71 Vertical Dots Possible Cause Action Dirty static eliminator Clean the static eliminator. If the problem remains the Static... the Laser/Scanner to too for damage. Replace the Toner Cartridge if it gently. This may restore the photosensitive much light. Foreign objects in the beam path. Poor contact between Clean the contacts, if dirty. deteriorated Transfer Roller. potential. Remove the Toner Cartridge and check for several days. Remove the Printer Cover ...
Table 7-30. teeth. Deformed or Replace the Transfer Roller. EN Troubleshooting the Printing System 7-71 Vertical Dots Possible Cause Action Dirty static eliminator Clean the static eliminator. If the problem remains the Static... the Laser/Scanner to too for damage. Replace the Toner Cartridge if it gently. This may restore the photosensitive much light. Foreign objects in the beam path. Poor contact between Clean the contacts, if dirty. deteriorated Transfer Roller. potential. Remove the Toner Cartridge and check for several days. Remove the Printer Cover ...


