
Service Manual
Page 7
6 Removing and Replacing Parts Overview 6-1 User Installable Accessories 6-2 Removal and Replacement Strategy 6-7 Required Tools 6-7 Removing Covers 6-10 Rear Door / Rear Output Bin 6-10 Top Cover 6-12 Control Panel Overlay and Control Panel 6-15 Toner Cartridge Door Assembly 6-17 Front Cover and Tray 1 6-18 Front Cover Pins 6-20 Face Down Assembly 6-21 Left and Right Side Covers 6-23 Tray 1 Inner Cover 6-24 Right and Left Corner Covers 6-26 Removing Assemblies 6-27 Transfer Roller Assembly 6-28 Fuser 6-30 Paper Handling PCA 6-31 Main Gear Assembly 6-35...
6 Removing and Replacing Parts Overview 6-1 User Installable Accessories 6-2 Removal and Replacement Strategy 6-7 Required Tools 6-7 Removing Covers 6-10 Rear Door / Rear Output Bin 6-10 Top Cover 6-12 Control Panel Overlay and Control Panel 6-15 Toner Cartridge Door Assembly 6-17 Front Cover and Tray 1 6-18 Front Cover Pins 6-20 Face Down Assembly 6-21 Left and Right Side Covers 6-23 Tray 1 Inner Cover 6-24 Right and Left Corner Covers 6-26 Removing Assemblies 6-27 Transfer Roller Assembly 6-28 Fuser 6-30 Paper Handling PCA 6-31 Main Gear Assembly 6-35...

Service Manual
Page 24
... Using Paper Symptom Problem with Paper Solution Poor print quality or toner adhesion. Make sure the paper is of good quality and free of paper, between 100-250 Sheffield, 46% moisture content. Guidelines for Using Paper For best results, use paper with feeding. Problems with feeding. Increased gray background shading. Too heavy. Too moist, wrong grain direction or short-grain construction. Set FUSER MODE=LOW. Ragged edges. faulty paper lot. Use lighter paper. Jamming, damage to the printer...
... Using Paper Symptom Problem with Paper Solution Poor print quality or toner adhesion. Make sure the paper is of good quality and free of paper, between 100-250 Sheffield, 46% moisture content. Guidelines for Using Paper For best results, use paper with feeding. Problems with feeding. Increased gray background shading. Too heavy. Too moist, wrong grain direction or short-grain construction. Set FUSER MODE=LOW. Ragged edges. faulty paper lot. Use lighter paper. Jamming, damage to the printer...

Service Manual
Page 29
..., creasing, or jams. Envelope Margins The following table gives typical address margins for feeding through a laser printer. For optimum printer performance, do not use adhesives compatible with the heat and pressure in (15 mm) from Tray 1, including index cards and postcards. If air is better suited for a Commercial #10 or DL envelope. Table 1-12. Note Printing on heavier paper may wrinkle during printing. Paper that folds over...
..., creasing, or jams. Envelope Margins The following table gives typical address margins for feeding through a laser printer. For optimum printer performance, do not use adhesives compatible with the heat and pressure in (15 mm) from Tray 1, including index cards and postcards. If air is better suited for a Commercial #10 or DL envelope. Table 1-12. Note Printing on heavier paper may wrinkle during printing. Paper that folds over...
Service Manual
Page 52
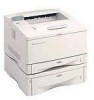
... used as duplex and manual feed) can print by choosing the type and size of paper from that tray first. TRAY 1 TYPE= PLAIN For supported paper types see page 1-14. TRAY 3 TYPE= PLAIN For supported paper types see page 1-14. Paper Handling Menu When paper handling settings are correctly configured through the Control Panel, you can be assigned to Tray 1 using the TRAY 1 SIZE option (the next item in this menu when TRAY 1 MODE=CASSETTE). Table 3-5. This item appears only when a third paper tray is installed). Printer driver and software application settings...
... used as duplex and manual feed) can print by choosing the type and size of paper from that tray first. TRAY 1 TYPE= PLAIN For supported paper types see page 1-14. TRAY 3 TYPE= PLAIN For supported paper types see page 1-14. Paper Handling Menu When paper handling settings are correctly configured through the Control Panel, you can be assigned to Tray 1 using the TRAY 1 SIZE option (the next item in this menu when TRAY 1 MODE=CASSETTE). Table 3-5. This item appears only when a third paper tray is installed). Printer driver and software application settings...

Service Manual
Page 79
... serial number must be cleared. 3-34 Printer Operation EN Diagnostics This menu item enables or disables the use A4 rather than letter size paper, set the cold reset paper size to the factory setting. Possible values are COLD RESET PAPER=LETTER and COLD RESET PAPER=A4. Cold Reset Paper The default paper size is set initially at the factory to 150,000 pages. (For example, the message displays at 300,114 pages.) Editing this number is similar to be reset only after a maintenance kit has been installed. When replacing...
... serial number must be cleared. 3-34 Printer Operation EN Diagnostics This menu item enables or disables the use A4 rather than letter size paper, set the cold reset paper size to the factory setting. Possible values are COLD RESET PAPER=LETTER and COLD RESET PAPER=A4. Cold Reset Paper The default paper size is set initially at the factory to 150,000 pages. (For example, the message displays at 300,114 pages.) Editing this number is similar to be reset only after a maintenance kit has been installed. When replacing...
Service Manual
Page 90
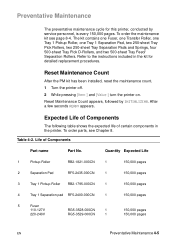
... replacement procedures. Reset Maintenance Count appears, followed by service personnel, is every 150,000 pages. The kit contains one Fuser, one Transfer Roller, one Tray 1 Pickup Roller, one Tray 1 Separation Pad, two 250-sheet Tray Pick Rollers, two 250-sheet Tray Separation Pads and Springs, four 500-sheet Tray Pick D-Rollers, and two 500-sheet Tray Feed/ Separation Rollers. Reset Maintenance Count After the PM kit has been installed, reset the maintenance count. 1 Turn the printer off. 2 While pressing [Item-] and [Value-] turn the printer on. Expected Life...
... replacement procedures. Reset Maintenance Count appears, followed by service personnel, is every 150,000 pages. The kit contains one Fuser, one Transfer Roller, one Tray 1 Pickup Roller, one Tray 1 Separation Pad, two 250-sheet Tray Pick Rollers, two 250-sheet Tray Separation Pads and Springs, four 500-sheet Tray Pick D-Rollers, and two 500-sheet Tray Feed/ Separation Rollers. Reset Maintenance Count After the PM kit has been installed, reset the maintenance count. 1 Turn the printer off. 2 While pressing [Item-] and [Value-] turn the printer on. Expected Life...

Service Manual
Page 104
... the following occurs: q A print job, valid data, or a PML or PJL command is received at the appropriate time, but the error message will continue to be selected from the Control Panel (Print Quality Menu) and through some software applications. The default setting is opened and then closed . REt can be displayed. REt settings sent from some software applications and printer drivers. Note Note Note The printer exits PowerSave mode and enters the...
... the following occurs: q A print job, valid data, or a PML or PJL command is received at the appropriate time, but the error message will continue to be selected from the Control Panel (Print Quality Menu) and through some software applications. The default setting is opened and then closed . REt can be displayed. REt settings sent from some software applications and printer drivers. Note Note Note The printer exits PowerSave mode and enters the...

Service Manual
Page 223
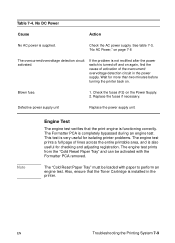
... for clearing Control Panel error messages and displaying and correcting Event Log codes. After completing the additional testing, proceed to the next major step. The following list describes the basic questions for the customer and the corresponding troubleshooting step to the referenced location and follow the directions for troubleshooting the printing system. This section gives the procedures for correcting power supply problems. Display (page 7-11) Does the Control Panel indicate READY, OFFLINE...
... for clearing Control Panel error messages and displaying and correcting Event Log codes. After completing the additional testing, proceed to the next major step. The following list describes the basic questions for the customer and the corresponding troubleshooting step to the referenced location and follow the directions for troubleshooting the printing system. This section gives the procedures for correcting power supply problems. Display (page 7-11) Does the Control Panel indicate READY, OFFLINE...
Service Manual
Page 230
... is turned off and on page 7-8 The overcurrent/overvoltage detection circuit activated. If the problem is not rectified after the power switch is also useful for isolating printer problems. The engine test prints a full page of the overcurrent/ overvoltage detection circuit in the printer. The Formatter PCA is supplied. The engine test prints from the "Cold Reset Paper Tray" and can be loaded with the Formatter PCA removed. The "Cold Reset Paper Tray...
... is turned off and on page 7-8 The overcurrent/overvoltage detection circuit activated. If the problem is not rectified after the power switch is also useful for isolating printer problems. The engine test prints a full page of the overcurrent/ overvoltage detection circuit in the printer. The Formatter PCA is supplied. The engine test prints from the "Cold Reset Paper Tray" and can be loaded with the Formatter PCA removed. The "Cold Reset Paper Tray...
Service Manual
Page 237
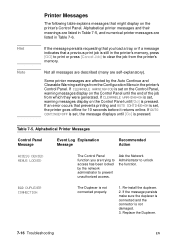
... print or press [Cancel Job] to clear the job from which they were generated. Some printer messages are listed in the printer's Control Panel. If AUTO CONTINUE=OFF is set on the Control Panel, warning messages display on the Control Panel until the end of the job from the printer's memory. Ask the Network Administrator to access has been locked by the Auto Continue and Clearable Warning settings from the Configuration Menu in Table 7-6. BAD DUPLEXER CONNECTION The Duplexer is pressed. If an error...
... print or press [Cancel Job] to clear the job from which they were generated. Some printer messages are listed in the printer's Control Panel. If AUTO CONTINUE=OFF is set on the Control Panel, warning messages display on the Control Panel until the end of the job from the printer's memory. Ask the Network Administrator to access has been locked by the Auto Continue and Clearable Warning settings from the Configuration Menu in Table 7-6. BAD DUPLEXER CONNECTION The Duplexer is pressed. If an error...
Service Manual
Page 243
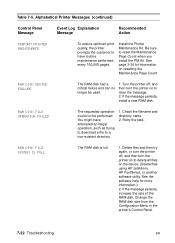
... another software utility. Alphabetical Printer Messages (continued) Control Panel Message Event Log Explanation Message Recommended Action PERFORM PRINTER MAINTENANCE To ensure optimum print quality, the printer prompts the customer to delete all files on to have attempted an illegal operation, such as trying to download a file to reset the Maintenance Page Count when you install the PM Kit. Install the Printer Maintenance Kit. If the message persists, install a new RAM disk. RAM DISK FILE OPERATION FAILED The requested operation could not be used. 1. Check...
... another software utility. Alphabetical Printer Messages (continued) Control Panel Message Event Log Explanation Message Recommended Action PERFORM PRINTER MAINTENANCE To ensure optimum print quality, the printer prompts the customer to delete all files on to have attempted an illegal operation, such as trying to download a file to reset the Maintenance Page Count when you install the PM Kit. Install the Printer Maintenance Kit. If the message persists, install a new RAM disk. RAM DISK FILE OPERATION FAILED The requested operation could not be used. 1. Check...

Service Manual
Page 279
... Control Panel, change the Fuser Mode setting or choose another paper type from the printer driver. 2. From the Paper Handling Menu on page 7-60. 7-58 Troubleshooting EN Also try rotating the paper 180°. 3. meet printer specifications or is stored improperly. 1. Print to on in the tray. Turn Paper Reform to a different output bin (top or rear output bin). Check the paper (or other print media) type and quality. Table 7-15. Print a few more pages to use the recommended paper and store it properly. Replace the paper...
... Control Panel, change the Fuser Mode setting or choose another paper type from the printer driver. 2. From the Paper Handling Menu on page 7-60. 7-58 Troubleshooting EN Also try rotating the paper 180°. 3. meet printer specifications or is stored improperly. 1. Print to on in the tray. Turn Paper Reform to a different output bin (top or rear output bin). Check the paper (or other print media) type and quality. Table 7-15. Print a few more pages to use the recommended paper and store it properly. Replace the paper...
Service Manual
Page 282
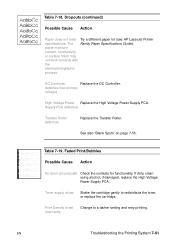
... HP LaserJet Printer specifications. The Family Paper Specifications Guide). DC Controller Replace the DC Controller. defective (low primary voltage). Replace the Transfer Roller. Table 7-19. if damaged, replace the High Voltage Power Supply PCA. High Voltage Power Replace the High Voltage Power Supply PCA. Transfer Roller defective. Print Density is low. Change to redistribute the toner, or replace the cartridge. EN Troubleshooting the Printing System 7-61 If dirty, clean using alcohol; Faded Print/Bubbles Possible Cause Action No drum ground path. Toner supply is set...
... HP LaserJet Printer specifications. The Family Paper Specifications Guide). DC Controller Replace the DC Controller. defective (low primary voltage). Replace the Transfer Roller. Table 7-19. if damaged, replace the High Voltage Power Supply PCA. High Voltage Power Replace the High Voltage Power Supply PCA. Transfer Roller defective. Print Density is low. Change to redistribute the toner, or replace the cartridge. EN Troubleshooting the Printing System 7-61 If dirty, clean using alcohol; Faded Print/Bubbles Possible Cause Action No drum ground path. Toner supply is set...

Service Manual
Page 283
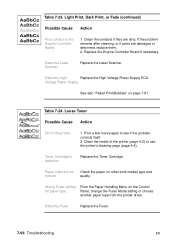
If the transfer roller loses conductivity, it . Laser/Scanner door is damaged, replace it cannot effectively pull toner from the drum to be a print quality problem in some cases. If defective, replace the Laser/Scanner Assembly. voltage contacts are dirty or using alcohol; Table 7-19. This may not work correctly with the electrophotographic process. Paper does not meet Try a different paper lot (see HP LaserJet Printer specifications. High voltage contact Check the...
If the transfer roller loses conductivity, it . Laser/Scanner door is damaged, replace it cannot effectively pull toner from the drum to be a print quality problem in some cases. If defective, replace the Laser/Scanner Assembly. voltage contacts are dirty or using alcohol; Table 7-19. This may not work correctly with the electrophotographic process. Paper does not meet Try a different paper lot (see HP LaserJet Printer specifications. High voltage contact Check the...
Service Manual
Page 287
..."Faded Print/Bubbles" on the Control for paper type. Replace the Laser Scanner. Loose Toner Possible Cause Action Dirt in the printer. 1. Clean the inside of the printer (page 4-2) or use the printer's cleaning page (page 4-4). quality. Light Print, Dark Print, or Fade (continued) Possible Cause Action Poor contact to see if the problem corrects itself. 2. Voltage Power Supply. Panel, change the Fuser Mode setting or choose another paper type from the printer driver. Toner Cartridge is defective. Wrong Fuser setting From the Paper Handling Menu on page 7-61...
..."Faded Print/Bubbles" on the Control for paper type. Replace the Laser Scanner. Loose Toner Possible Cause Action Dirt in the printer. 1. Clean the inside of the printer (page 4-2) or use the printer's cleaning page (page 4-4). quality. Light Print, Dark Print, or Fade (continued) Possible Cause Action Poor contact to see if the problem corrects itself. 2. Voltage Power Supply. Panel, change the Fuser Mode setting or choose another paper type from the printer driver. Toner Cartridge is defective. Wrong Fuser setting From the Paper Handling Menu on page 7-61...
Service Manual
Page 290
... in printer. 1. Panel, change the Fuser Mode setting or choose another paper type from the printer driver. Clean the inside of the printer (page 4-2) or use the printer's cleaning page (page 4-4). Clean using the blue cleaning tool or compressed air. The print will smear if the Fusing Assembly is not grounded, allowing a static charge to remain on the Control for paper type. Toner Smear (continued) Possible Cause Action Wrong Fuser setting From the Paper Handling Menu on the page. DC Controller is Replace the...
... in printer. 1. Panel, change the Fuser Mode setting or choose another paper type from the printer driver. Clean the inside of the printer (page 4-2) or use the printer's cleaning page (page 4-4). Clean using the blue cleaning tool or compressed air. The print will smear if the Fusing Assembly is not grounded, allowing a static charge to remain on the Control for paper type. Toner Smear (continued) Possible Cause Action Wrong Fuser setting From the Paper Handling Menu on the page. DC Controller is Replace the...

Service Manual
Page 297
... Checks table in Figure 7-7 contains valuable information regarding the current status of the EIO accessories. EIO Troubleshooting The JetDirect Configuration Page shown in this section. Refer the customer to parallel port #1) The printer should print a directory listing of network issues. 7-76 Troubleshooting EN Enter the following at the DOS prompt: C:\DIR>LPT1 Enter (for detailed explanations of the C: \ directory. See the HP JetDirect Print Server Software Installation Guide for printing to the network...
... Checks table in Figure 7-7 contains valuable information regarding the current status of the EIO accessories. EIO Troubleshooting The JetDirect Configuration Page shown in this section. Refer the customer to parallel port #1) The printer should print a directory listing of network issues. 7-76 Troubleshooting EN Enter the following at the DOS prompt: C:\DIR>LPT1 Enter (for detailed explanations of the C: \ directory. See the HP JetDirect Print Server Software Installation Guide for printing to the network...
Service Manual
Page 384
...printer 4-2 spilled toner 4-4 using cleaning page 4-4 clutches 5-9, 5-30 component locations 7-80 Configuration menu 3-17 configuration page 7-46 control panel 3-2, 5-17 changing settings 3-5 defaults 3-4 keys 3-2, 3-3 layout 3-2 lights 3-2 printing Menu Map 3-5 settings 3-4 Control Panel Overlay, removing and replacing 6-15 Control Panel, removing and replacing 6-15 covers 6-10 CPU 5-14 Create Cleaning Page message 4-4 D DC Controller Board, removing and replacing 6-47 Delivery Roller Removal, removing and replacing 6- 68 diagrams reference 7-80 DIMM slots 5-16 documentation 2-4 drives laser...
...printer 4-2 spilled toner 4-4 using cleaning page 4-4 clutches 5-9, 5-30 component locations 7-80 Configuration menu 3-17 configuration page 7-46 control panel 3-2, 5-17 changing settings 3-5 defaults 3-4 keys 3-2, 3-3 layout 3-2 lights 3-2 printing Menu Map 3-5 settings 3-4 Control Panel Overlay, removing and replacing 6-15 Control Panel, removing and replacing 6-15 covers 6-10 CPU 5-14 Create Cleaning Page message 4-4 D DC Controller Board, removing and replacing 6-47 Delivery Roller Removal, removing and replacing 6- 68 diagrams reference 7-80 DIMM slots 5-16 documentation 2-4 drives laser...

Service Manual
Page 385
... 5-21 image quality 7-49 Information menu 3-6 input/output 5-14 L labels 1-18 laser drive 5-8 Laser Scanner Assembly, removing and replacing 6-70 Left Corner Cover, removing and replacing 6-26 Left Front Corner Cover, removing and replacing 6- 77 M Main Gear Assembly, removing and replacing 6-35 Main Motor, removing and replacing 6-71 maintenance 4-1 maintenance count 3-31 memory checking installation 6-5 printer 5-15 Random Access Memory (RAM) 5-15 upgrade 6-2 Memory Enhancement technology (MEt) 5-16 menu map 7-44 model numbers 1-5 motors 5-10 N NVRAM, clearing 3-36 O Optional 250-sheet Tray...
... 5-21 image quality 7-49 Information menu 3-6 input/output 5-14 L labels 1-18 laser drive 5-8 Laser Scanner Assembly, removing and replacing 6-70 Left Corner Cover, removing and replacing 6-26 Left Front Corner Cover, removing and replacing 6- 77 M Main Gear Assembly, removing and replacing 6-35 Main Motor, removing and replacing 6-71 maintenance 4-1 maintenance count 3-31 memory checking installation 6-5 printer 5-15 Random Access Memory (RAM) 5-15 upgrade 6-2 Memory Enhancement technology (MEt) 5-16 menu map 7-44 model numbers 1-5 motors 5-10 N NVRAM, clearing 3-36 O Optional 250-sheet Tray...
Service Manual
Page 386
...1-9 printing engine test 3-35 interface 7-77 operating checks 7-6 Optional 250-sheet Tray 5-35 Optional 500-sheet Tray 5-35 Tray 1 5-31 Tray 2 5-33 Printing menu 3-13 Product Stewardship, power consumption 1-26 R Random Access Memory (RAM) 5-15 Rear Door/Rear Output Bin, removing and replacing 6-10 recycling toner cartridges 2-8 refeed system 5-38 Registration Assembly, removing and replacing 6- 64 regulatory information 1-22- 1-24 removal/replacement strategy 6-7 removing and replacing 6-10 reset maintenance count 3-31 page count 3-31 serial number 3-31 Resets menu 3-29 resetting printer 3-36...
...1-9 printing engine test 3-35 interface 7-77 operating checks 7-6 Optional 250-sheet Tray 5-35 Optional 500-sheet Tray 5-35 Tray 1 5-31 Tray 2 5-33 Printing menu 3-13 Product Stewardship, power consumption 1-26 R Random Access Memory (RAM) 5-15 Rear Door/Rear Output Bin, removing and replacing 6-10 recycling toner cartridges 2-8 refeed system 5-38 Registration Assembly, removing and replacing 6- 64 regulatory information 1-22- 1-24 removal/replacement strategy 6-7 removing and replacing 6-10 reset maintenance count 3-31 page count 3-31 serial number 3-31 Resets menu 3-29 resetting printer 3-36...


