HP Color LaserJet 4650 series printer - User Guide
Page 224
... not improve print quality, go to http://www.hp.com/support/lj4650. 210 Chapter 8 Problem solving ENWW Print quality problems associated with the environment The printer is operating in smaller batches. ● The selected colors are using a reflective overhead projector, use a ...The printer returns to highlight PQ TROUBLESHOOTING. 5. Select different colors in the output bin. Print quality problems associated with jams ● Make sure that the printing environment is cleared from the paper path. See Environmental specifications. Press MENU to clean the printer. The...
... not improve print quality, go to http://www.hp.com/support/lj4650. 210 Chapter 8 Problem solving ENWW Print quality problems associated with the environment The printer is operating in smaller batches. ● The selected colors are using a reflective overhead projector, use a ...The printer returns to highlight PQ TROUBLESHOOTING. 5. Select different colors in the output bin. Print quality problems associated with jams ● Make sure that the printing environment is cleared from the paper path. See Environmental specifications. Press MENU to clean the printer. The...

HP Color LaserJet 4650 series printer - User Guide
Page 225
...select PRINT QUALITY. 6. Press MENU to http://www.hp.com/support/lj4650. For the latest information and problem-solving procedures, go /printquality/clj4650 Calibrating the printer The HP Color LaserJet 4650 printer automatically calibrates and cleans at various times to maintain the highest level of.... The tool includes solutions for the HP Color LaserJet 4650 printer. While the printer is designed to provide intuitive, step-by-step directions for the amount of QUICK CALIBRATE NOW in steps 6 and 7. It is calibrating and cleaning, the printer will be run . Press to highlight...
...select PRINT QUALITY. 6. Press MENU to http://www.hp.com/support/lj4650. For the latest information and problem-solving procedures, go /printquality/clj4650 Calibrating the printer The HP Color LaserJet 4650 printer automatically calibrates and cleans at various times to maintain the highest level of.... The tool includes solutions for the HP Color LaserJet 4650 printer. While the printer is designed to provide intuitive, step-by-step directions for the amount of QUICK CALIBRATE NOW in steps 6 and 7. It is calibrating and cleaning, the printer will be run . Press to highlight...
HP Color LaserJet 4650 series printer - User Guide
Page 234
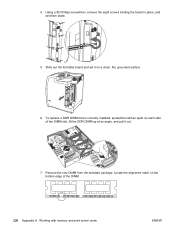
4. Locate the alignment notch on the bottom edge of the DIMM slot, lift the DDR DIMM up at an angle, and pull it on each side of the DIMM. 220 Appendix A Working with memory and print server cards ENWW Remove the new DIMM from the antistatic package. Using a #2 Phillips screwdriver, remove the eight screws holding the board in place, and set it out. 7. Slide out the formatter board and set them aside. 5. To replace a DDR DIMM that is currently installed, spread the latches apart on a clean, flat, grounded surface. 6.
4. Locate the alignment notch on the bottom edge of the DIMM slot, lift the DDR DIMM up at an angle, and pull it on each side of the DIMM. 220 Appendix A Working with memory and print server cards ENWW Remove the new DIMM from the antistatic package. Using a #2 Phillips screwdriver, remove the eight screws holding the board in place, and set it out. 7. Slide out the formatter board and set them aside. 5. To replace a DDR DIMM that is currently installed, spread the latches apart on a clean, flat, grounded surface. 6.
HP Color LaserJet 4650 series printer - User Guide
Page 238
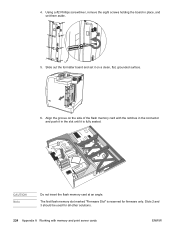
... flash memory card with memory and print server cards ENWW The first flash memory slot marked "Firmware Slot" is fully seated. Align the groove on a clean, flat, grounded surface. 6. Slide out the formatter board and set it in place, and set them aside. 5. Slots 2 and 3 should be used for firmware only...
... flash memory card with memory and print server cards ENWW The first flash memory slot marked "Firmware Slot" is fully seated. Align the groove on a clean, flat, grounded surface. 6. Slide out the formatter board and set it in place, and set them aside. 5. Slots 2 and 3 should be used for firmware only...

