HP Notebook and Tablet PC Cleaning Guideline
Page 2
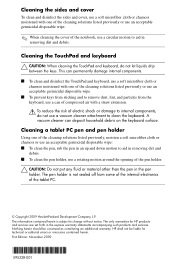
...The only warranties for technical or editorial errors or omissions contained herein. First Edition: November 2009 595328-001 Cleaning the TouchPad and keyboard Ä CAUTION: When cleaning the TouchPad and keyboard, do not use a can of compressed air with a straw extension. Å To reduce the risk ... keys from sticking and to remove dust, lint, and particles from the keyboard, use a vacuum cleaner attachment to change without notice. HP shall not be construed as constituting an additional warranty. Cleaning the sides and cover To clean and disinfect the sides and cover, use ...
...The only warranties for technical or editorial errors or omissions contained herein. First Edition: November 2009 595328-001 Cleaning the TouchPad and keyboard Ä CAUTION: When cleaning the TouchPad and keyboard, do not use a can of compressed air with a straw extension. Å To reduce the risk ... keys from sticking and to remove dust, lint, and particles from the keyboard, use a vacuum cleaner attachment to change without notice. HP shall not be construed as constituting an additional warranty. Cleaning the sides and cover To clean and disinfect the sides and cover, use ...
Security - Windows XP, Windows Vista and Windows 7
Page 5
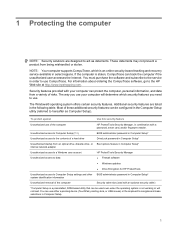
...Setup). Most of risks. You must purchase the software and subscribe to the service in order to use either a pointing device (TouchPad, pointing stick, or USB mouse) or the keyboard to the contents of the computer Security cable slot (used even when the ... network adapter Unauthorized access to a Windows user account Unauthorized access to data HP ProtectTools Security Manager ● Firewall software ● Windows updates ● Drive Encryption for HP ProtectTools Unauthorized access to the HP Web site at http://www.hpshopping.com. For information about ordering the CompuTrace...
...Setup). Most of risks. You must purchase the software and subscribe to the service in order to use either a pointing device (TouchPad, pointing stick, or USB mouse) or the keyboard to the contents of the computer Security cable slot (used even when the ... network adapter Unauthorized access to a Windows user account Unauthorized access to data HP ProtectTools Security Manager ● Firewall software ● Windows updates ● Drive Encryption for HP ProtectTools Unauthorized access to the HP Web site at http://www.hpshopping.com. For information about ordering the CompuTrace...
Computer Setup - Windows Vista and Windows XP
Page 6
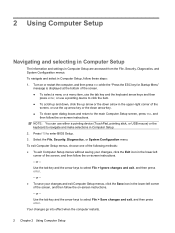
... scroll up and down, click the up arrow or the down arrow in the lower-left corner of the screen, or use either a pointing device (TouchPad, pointing stick, or USB mouse) or the keyboard to navigate and make selections in Computer Setup are accessed from the File, Security, Diagnostics, and System...
... scroll up and down, click the up arrow or the down arrow in the lower-left corner of the screen, or use either a pointing device (TouchPad, pointing stick, or USB mouse) or the keyboard to navigate and make selections in Computer Setup are accessed from the File, Security, Diagnostics, and System...

Drives - Linux
Page 22
... and WLAN compartment. 19. 16. Remove the hard drive screw (1). 20. Use the Mylar tab (2) on the computer so that the TouchPad cable is connected, and then disconnect the TouchPad cable from the system board. 18 Chapter 4 Replacing the hard drive Slide the top cover back until it from the system board...
... and WLAN compartment. 19. 16. Remove the hard drive screw (1). 20. Use the Mylar tab (2) on the computer so that the TouchPad cable is connected, and then disconnect the TouchPad cable from the system board. 18 Chapter 4 Replacing the hard drive Slide the top cover back until it from the system board...
Drives - Linux
Page 24
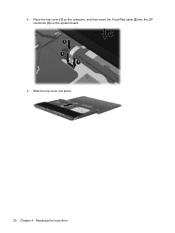
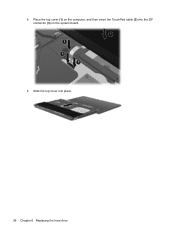
4. Place the top cover (1) on the computer, and then insert the TouchPad cable (2) into place. 20 Chapter 4 Replacing the hard drive Slide the top cover into the ZIF connector (3) on the system board. 5.
4. Place the top cover (1) on the computer, and then insert the TouchPad cable (2) into place. 20 Chapter 4 Replacing the hard drive Slide the top cover into the ZIF connector (3) on the system board. 5.
Drives - Windows Vista
Page 28
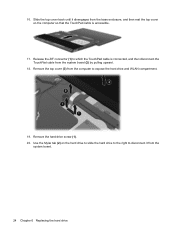
... and WLAN compartment. 19. Remove the hard drive screw (1). 20. 16. Use the Mylar tab (2) on the computer so that the TouchPad cable is connected, and then disconnect the TouchPad cable from the system board (2) by pulling upward. 18. Slide the top cover back until it disengages from the base enclosure, and... rest the top cover on the hard drive to slide the hard drive to the right to disconnect it from the computer to which the TouchPad cable is accessible. 17. Remove the top cover (3) from the system board. 24 Chapter 6 Replacing the hard drive
... and WLAN compartment. 19. Remove the hard drive screw (1). 20. 16. Use the Mylar tab (2) on the computer so that the TouchPad cable is connected, and then disconnect the TouchPad cable from the system board (2) by pulling upward. 18. Slide the top cover back until it disengages from the base enclosure, and... rest the top cover on the hard drive to slide the hard drive to the right to disconnect it from the computer to which the TouchPad cable is accessible. 17. Remove the top cover (3) from the system board. 24 Chapter 6 Replacing the hard drive
Drives - Windows Vista
Page 30
Slide the top cover into the ZIF connector (3) on the computer, and then insert the TouchPad cable (2) into place. 26 Chapter 6 Replacing the hard drive Place the top cover (1) on the system board. 5. 4.
Slide the top cover into the ZIF connector (3) on the computer, and then insert the TouchPad cable (2) into place. 26 Chapter 6 Replacing the hard drive Place the top cover (1) on the system board. 5. 4.

Drives - Windows Vista
Page 30
...board (2) by pulling upward. 18. Remove the 2 hard drive screws (1) and loosen the captive screw (2) that the TouchPad cable is connected, and then disconnect the TouchPad cable from the computer to disconnect it disengages from the system board. 26 Chapter 6 Replacing the hard drive Use the Mylar... tab (3) on the computer so that secure the hard drive. 20. Release the ZIF connector (1) to which the TouchPad cable is accessible....
...board (2) by pulling upward. 18. Remove the 2 hard drive screws (1) and loosen the captive screw (2) that the TouchPad cable is connected, and then disconnect the TouchPad cable from the computer to disconnect it disengages from the system board. 26 Chapter 6 Replacing the hard drive Use the Mylar... tab (3) on the computer so that secure the hard drive. 20. Release the ZIF connector (1) to which the TouchPad cable is accessible....

Drives - Windows Vista
Page 32
Slide the top cover into the ZIF connector (3) on the computer, and then insert the TouchPad cable (2) into place. 28 Chapter 6 Replacing the hard drive 4. Place the top cover (1) on the system board. 5.
Slide the top cover into the ZIF connector (3) on the computer, and then insert the TouchPad cable (2) into place. 28 Chapter 6 Replacing the hard drive 4. Place the top cover (1) on the system board. 5.

Drives - Windows XP
Page 28
... is accessible. 17. Remove the hard drive screw (1). 20. Use the Mylar tab (2) on the computer so that the TouchPad cable is connected, and then disconnect the TouchPad cable from the computer to disconnect it disengages from the system board. 24 Chapter 6 Replacing the hard drive Slide the top cover back until...
... is accessible. 17. Remove the hard drive screw (1). 20. Use the Mylar tab (2) on the computer so that the TouchPad cable is connected, and then disconnect the TouchPad cable from the computer to disconnect it disengages from the system board. 24 Chapter 6 Replacing the hard drive Slide the top cover back until...

Drives - Windows XP
Page 30
4. Place the top cover (1) on the system board. 5. Slide the top cover into the ZIF connector (3) on the computer, and then insert the TouchPad cable (2) into place. 26 Chapter 6 Replacing the hard drive
4. Place the top cover (1) on the system board. 5. Slide the top cover into the ZIF connector (3) on the computer, and then insert the TouchPad cable (2) into place. 26 Chapter 6 Replacing the hard drive

Drives - Windows XP
Page 30
.... 26 Chapter 6 Replacing the hard drive Remove the 2 hard drive screws (1) and loosen the captive screw (2) that the TouchPad cable is connected, and then disconnect the TouchPad cable from the computer to which the TouchPad cable is accessible. 17. 16. Remove the top cover (3) from the system board (2) by pulling upward. 18. Release...
.... 26 Chapter 6 Replacing the hard drive Remove the 2 hard drive screws (1) and loosen the captive screw (2) that the TouchPad cable is connected, and then disconnect the TouchPad cable from the computer to which the TouchPad cable is accessible. 17. 16. Remove the top cover (3) from the system board (2) by pulling upward. 18. Release...

Drives - Windows XP
Page 32
Slide the top cover into the ZIF connector (3) on the system board. 5. Place the top cover (1) on the computer, and then insert the TouchPad cable (2) into place. 28 Chapter 6 Replacing the hard drive 4.
Slide the top cover into the ZIF connector (3) on the system board. 5. Place the top cover (1) on the computer, and then insert the TouchPad cable (2) into place. 28 Chapter 6 Replacing the hard drive 4.

Notebook Tour - Linux
Page 9
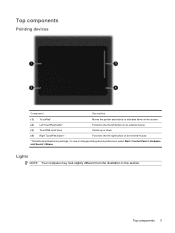
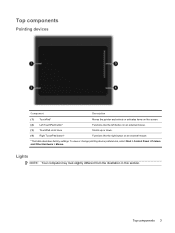
Top components Pointing devices Component (1) TouchPad (2) Left TouchPad button (3) TouchPad scroll zone (4) Right TouchPad button Description Moves the pointer and selects or activates items on an external mouse. Functions like the right button on an external mouse. Top components 3 Lights NOTE: Your computer may look slightly different from the illustration in this section. Functions like the left button on the screen. Scrolls up or down.
Top components Pointing devices Component (1) TouchPad (2) Left TouchPad button (3) TouchPad scroll zone (4) Right TouchPad button Description Moves the pointer and selects or activates items on an external mouse. Functions like the right button on an external mouse. Top components 3 Lights NOTE: Your computer may look slightly different from the illustration in this section. Functions like the left button on the screen. Scrolls up or down.
Notebook Tour - Linux
Page 22
... release latches, identifying 11 battery, identifying 13 bays battery 11, 14 Bluetooth label 14 buttons Info Center 5 power 5 QuickLook 5 TouchPad 3 C caps lock light, identifying 4 components additional hardware 13 bottom 11 display 2 front 8 left-side 10 right-side 9 ...slot, identifying 10 external monitor port, identifying 10 F fn key, identifying 6, 7 function keys, identifying 6, 7 H headphone (audio-out) jack 8 HP Mobile Broadband Module serial number label 15 I Info Center/QuickLook button, identifying 5 Info Center/QuickLook light, identifying 4 internal display switch, identifying 2, 5...
... release latches, identifying 11 battery, identifying 13 bays battery 11, 14 Bluetooth label 14 buttons Info Center 5 power 5 QuickLook 5 TouchPad 3 C caps lock light, identifying 4 components additional hardware 13 bottom 11 display 2 front 8 left-side 10 right-side 9 ...slot, identifying 10 external monitor port, identifying 10 F fn key, identifying 6, 7 function keys, identifying 6, 7 H headphone (audio-out) jack 8 HP Mobile Broadband Module serial number label 15 I Info Center/QuickLook button, identifying 5 Info Center/QuickLook light, identifying 4 internal display switch, identifying 2, 5...
Notebook Tour - Linux
Page 23
...14 release latches, battery 11 RJ-11 (modem) jack, identifying 9 RJ-45 (network) jack, identifying 10 S scroll zone, TouchPad 3 security cable slot, identifying 10 serial number, computer 14 service tag 14 SIM label 15 slots ExpressCard 10 security cable 10 ...speakers, identifying 5 switch, wireless 8 T TouchPad buttons, identifying 3 TouchPad scroll zone, identifying 3 TouchPad, identifying 3 traveling with the computer modem approval label 14 wireless certification labels 14 U USB ports, identifying 9, 10 V ...
...14 release latches, battery 11 RJ-11 (modem) jack, identifying 9 RJ-45 (network) jack, identifying 10 S scroll zone, TouchPad 3 security cable slot, identifying 10 serial number, computer 14 service tag 14 SIM label 15 slots ExpressCard 10 security cable 10 ...speakers, identifying 5 switch, wireless 8 T TouchPad buttons, identifying 3 TouchPad scroll zone, identifying 3 TouchPad, identifying 3 traveling with the computer modem approval label 14 wireless certification labels 14 U USB ports, identifying 9, 10 V ...
Notebook Tour - Windows Vista
Page 9
... computer may look slightly different from the illustration in this section. Top components 3 Functions like the left button on an external mouse. (3) TouchPad scroll zone Scrolls up or down. (4) Right TouchPad button* Functions like the right button on the screen. To view or change pointing device preferences, select Start > Control Panel > Hardware...
... computer may look slightly different from the illustration in this section. Top components 3 Functions like the left button on an external mouse. (3) TouchPad scroll zone Scrolls up or down. (4) Right TouchPad button* Functions like the right button on the screen. To view or change pointing device preferences, select Start > Control Panel > Hardware...
Notebook Tour - Windows Vista
Page 23
..., identifying 12 battery, identifying 14 bays battery 12, 15 Bluetooth label 16 buttons Info Center 5 power 5 QuickLook 5 TouchPad 3 wireless 8 C caps lock light, identifying 4 Certificate of Authenticity label 15 components additional hardware 14 bottom 12 display ...slot, identifying 11 external monitor port, identifying 11 F fn key, identifying 6, 7 function keys, identifying 6, 7 H headphone (audio-out) jack 9 HP Mobile Broadband Module serial number label 16 I Info Center button, identifying 5 Info/QuickLook light, identifying 4 internal display switch, identifying 2, 5 internal microphone...
..., identifying 12 battery, identifying 14 bays battery 12, 15 Bluetooth label 16 buttons Info Center 5 power 5 QuickLook 5 TouchPad 3 wireless 8 C caps lock light, identifying 4 Certificate of Authenticity label 15 components additional hardware 14 bottom 12 display ...slot, identifying 11 external monitor port, identifying 11 F fn key, identifying 6, 7 function keys, identifying 6, 7 H headphone (audio-out) jack 9 HP Mobile Broadband Module serial number label 16 I Info Center button, identifying 5 Info/QuickLook light, identifying 4 internal display switch, identifying 2, 5 internal microphone...
Notebook Tour - Windows Vista
Page 24
... wireless certification labels 16 release latches, battery 12 RJ-11 (modem) jack, identifying 10 RJ-45 (network) jack, identifying 11 TouchPad scroll zone, identifying 3 TouchPad, identifying 3 traveling with the computer modem approval label 15 wireless certification labels 16 U USB ports, identifying 10, 11 V vents... identifying 8 WLAN antennas, identifying 13 WLAN device 16 WLAN label 16 WWAN antenna, identifying 13 S scroll zone, TouchPad 3 security cable slot, identifying 11 serial number, computer 15 service tag 15 SIM label 16 slots ExpressCard 11 security cable 11 speakers, identifying...
... wireless certification labels 16 release latches, battery 12 RJ-11 (modem) jack, identifying 10 RJ-45 (network) jack, identifying 11 TouchPad scroll zone, identifying 3 TouchPad, identifying 3 traveling with the computer modem approval label 15 wireless certification labels 16 U USB ports, identifying 10, 11 V vents... identifying 8 WLAN antennas, identifying 13 WLAN device 16 WLAN label 16 WWAN antenna, identifying 13 S scroll zone, TouchPad 3 security cable slot, identifying 11 serial number, computer 15 service tag 15 SIM label 16 slots ExpressCard 11 security cable 11 speakers, identifying...
Notebook Tour - Windows XP
Page 9
...or change pointing device preferences, select Start > Control Panel > Printers and Other Hardware > Mouse. Top components Pointing devices Component Description (1) TouchPad* (2) Left TouchPad button* Moves the pointer and selects or activates items on an external mouse. *This table describes factory settings. Lights NOTE: Your computer may... look slightly different from the illustration in this section. Functions like the left button on an external mouse. (3) TouchPad scroll zone Scrolls up or down. (4) Right TouchPad button* Functions like the right button on the screen.
...or change pointing device preferences, select Start > Control Panel > Printers and Other Hardware > Mouse. Top components Pointing devices Component Description (1) TouchPad* (2) Left TouchPad button* Moves the pointer and selects or activates items on an external mouse. *This table describes factory settings. Lights NOTE: Your computer may... look slightly different from the illustration in this section. Functions like the left button on an external mouse. (3) TouchPad scroll zone Scrolls up or down. (4) Right TouchPad button* Functions like the right button on the screen.


