
HP Notebook Reference Guide - Windows 7
Page 7
... 33 Connecting an eSATA device 33 Removing an eSATA device 34 Using optional external devices ...34 Using optional external drives 34 Using the expansion port (select models only 34 6 Drives ...36 Handling drives ...36 Using hard drives ...37 Improving hard drive performance 37 Using Disk Defragmenter 37 Using Disk Cleanup 37 Using HP 3D DriveGuard (select models only 37...
... 33 Connecting an eSATA device 33 Removing an eSATA device 34 Using optional external devices ...34 Using optional external drives 34 Using the expansion port (select models only 34 6 Drives ...36 Handling drives ...36 Using hard drives ...37 Improving hard drive performance 37 Using Disk Defragmenter 37 Using Disk Cleanup 37 Using HP 3D DriveGuard (select models only 37...

HP Notebook Reference Guide - Windows 7
Page 43
... device. NOTE: The eSATA port also supports an optional USB device. You will hear a sound when the device has been detected. Removing a 1394 device CAUTION: To reduce the risk of loss of damage to an eSATA port connector, use minimal force to connect the device. ▲ ... (select models only) 33 Connecting an eSATA device CAUTION: To reduce the risk of information or an unresponsive system, stop the 1394 device before removing it. Using an eSATA device (select models only) An eSATA port connects an optional high-performance eSATA component, such as an eSATA external hard drive.
... device. NOTE: The eSATA port also supports an optional USB device. You will hear a sound when the device has been detected. Removing a 1394 device CAUTION: To reduce the risk of loss of damage to an eSATA port connector, use minimal force to connect the device. ▲ ... (select models only) 33 Connecting an eSATA device CAUTION: To reduce the risk of information or an unresponsive system, stop the 1394 device before removing it. Using an eSATA device (select models only) An eSATA port connects an optional high-performance eSATA component, such as an eSATA external hard drive.

HP Notebook Reference Guide - Windows 7
Page 44
...use the following types: ● 1.44-megabyte diskette drive ● Hard drive module (a hard drive with an adapter attached) ● External optical drive (CD, DVD, and Blu-ray) ● MultiBay...device, plug the device power cord into a grounded AC outlet. 3. NOTE: HP external USB optical drives should be used with the device. 2. To disconnect a powered external device, turn...Remove the device. Using optional external drives Removable external drives expand your information and close all programs associated with the computer. 34 Chapter 5 External cards and devices A USB drive...
...use the following types: ● 1.44-megabyte diskette drive ● Hard drive module (a hard drive with an adapter attached) ● External optical drive (CD, DVD, and Blu-ray) ● MultiBay...device, plug the device power cord into a grounded AC outlet. 3. NOTE: HP external USB optical drives should be used with the device. 2. To disconnect a powered external device, turn...Remove the device. Using optional external drives Removable external drives expand your information and close all programs associated with the computer. 34 Chapter 5 External cards and devices A USB drive...

HP Notebook Reference Guide - Windows 7
Page 46
.... ● Handle a drive carefully; do not damage drives. 36 Chapter 6 Drives If you move the computer while an optical drive is writing to clear, or properly disconnect the external hard drive. ● Before handling a drive, discharge static electricity by touching the unpainted metal surface of the drive. ● Do not touch the connector pins on a removable drive or on the...
.... ● Handle a drive carefully; do not damage drives. 36 Chapter 6 Drives If you move the computer while an optical drive is writing to clear, or properly disconnect the external hard drive. ● Before handling a drive, discharge static electricity by touching the unpainted metal surface of the drive. ● Do not touch the connector pins on a removable drive or on the...
HP Notebook Reference Guide - Windows 7
Page 65
...or initiate Sleep or Hibernation. b. You will need this path when you are ready to install the update. Double-click your hard drive. Using the hard drive path you want to download. 3. Using Setup Utility (BIOS) 55 Do not download or install a BIOS update while the computer...contains the update. 4. Open Windows Explorer by following the on the screen reports a successful installation, you connect your computer. Do not insert, remove, connect, or disconnect any instructions that has an .exe extension (for example, filename.exe). At the download area, follow these steps: ...
...or initiate Sleep or Hibernation. b. You will need this path when you are ready to install the update. Double-click your hard drive. Using the hard drive path you want to download. 3. Using Setup Utility (BIOS) 55 Do not download or install a BIOS update while the computer...contains the update. 4. Open Windows Explorer by following the on the screen reports a successful installation, you connect your computer. Do not insert, remove, connect, or disconnect any instructions that has an .exe extension (for example, filename.exe). At the download area, follow these steps: ...
HP Notebook Reference Guide - Windows 7
Page 72
... hard drive external 34 HP 3D DriveGuard 37 HDMI configuring audio 17 HDMI port, connecting 16 Hibernation exiting 19 initiated during critical battery level 23 initiating 19 high-definition devices, connecting 16, 17 HP 3D DriveGuard 37 HP Connection Manager 3 HP CoolSense 26 HP Mobile Broadband Module 6 HP USB... selecting a location setting 10 N network cable, connecting 11 network icon 2 O operating system controls 4 optical disc inserting 39 removing 40 optical drive 34 optional external devices, using 34 P passwords set in Setup Utility (BIOS) 45 set in Windows 45 ports DisplayPort 15 ...
... hard drive external 34 HP 3D DriveGuard 37 HDMI configuring audio 17 HDMI port, connecting 16 Hibernation exiting 19 initiated during critical battery level 23 initiating 19 high-definition devices, connecting 16, 17 HP 3D DriveGuard 37 HP Connection Manager 3 HP CoolSense 26 HP Mobile Broadband Module 6 HP USB... selecting a location setting 10 N network cable, connecting 11 network icon 2 O operating system controls 4 optical disc inserting 39 removing 40 optical drive 34 optional external devices, using 34 P passwords set in Setup Utility (BIOS) 45 set in Windows 45 ports DisplayPort 15 ...
HP 2000 Notebook PC - Maintenance and Service Guide
Page 42
... guidelines described in a static-proof bag. Before handling a drive, be sure that you are removing or installing internal components, observe these precautions: Before removing or inserting a hard drive, shut down through the operating system. After removing a hard drive, an optical drive, or a diskette drive, place it in an electrostatic-safe container. If a drive must be handled with at all and can...
... guidelines described in a static-proof bag. Before handling a drive, be sure that you are removing or installing internal components, observe these precautions: Before removing or inserting a hard drive, shut down through the operating system. After removing a hard drive, an optical drive, or a diskette drive, place it in an electrostatic-safe container. If a drive must be handled with at all and can...
HP 2000 Notebook PC - Maintenance and Service Guide
Page 54
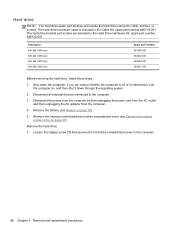
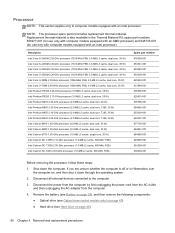
... memory module/wireless module compartment cover (see Battery on page 40). Disconnect all external devices connected to the computer. 46 Chapter 4 Removal and replacement procedures The hard drive bracket and screws are unsure whether the computer is included in the Cable Kit, spare part number 646119-001. If you are included in Hibernation...
... memory module/wireless module compartment cover (see Battery on page 40). Disconnect all external devices connected to the computer. 46 Chapter 4 Removal and replacement procedures The hard drive bracket and screws are unsure whether the computer is included in the Cable Kit, spare part number 646119-001. If you are included in Hibernation...

HP 2000 Notebook PC - Maintenance and Service Guide
Page 55
The hard drive compartment cover is available in the Plastics Kit, spare part number 646131-001. 4. Remove the hard drive (4). Disconnect the hard drive connector cable (1) from the clips (2) built into the base enclosure. 6. Remove the four Phillips PM 2.5×6.0 screws (3) that secure the hard drive to the computer. 7. Release the hard drive connector cable from the system board. 5. Component replacement procedures 47 Lift the rear edge of the hard drive compartment cover (2) up and forward until it rests at an angle. 3. Remove the hard drive compartment cover. 2.
The hard drive compartment cover is available in the Plastics Kit, spare part number 646131-001. 4. Remove the hard drive (4). Disconnect the hard drive connector cable (1) from the clips (2) built into the base enclosure. 6. Remove the four Phillips PM 2.5×6.0 screws (3) that secure the hard drive to the computer. 7. Release the hard drive connector cable from the system board. 5. Component replacement procedures 47 Lift the rear edge of the hard drive compartment cover (2) up and forward until it rests at an angle. 3. Remove the hard drive compartment cover. 2.
HP 2000 Notebook PC - Maintenance and Service Guide
Page 56
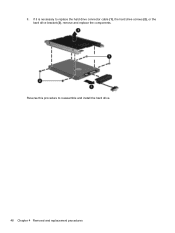
8. If it is necessary to reassemble and install the hard drive. 48 Chapter 4 Removal and replacement procedures Reverse this procedure to replace the hard drive connector cable (1), the hard drive screws (2), or the hard drive bracket (3), remove and replace the components.
8. If it is necessary to reassemble and install the hard drive. 48 Chapter 4 Removal and replacement procedures Reverse this procedure to replace the hard drive connector cable (1), the hard drive screws (2), or the hard drive bracket (3), remove and replace the components.
HP 2000 Notebook PC - Maintenance and Service Guide
Page 57
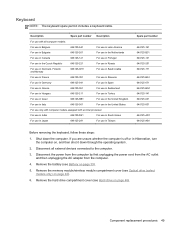
...computer. Description Spare part number Description For use in Hibernation, turn the computer on page 40). 6. Remove the memory module/wireless module compartment cover (see Battery on page 46). Remove the hard drive compartment cover (see Hard drive on page 39). 5. Disconnect all computer models: For use in Belgium 646125-A41 For use in...-131 646125-251 646125-171 646125-BA1 646125-071 646125-BG1 646125-141 646125-031 646125-001 646125-AD1 646125-AB1 Before removing the keyboard, follow these steps: 1. Keyboard NOTE: The keyboard spare part kit includes a keyboard cable.
...computer. Description Spare part number Description For use in Hibernation, turn the computer on page 40). 6. Remove the memory module/wireless module compartment cover (see Battery on page 46). Remove the hard drive compartment cover (see Hard drive on page 39). 5. Disconnect all computer models: For use in Belgium 646125-A41 For use in...-131 646125-251 646125-171 646125-BA1 646125-071 646125-BG1 646125-141 646125-031 646125-001 646125-AD1 646125-AB1 Before removing the keyboard, follow these steps: 1. Keyboard NOTE: The keyboard spare part kit includes a keyboard cable.

HP 2000 Notebook PC - Maintenance and Service Guide
Page 61
... with the TouchPad button board spare part kit, spare part number 646130-001) ● TouchPad cable (3) (included in the battery bay and the hard drive bay that secure the top cover to which the following cables are attached, and then disconnect the cables from the system board: ● Power button... spare part number 646129-001) ● TouchPad button board cable (2) (included with the front toward you. 7. Release the ZIF connectors to the computer. 6. Remove the seven Phillips PM2.5×6.0 screws in the Cable Kit, spare part number 646119-001) Component replacement procedures 53
... with the TouchPad button board spare part kit, spare part number 646130-001) ● TouchPad cable (3) (included in the battery bay and the hard drive bay that secure the top cover to which the following cables are attached, and then disconnect the cables from the system board: ● Power button... spare part number 646129-001) ● TouchPad button board cable (2) (included with the front toward you. 7. Release the ZIF connectors to the computer. 6. Remove the seven Phillips PM2.5×6.0 screws in the Cable Kit, spare part number 646119-001) Component replacement procedures 53
HP 2000 Notebook PC - Maintenance and Service Guide
Page 78
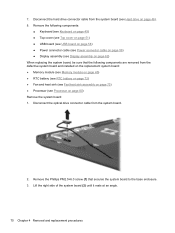
... Remove the following components are removed from the defective system board and installed on the replacement system board: ● Memory module (see Memory module on page 45) ● RTC battery (see RTC battery on page 72) ● Fan and heat sink (see Fan/heat sink assembly on page 73) ● Processor (see Hard drive... on page 80) Remove the system board: 1. Disconnect the hard drive connector cable from the system board. 2.
... Remove the following components are removed from the defective system board and installed on the replacement system board: ● Memory module (see Memory module on page 45) ● RTC battery (see RTC battery on page 72) ● Fan and heat sink (see Fan/heat sink assembly on page 73) ● Processor (see Hard drive... on page 80) Remove the system board: 1. Disconnect the hard drive connector cable from the system board. 2.
HP 2000 Notebook PC - Maintenance and Service Guide
Page 88
... system. 2. If you are unsure whether the computer is also available in Hibernation, turn the computer on page 46) 80 Chapter 4 Removal and replacement procedures Description Intel Core i5-2450M 2.50-GHz processor (1333-MHz FSB, 3.0-MB L3 cache, dual core, 35 W) Intel... computer. 4. Processor NOTE: This section applies only to the computer. 3. Remove the battery (see Battery on page 39), and then remove the following components: ● Optical drive (see Optical drive (select models only) on page 40) ● Hard drive (see Hard drive on , and then shut it down the computer.
... system. 2. If you are unsure whether the computer is also available in Hibernation, turn the computer on page 46) 80 Chapter 4 Removal and replacement procedures Description Intel Core i5-2450M 2.50-GHz processor (1333-MHz FSB, 3.0-MB L3 cache, dual core, 35 W) Intel... computer. 4. Processor NOTE: This section applies only to the computer. 3. Remove the battery (see Battery on page 39), and then remove the following components: ● Optical drive (see Optical drive (select models only) on page 40) ● Hard drive (see Hard drive on , and then shut it down the computer.
HP 2000 Notebook PC - Maintenance and Service Guide
Page 93
...location on your computer. If no instructions are already in an optional docking device, or connected to an optional power source. Double-click your hard drive. BIOS version information (also known as ROM date and System BIOS) can be displayed by using the AC adapter. During the download and ...the risk of the path to select Main. 3. Do not download or install a BIOS update while the computer is complete. Do not insert, remove, connect, or disconnect any instructions that is later than those currently installed on the computer, you need to know the version of the date, ...
...location on your computer. If no instructions are already in an optional docking device, or connected to an optional power source. Double-click your hard drive. BIOS version information (also known as ROM date and System BIOS) can be displayed by using the AC adapter. During the download and ...the risk of the path to select Main. 3. Do not download or install a BIOS update while the computer is complete. Do not insert, remove, connect, or disconnect any instructions that is later than those currently installed on the computer, you need to know the version of the date, ...

HP 2000 Notebook PC - Maintenance and Service Guide
Page 114
... equipment 37 grounding 34 packaging 36 transporting 36 workstation 36 H hard drive precautions 34 product description 3 removal 46 spare part numbers 21, 24, 27, 28, 46 specifications 89 hard drive bay 14 hard drive bracket illustrated 24 removal 48 hard drive compartment cover illustrated 26 removal 46 hard drive connector cable illustrated 23 removal 48 Hard Drive Hardware Kit, spare part number 21, 24, 29, 46...
... equipment 37 grounding 34 packaging 36 transporting 36 workstation 36 H hard drive precautions 34 product description 3 removal 46 spare part numbers 21, 24, 27, 28, 46 specifications 89 hard drive bay 14 hard drive bracket illustrated 24 removal 48 hard drive compartment cover illustrated 26 removal 46 hard drive connector cable illustrated 23 removal 48 Hard Drive Hardware Kit, spare part number 21, 24, 29, 46...
HP 2000 Notebook PC - Maintenance and Service Guide
Page 115
... 4 external media cards 5 graphics 2 hard drives 3 keyboard 5 memory module 3 microphone 4 operating system 6 optical drive 4 pointing device 5 ports 5 power requirements 5 processors 1 product name 1 security 6 serviceability 6 video 4 wireless 4 product name 1, 38 product number 38 R removal/replacement preliminaries 33 procedures 38 right-side components...(BIOS) 82 Speaker Kit, spare part number 19, 30, 60 speakers removal 60 spare part number 19, 30, 60 specifications computer 87 display 88 hard drive 89 system board removal 69 spare part numbers 19, 30, 31, 69 System Diagnostics 82 T...
... 4 external media cards 5 graphics 2 hard drives 3 keyboard 5 memory module 3 microphone 4 operating system 6 optical drive 4 pointing device 5 ports 5 power requirements 5 processors 1 product name 1 security 6 serviceability 6 video 4 wireless 4 product name 1, 38 product number 38 R removal/replacement preliminaries 33 procedures 38 right-side components...(BIOS) 82 Speaker Kit, spare part number 19, 30, 60 speakers removal 60 spare part number 19, 30, 60 specifications computer 87 display 88 hard drive 89 system board removal 69 spare part numbers 19, 30, 31, 69 System Diagnostics 82 T...
Getting Started HP Notebook - Windows 7
Page 6
...Scrolling 23 Pinching/Zooming 23 Rotating (select models only 24 Flicking (select models only 24 6 Maintenance ...25 Inserting or removing the battery ...25 Replacing or upgrading the hard drive 27 Removing the hard drive ...27 Installing a hard drive ...28 Adding or replacing memory modules 30 7 Backup and recovery ...35 Restore ...36 Creating restore media ...36 Performing... date and time 41 8 Customer support ...42 Contacting customer support ...42 Labels ...43 9 Specifications ...44 Input power ...44 DC plug of external HP power supply 44 Operating environment ...45 Index ...46 vi
...Scrolling 23 Pinching/Zooming 23 Rotating (select models only 24 Flicking (select models only 24 6 Maintenance ...25 Inserting or removing the battery ...25 Replacing or upgrading the hard drive 27 Removing the hard drive ...27 Installing a hard drive ...28 Adding or replacing memory modules 30 7 Backup and recovery ...35 Restore ...36 Creating restore media ...36 Performing... date and time 41 8 Customer support ...42 Contacting customer support ...42 Labels ...43 9 Specifications ...44 Input power ...44 DC plug of external HP power supply 44 Operating environment ...45 Index ...46 vi
Getting Started HP Notebook - Windows 7
Page 31
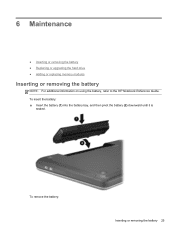
To remove the battery: Inserting or removing the battery 25 To insert the battery: ▲ Insert the battery (1) into the battery bay, and then pivot the battery (2) downward until it is seated. 6 Maintenance ● Inserting or removing the battery ● Replacing or upgrading the hard drive ● Adding or replacing memory modules Inserting or removing the battery NOTE: For additional information on using the battery, refer to the HP Notebook Reference Guide.
To remove the battery: Inserting or removing the battery 25 To insert the battery: ▲ Insert the battery (1) into the battery bay, and then pivot the battery (2) downward until it is seated. 6 Maintenance ● Inserting or removing the battery ● Replacing or upgrading the hard drive ● Adding or replacing memory modules Inserting or removing the battery NOTE: For additional information on using the battery, refer to the HP Notebook Reference Guide.

Getting Started HP Notebook - Windows 7
Page 33
... the computer through the operating system. Loosen the memory module compartment cover screw (1). 5. Replacing or upgrading the hard drive 27 Unplug the power cord from the hard drive bay. Loosen the hard drive cover screw (1). Do not remove the hard drive while the computer is off or in Hibernation, turn the computer on , in the Sleep state, or in...
... the computer through the operating system. Loosen the memory module compartment cover screw (1). 5. Replacing or upgrading the hard drive 27 Unplug the power cord from the hard drive bay. Loosen the hard drive cover screw (1). Do not remove the hard drive while the computer is off or in Hibernation, turn the computer on , in the Sleep state, or in...


