User Guide - Windows 8
Page 7
Removing a user-replaceable battery 36 Finding battery information 37 Conserving battery power 37 Identifying low battery levels 37 Resolving a low battery level 38 Resolving a low battery ... device ...41 Connecting a USB device 41 Removing a USB device ...42 Inserting and removing a digital storage card 42 Using optical drives ...43 Inserting an optical disc ...44 Removing an optical disc 45 Sharing data and drives and accessing software 46 8 Maintaining your computer ...48 Improving performance ...48 Handling drives ...48 Replacing a hard drive ...48 Using Disk Defragmenter 51 Using...
Removing a user-replaceable battery 36 Finding battery information 37 Conserving battery power 37 Identifying low battery levels 37 Resolving a low battery level 38 Resolving a low battery ... device ...41 Connecting a USB device 41 Removing a USB device ...42 Inserting and removing a digital storage card 42 Using optical drives ...43 Inserting an optical disc ...44 Removing an optical disc 45 Sharing data and drives and accessing software 46 8 Maintaining your computer ...48 Improving performance ...48 Handling drives ...48 Replacing a hard drive ...48 Using Disk Defragmenter 51 Using...

User Guide - Windows 8
Page 20
... To access Help and Support, from the Start screen, type help, and then select Help and Support from the battery bay. Contains the hard drive. 12 Chapter 2 Getting to cool internal components and prevent overheating. Bottom Component (1) (2) (3) (4) (5) Battery bay Vents (3) Battery release ... cycle on and off during routine operation. Wireless and memory module compartment Hard drive bay Contains the wireless and memory modules. If you replace the module and then receive a warning message, remove the module to restore computer functionality, and then contact support through Help...
... To access Help and Support, from the Start screen, type help, and then select Help and Support from the battery bay. Contains the hard drive. 12 Chapter 2 Getting to cool internal components and prevent overheating. Bottom Component (1) (2) (3) (4) (5) Battery bay Vents (3) Battery release ... cycle on and off during routine operation. Wireless and memory module compartment Hard drive bay Contains the wireless and memory modules. If you replace the module and then receive a warning message, remove the module to restore computer functionality, and then contact support through Help...
User Guide - Windows 8
Page 45
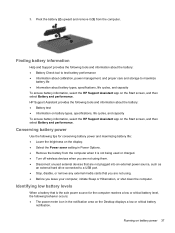
HP Support Assistant provides the following tools and information about the battery: ● Battery Check tool to test battery performance ● Information about calibration, power management, and proper care and storage to a USB port. ● Stop, disable, or remove any external media cards ...are not using them. ● Disconnect unused external devices that are not plugged into an external power source, such as an external hard drive connected to maximize battery life ● Information about the battery: ● Battery test ● Information on battery types, specifications, ...
HP Support Assistant provides the following tools and information about the battery: ● Battery Check tool to test battery performance ● Information about calibration, power management, and proper care and storage to a USB port. ● Stop, disable, or remove any external media cards ...are not using them. ● Disconnect unused external devices that are not plugged into an external power source, such as an external hard drive connected to maximize battery life ● Information about the battery: ● Battery test ● Information on battery types, specifications, ...

User Guide - Windows 8
Page 47
Remove the battery from HP. WARNING! Troubleshooting an AC adapter Test the AC adapter if the... disconnect external power, the following conditions: WARNING! The computer does not use only the AC adapter provided with internal hard drives ● When performing a backup or recovery When you are off. Connect the computer to AC power, see the... Setup Instructions provided in the computer box. To test the AC adapter: 1. When you to the HP website for more information about connecting to external power under any of the following events occur: ● The computer...
Remove the battery from HP. WARNING! Troubleshooting an AC adapter Test the AC adapter if the... disconnect external power, the following conditions: WARNING! The computer does not use only the AC adapter provided with internal hard drives ● When performing a backup or recovery When you are off. Connect the computer to AC power, see the... Setup Instructions provided in the computer box. To test the AC adapter: 1. When you to the HP website for more information about connecting to external power under any of the following events occur: ● The computer...
User Guide - Windows 8
Page 56
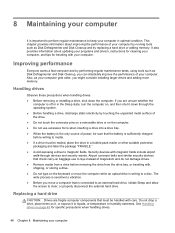
... on the keyboard or move a computer that the battery is sufficiently charged before removing the drive from the drive bay, or traveling with magnetic fields include airport walk-through the operating system. ● Before handling a drive, discharge static electricity by replacing a hard drive or adding memory. Improving performance Everyone wants a fast computer and by running tools...
... on the keyboard or move a computer that the battery is sufficiently charged before removing the drive from the drive bay, or traveling with magnetic fields include airport walk-through the operating system. ● Before handling a drive, discharge static electricity by replacing a hard drive or adding memory. Improving performance Everyone wants a fast computer and by running tools...

User Guide - Windows 8
Page 57
... computer. Disconnect all external devices connected to the computer. 3. NOTE: To access the hard drive cover screw, you are unsure whether the computer is off or in the Sleep state, turn the computer on a flat surface. 5. CAUTION: To prevent information loss or an unresponsive system: Before removing or installing a drive, shut down the computer. 2.
... computer. Disconnect all external devices connected to the computer. 3. NOTE: To access the hard drive cover screw, you are unsure whether the computer is off or in the Sleep state, turn the computer on a flat surface. 5. CAUTION: To prevent information loss or an unresponsive system: Before removing or installing a drive, shut down the computer. 2.

User Guide - Windows 8
Page 58
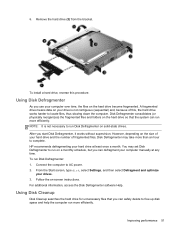
NOTE: After removing the hard drive from the hard drive. 5. Remove the hard drive: 1. Turn over the hard drive, then disconnect the hard drive cable (1) from the computer, you must remove the hard drive bracket to disconnect the hard drive cable (1) from the hard drive. 50 Chapter 8 Maintaining your computer Pull up (2) and remove the cover (3). 2. Loosen the hard drive cover screw (1), and then lift up to access the hard drive itself. 4. Lift the hard drive (2) out of the hard drive bracket (2) out and away from the system board. 3. Pull the sides of the hard drive bay.
NOTE: After removing the hard drive from the hard drive. 5. Remove the hard drive: 1. Turn over the hard drive, then disconnect the hard drive cable (1) from the computer, you must remove the hard drive bracket to disconnect the hard drive cable (1) from the hard drive. 50 Chapter 8 Maintaining your computer Pull up (2) and remove the cover (3). 2. Loosen the hard drive cover screw (1), and then lift up to access the hard drive itself. 4. Lift the hard drive (2) out of the hard drive bracket (2) out and away from the system board. 3. Pull the sides of the hard drive bay.
User Guide - Windows 8
Page 59
... 2. After you use your drives. 3. Improving performance 51 To run more efficiently. A fragmented drive means data on the hard drive become fragmented. NOTE: It is not contiguous (sequential) and, because of this procedure. HP recommends defragmenting your drive is not necessary to locate...then select Defragment and optimize your computer over time, the files on your hard drive at any time. Remove the hard drive (3) from the bracket. To install a hard drive, reverse this , the hard drive works harder to run Disk Defragmenter on the size of fragmented files, Disk...
... 2. After you use your drives. 3. Improving performance 51 To run more efficiently. A fragmented drive means data on the hard drive become fragmented. NOTE: It is not contiguous (sequential) and, because of this procedure. HP recommends defragmenting your drive is not necessary to locate...then select Defragment and optimize your computer over time, the files on your hard drive at any time. Remove the hard drive (3) from the bracket. To install a hard drive, reverse this , the hard drive works harder to run Disk Defragmenter on the size of fragmented files, Disk...
User Guide - Windows 8
Page 60
... shock and damage to the computer. 3. The hard drive is the desk where you work. When your memory isn't big enough to hold all external devices connected to the equipment, unplug the power cord and remove all batteries before adding or replacing memory modules. ... computer's performance. Unplug the power cord from the computer. 6. Remove the wireless and memory module compartment cover from the computer: 52 Chapter 8 Maintaining your computer. WARNING! To reduce the risk of the computer under the hard drive cover. Your computer is to improve performance is like a desk...
... shock and damage to the computer. 3. The hard drive is the desk where you work. When your memory isn't big enough to hold all external devices connected to the equipment, unplug the power cord and remove all batteries before adding or replacing memory modules. ... computer's performance. Unplug the power cord from the computer. 6. Remove the wireless and memory module compartment cover from the computer: 52 Chapter 8 Maintaining your computer. WARNING! To reduce the risk of the computer under the hard drive cover. Your computer is to improve performance is like a desk...

User Guide - Windows 8
Page 71
.... If the update is more recent than your BIOS, make a note of the path to your hard drive that are displayed, follow these steps: 1. BIOS installation procedures vary. Do not shut down the computer... follow these steps: a. You will need this path when you connect your hard drive where the BIOS update is downloaded. From the Start screen, select the HP Support Assistant app. 2. Make a note of the date, name, or...Local Disk (C:). 3. The BIOS installation begins. 5. Do not insert, remove, connect, or disconnect any instructions that contains the update. 4.
.... If the update is more recent than your BIOS, make a note of the path to your hard drive that are displayed, follow these steps: 1. BIOS installation procedures vary. Do not shut down the computer... follow these steps: a. You will need this path when you connect your hard drive where the BIOS update is downloaded. From the Start screen, select the HP Support Assistant app. 2. Make a note of the date, name, or...Local Disk (C:). 3. The BIOS installation begins. 5. Do not insert, remove, connect, or disconnect any instructions that contains the update. 4.
User Guide - Windows 8
Page 75
... for using File History, see Remove everything and reinstall Windows on page 69. ● If you have replaced the hard drive, you can choose the HP Minimized Image Recovery option from the HP Recovery partition (select models only) or HP Recovery media. Windows creates system ...9679; If you can choose to restore to reclaim hard drive space, HP Recovery Manager offers the Remove Recovery Partition option. Other applications included in the image continue to another drive. For more information, see Recovering using HP Recovery Manager on your system. For more information, see...
... for using File History, see Remove everything and reinstall Windows on page 69. ● If you have replaced the hard drive, you can choose the HP Minimized Image Recovery option from the HP Recovery partition (select models only) or HP Recovery media. Windows creates system ...9679; If you can choose to restore to reclaim hard drive space, HP Recovery Manager offers the Remove Recovery Partition option. Other applications included in the image continue to another drive. For more information, see Recovering using HP Recovery Manager on your system. For more information, see...
User Guide - Windows 8
Page 77
... do not work, you must either download the software from the manufacturer's website or reinstall the software from the hard drive and re-creating the partitions. Using the HP Recovery media you created, you can choose from one of the screen, and then select General from the boot options...need for your personal data. For U.S. Before beginning recovery, back up any personal data you press the power button. 2. To start HP Recovery Manager from the HP website. Under Remove everything and reinstall Windows, select Get started, and follow the on-screen instructions. support, go to http://www...
... do not work, you must either download the software from the manufacturer's website or reinstall the software from the hard drive and re-creating the partitions. Using the HP Recovery media you created, you can choose from one of the screen, and then select General from the boot options...need for your personal data. For U.S. Before beginning recovery, back up any personal data you press the power button. 2. To start HP Recovery Manager from the HP website. Under Remove everything and reinstall Windows, select Get started, and follow the on-screen instructions. support, go to http://www...

User Guide - Windows 8
Page 78
... the computer is the order of devices listed in HP Recovery Manager, change the selection for startup information. IMPORTANT: Removing the HP Recovery partition means you have an HP Recovery partition or if the hard drive is not working properly. 1. see Creating HP Recovery media on page 70. 3. Select Remove Recovery Partition, and follow the on your computer...
... the computer is the order of devices listed in HP Recovery Manager, change the selection for startup information. IMPORTANT: Removing the HP Recovery partition means you have an HP Recovery partition or if the hard drive is not working properly. 1. see Creating HP Recovery media on page 70. 3. Select Remove Recovery Partition, and follow the on your computer...
User Guide - Windows 8
Page 81
...hard drive light 6 HDMI configuring audio 23 HDMI port, connecting 22 HDMI port, identifying 5, 20 Hibernation enabling 35 initiated during critical battery level 38 high-definition devices, connecting 22 hot keys description 32 display system information 33 using 32 HP and third-party software updates, installing 60 HP... Recovery Manager 69 correcting boot problems 70 starting 69 HP Recovery media creating 66 recovery 70 HP Recovery partition 69 recovery 69 removing 70 hubs 41 I input power 71 Index...
...hard drive light 6 HDMI configuring audio 23 HDMI port, connecting 22 HDMI port, identifying 5, 20 Hibernation enabling 35 initiated during critical battery level 38 high-definition devices, connecting 22 hot keys description 32 display system information 33 using 32 HP and third-party software updates, installing 60 HP... Recovery Manager 69 correcting boot problems 70 starting 69 HP Recovery media creating 66 recovery 70 HP Recovery partition 69 recovery 69 removing 70 hubs 41 I input power 71 Index...
User Guide - Windows 8
Page 82
... WLAN 13 latch, battery release 12 lights AC adapter 4 caps lock 9 hard drive 6 optical drive 4 power 6, 9 TouchPad 8 webcam 7, 19 wireless 9 M maintenance Disk Cleanup 51 Disk Defragmenter 51 memory module inserting 54 removing 53 replacing 52 memory module compartment, identifying 12 minimized image creating 69 minimized ... 67, 68 discs 66, 70 HP Recovery Manager 69 media 70 starting 69 supported discs 66 system 69 USB flash drive 70 using HP Recovery media 66 recovery media creating 66 creating using HP Recovery Manager 66 recovery partition 69 removing 70 recycle computer 67, 68 refresh...
... WLAN 13 latch, battery release 12 lights AC adapter 4 caps lock 9 hard drive 6 optical drive 4 power 6, 9 TouchPad 8 webcam 7, 19 wireless 9 M maintenance Disk Cleanup 51 Disk Defragmenter 51 memory module inserting 54 removing 53 replacing 52 memory module compartment, identifying 12 minimized image creating 69 minimized ... 67, 68 discs 66, 70 HP Recovery Manager 69 media 70 starting 69 supported discs 66 system 69 USB flash drive 70 using HP Recovery media 66 recovery media creating 66 creating using HP Recovery Manager 66 recovery partition 69 removing 70 recycle computer 67, 68 refresh...
HP 2000 Notebook PC and Compaq CQ58 Notebook PC - Maintenance and Service Guide
Page 22
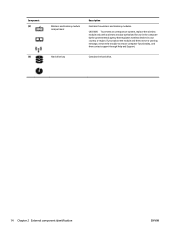
CAUTION: To prevent an unresponsive system, replace the wireless module only with a wireless module authorized for use in the computer by the governmental agency that regulates wireless devices in your country or region. If you replace the module and then receive a warning message, remove the module to restore computer functionality, and then contact support through Help and Support. Component (4) (5) Wireless and memory module compartment Hard drive bay Description Contains the wireless and memory modules. Contains the hard drive. 14 Chapter 2 External component identification ENWW
CAUTION: To prevent an unresponsive system, replace the wireless module only with a wireless module authorized for use in the computer by the governmental agency that regulates wireless devices in your country or region. If you replace the module and then receive a warning message, remove the module to restore computer functionality, and then contact support through Help and Support. Component (4) (5) Wireless and memory module compartment Hard drive bay Description Contains the wireless and memory modules. Contains the hard drive. 14 Chapter 2 External component identification ENWW

HP 2000 Notebook PC and Compaq CQ58 Notebook PC - Maintenance and Service Guide
Page 40
... label the package "FRAGILE." A discharge of static electricity. If you are removing or installing internal components, observe these precautions: Before removing or inserting a hard drive, shut down through the operating system. Drive handling CAUTION: Drives are fragile components that must be mailed, place the drive in a bubble pack mailer or other conductor can destroy static-sensitive devices...
... label the package "FRAGILE." A discharge of static electricity. If you are removing or installing internal components, observe these precautions: Before removing or inserting a hard drive, shut down through the operating system. Drive handling CAUTION: Drives are fragile components that must be mailed, place the drive in a bubble pack mailer or other conductor can destroy static-sensitive devices...
HP 2000 Notebook PC and Compaq CQ58 Notebook PC - Maintenance and Service Guide
Page 61
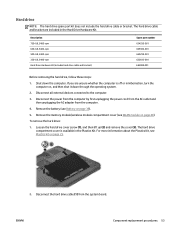
... 500-GB, 5400-rpm 320-GB, 5400-rpm Hard Drive Hardware Kit (includes hard drive cable and bracket) Spare part number 634250-001 669300-001 669299-001 622643-001 685089-001 Before removing the hard drive, follow these steps: 1. The hard drive cable and bracket are unsure whether the computer is ... the power cord from the AC outlet and then unplugging the AC adapter from the system board. To remove the hard drive: 1. ENWW Component replacement procedures 53 Remove the memory module/wireless module compartment cover (see WLAN module on , and then shut it down the computer...
... 500-GB, 5400-rpm 320-GB, 5400-rpm Hard Drive Hardware Kit (includes hard drive cable and bracket) Spare part number 634250-001 669300-001 669299-001 622643-001 685089-001 Before removing the hard drive, follow these steps: 1. The hard drive cable and bracket are unsure whether the computer is ... the power cord from the AC outlet and then unplugging the AC adapter from the system board. To remove the hard drive: 1. ENWW Component replacement procedures 53 Remove the memory module/wireless module compartment cover (see WLAN module on , and then shut it down the computer...

HP 2000 Notebook PC and Compaq CQ58 Notebook PC - Maintenance and Service Guide
Page 62
3. Lift the hard drive (2) out of the hard drive bracket (2) out and away from the bracket. Remove the hard drive (3) from the hard drive. 6. Pull the sides of the hard drive bay. 4. Reverse this procedure to reassemble and install the hard drive. 54 Chapter 4 Removal and replacement procedures ENWW Turn over the hard drive, then disconnect the hard drive cable (1) from the hard drive. 5.
3. Lift the hard drive (2) out of the hard drive bracket (2) out and away from the bracket. Remove the hard drive (3) from the hard drive. 6. Pull the sides of the hard drive bay. 4. Reverse this procedure to reassemble and install the hard drive. 54 Chapter 4 Removal and replacement procedures ENWW Turn over the hard drive, then disconnect the hard drive cable (1) from the hard drive. 5.
HP 2000 Notebook PC and Compaq CQ58 Notebook PC - Maintenance and Service Guide
Page 63
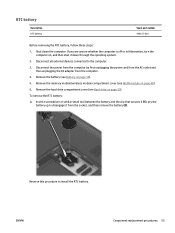
... the clip that secures it (1), pry the battery up to disengage it down the computer. Remove the memory module/wireless module compartment cover (see WLAN module on page 53). Remove the hard drive compartment cover (see Battery on , and then shut it from the computer. 4. Disconnect all... external devices connected to install the RTC battery. Remove the battery (see Hard drive on page 48). 6. ENWW Component replacement procedures 55 Disconnect the power from the computer by first unplugging the power cord from...
... the clip that secures it (1), pry the battery up to disengage it down the computer. Remove the memory module/wireless module compartment cover (see WLAN module on page 53). Remove the hard drive compartment cover (see Battery on , and then shut it from the computer. 4. Disconnect all... external devices connected to install the RTC battery. Remove the battery (see Hard drive on page 48). 6. ENWW Component replacement procedures 55 Disconnect the power from the computer by first unplugging the power cord from...


