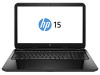
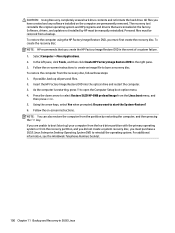
15-r029wm Hard Drive Removal - HP
15-r029wm Hard Drive Removal
Related Manual Pages


Similar Questions

Changing Hard Drive
can't locate and determine how to access the hard drive to install a new drive.
can't locate and determine how to access the hard drive to install a new drive.
(Posted by larryallen1837 8 years ago)


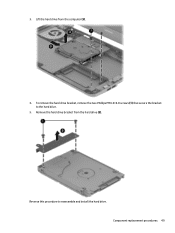
Remove Hard Drive
I'm replacing the keyboard in my dv7-3058dx and one of the screws for the keyboard I believe is unde...
I'm replacing the keyboard in my dv7-3058dx and one of the screws for the keyboard I believe is unde...
(Posted by twhitehouse 12 years ago)
Related Terms
The following terms were also used when searching for 15-r029wm Hard Drive Removal - HP:- hp 15 r029wm laptop review
- hp 15-r029wm 15.6 laptop
- hp 15-r029wm 15.6
- hp 15-r029wm
- hp 15 r029wm walmart
- hp 15 r029wm take apart
- hp 15 r029wm specs
- hp 15 r029wm safe mode
- hp 15 r029wm reviews
- hp 15 r029wm review
- hp 15 r029wm notebook review
- hp 15 r029wm notebook pc
- hp 15 r029wm notebook
- hp 15-r029wm battery
- hp 15 r029wm laptop
- hp 15 r029wm drivers
- hp 15 r029wm disassembly
- hp 15 r029wm charger
- hp 15 r029wm
- 15r029wm notebook
- 15r029wm hp
- 15-r029wm windows 7
- 15-r029wm walmart
- 15-r029wm specs
- 15-r029wm service manual
- hp 15-r029wm notebook
- hp 15r029wm
- hp 15-r029wm walmart
- hp 15-r029wm specs
- hp 15-r029wm screen replacement
- hp 15-r029wm reviews
- hp 15-r029wm review
- hp 15-r029wm ram upgrade
- hp 15-r029wm ram
- hp 15-r029wm price
- hp 15-r029wm power jack
- hp 15-r029wm notebook review
- hp 15-r029wm notebook pc
- 15-r029wm screen replacement
- hp 15-r029wm memory upgrade
- hp 15-r029wm manual
- hp 15-r029wm laptop reviews
- hp 15-r029wm laptop review
- hp 15-r029wm laptop
- hp 15-r029wm keyboard
- hp 15-r029wm hard drive removal
- hp 15-r029wm drivers
- hp 15-r029wm disassembly
- hp 15-r029wm charger
- hp 15-r029wm bluetooth
- 15 r029wm safe mode
- 15-r029wm drivers
- 15-r029wm disassembly
- 15-r029wm charger
- 15-r029wm boot menu
- 15-r029wm bluetooth
- 15-r029wm battery
- 15-r029wm 15.6 laptop
- 15-r029wm 15.6
- 15-r029wm
- 15 r029wm walmart
- 15 r029wm take apart
- 15 r029wm specs
- 15-r029wm hard drive removal
- 15 r029wm reviews
- 15 r029wm review
- 15 r029wm notebook review
- 15 r029wm notebook pc
- 15 r029wm notebook
- 15 r029wm laptop review
- 15 r029wm laptop
- 15 r029wm hp laptop
- 15 r029wm drivers
- 15 r029wm disassembly
- 15 r029wm charger
- 15-r029wm notebook price
- 15-r029wm screen
- 15-r029wm reviews
- 15-r029wm review
- 15-r029wm rev
- 15-r029wm replace memory
- 15-r029wm ram upgrade
- 15-r029wm ram
- 15-r029wm price
- 15-r029wm power jack
- 15-r029wm notebook reviews
- 15-r029wm notebook review
- 15 r029wm
- 15-r029wm notebook pc
- 15-r029wm notebook
- 15-r029wm memory upgrade
- 15-r029wm memory
- 15-r029wm manual
- 15-r029wm laptop reviews
- 15-r029wm laptop review
- 15-r029wm laptop
- 15-r029wm keyboard
- 15-r029wm hp laptop
- 15-r029wm hp