
End User License Agreement
Page 1
... governs your HP product ("HP Product"), that it is used only for CONDITIONS OF THIS EULA. You may use on more than one computer, you shall be governed You do not have Software Product into Your Computer's AGREE TO ALL TERMS AND temporary memory (RAM) for back-up ...copies of the Software Product, provided the copy contains all terms and conditions of this EULA may not separate component parts of the HP Product. Copying. Reservation of using the Software INSTALLING, COPYING,...
... governs your HP product ("HP Product"), that it is used only for CONDITIONS OF THIS EULA. You may use on more than one computer, you shall be governed You do not have Software Product into Your Computer's AGREE TO ALL TERMS AND temporary memory (RAM) for back-up ...copies of the Software Product, provided the copy contains all terms and conditions of this EULA may not separate component parts of the HP Product. Copying. Reservation of using the Software INSTALLING, COPYING,...
HP Mini User Guide - Windows XP
Page 8
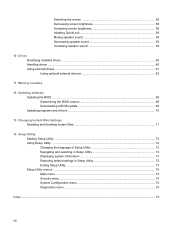
... sound 59 Increasing speaker sound 59 10 Drives Identifying installed drives ...60 Handling drives ...60 Using external drives ...61 Using optional external devices 62 11 Memory modules 12 Updating software Updating the BIOS ...68 Determining the BIOS version 68 Downloading a BIOS update 68 Updating programs and drivers ...70 13 Changing Instant...
... sound 59 Increasing speaker sound 59 10 Drives Identifying installed drives ...60 Handling drives ...60 Using external drives ...61 Using optional external devices 62 11 Memory modules 12 Updating software Updating the BIOS ...68 Determining the BIOS version 68 Downloading a BIOS update 68 Updating programs and drivers ...70 13 Changing Instant...
HP Mini User Guide - Windows XP
Page 15
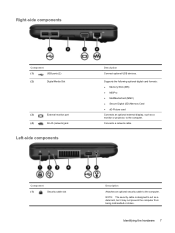
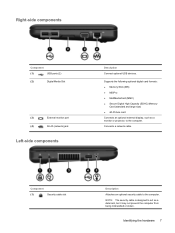
NOTE: The security cable is designed to the computer. Supports the following optional digital card formats: ● Memory Stick (MS) ● MS/Pro ● MultiMediaCard (MMC) ● Secure Digital (SD) Memory Card ● xD-Picture card Connects an optional external display, such as a monitor or projector, to act as a deterrent, but it may...
NOTE: The security cable is designed to the computer. Supports the following optional digital card formats: ● Memory Stick (MS) ● MS/Pro ● MultiMediaCard (MMC) ● Secure Digital (SD) Memory Card ● xD-Picture card Connects an optional external display, such as a monitor or projector, to act as a deterrent, but it may...
HP Mini User Guide - Windows XP
Page 18
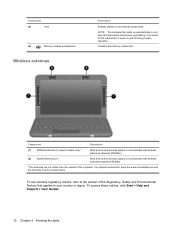
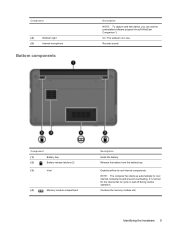
Contains the memory module slot. For optimal transmission, keep the areas immediately around the antennas free from the outside of the Regulatory, Safety and Environmental Notices that applies ... wireless regulatory notices, refer to cool internal components. NOTE: The computer fan starts up automatically to cycle on and off during routine operation. Component (3) Vent (4) Memory module compartment Wireless antennas Description Enables airflow to the section of the computer.
Contains the memory module slot. For optimal transmission, keep the areas immediately around the antennas free from the outside of the Regulatory, Safety and Environmental Notices that applies ... wireless regulatory notices, refer to cool internal components. NOTE: The computer fan starts up automatically to cycle on and off during routine operation. Component (3) Vent (4) Memory module compartment Wireless antennas Description Enables airflow to the section of the computer.
HP Mini User Guide - Windows XP
Page 21
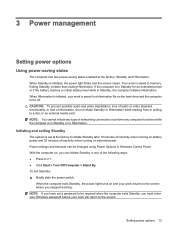
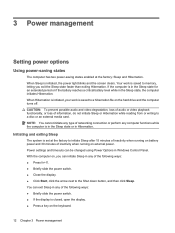
... video degradation, loss of audio or video playback functionality, or loss of information, do not initiate Standby or Hibernation while reading from or writing to memory. When the computer exits Standby, the power light turns on , you can be required when the computer exits Standby, you stopped working. If the computer...
... video degradation, loss of audio or video playback functionality, or loss of information, do not initiate Standby or Hibernation while reading from or writing to memory. When the computer exits Standby, the power light turns on , you can be required when the computer exits Standby, you stopped working. If the computer...
HP Mini User Guide - Windows XP
Page 60
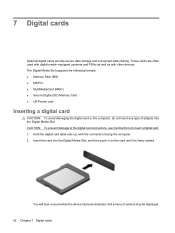
... digital cards provide secure data storage and convenient data sharing. The Digital Media Slot supports the following formats: ● Memory Stick (MS) ● MS/Pro ● MultiMediaCard (MMC) ● Secure Digital (SD) Memory Card ● xD-Picture card Inserting a digital card CAUTION: To avoid damaging the digital card or the computer, do...
... digital cards provide secure data storage and convenient data sharing. The Digital Media Slot supports the following formats: ● Memory Stick (MS) ● MS/Pro ● MultiMediaCard (MMC) ● Secure Digital (SD) Memory Card ● xD-Picture card Inserting a digital card CAUTION: To avoid damaging the digital card or the computer, do...
HP Mini User Guide - Windows XP
Page 65
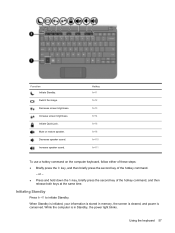
...; Press and hold down the fn key, briefly press the second key of the hotkey command. - When Standby is initiated, your information is stored in memory, the screen is cleared, and power is in Standby, the power light blinks. While the computer is conserved. Decrease screen brightness. Increase speaker sound. Initiate...
...; Press and hold down the fn key, briefly press the second key of the hotkey command. - When Standby is initiated, your information is stored in memory, the screen is cleared, and power is in Standby, the power light blinks. While the computer is conserved. Decrease screen brightness. Increase speaker sound. Initiate...
HP Mini User Guide - Windows XP
Page 66
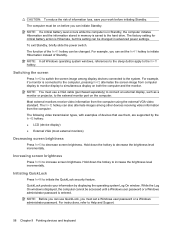
... use QuickLock, you can set a Windows user password or a Windows administrator password. While the Log On window is displayed, the computer cannot be changed in memory is entered. Switching the screen Press fn+f2 to the external monitor port on both the computer and the monitor. Most external monitors receive video...
... use QuickLock, you can set a Windows user password or a Windows administrator password. While the Log On window is displayed, the computer cannot be changed in memory is entered. Switching the screen Press fn+f2 to the external monitor port on both the computer and the monitor. Most external monitors receive video...
HP Mini User Guide - Windows XP
Page 71
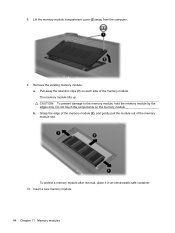
...from the computer. 7. Using a small Phillips screwdriver, loosen the 2 cover screws (1). 63 To add or replace a memory module: 1. The memory capacity of static electricity by sliding the power switch. Before beginning any procedure, ensure that you are discharged of the ...by touching a grounded metal object. WARNING! Save your work. 2. CAUTION: Electrostatic discharge (ESD) can be upgraded by replacing the existing memory module in Hibernation, turn the computer on a flat surface. 6. Then shut down the computer through the operating system. 3. Disconnect all external...
...from the computer. 7. Using a small Phillips screwdriver, loosen the 2 cover screws (1). 63 To add or replace a memory module: 1. The memory capacity of static electricity by sliding the power switch. Before beginning any procedure, ensure that you are discharged of the ...by touching a grounded metal object. WARNING! Save your work. 2. CAUTION: Electrostatic discharge (ESD) can be upgraded by replacing the existing memory module in Hibernation, turn the computer on a flat surface. 6. Then shut down the computer through the operating system. 3. Disconnect all external...
HP Mini User Guide - Windows XP
Page 72
... retention clips (1) on the memory module. Grasp the edge of the memory module (2), and gently pull the module out of the memory module. Insert a new memory module: 64 Chapter 11 Memory modules Do not touch the components on each side of the memory module slot. The memory module tilts up. b. To protect a memory module after removal, place it...
... retention clips (1) on the memory module. Grasp the edge of the memory module (2), and gently pull the module out of the memory module. Insert a new memory module: 64 Chapter 11 Memory modules Do not touch the components on each side of the memory module slot. The memory module tilts up. b. To protect a memory module after removal, place it...
HP Mini User Guide - Windows XP
Page 73
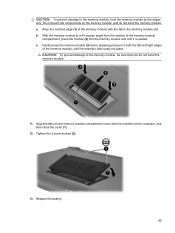
... Replace the battery. 65 CAUTION: To prevent damage to the memory module, be sure that you do not bend the memory module. Align the tabs on the memory module compartment cover with the tab in the memory module slot. a. With the memory module at a 45-degree angle from the surface of the... memory module compartment, press the module (2) into the memory module slot until the retention ...
... Replace the battery. 65 CAUTION: To prevent damage to the memory module, be sure that you do not bend the memory module. Align the tabs on the memory module compartment cover with the tab in the memory module slot. a. With the memory module at a 45-degree angle from the surface of the... memory module compartment, press the module (2) into the memory module slot until the retention ...

HP Mini User Guide - Windows XP
Page 74
14. Turn on the computer. 66 Chapter 11 Memory modules Turn the computer right-side up, and then reconnect external power and external devices. 15.
14. Turn on the computer. 66 Chapter 11 Memory modules Turn the computer right-side up, and then reconnect external power and external devices. 15.
HP Mini User Guide - Windows XP
Page 82
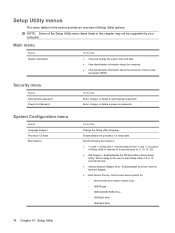
Enter, change the system time and date. ● View identification information about the computer. ● View specification information about the processor, memory size, and system BIOS. Set the following boot options: ● f10 and f12 Delay (sec.)―Set the delay for the f10 and f12 functions ...
Enter, change the system time and date. ● View identification information about the computer. ● View specification information about the processor, memory size, and system BIOS. Set the following boot options: ● f10 and f12 Delay (sec.)―Set the delay for the f10 and f12 functions ...
HP Mini User Guide - Windows XP
Page 83
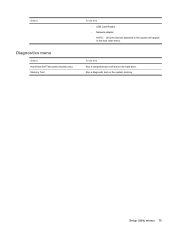
To do this Run a comprehensive self-test on the system memory. Run a diagnostic test on the hard drive. Setup Utility menus 75 Select Diagnostics menu Select Hard Disk Self Test (select models only) Memory Test To do this ◦ USB Card Reader ◦ Network adapter NOTE: Only the devices attached to the system will appear in the boot order menu.
To do this Run a comprehensive self-test on the system memory. Run a diagnostic test on the hard drive. Setup Utility menus 75 Select Diagnostics menu Select Hard Disk Self Test (select models only) Memory Test To do this ◦ USB Card Reader ◦ Network adapter NOTE: Only the devices attached to the system will appear in the boot order menu.

HP Mini User Guide - Windows XP
Page 84
... 43 calibrating battery 21 caps lock light, identifying 4 CD drive 61 changing Setup Utility language 72 charging batteries 18, 21 checking audio functions 41 compartments, memory module 10 components additional hardware 11 bottom 9 display 8 front 5 left-side 7 right-side 7 TouchPad 3 connecting to a WLAN 31 connection, external power 16 conservation, power 23...
... 43 calibrating battery 21 caps lock light, identifying 4 CD drive 61 changing Setup Utility language 72 charging batteries 18, 21 checking audio functions 41 compartments, memory module 10 components additional hardware 11 bottom 9 display 8 front 5 left-side 7 right-side 7 TouchPad 3 connecting to a WLAN 31 connection, external power 16 conservation, power 23...
HP Mini User Guide - Windows XP
Page 85
... 58 increasing speaker volume 59 initiating QuickLock 58 initiating Standby 57 muting speaker sound 59 switching screen image 58 using 57 HP Mobile Broadband Module 33 HP Mobile Broadband, disabled 33 hubs 54 I icons network status 27 wireless 27 Instant Web 1 Instant-On Software (IOS)... M Main menu 74 managing a power-on password 48 managing an administrator password 47 memory module inserting 64 removing 64 memory module compartment cover removing 64 replacing 65 memory module compartment, identifying 10 memory test 75 microphone (audio-in) jack 8, 38 monitor, connecting 43 mouse, external...
... 58 increasing speaker volume 59 initiating QuickLock 58 initiating Standby 57 muting speaker sound 59 switching screen image 58 using 57 HP Mobile Broadband Module 33 HP Mobile Broadband, disabled 33 hubs 54 I icons network status 27 wireless 27 Instant Web 1 Instant-On Software (IOS)... M Main menu 74 managing a power-on password 48 managing an administrator password 47 memory module inserting 64 removing 64 memory module compartment cover removing 64 replacing 65 memory module compartment, identifying 10 memory test 75 microphone (audio-in) jack 8, 38 monitor, connecting 43 mouse, external...
Mini User Guide - Windows 7
Page 8
... sound 59 Increasing speaker sound 59 10 Drives Identifying installed drives ...60 Handling drives ...60 Using external drives ...61 Using optional external devices 62 11 Memory modules 12 Updating software Updating the BIOS ...68 Determining the BIOS version 68 Downloading a BIOS update 68 Updating programs and drivers ...70 13 Changing Instant...
... sound 59 Increasing speaker sound 59 10 Drives Identifying installed drives ...60 Handling drives ...60 Using external drives ...61 Using optional external devices 62 11 Memory modules 12 Updating software Updating the BIOS ...68 Determining the BIOS version 68 Downloading a BIOS update 68 Updating programs and drivers ...70 13 Changing Instant...
Mini User Guide - Windows 7
Page 17
... computer. NOTE: The security cable is designed to the computer. Supports the following optional digital card formats: ● Memory Stick (MS) ● MS/Pro ● MultiMediaCard (MMC) ● Secure Digital High Capacity (SDHC) Memory Card (standard and large size) ● xD-Picture card Connects an optional external display, such as a deterrent, but...
... computer. NOTE: The security cable is designed to the computer. Supports the following optional digital card formats: ● Memory Stick (MS) ● MS/Pro ● MultiMediaCard (MMC) ● Secure Digital High Capacity (SDHC) Memory Card (standard and large size) ● xD-Picture card Connects an optional external display, such as a deterrent, but...
Mini User Guide - Windows 7
Page 19
Records sound. Component (1) Battery bay (2) Battery release latches (2) (3) Vent (4) Memory module compartment Description Holds the battery. On: The webcam is normal for the internal fan to cool internal components and prevent ...starts up automatically to cycle on and off during routine operation. It is in use the preinstalled software program Arcsoft WebCam Companion 3. Contains the memory module slot. Enables airflow to cool internal components. Release the battery from the battery bay. Component (4) Webcam light (5) Internal microphone Bottom components...
Records sound. Component (1) Battery bay (2) Battery release latches (2) (3) Vent (4) Memory module compartment Description Holds the battery. On: The webcam is normal for the internal fan to cool internal components and prevent ...starts up automatically to cycle on and off during routine operation. It is in use the preinstalled software program Arcsoft WebCam Companion 3. Contains the memory module slot. Enables airflow to cool internal components. Release the battery from the battery bay. Component (4) Webcam light (5) Internal microphone Bottom components...
Mini User Guide - Windows 7
Page 22
... is in the Sleep state or in any of the following ways: ● Briefly slide the power switch. ● If the display is saved to memory, letting you can exit Sleep in any of the following ways: ● Press fn+f1. ● Briefly slide the power switch. ● Close the display...
... is in the Sleep state or in any of the following ways: ● Briefly slide the power switch. ● If the display is saved to memory, letting you can exit Sleep in any of the following ways: ● Press fn+f1. ● Briefly slide the power switch. ● Close the display...
