Innovative technologies in HP ProLiant Gen8 servers
Page 7
... Onboard Administrator adjusts the individual caps to give each server blade the power it can 't be made in the design phase and the decision can quickly control sudden surges in power consumption by using Insight Control (version 2.0 or later) or Onboard Administrator (firmware version 2.30 or later). Networking HP FlexibleNetwork Adapters include features that if new connectivity technologies come...
... Onboard Administrator adjusts the individual caps to give each server blade the power it can 't be made in the design phase and the decision can quickly control sudden surges in power consumption by using Insight Control (version 2.0 or later) or Onboard Administrator (firmware version 2.30 or later). Networking HP FlexibleNetwork Adapters include features that if new connectivity technologies come...

Innovative technologies in HP ProLiant Gen8 servers
Page 12
... (drivers, agents, utilities) and firmware for all software used during the update and creates a log of the deployment and installation process. For a complete list of the SPP, see the HP Service Pack for ProLiant Release Notes or the contents report. HP SUM 5.0 has a simple, intuitive user interface that have a customized solution and faster downloads. Each SPP contains firmware and software components that guides...
... (drivers, agents, utilities) and firmware for all software used during the update and creates a log of the deployment and installation process. For a complete list of the SPP, see the HP Service Pack for ProLiant Release Notes or the contents report. HP SUM 5.0 has a simple, intuitive user interface that have a customized solution and faster downloads. Each SPP contains firmware and software components that guides...

HP 10000 Series Rack Airflow Optimization Kit Installation Instructions
Page 2
... of your rack. 3. If installing the foam rail gasket between racks that will be bayed using a 600-mm baying bracket, rotate the foam rail gasket 90 degrees before inserting it into the space between the racks. Depending on the size of the rack. 5. (Optional) See the HP Baying Rack Option Kit for specific information on baying racks, see the HP Baying Rack Option Kit. Insert the...
... of your rack. 3. If installing the foam rail gasket between racks that will be bayed using a 600-mm baying bracket, rotate the foam rail gasket 90 degrees before inserting it into the space between the racks. Depending on the size of the rack. 5. (Optional) See the HP Baying Rack Option Kit for specific information on baying racks, see the HP Baying Rack Option Kit. Insert the...
Plinth Rack Option Kit Installation Instructions
Page 1
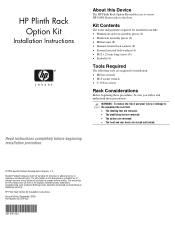
... mm long screws (4) • Eyebolts (4) Tools Required The following tools are required for installation: • M8 hex wrench • M13 socket wrench • T-30 Torx driver Rack Considerations Before beginning these precautions: WARNING: To reduce the risk of any kind and is subject to the floor. HP Plinth Rack Option Kit Installation Instructions Second Edition (September 2003) Part Number 251374-022 251374...
... mm long screws (4) • Eyebolts (4) Tools Required The following tools are required for installation: • M8 hex wrench • M13 socket wrench • T-30 Torx driver Rack Considerations Before beginning these precautions: WARNING: To reduce the risk of any kind and is subject to the floor. HP Plinth Rack Option Kit Installation Instructions Second Edition (September 2003) Part Number 251374-022 251374...

Plinth Rack Option Kit Installation Instructions
Page 2
... with a torque of personal injury or damage to these instructions. For information on the rack top. Position the finished plinth assembly under the rack (1) to do so could result in an unstable installation. 1. Installation is complete. Locate the holes on securing the plinth assembly to the floor. Installing the Plinth Rack Option Kit WARNING: To reduce the risk of 135 N⋅...
... with a torque of personal injury or damage to these instructions. For information on the rack top. Position the finished plinth assembly under the rack (1) to do so could result in an unstable installation. 1. Installation is complete. Locate the holes on securing the plinth assembly to the floor. Installing the Plinth Rack Option Kit WARNING: To reduce the risk of 135 N⋅...
10000 Series Rack Reference Guide
Page 6
... hazardous energy circuits or electric shock hazards. Important Safety Information Before installing this enclosure. The potential for specific details. Refer all maintenance, upgrades, and servicing to qualified personnel. Symbols on Equipment The following symbols may be...servicing to indicate the presence of potentially hazardous conditions: WARNING: This symbol, in conjunction with the server. This symbol indicates the presence of a potential hazard. HP 10000 Series Rack Reference Guide vii About This Guide This guide provides step-by-step instructions for installation...
... hazardous energy circuits or electric shock hazards. Important Safety Information Before installing this enclosure. The potential for specific details. Refer all maintenance, upgrades, and servicing to qualified personnel. Symbols on Equipment The following symbols may be...servicing to indicate the presence of potentially hazardous conditions: WARNING: This symbol, in conjunction with the server. This symbol indicates the presence of a potential hazard. HP 10000 Series Rack Reference Guide vii About This Guide This guide provides step-by-step instructions for installation...

10000 Series Rack Reference Guide
Page 14
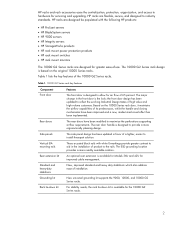
Overview Table 1-1: Rack Options continued Option Cable Management D-Ring Rack Option Kit 25-inch Rail Adapter Option Kit 1U Keyboard Drawer Option Kit 100 Kilo Sliding Shelf Rack Option Kit TFT5600 Rackmount Keyboard and Monitor (RKM) TFT5000R Flat Panel Monitor Rackmount Depth Adjustable Fixed Rail Kit Shock Pallet Spares Kit Rack Door Cushion Spares Kit Description Helps with cable management Allows the inner rack rails to accommodate third-party rack options Holds...
Overview Table 1-1: Rack Options continued Option Cable Management D-Ring Rack Option Kit 25-inch Rail Adapter Option Kit 1U Keyboard Drawer Option Kit 100 Kilo Sliding Shelf Rack Option Kit TFT5600 Rackmount Keyboard and Monitor (RKM) TFT5000R Flat Panel Monitor Rackmount Depth Adjustable Fixed Rail Kit Shock Pallet Spares Kit Rack Door Cushion Spares Kit Description Helps with cable management Allows the inner rack rails to accommodate third-party rack options Holds...

10000 Series Rack Reference Guide
Page 16
... and configure the system. Installation Service In the United States, HP can make arrangements to have your rack system installed by qualified guaranteed service providers. For more information on HP support, see "About This Guide." 1-6 HP 10000 Series Rack Reference Guide Install the remaining components in the appropriate sequence. 14. Reinstall any doors and panels. 15. Overview 9. Install the appropriate support rails and/or tray for...
... and configure the system. Installation Service In the United States, HP can make arrangements to have your rack system installed by qualified guaranteed service providers. For more information on HP support, see "About This Guide." 1-6 HP 10000 Series Rack Reference Guide Install the remaining components in the appropriate sequence. 14. Reinstall any doors and panels. 15. Overview 9. Install the appropriate support rails and/or tray for...

10000 Series Rack Reference Guide
Page 19
..., based on your rack installation, remember that the total U measurement of the components you want to install cannot exceed the stated U height of the rack. • Keyboard-The rack keyboard requires installation of a 1U Keyboard Drawer Rack Option Kit. • Monitor-The monitor requires installation of a Monitor/Utility Shelf Rack Option Kit unless you are configuring your specific rack configuration: • Power-If a UPS is measured in the rack: • Weight...
..., based on your rack installation, remember that the total U measurement of the components you want to install cannot exceed the stated U height of the rack. • Keyboard-The rack keyboard requires installation of a 1U Keyboard Drawer Rack Option Kit. • Monitor-The monitor requires installation of a Monitor/Utility Shelf Rack Option Kit unless you are configuring your specific rack configuration: • Power-If a UPS is measured in the rack: • Weight...

10000 Series Rack Reference Guide
Page 27
The handle pops out. 2. If your rack has side panels, also remove them before installing mounting brackets and other hardware. To remove the rack front door: 1. Lift the handle up and out to all sides of the rack while you are installing the various components, first remove the rack doors. Unlock the door (1) and press the handle release button (2). Preparing the Rack for Component Installation Removing the Rack Doors To provide access to open the door (3). 3 1 2 Figure 3-1: Opening the front door HP 10000 Series Rack Reference Guide 3-3
The handle pops out. 2. If your rack has side panels, also remove them before installing mounting brackets and other hardware. To remove the rack front door: 1. Lift the handle up and out to all sides of the rack while you are installing the various components, first remove the rack doors. Unlock the door (1) and press the handle release button (2). Preparing the Rack for Component Installation Removing the Rack Doors To provide access to open the door (3). 3 1 2 Figure 3-1: Opening the front door HP 10000 Series Rack Reference Guide 3-3

10000 Series Rack Reference Guide
Page 71
... rails installation 4-8 preparing 4-7 flat panel monitor rackmount option kit 1-4 flat panel monitor, component placement 2-3 front door, opening 3-3 G graphics, Rack Builder Online 2-2 graphite metallic, color 1-2 ground bonding rack option kit 1-3 Index-2 HP 10000 Series Rack Reference Guide switching 3-10 software for racks 2-1 considerations baying racks 2-4 delivery 1-5 height 2-3 keyboard 2-3 monitor 2-3 side panels 2-4 stabilizing feet 2-4 D definition, U measurement 1-1 delivery considerations 1-5, B-4 service, expedited B-3 service, inside B-2 services, overview B-2 depth adjustable...
... rails installation 4-8 preparing 4-7 flat panel monitor rackmount option kit 1-4 flat panel monitor, component placement 2-3 front door, opening 3-3 G graphics, Rack Builder Online 2-2 graphite metallic, color 1-2 ground bonding rack option kit 1-3 Index-2 HP 10000 Series Rack Reference Guide switching 3-10 software for racks 2-1 considerations baying racks 2-4 delivery 1-5 height 2-3 keyboard 2-3 monitor 2-3 side panels 2-4 stabilizing feet 2-4 D definition, U measurement 1-1 delivery considerations 1-5, B-4 service, expedited B-3 service, inside B-2 services, overview B-2 depth adjustable...

10000 Series Rack Reference Guide
Page 72
... delivery service B-2 installation cable management arm 4-20 cable management arm bracket 4-17 cage nuts 4-6 components 4-18 overview 4-4 fixed rails 4-8 guidelines 4-2 service 1-6 sliding rails 4-14 tools needed for 3-2 zero U devices 4-4 Index interchangeable front and split rear doors 1-2 J joining racks 2-4 K keyboard rack configuration consideration 2-3 required parts 2-3 kit components list 3-2 L labeling, Rack Builder Online 2-2 land transport of rack B-2 leveling feet 3-8 M Maximum Recommended Ambient Operating Temperature 2-7 measurements 2-3 model specifications...
... delivery service B-2 installation cable management arm 4-20 cable management arm bracket 4-17 cage nuts 4-6 components 4-18 overview 4-4 fixed rails 4-8 guidelines 4-2 service 1-6 sliding rails 4-14 tools needed for 3-2 zero U devices 4-4 Index interchangeable front and split rear doors 1-2 J joining racks 2-4 K keyboard rack configuration consideration 2-3 required parts 2-3 kit components list 3-2 L labeling, Rack Builder Online 2-2 land transport of rack B-2 leveling feet 3-8 M Maximum Recommended Ambient Operating Temperature 2-7 measurements 2-3 model specifications...

10842 Rack Reference Guide
Page 27
Lift the handle up and out to all sides of the rack while you are installing the various components, first remove the rack doors. Unlock the door (1) and press the handle release button down (2) until the handle pops out. 2. To remove the rack front door: 1. Preparing the Rack Removing the Rack Doors To provide access to open the door (3). 3 1 2 Figure 3-1: Opening the rack front door HP 10842 Rack Reference Guide 3-3 If your rack has side panels, also remove them before installing mounting brackets and other hardware.
Lift the handle up and out to all sides of the rack while you are installing the various components, first remove the rack doors. Unlock the door (1) and press the handle release button down (2) until the handle pops out. 2. To remove the rack front door: 1. Preparing the Rack Removing the Rack Doors To provide access to open the door (3). 3 1 2 Figure 3-1: Opening the rack front door HP 10842 Rack Reference Guide 3-3 If your rack has side panels, also remove them before installing mounting brackets and other hardware.

10842 Rack Reference Guide
Page 37
... outline the sequence for mounting it . 6. Use the template to measure and mark the rack for installing the components. • Install the heavier components first from the bottom of the rack up. • Be sure to balance the weight load between the wall and the rear of the UPS units into one rack. HP 10842 Rack Reference Guide 4-3 For specific installation instructions, refer to the documentation...
... outline the sequence for mounting it . 6. Use the template to measure and mark the rack for installing the components. • Install the heavier components first from the bottom of the rack up. • Be sure to balance the weight load between the wall and the rear of the UPS units into one rack. HP 10842 Rack Reference Guide 4-3 For specific installation instructions, refer to the documentation...
Best practices for HP 10000 Series and HP 10000 G2 Series Racks
Page 4
... updated to install three-part solution. Side panels The side panel design has been updated in the installation of a lighter, easier to reflect the evolving Industrial Design tastes of the 10000 G2 Series racks. An optional rear extension is available for improved cable management, New, improved standard and heavy duty stabilizers which also address ease of -use. Vertical ElA mounting rails Rear extension kit...
... updated to install three-part solution. Side panels The side panel design has been updated in the installation of a lighter, easier to reflect the evolving Industrial Design tastes of the 10000 G2 Series racks. An optional rear extension is available for improved cable management, New, improved standard and heavy duty stabilizers which also address ease of -use. Vertical ElA mounting rails Rear extension kit...
Best practices for HP 10000 Series and HP 10000 G2 Series Racks
Page 19
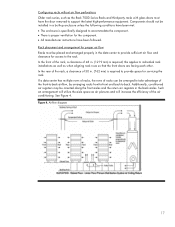
...installed in a built-up enclosure unless the following conditions have been met: • The enclosure is specifically designed to accommodate the component. • There is proper ventilation for the component. • All manufacturer instructions have the door removed to support the latest high-performance equipment. In the rear of the rack, a clearance of racks... air flow and clearance for access to the rack. Rack placement and arrangement for servicing the rack. Such an arrangement will utilize the aisle space as when aligning rack rows so that the front doors are facing each...
...installed in a built-up enclosure unless the following conditions have been met: • The enclosure is specifically designed to accommodate the component. • There is proper ventilation for the component. • All manufacturer instructions have the door removed to support the latest high-performance equipment. In the rear of the rack, a clearance of racks... air flow and clearance for access to the rack. Rack placement and arrangement for servicing the rack. Such an arrangement will utilize the aisle space as when aligning rack rows so that the front doors are facing each...

Best practices for HP 10000 Series and HP 10000 G2 Series Racks
Page 22
...reviewing the server loading to determine the number of a configured rack is also a quick reference power cord matrix available at http://h30099.www3.hp.com/configurator/calc/Site Preparation Utility.xls. Also available is wired to be properly grounded in physical injury or damage to provide a specific floor... loading. All buildings and raised computer room floors are considered suitable for the power supplies to an industrial style plug. Furthermore, make sure that all power distribution devices used in front of a configured rack and 30 inches to the rear of power...
...reviewing the server loading to determine the number of a configured rack is also a quick reference power cord matrix available at http://h30099.www3.hp.com/configurator/calc/Site Preparation Utility.xls. Also available is wired to be properly grounded in physical injury or damage to provide a specific floor... loading. All buildings and raised computer room floors are considered suitable for the power supplies to an industrial style plug. Furthermore, make sure that all power distribution devices used in front of a configured rack and 30 inches to the rear of power...
Best practices for HP 10000 Series and HP 10000 G2 Series Racks
Page 32
... the rack also ensures that the front panel mounting screws are specifically trained for inside deliveries and special handling situations involving electronic equipment; If you have several alternatives for rack CTO with the field installation option. • With included site prep service, will...options include: - Certain carriers may be accommodated by tipping. components. Once the rack is unable to its size. If you have been qualified for purchasing HP factory racked solutions that is positioned in each unit comes equipped with the appropriate isolators to...
... the rack also ensures that the front panel mounting screws are specifically trained for inside deliveries and special handling situations involving electronic equipment; If you have several alternatives for rack CTO with the field installation option. • With included site prep service, will...options include: - Certain carriers may be accommodated by tipping. components. Once the rack is unable to its size. If you have been qualified for purchasing HP factory racked solutions that is positioned in each unit comes equipped with the appropriate isolators to...
side panels rack option kit installation instructions
Page 1
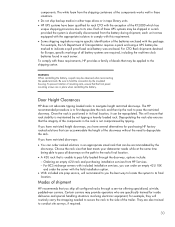
... is complete. hp side panels rack option kit installation instructions Second Edition (December 2002) Part Number 246441-022 246441- 022 Installation is a single-rack installation. • No components are extended. hp side panels rack option kit installation instructions About This Device The HP Side Panels Rack Option Kit allows the user to attach side panels to change without notice. The information in this option kit. The warranties for technical or editorial errors or omissions contained...
... is complete. hp side panels rack option kit installation instructions Second Edition (December 2002) Part Number 246441-022 246441- 022 Installation is a single-rack installation. • No components are extended. hp side panels rack option kit installation instructions About This Device The HP Side Panels Rack Option Kit allows the user to attach side panels to change without notice. The information in this option kit. The warranties for technical or editorial errors or omissions contained...

Baying Rack Option Kit Installation Instructions
Page 2
... baying brackets, using two T-30 Torx screws each end of the bayed racks and reattach the front and rear doors. Bay any additional racks. 6. Use either a 24-inch or 600-mm baying bracket, depending on solid flooring (no cracks or openings). 4. Lift each side panel up to remove it from damage. Unlock the two side panel locks securing each rack set. 2. Installing the Baying Rack Option Kit WARNING...
... baying brackets, using two T-30 Torx screws each end of the bayed racks and reattach the front and rear doors. Bay any additional racks. 6. Use either a 24-inch or 600-mm baying bracket, depending on solid flooring (no cracks or openings). 4. Lift each side panel up to remove it from damage. Unlock the two side panel locks securing each rack set. 2. Installing the Baying Rack Option Kit WARNING...


