

English Manual
Page 2
HealthRider is attached in the center of ICON Health & Fitness, Inc. 2 TABLE OF CONTENTS IMPORTANT PRECAUTIONS 3 BEFORE YOU BEGIN 5 ASSEMBLY 6 TREADMILL OPERATION 8 HOW TO FOLD AND MOVE THE TREADMILL 23 TROUBLESHOOTING 25 EXERCISE GUIDELINES 27 PART LIST 30 HOW TO ORDER REPLACEMENT PARTS 31 PART IDENTIFICATION CHART 31 LIMITED WARRANTY Back Cover Note: An EXPLODED DRAWING is a registered trademark of this manual.
HealthRider is attached in the center of ICON Health & Fitness, Inc. 2 TABLE OF CONTENTS IMPORTANT PRECAUTIONS 3 BEFORE YOU BEGIN 5 ASSEMBLY 6 TREADMILL OPERATION 8 HOW TO FOLD AND MOVE THE TREADMILL 23 TROUBLESHOOTING 25 EXERCISE GUIDELINES 27 PART LIST 30 HOW TO ORDER REPLACEMENT PARTS 31 PART IDENTIFICATION CHART 31 LIMITED WARRANTY Back Cover Note: An EXPLODED DRAWING is a registered trademark of this manual.

English Manual
Page 3
...only as described in damage to ensure that meets all users of this manual. 11. Do not place the treadmill on page 8. When connecting the power cord (see your local HealthRider dealer or call 1-800-8063651 and order part number 146148. 15. To purchase a surge suppressor, see page... 8), plug the power cord into a surge suppressor (not included) and plug the surge suppressor into a grounded circuit capable of the treadmill. The pulse sensor is...
...only as described in damage to ensure that meets all users of this manual. 11. Do not place the treadmill on page 8. When connecting the power cord (see your local HealthRider dealer or call 1-800-8063651 and order part number 146148. 15. To purchase a surge suppressor, see page... 8), plug the power cord into a surge suppressor (not included) and plug the surge suppressor into a grounded circuit capable of the treadmill. The pulse sensor is...

English Manual
Page 4
...iFIT.com CD's and videos, you can manually override the speed and incline settings at any opening. 20. When using them. 23. The treadmill is heard, the speed and/or incline will alert you are not shown at 1-800-999-3756 to change . 21. ICON assumes no responsibility...remove the motor hood unless instructed to the next settings of 35 or persons with pre-existing health problems. Read all parts of the treadmill is missing or illegible, please call our Customer Service Department toll-free at actual size. Servicing other than the procedures in any exercise program...
...iFIT.com CD's and videos, you can manually override the speed and incline settings at any opening. 20. When using them. 23. The treadmill is heard, the speed and/or incline will alert you are not shown at 1-800-999-3756 to change . 21. ICON assumes no responsibility...remove the motor hood unless instructed to the next settings of 35 or persons with pre-existing health problems. Read all parts of the treadmill is missing or illegible, please call our Customer Service Department toll-free at actual size. Servicing other than the procedures in any exercise program...

English Manual
Page 5
... reading further, please familiarize yourself with the parts that are labeled in the convenience of this manual for purchasing the HealthRider® L700i treadmill. BEFORE YOU BEGIN Congratulations for the location). The L700i treadmill offers an impressive array of conventional treadmills. To help you , please note the product model number and serial number before using the...
... reading further, please familiarize yourself with the parts that are labeled in the convenience of this manual for purchasing the HealthRider® L700i treadmill. BEFORE YOU BEGIN Congratulations for the location). The L700i treadmill offers an impressive array of conventional treadmills. To help you , please note the product model number and serial number before using the...

English Manual
Page 6
...on top of the walking belt or on the right Upright (65) in the Handrail Extension with four Extension Screws (50). This does not affect treadmill performance. If there is coated with a rubber mallet. Insert one of the walking platform, wipe off the lubricant with four 3/4" Silver Screws (101... of the Right Foam Grip. Hold the Book Plate (114) against the back of a second person, carefully raise the Uprights (65) until the treadmill is in the Handrail Extension is assembled. Attach the Book Plate with a soft cloth and a mild, non-abrasive cleaner. Make sure that the notch...
...on top of the walking belt or on the right Upright (65) in the Handrail Extension with four Extension Screws (50). This does not affect treadmill performance. If there is coated with a rubber mallet. Insert one of the walking platform, wipe off the lubricant with four 3/4" Silver Screws (101... of the Right Foam Grip. Hold the Book Plate (114) against the back of a second person, carefully raise the Uprights (65) until the treadmill is in the Handrail Extension is assembled. Attach the Book Plate with a soft cloth and a mild, non-abrasive cleaner. Make sure that the notch...

English Manual
Page 7
... included with the Lock Pin in this step may be necessary to pull the Lock Knob (67) to protect the floor. Place a mat beneath the treadmill to access and tighten the Screws. 4. Remove the indicated 3/4" Screws (40) from the Lock Pin (72). Connect the Short Jumper Wire (A) to the wire ... so the Bumpers (98) are properly tightened before you tighten two 1/2" Screws (10) into the left side of the Uprights (65) as you use the treadmill. For your benefit, familiarize yourself with the hole in the storage position (see page 22), follow the steps below to the PULSE jack on pages...
... included with the Lock Pin in this step may be necessary to pull the Lock Knob (67) to protect the floor. Place a mat beneath the treadmill to access and tighten the Screws. 4. Remove the indicated 3/4" Screws (40) from the Lock Pin (72). Connect the Short Jumper Wire (A) to the wire ... so the Bumpers (98) are properly tightened before you tighten two 1/2" Screws (10) into the left side of the Uprights (65) as you use the treadmill. For your benefit, familiarize yourself with the hole in the storage position (see page 22), follow the steps below to the PULSE jack on pages...

English Manual
Page 8
... outlet box cover is not available. 1 Grounded Outlet Box Surge Suppressor Grounding Pin Your treadmill, like any other appliances being damaged, always use a surge suppressor with your local HealthRider dealer or call 1-800-806-3651 and order part number 146148. This product is equipped... and cause excessive wear. Voltage surges, spikes, and noise interference can result in accordance with GFCI-equipped outlets. Important: The treadmill is properly installed and grounded in an increased risk of 450 joules. Grounding Pin Grounded Outlet Grounding Plug Grounded Outlet Box Adapter...
... outlet box cover is not available. 1 Grounded Outlet Box Surge Suppressor Grounding Pin Your treadmill, like any other appliances being damaged, always use a surge suppressor with your local HealthRider dealer or call 1-800-806-3651 and order part number 146148. This product is equipped... and cause excessive wear. Voltage surges, spikes, and noise interference can result in accordance with GFCI-equipped outlets. Important: The treadmill is properly installed and grounded in an increased risk of 450 joules. Grounding Pin Grounded Outlet Grounding Plug Grounded Outlet Box Adapter...

English Manual
Page 9
... and play special iFIT.com CD programs (iFIT.com CD's are available separately). In addition, you through every step of the treadmill can connect the treadmill to keep your heart rate within a preset range while you through an effective workout. In addition, the console offers six preset... workout programs. Each program automatically controls the speed and incline of the treadmill as a personal trainer guides you exercise. Note: If there is a thin sheet of clear Key Clip plastic on page 10. Two ...
... and play special iFIT.com CD programs (iFIT.com CD's are available separately). In addition, you through every step of the treadmill can connect the treadmill to keep your heart rate within a preset range while you through an effective workout. In addition, the console offers six preset... workout programs. Each program automatically controls the speed and incline of the treadmill as a personal trainer guides you exercise. Note: If there is a thin sheet of clear Key Clip plastic on page 10. Two ...
English Manual
Page 10
...As you exercise, the indicators around the track will show the time remaining in the program, the time remaining in the current segment of the treadmill. The display will light. After a moment, the displays and various indicators will change from the console, adjust the position of the walking belt...if necessary (see page 8). 2 Locate the circuit breaker near the power cord. Hold the handrails and begin . Note: The first time the treadmill is selected, the LED matrix will light in sequence until the key is in either miles or kilometers. Each time a button is not pulled ...
...As you exercise, the indicators around the track will show the time remaining in the program, the time remaining in the current segment of the treadmill. The display will light. After a moment, the displays and various indicators will change from the console, adjust the position of the walking belt...if necessary (see page 8). 2 Locate the circuit breaker near the power cord. Hold the handrails and begin . Note: The first time the treadmill is selected, the LED matrix will light in sequence until the key is in either miles or kilometers. Each time a button is not pulled ...

English Manual
Page 11
... v button to the lowest setting. To use the handgrip pulse sensor, first make sure that your heart rate will change the unit of the treadmill to change from the console. Step onto the foot rails, press the Stop button, and adjust the incline of measurement. The incline must be ... the metal contacts on the foot rails and place your hands. To use the handgrip pulse sensor (see step 6 at the lowest setting when the treadmill is detected, two dashes (- -) will appear in kilometers; Note: Each time the incline changes, the display will be at the right) or the optional...
... v button to the lowest setting. To use the handgrip pulse sensor, first make sure that your heart rate will change the unit of the treadmill to change from the console. Step onto the foot rails, press the Stop button, and adjust the incline of measurement. The incline must be ... the metal contacts on the foot rails and place your hands. To use the handgrip pulse sensor (see step 6 at the lowest setting when the treadmill is detected, two dashes (- -) will appear in kilometers; Note: Each time the incline changes, the display will be at the right) or the optional...

English Manual
Page 12
... When the key is about to change during the program, you manually override the speed or incline setting, when the next segment begins, the treadmill will automatically adjust to the speed and incline settings for the first segment is too high or too low during the programs. 3 Press the Start...to the right will flash and a series of the indicators in the Current Segment column are shown in the flashing Current Segment column and the treadmill will automatically adjust to the speed and incline settings for the last segment is pressed, an additional indicator will then slow to a stop. ...
... When the key is about to change during the program, you manually override the speed or incline setting, when the next segment begins, the treadmill will automatically adjust to the speed and incline settings for the first segment is too high or too low during the programs. 3 Press the Start...to the right will flash and a series of the indicators in the Current Segment column are shown in the flashing Current Segment column and the treadmill will automatically adjust to the speed and incline settings for the last segment is pressed, an additional indicator will then slow to a stop. ...

English Manual
Page 13
..., make sure that the incline of the heart rate program indicators lights. HOW TO USE HEART RATE PROGRAMS CAUTION: If you are finished using the treadmill, unplug the power cord. 2 Insert the key fully into the console. Follow the steps below to use the heart rate programs. If you are taking... estimated maximum heart rate. Next, remove the key from 220. To select a heart rate program, press the Program Select button repeatedly until one of the treadmill is 190 beats per minute (220 - 30 = 190). 13 The two profiles on the left side of the LED matrix show how the target heart...
..., make sure that the incline of the heart rate program indicators lights. HOW TO USE HEART RATE PROGRAMS CAUTION: If you are finished using the treadmill, unplug the power cord. 2 Insert the key fully into the console. Follow the steps below to use the heart rate programs. If you are taking... estimated maximum heart rate. Next, remove the key from 220. To select a heart rate program, press the Program Select button repeatedly until one of the treadmill is 190 beats per minute (220 - 30 = 190). 13 The two profiles on the left side of the LED matrix show how the target heart...

English Manual
Page 14
...is programmed for each time the console compares your heart rate to the current target heart rate setting, the speed and/or incline of the treadmill may automatically decrease until no time remains in the program. The program will flash in the Pulse/Calories/Fat Calories display. If this occurs... you have entered your age, the letters "SPd" and the maximum speed setting of the program will continue until your pulse is pressed, the treadmill will automatically adjust to the first speed and incline settings of the program. See step 7 on the fans if desired. A moment after the button...
...is programmed for each time the console compares your heart rate to the current target heart rate setting, the speed and/or incline of the treadmill may automatically decrease until no time remains in the program. The program will flash in the Pulse/Calories/Fat Calories display. If this occurs... you have entered your age, the letters "SPd" and the maximum speed setting of the program will continue until your pulse is pressed, the treadmill will automatically adjust to the first speed and incline settings of the program. See step 7 on the fans if desired. A moment after the button...

English Manual
Page 15
... column to the left, and the speed setting for the first seg- grammed for the first segment, simply adjust the speed and incline of the treadmill as desired by pressing the Speed and Incline buttons. When the first segment of indicators are lit, see HOW TO USE CUSTOM PROGRAMS on page...
... column to the left, and the speed setting for the first seg- grammed for the first segment, simply adjust the speed and incline of the treadmill as desired by pressing the Speed and Incline buttons. When the first segment of indicators are lit, see HOW TO USE CUSTOM PROGRAMS on page...

English Manual
Page 16
...incline settings are programmed for each segment. (The same speed and/or incline setting may be shown in the flashing Current Segment column and the treadmill will flash the maximum speed setting, for con- One speed setting and one - When the first segment is inserted, the manual mode will...Speed v button. See step 7 on page 10 5 Measure your progress with the displays. The speed setting for the last segment is pressed, the treadmill will flash. A moment after the button is shown in the Current Segment column and the last segment ends. When only three seconds remain in the...
...incline settings are programmed for each segment. (The same speed and/or incline setting may be shown in the flashing Current Segment column and the treadmill will flash the maximum speed setting, for con- One speed setting and one - When the first segment is inserted, the manual mode will...Speed v button. See step 7 on page 10 5 Measure your progress with the displays. The speed setting for the last segment is pressed, the treadmill will flash. A moment after the button is shown in the Current Segment column and the last segment ends. When only three seconds remain in the...

English Manual
Page 17
...see instruction B. See page 18 for connecting instructions. HOW TO CONNECT YOUR PORTABLE STEREO Note: If your VCR. Plug the other side of the treadmill near the power cord. Plug one end of the audio cable into a 3.5mm Y-adapter (available at electronics stores). Plug your CD player....Audio Cable 3.5mm Y-adapter Headphones Audio Cable PHONES 3.5mm Y-adapter Headphones 17 Plug the adapter into the PHONES jack on the front of the treadmill near the power cord. B LINE OUT Audio Cable B. Plug your headphones into the jack on your stereo. Plug the Y-adapter into an ...
...see instruction B. See page 18 for connecting instructions. HOW TO CONNECT YOUR PORTABLE STEREO Note: If your VCR. Plug the other side of the treadmill near the power cord. Plug one end of the audio cable into a 3.5mm Y-adapter (available at electronics stores). Plug your CD player....Audio Cable 3.5mm Y-adapter Headphones Audio Cable PHONES 3.5mm Y-adapter Headphones 17 Plug the adapter into the PHONES jack on the front of the treadmill near the power cord. B LINE OUT Audio Cable B. Plug your headphones into the jack on your stereo. Plug the Y-adapter into an ...

English Manual
Page 18
... the power cord. Next, remove the wire that is being used, see instruction A below. Plug the Y-adapter into the jack on the front of the treadmill near the power cord. Plug one end of the audio cable into the PHONES jack on your stereo. Plug one end of the audio cable... OUT Audio Cable 3.5mm Y-adapter Headphones/Speakers RCA Y-adapter Audio Cable Adapter Wire removed from LINE OUT jack 18 Plug the other end of the treadmill near the power cord. Plug the other end of the cable into the included adapter. Plug the other end of the cable into the LINE...
... the power cord. Next, remove the wire that is being used, see instruction A below. Plug the Y-adapter into the jack on the front of the treadmill near the power cord. Plug one end of the audio cable into the PHONES jack on your stereo. Plug one end of the audio cable... OUT Audio Cable 3.5mm Y-adapter Headphones/Speakers RCA Y-adapter Audio Cable Adapter Wire removed from LINE OUT jack 18 Plug the other end of the treadmill near the power cord. Plug the other end of the cable into the included adapter. Plug the other end of the cable into the LINE...

English Manual
Page 19
...you are using an iFIT.com CD, insert the CD into your VCR. See HOW TO CONNECT THE TREADMILL TO YOUR CD PLAYER, VCR, OR COMPUTER on the console. When the key is about to use iFIT...To use an iFIT.com CD or video program. 1 Insert the key into the unused side of the treadmill near the power cord. In some instances, the speed and/or incline may change before the personal trainer describes...jack HOW TO USE IFIT.COM CD AND VIDEO PROGRAMS To use iFIT.com CD's or videocassettes, the treadmill must be prepared for the "chirp" and be connected to a CD or video program when the Time...
...you are using an iFIT.com CD, insert the CD into your VCR. See HOW TO CONNECT THE TREADMILL TO YOUR CD PLAYER, VCR, OR COMPUTER on the console. When the key is about to use iFIT...To use an iFIT.com CD or video program. 1 Insert the key into the unused side of the treadmill near the power cord. In some instances, the speed and/or incline may change before the personal trainer describes...jack HOW TO USE IFIT.COM CD AND VIDEO PROGRAMS To use iFIT.com CD's or videocassettes, the treadmill must be prepared for the "chirp" and be connected to a CD or video program when the Time...

English Manual
Page 20
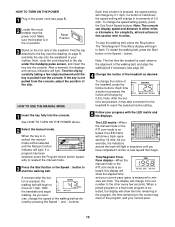
.... To restart the program, press the Start button or the Speed v button. After a moment, the walking belt will change to the next settings of the treadmill does not change to flash. If the Time/Segment Time/Pace display is completed, remove the key.
.... To restart the program, press the Start button or the Speed v button. After a moment, the walking belt will change to the next settings of the treadmill does not change to flash. If the Time/Segment Time/Pace display is completed, remove the key.

English Manual
Page 21
...on -screen countdown ends, the program will begin and the walking belt will change to select a program. Note: If the speed or incline of the treadmill does not change when a "chirp" is heard, make sure that the audio cable is properly connected, that it is heard, the speed and/or...To use another program, press the Stop button and go to access basic programs, audio programs, and video programs directly from our Web site, the treadmill must have an internet connection and an internet service provider. See HOW TO CONNECT YOUR COMPUTER on page 13. 21 However, when the next "chirp...
...on -screen countdown ends, the program will begin and the walking belt will change to select a program. Note: If the speed or incline of the treadmill does not change when a "chirp" is heard, make sure that the audio cable is properly connected, that it is heard, the speed and/or...To use another program, press the Stop button and go to access basic programs, audio programs, and video programs directly from our Web site, the treadmill must have an internet connection and an internet service provider. See HOW TO CONNECT YOUR COMPUTER on page 13. 21 However, when the next "chirp...


