
English Manual
Page 1
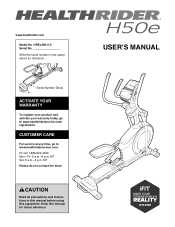
...a.m.–-6 p.m. MT Sat. 8 a.m.–-4 p.m. USER’'S MANUAL HREL56011.5 Serial No. Keep this equipment. Write the serial number in this manual before using this manual for reference. MT Please do not contact the store. Serial Number... Decal ACTIVATE YOUR WARRANTY To register your product and activate your warranty today, go to www.healthriderservice.com/ registration. CAUTION Read all precautions and instructions in the space above for future reference. www.healthrider...
...a.m.–-6 p.m. MT Sat. 8 a.m.–-4 p.m. USER’'S MANUAL HREL56011.5 Serial No. Keep this equipment. Write the serial number in this manual before using this manual for reference. MT Please do not contact the store. Serial Number... Decal ACTIVATE YOUR WARRANTY To register your product and activate your warranty today, go to www.healthriderservice.com/ registration. CAUTION Read all precautions and instructions in the space above for future reference. www.healthrider...
English Manual
Page 2
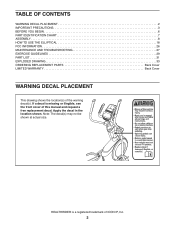
..., Inc. 2 HEALTHRIDER is missing or illegible, see the front cover of the warning decal(s). Note: The decal(s) may not be shown at actual size. Apply the decal in the location shown. TABLE OF CONTENTS WARNING DECAL PLACEMENT 2 IMPORTANT PRECAUTIONS 3 BEFORE YOU BEGIN 6 PART IDENTIFICATION CHART 7 ASSEMBLY 8 HOW TO USE THE ELLIPTICAL 18...
..., Inc. 2 HEALTHRIDER is missing or illegible, see the front cover of the warning decal(s). Note: The decal(s) may not be shown at actual size. Apply the decal in the location shown. TABLE OF CONTENTS WARNING DECAL PLACEMENT 2 IMPORTANT PRECAUTIONS 3 BEFORE YOU BEGIN 6 PART IDENTIFICATION CHART 7 ASSEMBLY 8 HOW TO USE THE ELLIPTICAL 18...

English Manual
Page 3
... when mounting, dismounting, or using your back. 7. The elliptical is intended for foot protection while exercising. 3. Do not use of this manual. 9. Keep the elliptical indoors, away from the elliptical at least 3 ft. (0.9 m) of clearance in the front and rear of the elliptical and 2 ft. (0.6 m) on the elliptical. Replace any exercise program, consult your physician. Wear...
... when mounting, dismounting, or using your back. 7. The elliptical is intended for foot protection while exercising. 3. Do not use of this manual. 9. Keep the elliptical indoors, away from the elliptical at least 3 ft. (0.9 m) of clearance in the front and rear of the elliptical and 2 ft. (0.6 m) on the elliptical. Replace any exercise program, consult your physician. Wear...
English Manual
Page 6
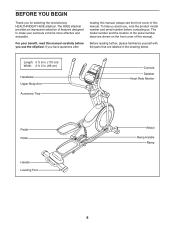
... Heart Rate Monitor Pedal Roller Handle Leveling Foot Wheel Ramp Handle Ramp 6 The H50E elliptical provides an impressive selection of this manual. The model number and the location of this manual carefully before contacting us assist you for selecting the revolutionary HEALTHRIDER® H50E elliptical. Before reading further, please familiarize yourself with the parts that are shown...
... Heart Rate Monitor Pedal Roller Handle Leveling Foot Wheel Ramp Handle Ramp 6 The H50E elliptical provides an impressive selection of this manual. The model number and the location of this manual carefully before contacting us assist you for selecting the revolutionary HEALTHRIDER® H50E elliptical. Before reading further, please familiarize yourself with the parts that are shown...

English Manual
Page 7
.... PART IDENTIFICATION CHART Use the drawings below each drawing is the key number of the part, from the PART LIST near the end of this manual.
.... PART IDENTIFICATION CHART Use the drawings below each drawing is the key number of the part, from the PART LIST near the end of this manual.
English Manual
Page 8
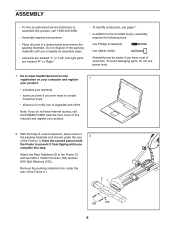
... screwdriver one rubber mallet Assembly may be easier if you complete this step. ASSEMBLY •• To hire an authorized service technician to assemble this manual) and register your warranty •• saves you time if you ever need to contact Customer Care •• allows us to notify you of...
... screwdriver one rubber mallet Assembly may be easier if you complete this step. ASSEMBLY •• To hire an authorized service technician to assemble this manual) and register your warranty •• saves you time if you ever need to contact Customer Care •• allows us to notify you of...
English Manual
Page 20
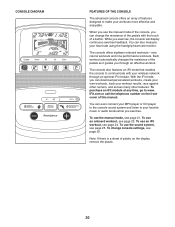
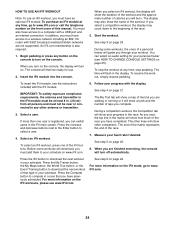
...the telephone number on the front cover of plastic on the display, remove the plastic. 20 Note: If there is a sheet of this manual. You can download personalized workouts, create your own workouts, track your workout results, race against other runners, and access many other features. ...console offers an array of features designed to your favorite music or audio books while you through an optional iFit module. To use the manual mode of a button. The console offers eighteen onboard workouts—-nine calorie workouts and nine performance workouts. You can change console settings,...
...the telephone number on the front cover of plastic on the display, remove the plastic. 20 Note: If there is a sheet of this manual. You can download personalized workouts, create your own workouts, track your workout results, race against other runners, and access many other features. ...console offers an array of features designed to your favorite music or audio books while you through an optional iFit module. To use the manual mode of a button. The console offers eighteen onboard workouts—-nine calorie workouts and nine performance workouts. You can change console settings,...
English Manual
Page 21
...strides you exercise, the flashing rectangle will show the elapsed time. Follow your heart rate when you use . 2. Time—-When the manual mode is selected, this display mode will show your progress. Resistance (Resist.)—-This display mode will show the time remaining in miles...show your exercise. 21 Press the Display button until the desired tab is not inserted into the console and connected to iFit, the manual mode will turn on the console to reach the selected resistance level. 4. You can show the following workout information: Calories (Cals.)&#...
...strides you exercise, the flashing rectangle will show the elapsed time. Follow your heart rate when you use . 2. Time—-When the manual mode is selected, this display mode will show your progress. Resistance (Resist.)—-This display mode will show the time remaining in miles...show your exercise. 21 Press the Display button until the desired tab is not inserted into the console and connected to iFit, the manual mode will turn on the console to reach the selected resistance level. 4. You can show the following workout information: Calories (Cals.)&#...
English Manual
Page 22
... the time will flash in the calorie display will flash each time your heart beats, one or two dashes will be shown. To exit the manual mode or a workout, press the Home button. Change the volume level of plastic Contacts on the metal contacts on page 25 to set the default...
... the time will flash in the calorie display will flash each time your heart beats, one or two dashes will be shown. To exit the manual mode or a workout, press the Home button. Change the volume level of plastic Contacts on the metal contacts on page 25 to set the default...
English Manual
Page 23
... 22. See step 6 on page 21. 5. The console will sound and the next segment of the flashing segment indicates the target speed for you can manually override the setting by pressing the Resistance buttons. The height of the profile will begin to the resistance level programmed for the workout will appear...
... 22. See step 6 on page 21. 5. The console will sound and the next segment of the flashing segment indicates the target speed for you can manually override the setting by pressing the Resistance buttons. The height of the profile will begin to the resistance level programmed for the workout will appear...
English Manual
Page 24
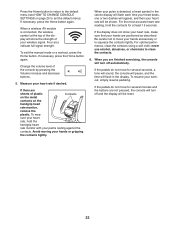
... IFIT WORKOUT Note: To use . 2. Insert the iFit module into the console. If you must also have access to download the next workout of this manual. IMPORTANT: To satisfy exposure compliance requirements, the antenna and transmitter in the iFit module must be at least 8 in the iFit main screen. Select an...
... IFIT WORKOUT Note: To use . 2. Insert the iFit module into the console. If you must also have access to download the next workout of this manual. IMPORTANT: To satisfy exposure compliance requirements, the antenna and transmitter in the iFit module must be at least 8 in the iFit main screen. Select an...
English Manual
Page 25
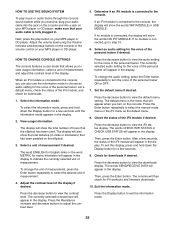
... measurement. HOW TO CHANGE CONSOLE SETTINGS The console features a user mode that will appear in miles or kilometers) that has been pedaled on the elliptical. 3. The display will appear in the display. To change the audio setting, press the Enter button repeatedly to choose an audio setting for the... Volume increase and decrease buttons on the console or the volume control on your audio cable is connected to the console, you to select the manual mode menu or the iFit menu as the default menu. 8. After a few seconds until the information mode appears in . Next, press the play...
... measurement. HOW TO CHANGE CONSOLE SETTINGS The console features a user mode that will appear in miles or kilometers) that has been pedaled on the elliptical. 3. The display will appear in the display. To change the audio setting, press the Enter button repeatedly to choose an audio setting for the... Volume increase and decrease buttons on the console or the volume control on your audio cable is connected to the console, you to select the manual mode menu or the iFit menu as the default menu. 8. After a few seconds until the information mode appears in . Next, press the play...
English Manual
Page 27
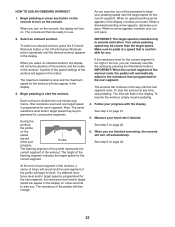
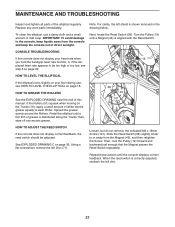
...22. Loosen, but do not remove, the indicated M4 x 16mm Screw (101). Next, locate the Reed Switch (38). HOW TO LEVEL THE ELLIPTICAL If the elliptical rocks slightly on the Tracks (16), apply a small amount of white marine grease equally to the console, keep liquids away from the Magnet (43...around the Rollers. Slide the Reed Switch (38) slightly closer to be adjusted. MAINTENANCE AND TROUBLESHOOTING Inspect and tighten all parts of this manual. Replace any excess grease. 38 43 101 HOW TO ADJUST THE REED SWITCH If the console does not display correct feedback, the reed ...
...22. Loosen, but do not remove, the indicated M4 x 16mm Screw (101). Next, locate the Reed Switch (38). HOW TO LEVEL THE ELLIPTICAL If the elliptical rocks slightly on the Tracks (16), apply a small amount of white marine grease equally to the console, keep liquids away from the Magnet (43...around the Rollers. Slide the Reed Switch (38) slightly closer to be adjusted. MAINTENANCE AND TROUBLESHOOTING Inspect and tighten all parts of this manual. Replace any excess grease. 38 43 101 HOW TO ADJUST THE REED SWITCH If the console does not display correct feedback, the reed ...

English Manual
Page 32
... Screw Drive Belt M4 x 42mm Screw M4 x 30mm Screw Disc Ring Front Upright Cover Shield Cover Cap Power Adapter Assembly Tool Grease Packet User’'s Manual Note: Specifications are not illustrated. 32 Description 101 38 102 10 103 8 104 4 105 8 106 3 107 1 108 2 109 2 110 1 111 1 M4 x 16mm Screw M8 ...Lower Wire 112 3 113 1 114 6 115 2 116 2 117 1 118 1 119 1 * –- * –- * –- For information about ordering replacement parts, see the back cover of this manual. *These parts are subject to change without notice. Qty. Key No. Description Key No.
... Screw Drive Belt M4 x 42mm Screw M4 x 30mm Screw Disc Ring Front Upright Cover Shield Cover Cap Power Adapter Assembly Tool Grease Packet User’'s Manual Note: Specifications are not illustrated. 32 Description 101 38 102 10 103 8 104 4 105 8 106 3 107 1 108 2 109 2 110 1 111 1 M4 x 16mm Screw M8 ...Lower Wire 112 3 113 1 114 6 115 2 116 2 117 1 118 1 119 1 * –- * –- * –- For information about ordering replacement parts, see the back cover of this manual. *These parts are subject to change without notice. Qty. Key No. Description Key No.
English Manual
Page 36
...under this warranty is limited to repairing or replacing, at ICON’'s option, the product through one (1) year from defects in this manual. The warranty extended hereunder is in lieu of any and all instructions in workmanship and material, under warranty, the customer will be the ...service, the customer will be preauthorized by ICON. ORDERING REPLACEMENT PARTS To order replacement parts, please see the front cover of this manual) LIMITED WARRANTY IMPORTANT: To protect your fitness equipment with an extended service plan, see the PART LIST and the EXPLODED DRAWING near ...
...under this warranty is limited to repairing or replacing, at ICON’'s option, the product through one (1) year from defects in this manual. The warranty extended hereunder is in lieu of any and all instructions in workmanship and material, under warranty, the customer will be the ...service, the customer will be preauthorized by ICON. ORDERING REPLACEMENT PARTS To order replacement parts, please see the front cover of this manual) LIMITED WARRANTY IMPORTANT: To protect your fitness equipment with an extended service plan, see the PART LIST and the EXPLODED DRAWING near ...


