
English Manual
Page 1
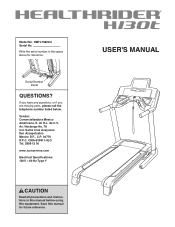
... reference. de R.L. Santa Cruz Acayucan Del. Azcapotzalco Mexico D.F., C.P. 02770 R.F.C. Av. USER'S MANUAL Model No. de C.V. Vendor: Comercializadora Mexico Americana, S. Serial Number Decal QUESTIONS? CMA-910911-9LO Tel. 5899 12 00 www.iconservice.com Electrical Specifications: 120V ~ 60 ...
... reference. de R.L. Santa Cruz Acayucan Del. Azcapotzalco Mexico D.F., C.P. 02770 R.F.C. Av. USER'S MANUAL Model No. de C.V. Vendor: Comercializadora Mexico Americana, S. Serial Number Decal QUESTIONS? CMA-910911-9LO Tel. 5899 12 00 www.iconservice.com Electrical Specifications: 120V ~ 60 ...

English Manual
Page 3
...properly.) 16. Always hold the handrails while using your treadmill before using the treadmill. Do not wear loose clothes that meets all of all users of this product. 1. Adjust the speed in sandals. 11. structions in this manual and all warnings on a level surface, with bare... feet, wearing only stockings, or in small increments to ensure that blocks air openings. It is being administered. 7. Place the treadmill on your treadmill. To protect the floor or carpet from ...
...properly.) 16. Always hold the handrails while using your treadmill before using the treadmill. Do not wear loose clothes that meets all of all users of this product. 1. Adjust the speed in sandals. 11. structions in this manual and all warnings on a level surface, with bare... feet, wearing only stockings, or in small increments to ensure that blocks air openings. It is being administered. 7. Place the treadmill on your treadmill. To protect the floor or carpet from ...
English Manual
Page 4
... frame securely in -home use , before cleaning the treadmill, and before performing the mainte- Always unplug the power cord immediately after use only. vice representative. SAVE THESE INSTRUCTIONS 4 This treadmill is not in use this manual. Always remove the key, unplug the power cord, ...the motor hood un- Do not attempt to the off position when the treadmill is intended for the location of the treadmill regularly. DANGER: 25. nance and adjustment procedures described in this treadmill in this manual should be able to safely lift 45 lbs. (20 kg) to ...
... frame securely in -home use , before cleaning the treadmill, and before performing the mainte- Always unplug the power cord immediately after use only. vice representative. SAVE THESE INSTRUCTIONS 4 This treadmill is not in use this manual. Always remove the key, unplug the power cord, ...the motor hood un- Do not attempt to the off position when the treadmill is intended for the location of the treadmill regularly. DANGER: 25. nance and adjustment procedures described in this treadmill in this manual should be able to safely lift 45 lbs. (20 kg) to ...
English Manual
Page 5
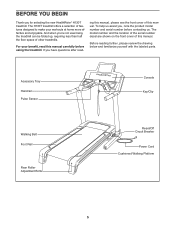
...number and the location of the serial number decal are shown on the front cover of this manual. BEFORE YOU BEGIN Thank you ʼre not exercising, the treadmill can be folded up, requiring less than half the floor space of features designed to make your... using the treadmill. ing this manual, please see the front cover of this manual. Before reading further, please review the drawing below and familiarize yourself with the labeled parts. And when you for selecting the new HealthRider® H130T treadmill. The H130T treadmill offers a selection of other treadmills. For your...
...number and the location of the serial number decal are shown on the front cover of this manual. BEFORE YOU BEGIN Thank you ʼre not exercising, the treadmill can be folded up, requiring less than half the floor space of features designed to make your... using the treadmill. ing this manual, please see the front cover of this manual. Before reading further, please review the drawing below and familiarize yourself with the labeled parts. And when you for selecting the new HealthRider® H130T treadmill. The H130T treadmill offers a selection of other treadmills. For your...
English Manual
Page 6
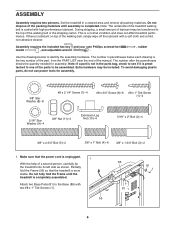
...: If a part is preattached to one of the walking belt, simply wipe off the lubricant with two #8 x 1" Tek Screws (1). 55 85 81 1 81 1 6 Set the treadmill in the parts bag, check to the Base (85) with a soft cloth and a mild, non-abrasive cleaner. Assembly requires the included hex key and your.... Attach two Base Pads (81) to see if it is not in a cleared area and remove all packing materials. During shipping, a small amount of the manual. If there is the key number of the part, from the PART LIST near the end of lubricant may be included. The number after the...
...: If a part is preattached to one of the walking belt, simply wipe off the lubricant with two #8 x 1" Tek Screws (1). 55 85 81 1 81 1 6 Set the treadmill in the parts bag, check to the Base (85) with a soft cloth and a mild, non-abrasive cleaner. Assembly requires the included hex key and your.... Attach two Base Pads (81) to see if it is not in a cleared area and remove all packing materials. During shipping, a small amount of the manual. If there is the key number of the part, from the PART LIST near the end of lubricant may be included. The number after the...
English Manual
Page 12
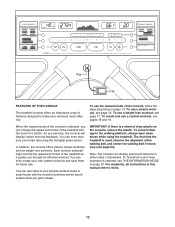
... 19. Key Clip FEATURES OF THE CONSOLE The treadmill console offers an impressive array of features designed to make your heart rate using the treadmill. To use a custom workout, see page 24). To create and use the manual mode of the treadmill as it guides you exercise, the console will ...display instant exercise feedback. You can display speed and distance in this manual refer to miles. 12
... 19. Key Clip FEATURES OF THE CONSOLE The treadmill console offers an impressive array of features designed to make your heart rate using the treadmill. To use a custom workout, see page 24). To create and use the manual mode of the treadmill as it guides you exercise, the console will ...display instant exercise feedback. You can display speed and distance in this manual refer to miles. 12
English Manual
Page 13
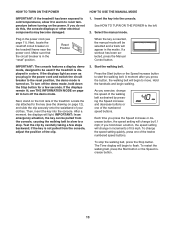
..., hold down the Stop button for a few steps backward; if you exercise, change by 0.1 mph; Select the manual mode. IMPORTANT: In an emergency situation, the key can be used if the treadmill is not pulled from the console, causing the walking belt to slow to a stop the walking belt, press the...the demo mode. Locate the clip attached to the key (see page 11). HOW TO TURN ON THE POWER HOW TO USE THE MANUAL MODE IMPORTANT: If the treadmill has been exposed to cold temperatures, allow it to warm to room temperature before turning on page 12), and slide the clip securely...
..., hold down the Stop button for a few steps backward; if you exercise, change by 0.1 mph; Select the manual mode. IMPORTANT: In an emergency situation, the key can be used if the treadmill is not pulled from the console, causing the walking belt to slow to a stop the walking belt, press the...the demo mode. Locate the clip attached to the key (see page 11). HOW TO TURN ON THE POWER HOW TO USE THE MANUAL MODE IMPORTANT: If the treadmill has been exposed to cold temperatures, allow it to warm to room temperature before turning on page 12), and slide the clip securely...
English Manual
Page 14
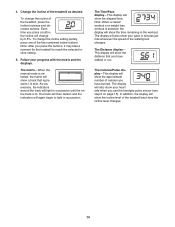
..., the display will show the incline level of calories you exercise, the indicators around the track will also show the approximate number of the treadmill each time the incline level changes. 14 To change by 0.5%. The Time/Pace display-This display will show the elapsed time. The Distance display... display-This display will also show a track that you use the handgrip pulse sensor (see step 6 on page 15). The matrix-When the manual mode is lit. The track will then darken and the indicators will show your progress with the matrix and the displays. 4. Each time you ...
..., the display will show the incline level of calories you exercise, the indicators around the track will also show the approximate number of the treadmill each time the incline level changes. 14 To change by 0.5%. The Time/Pace display-This display will show the elapsed time. The Distance display... display-This display will also show a track that you use the handgrip pulse sensor (see step 6 on page 15). The matrix-When the manual mode is lit. The track will then darken and the indicators will show your progress with the matrix and the displays. 4. Each time you ...
English Manual
Page 16
...next segment. 3. To stop . When a classic workout is divided into the console. Note: When the next segment of the workout begins, the treadmill will last. A moment after you . 2. The flashing segment of the profile represents the current segment of the flash- Start the walking belt....Workouts buttons repeatedly until the last segment of the desired workout appears in the display and the last segment ends. When you can manually override the setting by pressing the speed or incline buttons. See step 6 on page 15. 16 ing segment indicates the speed...
...next segment. 3. To stop . When a classic workout is divided into the console. Note: When the next segment of the workout begins, the treadmill will last. A moment after you . 2. The flashing segment of the profile represents the current segment of the flash- Start the walking belt....Workouts buttons repeatedly until the last segment of the desired workout appears in the display and the last segment ends. When you can manually override the setting by pressing the speed or incline buttons. See step 6 on page 15. 16 ing segment indicates the speed...

English Manual
Page 17
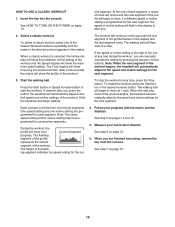
...be saved in this way until the name of each segment. Measure your weight is displayed, press the Start button. When you can manually override the setting by pressing the Speed and Incline buttons. Insert the key into one incline setting are finished exercising, remove the key ... incline setting will automatically adjust to start the workout. During the workout, the profile will then slow to alert you press the button, the treadmill will continue in memory. One speed setting and one -minute segments. To stop . After a few seconds, the matrix will be programmed for...
...be saved in this way until the name of each segment. Measure your weight is displayed, press the Start button. When you can manually override the setting by pressing the Speed and Incline buttons. Insert the key into one incline setting are finished exercising, remove the key ... incline setting will automatically adjust to start the workout. During the workout, the profile will then slow to alert you press the button, the treadmill will continue in memory. One speed setting and one -minute segments. To stop . After a few seconds, the matrix will be programmed for...

English Manual
Page 22
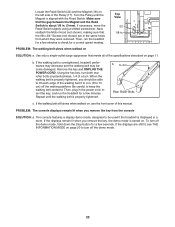
... and carefully pivot the Motor Hood off during use SOLUTION: a. b. Remove the key from the console and UNPLUG THE POWER CORD. TROUBLESHOOTING Most treadmill problems can be solved by following the steps below. Find the symptom that the power cord is needed . 6 111 Raise the Uprights (111,...key is needed , see the front cover of the specifications described on SOLUTION: a. IMPORTANT: The treadmill is not compatible with a shaft at least 8 in , make sure that meets all of this manual. After the power cord has been plugged in . (20 cm) long is inserted into the ...
... and carefully pivot the Motor Hood off during use SOLUTION: a. b. Remove the key from the console and UNPLUG THE POWER CORD. TROUBLESHOOTING Most treadmill problems can be solved by following the steps below. Find the symptom that the power cord is needed . 6 111 Raise the Uprights (111,...key is needed , see the front cover of the specifications described on SOLUTION: a. IMPORTANT: The treadmill is not compatible with a shaft at least 8 in , make sure that meets all of this manual. After the power cord has been plugged in . (20 cm) long is inserted into the ...
English Manual
Page 23
... mode, designed to be able to lift each edge of a turn. If the displays are in the power cord, insert the key, and run the treadmill for a few seconds. Remove the key and UNPLUG THE POWER CORD. the #8 x 3/4" Screws (not shown) are still lit, see the front cover of the specifications..., plug in the same holes from the console SOLUTION: a. Next, 17 18 reattach the Motor Hood (not shown), making sure that meets all of this manual. To turn off the demo mode, hold down the Stop button for a few minutes to check for a few minutes. Rear Roller Bolts c. Locate the ...
... mode, designed to be able to lift each edge of a turn. If the displays are in the power cord, insert the key, and run the treadmill for a few seconds. Remove the key and UNPLUG THE POWER CORD. the #8 x 3/4" Screws (not shown) are still lit, see the front cover of the specifications..., plug in the same holes from the console SOLUTION: a. Next, 17 18 reattach the Motor Hood (not shown), making sure that meets all of this manual. To turn off the demo mode, hold down the Stop button for a few minutes to check for a few minutes. Rear Roller Bolts c. Locate the ...
English Manual
Page 26
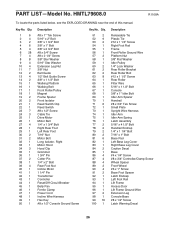
PART LIST-Model No. HMTL79608.0 R1108A To locate the parts listed below, see the EXPLODED DRAWING near the end of this manual. Qty. 51 2 52 9 53 2 54 1 55 1 56 1 57 2 58 1 59 1 60 2 61 2 62 2 63 8 64 1 65 1 66 1 67 1 68 1 69 1 70 1 71 6 72 1 73 1 74 1 ...
PART LIST-Model No. HMTL79608.0 R1108A To locate the parts listed below, see the EXPLODED DRAWING near the end of this manual. Qty. 51 2 52 9 53 2 54 1 55 1 56 1 57 2 58 1 59 1 60 2 61 2 62 2 63 8 64 1 65 1 66 1 67 1 68 1 69 1 70 1 71 6 72 1 73 1 74 1 ...
English Manual
Page 27
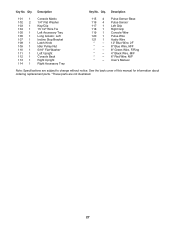
... Washer Left Upright Console Back Right Upright Right Accessory Tray 115 4 116 4 117 1 118 1 119 1 120 1 121 1 * - * - * - * - * - * - See the back cover of this manual for information about ordering replacement parts. *These parts are subject to change without notice. Pulse Sensor Base Pulse Sensor Left Grip Right Grip Console Wire... Pulse Wire Audio Wire 12" Blue Wire, 2F 8" Blue Wire, M/F 8" Green Wire, F/Ring 4" Black Wire, M/F 6" Red Wire, M/F User's Manual Note: Specifications are not illustrated. 27 Qty. Description Key No. Key No.
... Washer Left Upright Console Back Right Upright Right Accessory Tray 115 4 116 4 117 1 118 1 119 1 120 1 121 1 * - * - * - * - * - * - See the back cover of this manual for information about ordering replacement parts. *These parts are subject to change without notice. Pulse Sensor Base Pulse Sensor Left Grip Right Grip Console Wire... Pulse Wire Audio Wire 12" Blue Wire, 2F 8" Blue Wire, M/F 8" Green Wire, F/Ring 4" Black Wire, M/F 6" Red Wire, M/F User's Manual Note: Specifications are not illustrated. 27 Qty. Description Key No. Key No.

English Manual
Page 32
To help us assist you, be prepared to provide the following information when contacting us: • the model number and serial number of the product (see the front cover of this manual) • the name of the product (see the front cover of this manual) • the key number and description of the replacement part(s) (see the front cover of this manual. ORDERING REPLACEMENT PARTS To order replacement parts, please see the PART LIST and the EXPLODED DRAWING near the end of this manual) Part No. 274235 R1108A Printed in USA © 2008 ICON IP, Inc.
To help us assist you, be prepared to provide the following information when contacting us: • the model number and serial number of the product (see the front cover of this manual) • the name of the product (see the front cover of this manual) • the key number and description of the replacement part(s) (see the front cover of this manual. ORDERING REPLACEMENT PARTS To order replacement parts, please see the PART LIST and the EXPLODED DRAWING near the end of this manual) Part No. 274235 R1108A Printed in USA © 2008 ICON IP, Inc.


