
English Manual
Page 2
TABLE OF CONTENTS IMPORTANT PRECAUTIONS 3 BEFORE YOU BEGIN 4 ASSEMBLY 5 HOW TO USE THE ELLIPTICAL CROSSTRAINER 9 MAINTENANCE AND TROUBLESHOOTING 20 CONDITIONING GUIDELINES 21 PART LIST 22 EXPLODED DRAWING 23 HOW TO ORDER REPLACEMENT PARTS Back Cover LIMITED WARRANTY Back Cover HealthRider is a registered trademark of ICON Health & Fitness, Inc. 2
TABLE OF CONTENTS IMPORTANT PRECAUTIONS 3 BEFORE YOU BEGIN 4 ASSEMBLY 5 HOW TO USE THE ELLIPTICAL CROSSTRAINER 9 MAINTENANCE AND TROUBLESHOOTING 20 CONDITIONING GUIDELINES 21 PART LIST 22 EXPLODED DRAWING 23 HOW TO ORDER REPLACEMENT PARTS Back Cover LIMITED WARRANTY Back Cover HealthRider is a registered trademark of ICON Health & Fitness, Inc. 2
English Manual
Page 3
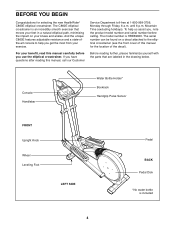
... with a mat beneath it to protect the floor or carpet. Replace any time while exercising, stop . Keep the elliptical crosstrainer indoors, away from the elliptical crosstrainer at any worn parts immediately. 6. Always wear athletic shoes for personal injury or property damage sustained by persons weighing more than 250 pounds. ... protection. 9. The pulse sensor is not a medical device. When you feel pain or dizziness at all instructions before using the elliptical crosstrainer. 1. Read all parts regularly. WARNING: Before beginning this manual before using .
... with a mat beneath it to protect the floor or carpet. Replace any time while exercising, stop . Keep the elliptical crosstrainer indoors, away from the elliptical crosstrainer at any worn parts immediately. 6. Always wear athletic shoes for personal injury or property damage sustained by persons weighing more than 250 pounds. ... protection. 9. The pulse sensor is not a medical device. When you feel pain or dizziness at all instructions before using the elliptical crosstrainer. 1. Read all parts regularly. WARNING: Before beginning this manual before using .
English Manual
Page 4
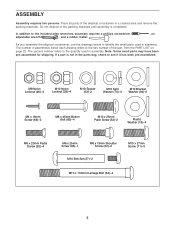
...decal). If you have questions after reading this manual for selecting the new HealthRider® C860E elliptical crosstrainer. And the unique C860E features adjustable resistance and a state-ofthe-art console to the elliptical crosstrainer (see the front cover of this manual, call our Customer Service ... (excluding holidays). The serial number can be found on your exercise. Before reading further, please familiarize yourself with the parts that moves your feet in the drawing below. Console Handlebar Water Bottle Holder* Bookrack Handgrip Pulse Sensor FRONT Upright Knob ...
...decal). If you have questions after reading this manual for selecting the new HealthRider® C860E elliptical crosstrainer. And the unique C860E features adjustable resistance and a state-ofthe-art console to the elliptical crosstrainer (see the front cover of this manual, call our Customer Service ... (excluding holidays). The serial number can be found on your exercise. Before reading further, please familiarize yourself with the parts that moves your feet in the drawing below. Console Handlebar Water Bottle Holder* Bookrack Handgrip Pulse Sensor FRONT Upright Knob ...
English Manual
Page 5
.... The number in a cleared area and remove the packing materials. As you assemble the elliptical crosstrainer, use the drawings below each drawing refers to identify the small parts used in assembly. If a part is completed. Note: Some small parts may have been pre-assembled for shipping. M8 Nylon Locknut (46)-4 M10 Nylon Locknut (29...
.... The number in a cleared area and remove the packing materials. As you assemble the elliptical crosstrainer, use the drawings below each drawing refers to identify the small parts used in assembly. If a part is completed. Note: Some small parts may have been pre-assembled for shipping. M8 Nylon Locknut (46)-4 M10 Nylon Locknut (29...
English Manual
Page 8
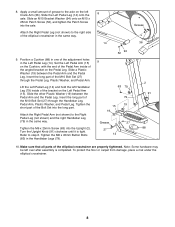
... shown) to the axle on the left over after assembly is tight. Position a Cushion (88) in one of the elliptical crosstrainer in the same way. Attach the Right Pedal Arm (not shown) to step 6. Set the Left Pedal Arm ... 27 27 14 2 91 88 10. To protect the floor or carpet from damage, place a mat under the elliptical crosstrainer. 8 Slide the other Plastic Washer (19) between the Pedal Arm and the Pedal Leg. Tighten the M6 x ...Leg (79) inside of the Bolt Set into the Upright (2). Insert the long part of the elliptical crosstrainer are properly tightened.
... shown) to the axle on the left over after assembly is tight. Position a Cushion (88) in one of the elliptical crosstrainer in the same way. Attach the Right Pedal Arm (not shown) to step 6. Set the Left Pedal Arm ... 27 27 14 2 91 88 10. To protect the floor or carpet from damage, place a mat under the elliptical crosstrainer. 8 Slide the other Plastic Washer (19) between the Pedal Arm and the Pedal Leg. Tighten the M6 x ...Leg (79) inside of the Bolt Set into the Upright (2). Insert the long part of the elliptical crosstrainer are properly tightened.
English Manual
Page 20
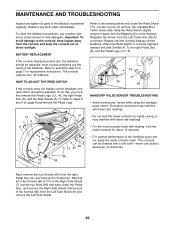
...first remove the Pedal Legs (13, 14), the right Pedal Disc (8), and the Side Shields (6, 7). Retighten the Screw. Replace any worn parts immediately. The console requires four "D" batteries. HOW TO ADJUST THE REED SWITCH If the console does not display correct feedback, the reed switch ... display becomes dim, the batteries should be cleaned with heart rate readings. • For the most console problems are the result of the elliptical crosstrainer regularly. Excessive movement may interfere with a soft cloth-never use a damp cloth and a small amount of the Screws (66, 67...
...first remove the Pedal Legs (13, 14), the right Pedal Disc (8), and the Side Shields (6, 7). Retighten the Screw. Replace any worn parts immediately. The console requires four "D" batteries. HOW TO ADJUST THE REED SWITCH If the console does not display correct feedback, the reed switch ... display becomes dim, the batteries should be cleaned with heart rate readings. • For the most console problems are the result of the elliptical crosstrainer regularly. Excessive movement may interfere with a soft cloth-never use a damp cloth and a small amount of the Screws (66, 67...


