
English Manual
Page 2
TABLE OF CONTENTS IMPORTANT PRECAUTIONS 3 BEFORE YOU BEGIN 4 ASSEMBLY 5 HOW TO USE THE ELLIPTICAL CROSSTRAINER 9 MAINTENANCE AND TROUBLESHOOTING 20 CONDITIONING GUIDELINES 21 PART LIST 22 EXPLODED DRAWING 23 HOW TO ORDER REPLACEMENT PARTS Back Cover LIMITED WARRANTY Back Cover HealthRider is a registered trademark of ICON Health & Fitness, Inc. 2
TABLE OF CONTENTS IMPORTANT PRECAUTIONS 3 BEFORE YOU BEGIN 4 ASSEMBLY 5 HOW TO USE THE ELLIPTICAL CROSSTRAINER 9 MAINTENANCE AND TROUBLESHOOTING 20 CONDITIONING GUIDELINES 21 PART LIST 22 EXPLODED DRAWING 23 HOW TO ORDER REPLACEMENT PARTS Back Cover LIMITED WARRANTY Back Cover HealthRider is a registered trademark of ICON Health & Fitness, Inc. 2
English Manual
Page 3
... instructions in this product. 3 If you stop exercising, allow the pedals to slowly come to protect the floor or carpet. Read all parts regularly. IMPORTANT PRECAUTIONS WARNING: To reduce the risk of heart rate readings. It is intended for persons over the age of this manual before using the elliptical crosstrainer. Wear appropriate exercise clothing when using the elliptical crosstrainer. 2. The pulse sensor is especially important for home use...
... instructions in this product. 3 If you stop exercising, allow the pedals to slowly come to protect the floor or carpet. Read all parts regularly. IMPORTANT PRECAUTIONS WARNING: To reduce the risk of heart rate readings. It is intended for persons over the age of this manual before using the elliptical crosstrainer. Wear appropriate exercise clothing when using the elliptical crosstrainer. 2. The pulse sensor is especially important for home use...
English Manual
Page 4
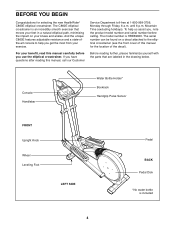
... help us assist you, note the product model number and serial number before you use the elliptical crosstrainer. until 6 p.m. Console Handlebar Water Bottle Holder* Bookrack Handgrip Pulse Sensor FRONT Upright Knob Wheel Leveling Foot LEFT SIDE Pedal BACK Pedal Disk *No water bottle is HRE69020. To help you have questions after reading this manual, call our Customer Service Department toll-free at 1-800-999-3756, Monday through...
... help us assist you, note the product model number and serial number before you use the elliptical crosstrainer. until 6 p.m. Console Handlebar Water Bottle Holder* Bookrack Handgrip Pulse Sensor FRONT Upright Knob Wheel Leveling Foot LEFT SIDE Pedal BACK Pedal Disk *No water bottle is HRE69020. To help you have questions after reading this manual, call our Customer Service Department toll-free at 1-800-999-3756, Monday through...
English Manual
Page 5
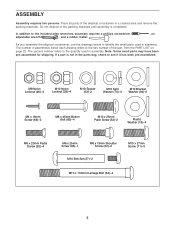
As you assemble the elliptical crosstrainer, use the drawings below each drawing refers to the quantity used in a cleared area and remove the packing materials. If a part is completed. ASSEMBLY Assembly requires two persons. Do not dispose of the elliptical crosstrainer in assembly. The second number refers to the key number of the part, from the PART LIST on page 22. Place all parts of the packing materials until assembly is...
As you assemble the elliptical crosstrainer, use the drawings below each drawing refers to the quantity used in a cleared area and remove the packing materials. If a part is completed. ASSEMBLY Assembly requires two persons. Do not dispose of the elliptical crosstrainer in assembly. The second number refers to the key number of the part, from the PART LIST on page 22. Place all parts of the packing materials until assembly is...
English Manual
Page 6
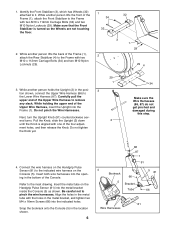
...tighten two M4 x 16mm Screws (66) into the opening in the posi- 3 tion shown, connect the Upper Wire Harness (86) to the inset drawing. ment holes, and then release the Knob. 1. Next, turn the Upright Knob (91) counterclockwise sev- Refer to the Lower Wire Harness (87). eral turns. Align the holes in the location... (1), attach the Front Stabilizer to remove any slack. Do not tighten the Knob yet. 34 Make sure the Wire Harnesses (86, 87) do not get pinched and damaged during this step. 4. Carefully pull the upper end of the Frame (1), attach the Rear Stabilizer ...
...tighten two M4 x 16mm Screws (66) into the opening in the posi- 3 tion shown, connect the Upper Wire Harness (86) to the inset drawing. ment holes, and then release the Knob. 1. Next, turn the Upright Knob (91) counterclockwise sev- Refer to the Lower Wire Harness (87). eral turns. Align the holes in the location... (1), attach the Front Stabilizer to remove any slack. Do not tighten the Knob yet. 34 Make sure the Wire Harnesses (86, 87) do not get pinched and damaged during this step. 4. Carefully pull the upper end of the Frame (1), attach the Rear Stabilizer ...
English Manual
Page 8
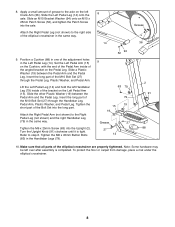
... Patch Screw (52), and tighten the Patch Screw into the long part. Insert the long part of the elliptical crosstrainer in the same way. Attach the Right Pedal Arm (not shown) to step 6. Turn the Upright Knob (91) clockwise until it is completed. Tighten the M8 x 45mm Button Bolts (83) in the Left Pedal Leg (14). Make sure that all parts of the M10 Bolt Set (27) through the Pedal Leg, Plastic Washer, and Pedal Arm...
... Patch Screw (52), and tighten the Patch Screw into the long part. Insert the long part of the elliptical crosstrainer in the same way. Attach the Right Pedal Arm (not shown) to step 6. Turn the Upright Knob (91) clockwise until it is completed. Tighten the M8 x 45mm Button Bolts (83) in the Left Pedal Leg (14). Make sure that all parts of the M10 Bolt Set (27) through the Pedal Leg, Plastic Washer, and Pedal Arm...
English Manual
Page 9
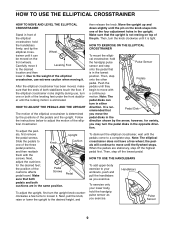
... instructions below to the desired location and then lower it . als, first remove the pedal screws. Next, adjust the cushions for variety, you move until the pedals come to the desired height, and then release the knob. the position of the elliptical crosstrainer, hold the handgrip pulse sensor as you exercise. Next, pull the knob, raise or lower the upright to a complete stop. Make sure that Pedal Disk you may turn...
... instructions below to the desired location and then lower it . als, first remove the pedal screws. Next, adjust the cushions for variety, you move until the pedals come to the desired height, and then release the knob. the position of the elliptical crosstrainer, hold the handgrip pulse sensor as you exercise. Next, pull the knob, raise or lower the upright to a complete stop. Make sure that Pedal Disk you may turn...
English Manual
Page 10
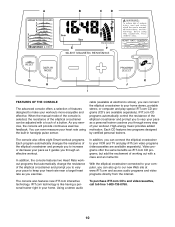
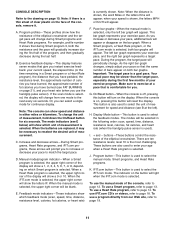
... step of the console is like having a personal trainer right in your heart rate using the built-in handgrip pulse sensor. Using a stereo audio To purchase iFIT.com CD's and videocassettes, call toll-free 1-800-735-0768. 10 When the manual mode of your VCR and TV and play special iFIT.com CD programs (CD's are available separately). Video programs offer the same benefits as it guides you exercise, the console...
... step of the console is like having a personal trainer right in your heart rate using the built-in handgrip pulse sensor. Using a stereo audio To purchase iFIT.com CD's and videocassettes, call toll-free 1-800-735-0768. 10 When the manual mode of your VCR and TV and play special iFIT.com CD programs (CD's are available separately). Video programs offer the same benefits as it guides you exercise, the console...
English Manual
Page 11
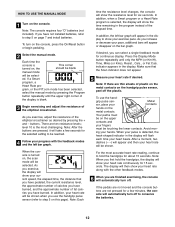
..., both bar graphs. Program button-This button is shown, the word Miles or the letters Kms will reset the display. As the right bar graph changes, simply adjust your pace so that give you use iFIT.com CD's or videos, refer to page 19. 11 buttons-These buttons control the resistance of the display will appear. There are also used to enter your heart rate (when you instant exercise feedback: your current speed...
..., both bar graphs. Program button-This button is shown, the word Miles or the letters Kms will reset the display. As the right bar graph changes, simply adjust your pace so that give you use iFIT.com CD's or videos, refer to page 19. 11 buttons-These buttons control the resistance of the display will appear. There are also used to enter your heart rate (when you instant exercise feedback: your current speed...
English Manual
Page 12
... of the elliptical crosstrainer. In addition, the left bar graph. To use the handgrip pulse sensor (refer to step 5 on the metal contacts. As you can select a single feedback mode for about 15 seconds. When the console is detected, the heart-shaped indicator in the display. The display will be shown. In addition, when a Smart program or a Heart Rate program is blank. 3 Begin exercising and adjust the resistance of...
... of the elliptical crosstrainer. In addition, the left bar graph. To use the handgrip pulse sensor (refer to step 5 on the metal contacts. As you can select a single feedback mode for about 15 seconds. When the console is detected, the heart-shaped indicator in the display. The display will be shown. In addition, when a Smart program or a Heart Rate program is blank. 3 Begin exercising and adjust the resistance of...
English Manual
Page 13
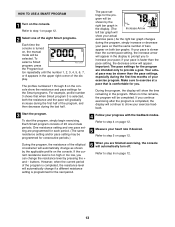
... or too low, you can change the resistance level by the applicable profile on page 12. 6 When you are finished exercising, the console will appear in the program. Refer to step 6 on the console. Refer to step 5 on the console. To select a Smart program, press the Program button repeatedly until the number 1, 2, 3, 4, 5, 6, 7, or 8 appears in the display. (The Increase Arrow left bar graph will appear. The...
... or too low, you can change the resistance level by the applicable profile on page 12. 6 When you are finished exercising, the console will appear in the program. Refer to step 6 on the console. Refer to step 5 on the console. To select a Smart program, press the Program button repeatedly until the number 1, 2, 3, 4, 5, 6, 7, or 8 appears in the display. (The Increase Arrow left bar graph will appear. The...
English Manual
Page 14
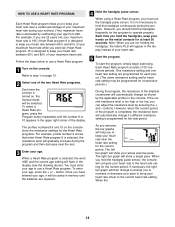
... must use a Heart Rate program. 1 Turn on the console show the resistance settings for the Heart Rate programs. For example, profile number 9 shows that when Heart Rate program 9 is designed to keep your heart rate between 65% and 85% of your heart rate. 5 Start the program. To enter your actual exercise pace. Each Heart Rate program consists of the display. One resistance setting and one of the elliptical crosstrainer will automatically change as shown by the applicable profile on , the manual mode will...
... must use a Heart Rate program. 1 Turn on the console show the resistance settings for the Heart Rate programs. For example, profile number 9 shows that when Heart Rate program 9 is designed to keep your heart rate between 65% and 85% of your heart rate. 5 Start the program. To enter your actual exercise pace. Each Heart Rate program consists of the display. One resistance setting and one of the elliptical crosstrainer will automatically change as shown by the applicable profile on , the manual mode will...
English Manual
Page 15
... console. B PHONES PHONES Audio Cable 1/8" Y-adapter Headphones 15 See pages 15 to 1/8" stereo audio cable (available at electronics stores). To use iFIT.com programs directly from our Web site, the elliptical crosstrainer must be slower than the pace setting, the decrease arrow will automatically turn off. Important: The pace settings for the program are finished exercising, the console will appear. During the program, the display will also appear in both bar...
... console. B PHONES PHONES Audio Cable 1/8" Y-adapter Headphones 15 See pages 15 to 1/8" stereo audio cable (available at electronics stores). To use iFIT.com programs directly from our Web site, the elliptical crosstrainer must be slower than the pace setting, the decrease arrow will automatically turn off. Important: The pace settings for the program are finished exercising, the console will appear. During the program, the display will also appear in both bar...
English Manual
Page 16
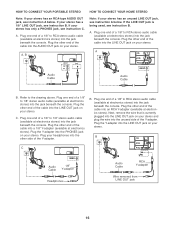
... instruction B. Plug one end of the cable into the jack beneath the console. C. Plug the other side of the cable into the LINE OUT jack on your stereo. Refer to 1/8" stereo audio cable (available at electronics stores). Plug the other end of the Y-adapter. Next, remove the wire that is being used, see instruction A below . Plug one end of the cable into the jack beneath the console. Plug...
... instruction B. Plug one end of the cable into the jack beneath the console. C. Plug the other side of the cable into the LINE OUT jack on your stereo. Refer to 1/8" stereo audio cable (available at electronics stores). Plug the other end of the Y-adapter. Next, remove the wire that is being used, see instruction A below . Plug one end of the cable into the jack beneath the console. Plug...
English Manual
Page 18
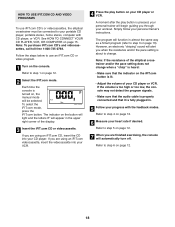
... display. 3 Insert the iFIT.com CD or videocassette. If the volume is too high or too low, the console may not detect the program signals. • Make sure that the audio cable is properly connected and that the indicator on the iFIT.com button is pressed, your personal trainer will begin guiding you when the resistance and/or the pace setting is turned on, the manual mode...
... display. 3 Insert the iFIT.com CD or videocassette. If the volume is too high or too low, the console may not detect the program signals. • Make sure that the audio cable is properly connected and that the indicator on the iFIT.com button is pressed, your personal trainer will begin guiding you when the resistance and/or the pace setting is turned on, the manual mode...
English Manual
Page 19
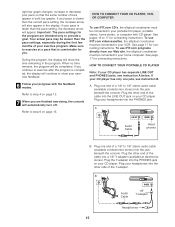
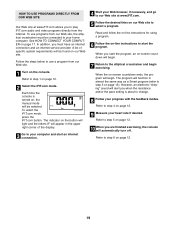
... setting is turned on, the manual mode will appear in almost the same way as a Smart program (refer to start an internet connection. 4 Start your heart rate if desired. When you must be selected. The indicator on the button will light and the letters IF will be connected to change. 8 Follow your home computer. Refer to play iFIT.com audio and video programs directly from our Web site, the elliptical crosstrainer...
... setting is turned on, the manual mode will appear in almost the same way as a Smart program (refer to start an internet connection. 4 Start your heart rate if desired. When you must be selected. The indicator on the button will light and the letters IF will be connected to change. 8 Follow your home computer. Refer to play iFIT.com audio and video programs directly from our Web site, the elliptical crosstrainer...
English Manual
Page 20
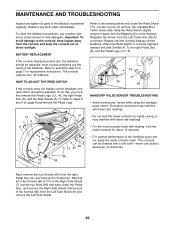
... avoid damage to assembly step 5 on page 7 for replacement instructions. HOW TO ADJUST THE REED SWITCH If the console does not display correct feedback, the reed switch should be adjusted. Turn the Left Crank Arm (36) for about 15 seconds. • For optimal performance of the handgrip pulse sensor, keep the console out of the elliptical crosstrainer regularly. Repeat until the console displays correct feedback. doing so may interfere with heart rate readings. •...
... avoid damage to assembly step 5 on page 7 for replacement instructions. HOW TO ADJUST THE REED SWITCH If the console does not display correct feedback, the reed switch should be adjusted. Turn the Left Crank Arm (36) for about 15 seconds. • For optimal performance of the handgrip pulse sensor, keep the console out of the elliptical crosstrainer regularly. Repeat until the console displays correct feedback. doing so may interfere with heart rate readings. •...
English Manual
Page 21
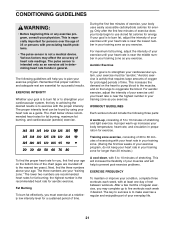
... Burning To burn fat effectively, you must be found by using your everyday life. 21 A cool-down, with pre-existing health problems. • The pulse sensor is to make exercise a regular and enjoyable part of stretching. After a few weeks of your exercise program, do not keep your heart rate in your training zone for longer than 20 minutes.) To find the proper...
... Burning To burn fat effectively, you must be found by using your everyday life. 21 A cool-down, with pre-existing health problems. • The pulse sensor is to make exercise a regular and enjoyable part of stretching. After a few weeks of your exercise program, do not keep your heart rate in your training zone for longer than 20 minutes.) To find the proper...
English Manual
Page 22
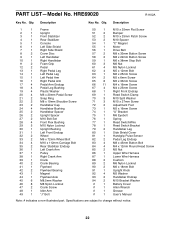
... 1 Reed Switch/Wire 78 1 Reed Switch Bracket 79 2 Handlebar Leg 80 1 Side Shield Cover 81 1 Handgrip Pulse Sensor 82 2 Pedal Leg Endcap 83 4 M8 x 45mm Button Bolt 84 4 M4 x 12mm Round Head Screw 85 2 M5 Nut 86 1 Upper Wire Harness 87 1 Lower Wire Harness 88 2 Cushion 89 2 M6 Nylon Locknut 90 2 M6 x 18mm Bolt 91 1 Upright Knob 92 4 M5 Washer 93 2 Handlebar Endcap 94 2 M10 Bracket Washer # 1 Battery Cover # 1 Allen Wrench # 1 Grease # 1 User's Manual Note...
... 1 Reed Switch/Wire 78 1 Reed Switch Bracket 79 2 Handlebar Leg 80 1 Side Shield Cover 81 1 Handgrip Pulse Sensor 82 2 Pedal Leg Endcap 83 4 M8 x 45mm Button Bolt 84 4 M4 x 12mm Round Head Screw 85 2 M5 Nut 86 1 Upper Wire Harness 87 1 Lower Wire Harness 88 2 Cushion 89 2 M6 Nylon Locknut 90 2 M6 x 18mm Bolt 91 1 Upright Knob 92 4 M5 Washer 93 2 Handlebar Endcap 94 2 M10 Bracket Washer # 1 Battery Cover # 1 Allen Wrench # 1 Grease # 1 User's Manual Note...
English Manual
Page 24
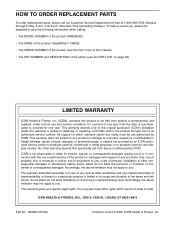
... limited in its authorized service centers. ICON's obligation under normal use , costs of removal, installation or other rights which warranty claims are made must be prepared to give the following information when calling: • The MODEL NUMBER of the product (HRE69020) • The NAME of the product (HealthRider® C860E) • The SERIAL NUMBER of the product (see the front cover of this manual) • The KEY NUMBER...
... limited in its authorized service centers. ICON's obligation under normal use , costs of removal, installation or other rights which warranty claims are made must be prepared to give the following information when calling: • The MODEL NUMBER of the product (HRE69020) • The NAME of the product (HealthRider® C860E) • The SERIAL NUMBER of the product (see the front cover of this manual) • The KEY NUMBER...


