

English Manual
Page 1
As a manufacturer, we are missing, PLEASE DO NOT CONTACT THE STORE; HREL74907.0 Serial No. please contact Customer Care. USER'S MANUAL Visit our website at www.healthrider.com new products, prizes, fitness tips, and much more! Serial Number Decal (on underside of frame) QUESTIONS? Keep this manual before contacting us: CALL TOLL-...
As a manufacturer, we are missing, PLEASE DO NOT CONTACT THE STORE; HREL74907.0 Serial No. please contact Customer Care. USER'S MANUAL Visit our website at www.healthrider.com new products, prizes, fitness tips, and much more! Serial Number Decal (on underside of frame) QUESTIONS? Keep this manual before contacting us: CALL TOLL-...

English Manual
Page 2
If the decal is a registered trademark of this manual and request a free replacement decal. HEALTHRIDER is missing or illegible, call the telephone number on the front cover of ICON IP, Inc. 2 Apply the decal in the indicated location. ...decal may not be shown at actual size. TABLE OF CONTENTS WARNING DECAL PLACEMENT 2 IMPORTANT PRECAUTIONS 3 BEFORE YOU BEGIN 4 ASSEMBLY 5 HOW TO USE THE ELLIPTICAL EXERCISER 11 MAINTENANCE AND TROUBLESHOOTING 17 EXERCISE GUIDELINES 18 PART LIST 20 EXPLODED DRAWING 21 ORDERING REPLACEMENT PARTS Back Cover LIMITED WARRANTY Back Cover WARNING...
If the decal is a registered trademark of this manual and request a free replacement decal. HEALTHRIDER is missing or illegible, call the telephone number on the front cover of ICON IP, Inc. 2 Apply the decal in the indicated location. ...decal may not be shown at actual size. TABLE OF CONTENTS WARNING DECAL PLACEMENT 2 IMPORTANT PRECAUTIONS 3 BEFORE YOU BEGIN 4 ASSEMBLY 5 HOW TO USE THE ELLIPTICAL EXERCISER 11 MAINTENANCE AND TROUBLESHOOTING 17 EXERCISE GUIDELINES 18 PART LIST 20 EXPLODED DRAWING 21 ORDERING REPLACEMENT PARTS Back Cover LIMITED WARRANTY Back Cover WARNING...

English Manual
Page 3
...of serious injury, read all important precautions and instructions in this manual and all warnings on your elliptical exerciser before using your elliptical exerciser. 10. Keep your elliptical exerciser at all times. 7. The pulse sensor is especially important for foot protection. 9. Various factors...device. Always wear athletic shoes for persons over the age of all parts regularly. Keep your back straight while using your elliptical exerciser only as an exercise aid in determining heart rate trends in a commercial, rental, or institutional setting. 4. Wear ...
...of serious injury, read all important precautions and instructions in this manual and all warnings on your elliptical exerciser before using your elliptical exerciser. 10. Keep your elliptical exerciser at all times. 7. The pulse sensor is especially important for foot protection. 9. Various factors...device. Always wear athletic shoes for persons over the age of all parts regularly. Keep your back straight while using your elliptical exerciser only as an exercise aid in determining heart rate trends in a commercial, rental, or institutional setting. 4. Wear ...
English Manual
Page 4
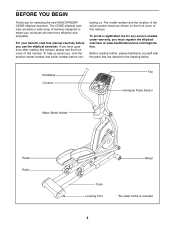
... at home more effective and enjoyable. tacting us assist you for any service needed under warranty, you use the elliptical exerciser. Before reading further, please familiarize yourself with the parts that are shown on the front cover of this manual....the front cover of features designed to make your benefit, read this manual. To avoid a registration fee for selecting the new HEALTHRIDER® C550E elliptical exerciser. The C550E elliptical exerciser provides a wide array of this manual carefully before con- The model number and the location of the serial number decal...
... at home more effective and enjoyable. tacting us assist you for any service needed under warranty, you use the elliptical exerciser. Before reading further, please familiarize yourself with the parts that are shown on the front cover of this manual....the front cover of features designed to make your benefit, read this manual. To avoid a registration fee for selecting the new HEALTHRIDER® C550E elliptical exerciser. The C550E elliptical exerciser provides a wide array of this manual carefully before con- The model number and the location of the serial number decal...
English Manual
Page 5
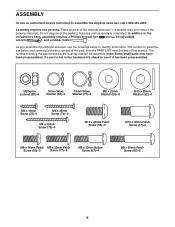
... Assembly requires two persons. Place all parts of the packing materials until assembly is not in the hardware kit, check to assemble the elliptical exerciser, call 1-800-445-2480. Note: Some small parts may have been preassembled. If a part is completed. ASSEMBLY To hire ...an authorized service technician to see if it has been preassembled. Do not dispose of the elliptical exerciser in parentheses below to the included hex keys, assembly requires a Phillips screwdriver , an adjustable wrench , and a rubber mallet . The...
... Assembly requires two persons. Place all parts of the packing materials until assembly is not in the hardware kit, check to assemble the elliptical exerciser, call 1-800-445-2480. Note: Some small parts may have been preassembled. If a part is completed. ASSEMBLY To hire ...an authorized service technician to see if it has been preassembled. Do not dispose of the elliptical exerciser in parentheses below to the included hex keys, assembly requires a Phillips screwdriver , an adjustable wrench , and a rubber mallet . The...

English Manual
Page 6
... (77), a Pivot Axle Cover (44), and an M8 x 25mm Washer (54). To make assembly easier, read the 1 information on page 5 before you begin assembling the elliptical exerciser. Apply a small amount of the included grease to a 16mm Wave Washer (66). Apply a generous amount of grease to the Pivot Axle (41). Slide the...
... (77), a Pivot Axle Cover (44), and an M8 x 25mm Washer (54). To make assembly easier, read the 1 information on page 5 before you begin assembling the elliptical exerciser. Apply a small amount of the included grease to a 16mm Wave Washer (66). Apply a generous amount of grease to the Pivot Axle (41). Slide the...
English Manual
Page 7
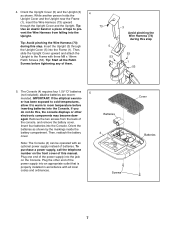
... two screws from falling into the Console. Orient the batteries as shown. Plug one end of the power supply into the Console. 4. IMPORTANT: If the elliptical exercis- Tip: Start all local codes and ordinances. While another person holds the Upright Cover and the Upright near the Frame (1), insert the Wire Harness...
... two screws from falling into the Console. Orient the batteries as shown. Plug one end of the power supply into the Console. 4. IMPORTANT: If the elliptical exercis- Tip: Start all local codes and ordinances. While another person holds the Upright Cover and the Upright near the Frame (1), insert the Wire Harness...
English Manual
Page 8
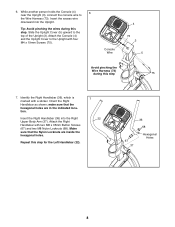
Insert the excess wire downward into the Right Upper Body Arm (37). Slide the Upright Cover (5) upward to the Wire Harness (73). Orient the Right Handlebar as shown; Make sure that the hexagonal holes are inside the hexagonal holes. Identify the Right Handlebar (36), which is marked with four M4 x 19mm Screws (75). Repeat this step 75 7. Attach the Console (4) and the Upright Cover to the Upright with a sticker. Console Wire 4 73 3 5 Avoid pinching the Wire Harness (73) during this step. 6. Attach the Right Handlebar with two M8 x 35mm Button Screws (67) and two ...
Insert the excess wire downward into the Right Upper Body Arm (37). Slide the Upright Cover (5) upward to the Wire Harness (73). Orient the Right Handlebar as shown; Make sure that the hexagonal holes are inside the hexagonal holes. Identify the Right Handlebar (36), which is marked with four M4 x 19mm Screws (75). Repeat this step 75 7. Attach the Console (4) and the Upright Cover to the Upright with a sticker. Console Wire 4 73 3 5 Avoid pinching the Wire Harness (73) during this step. 6. Attach the Right Handlebar with two M8 x 35mm Button Screws (67) and two ...
English Manual
Page 9
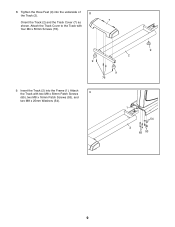
8. Tighten the three Feet (9) into the Frame (1). Attach 9 the Track with four M4 x 50mm Screws (76). 9 2 9 9 76 9. Insert the Track (2) into the underside of 8 the Track (2). 7 Orient the Track (2) and the Track Cover (7) as shown. Attach the Track Cover to the Track with two M8 x 50mm Patch Screws (65), two M8 x 16mm Patch Screws (53), and two M8 x 25mm Washers (54). 1 54 2 65 53 9
8. Tighten the three Feet (9) into the Frame (1). Attach 9 the Track with four M4 x 50mm Screws (76). 9 2 9 9 76 9. Insert the Track (2) into the underside of 8 the Track (2). 7 Orient the Track (2) and the Track Cover (7) as shown. Attach the Track Cover to the Track with two M8 x 50mm Patch Screws (65), two M8 x 16mm Patch Screws (53), and two M8 x 25mm Washers (54). 1 54 2 65 53 9

English Manual
Page 10
...the Right Link Arm (39) and then slide the Wave Washer onto the right side of the elliptical exerciser. 37 Grease 71 31 39 52 46 52 38 46 58 12. Apply a small amount ... the right Crank Arm (31). To protect the floor or carpet from damage, place a mat under the elliptical exerciser. 10 Orient the assembly as shown. Also, apply a small amount of grease to the right Crank ...47). With the help of another person, slide the Right Pedal Leg (38) onto the right side of the elliptical exerciser are marked with two M10 x 20mm Patch Screws (58), two Axle Covers (46), and two M10 ...
...the Right Link Arm (39) and then slide the Wave Washer onto the right side of the elliptical exerciser. 37 Grease 71 31 39 52 46 52 38 46 58 12. Apply a small amount ... the right Crank Arm (31). To protect the floor or carpet from damage, place a mat under the elliptical exerciser. 10 Orient the assembly as shown. Also, apply a small amount of grease to the right Crank ...47). With the help of another person, slide the Right Pedal Leg (38) onto the right side of the elliptical exerciser are marked with two M10 x 20mm Patch Screws (58), two Axle Covers (46), and two M10 ...
English Manual
Page 11
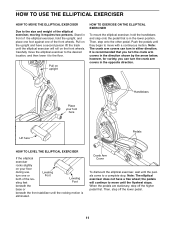
...lower it requires two persons. Pull on the front wheels. the pedals will roll on upright HOW TO EXERCISE ON THE ELLIPTICAL EXERCISER To mount the elliptical exerciser, hold the upright, and place one foot against one or both of the leveling feet Foot Leveling Foot beneath the... that is in the direction shown by the arrow below; Crank Arm Cover To dismount the elliptical exerciser, wait until the elliptical exerciser will continue to move with a continuous motion. Note: The elliptical exerciser does not have a second person lift the track until the pedals come to a complete...
...lower it requires two persons. Pull on the front wheels. the pedals will roll on upright HOW TO EXERCISE ON THE ELLIPTICAL EXERCISER To mount the elliptical exerciser, hold the upright, and place one foot against one or both of the leveling feet Foot Leveling Foot beneath the... that is in the direction shown by the arrow below; Crank Arm Cover To dismount the elliptical exerciser, wait until the elliptical exerciser will continue to move with a continuous motion. Note: The elliptical exerciser does not have a second person lift the track until the pedals come to a complete...

English Manual
Page 12
When you can even measure your pace while counting the calories you through an effective workout. The console has five calorie goal workouts designed to vary your heart rate using the handgrip pulse sensor. To use the manual mode of the pedals and prompt you to help you exercise, the console will display continuous exercise feedback. As you burn 300, 400, or 500 calories in 25-, 30or 45-minute workouts. matically control the resistance of the console, you use a preset workout, see page 15. CONSOLE DIAGRAM FEATURES OF THE CONSOLE The advanced console offers an ...
When you can even measure your pace while counting the calories you through an effective workout. The console has five calorie goal workouts designed to vary your heart rate using the handgrip pulse sensor. To use the manual mode of the pedals and prompt you to help you exercise, the console will display continuous exercise feedback. As you burn 300, 400, or 500 calories in 25-, 30or 45-minute workouts. matically control the resistance of the console, you use a preset workout, see page 15. CONSOLE DIAGRAM FEATURES OF THE CONSOLE The advanced console offers an ...

English Manual
Page 13
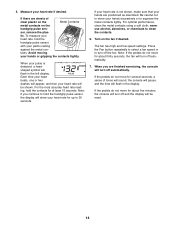
Select the manual mode. As you use the handgrip pulse sensor (see step 5 on page 14). When you select the manual mode, the center display will show your heart rate when you pedal, change the resistance of the pedals as desired. The right display- The upper display-When you have pedaled and your progress with the displays. The left display will show a track that represents 640 revolutions. The center display- There are ten resistance levels. Note: When you select a workout, the display will also show the approximate number of calories you select the manual mode, ...
Select the manual mode. As you use the handgrip pulse sensor (see step 5 on page 14). When you select the manual mode, the center display will show your heart rate when you pedal, change the resistance of the pedals as desired. The right display- The upper display-When you have pedaled and your progress with the displays. The left display will show a track that represents 640 revolutions. The center display- There are ten resistance levels. Note: When you select a workout, the display will also show the approximate number of calories you select the manual mode, ...
English Manual
Page 14
Each time your heart beats, one or two dashes will appear, and then your heart rate will turn off the fan. Be careful not to move for several seconds, a series of clear plastic on the Metal Contacts metal contacts on the fan if desired. sor, remove the plas- If the pedals do not move your heart rate for about five minutes, the console will be reset. 14 Measure your hands or gripping the contacts tightly. Note: If the pedals do not move for up to squeeze the metal contacts tightly. Note: If you are finished exercising, the console will show your ...
Each time your heart beats, one or two dashes will appear, and then your heart rate will turn off the fan. Be careful not to move for several seconds, a series of clear plastic on the Metal Contacts metal contacts on the fan if desired. sor, remove the plas- If the pedals do not move your heart rate for about five minutes, the console will be reset. 14 Measure your hands or gripping the contacts tightly. Note: If the pedals do not move for up to squeeze the metal contacts tightly. Note: If you are finished exercising, the console will show your ...

English Manual
Page 15
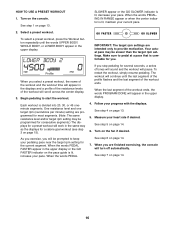
Press the Workout button repeatedly until the last segment of the profile flashes and the last segment of the profile will scroll across the center display. Each workout is lit, decrease your pace. During the workout, the workout profile will flash in the display for each segment of the workout, a series of tones will sound and the next segment of the workout ends. The flashing segment of the profile represents the current segment of the workout and the workout time will appear in the upper display. 4. At the end of the workout ends, the words PROGRAM DONE will be prompted to...
Press the Workout button repeatedly until the last segment of the profile flashes and the last segment of the profile will scroll across the center display. Each workout is lit, decrease your pace. During the workout, the workout profile will flash in the display for each segment of the workout, a series of tones will sound and the next segment of the workout ends. The flashing segment of the profile represents the current segment of the workout and the workout time will appear in the upper display. 4. At the end of the workout ends, the words PROGRAM DONE will be prompted to...
English Manual
Page 16
When the words PEDALING IN RANGE appear or when the center indicator is lit, maintain your progress with the displays. To select a preset workout, press the Workout button repeatedly until the last segment of the profile flashes and the last segment of the workout ends. IMPORTANT: The target rpm settings are finished exercising, the console will scroll across the center display. 3. Your actual pace may be slower than the target rpm settings. The workout will appear in the upper display. 4. Follow your current pace. 2. Turn on the console. Begin pedaling to keep your...
When the words PEDALING IN RANGE appear or when the center indicator is lit, maintain your progress with the displays. To select a preset workout, press the Workout button repeatedly until the last segment of the profile flashes and the last segment of the workout ends. IMPORTANT: The target rpm settings are finished exercising, the console will scroll across the center display. 3. Your actual pace may be slower than the target rpm settings. The workout will appear in the upper display. 4. Follow your current pace. 2. Turn on the console. Begin pedaling to keep your...

English Manual
Page 17
... the grease evenly around the Rollers. Loosen, but do not remove, the indicated M4 x 16mm Screw (72). Next, remove all parts of the elliptical exerciser until the Belt (80) is adjusted to the highest setting, the drive belt may need to be adjusted. Loosen, but do not remove, ... Reed Switch slightly closer to each Roller. HOW TO GREASE THE ROLLERS See the EXPLODED DRAWING near the end of this manual. Pedal the elliptical exerciser until the console displays correct feedback. To adjust the drive belt, see EXPLODED DRAWING A near the end of grease is correctly adjusted,...
... the grease evenly around the Rollers. Loosen, but do not remove, the indicated M4 x 16mm Screw (72). Next, remove all parts of the elliptical exerciser until the Belt (80) is adjusted to the highest setting, the drive belt may need to be adjusted. Loosen, but do not remove, ... Reed Switch slightly closer to each Roller. HOW TO GREASE THE ROLLERS See the EXPLODED DRAWING near the end of this manual. Pedal the elliptical exerciser until the console displays correct feedback. To adjust the drive belt, see EXPLODED DRAWING A near the end of grease is correctly adjusted,...

English Manual
Page 18
The chart below shows recommended heart rates for aerobic exercise. For maximum fat burning, exercise with 5 to 10 minutes of stretching. After a few minutes of the chart (ages are essential for energy. The pulse sensor is intended only as you must exercise at the bottom of exercise does your body begin to use your heart rate as a guide to make exercise a regular and enjoyable part of time. For detailed exercise information, obtain a reputable book or consult your "training zone." You can use stored fat calories for successful results. During the first few ...
The chart below shows recommended heart rates for aerobic exercise. For maximum fat burning, exercise with 5 to 10 minutes of stretching. After a few minutes of the chart (ages are essential for energy. The pulse sensor is intended only as you must exercise at the bottom of exercise does your body begin to use your heart rate as a guide to make exercise a regular and enjoyable part of time. For detailed exercise information, obtain a reputable book or consult your "training zone." You can use stored fat calories for successful results. During the first few ...
English Manual
Page 19
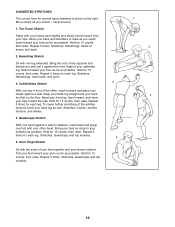
Hamstring Stretch Sit with the soles of your feet together and your knees outward. Calf/Achilles Stretch With one leg extended. Bend your front leg, lean forward, and move your back foot flat on the floor. Repeat 3 times for 15 counts, then relax. Bring your heel as close to relax as you reach down toward your extended leg. Inner Thigh Stretch Sit with one leg in front of your toes as far as well. Hold for each leg. Keep your back leg straight and your hips toward you stretch-never bounce. 1. Stretches: Hamstrings, lower back, and groin. 3 3. Quadriceps ...
Hamstring Stretch Sit with the soles of your feet together and your knees outward. Calf/Achilles Stretch With one leg extended. Bend your front leg, lean forward, and move your back foot flat on the floor. Repeat 3 times for 15 counts, then relax. Bring your heel as close to relax as you reach down toward your extended leg. Inner Thigh Stretch Sit with one leg in front of your toes as far as well. Hold for each leg. Keep your back leg straight and your hips toward you stretch-never bounce. 1. Stretches: Hamstrings, lower back, and groin. 3 3. Quadriceps ...

English Manual
Page 20
User's Manual Note: Specifications are not illustrated. 20 Qty. Description Key No. Description 1 1 Frame 2 1 Track 3 1 Upright 4 1 Console 5 1 Upright Cover 6 1 Water Bottle Holder 7 1 Track Cover 8 2 Wheel 9 3 Foot 10 1 Eddy Mechanism 11 1 Axle 12 1 Idler 13 1 Pulley 14 1 Crank 15 2 Crank Bearing 16 1 Resistance Motor 17 1 Resistance Cable 18 2 Magnet 19 2 Upper Body Bushing 20 1 Clamp 21 1 Reed Switch/Wire 22 1 Left Handlebar 23 1 Left Upper Body Arm 24 1 Left Pedal Leg 25 1 Left Link Arm 26 2...
User's Manual Note: Specifications are not illustrated. 20 Qty. Description Key No. Description 1 1 Frame 2 1 Track 3 1 Upright 4 1 Console 5 1 Upright Cover 6 1 Water Bottle Holder 7 1 Track Cover 8 2 Wheel 9 3 Foot 10 1 Eddy Mechanism 11 1 Axle 12 1 Idler 13 1 Pulley 14 1 Crank 15 2 Crank Bearing 16 1 Resistance Motor 17 1 Resistance Cable 18 2 Magnet 19 2 Upper Body Bushing 20 1 Clamp 21 1 Reed Switch/Wire 22 1 Left Handlebar 23 1 Left Upper Body Arm 24 1 Left Pedal Leg 25 1 Left Link Arm 26 2...