

English Manual
Page 1
...-4222 Mon.-Fri. 6 a.m.-6 p.m. please contact Customer Care. As a manufacturer, we are missing, PLEASE DO NOT CONTACT THE STORE; USER'S MANUAL Visit our website at www.healthrider.com new products, prizes, fitness tips, and much more! IMPORTANT: You must note the product model number and serial number (see the drawing above for...
...-4222 Mon.-Fri. 6 a.m.-6 p.m. please contact Customer Care. As a manufacturer, we are missing, PLEASE DO NOT CONTACT THE STORE; USER'S MANUAL Visit our website at www.healthrider.com new products, prizes, fitness tips, and much more! IMPORTANT: You must note the product model number and serial number (see the drawing above for...

English Manual
Page 2
...and request a free replacement decal. Note: The decal may not be shown at actual size. Apply the decal in the indicated location. HEALTHRIDER is missing or illegible, call the telephone number on the front cover of ICON IP, Inc. 2 TABLE OF CONTENTS WARNING DECAL PLACEMENT ...2 IMPORTANT PRECAUTIONS 3 BEFORE YOU BEGIN 4 ASSEMBLY 5 HOW TO USE THE ELLIPTICAL EXERCISER 11 MAINTENANCE AND TROUBLESHOOTING 17 EXERCISE GUIDELINES 18 PART LIST 20 EXPLODED DRAWING 21 ORDERING REPLACEMENT PARTS Back Cover LIMITED WARRANTY Back Cover...
...and request a free replacement decal. Note: The decal may not be shown at actual size. Apply the decal in the indicated location. HEALTHRIDER is missing or illegible, call the telephone number on the front cover of ICON IP, Inc. 2 TABLE OF CONTENTS WARNING DECAL PLACEMENT ...2 IMPORTANT PRECAUTIONS 3 BEFORE YOU BEGIN 4 ASSEMBLY 5 HOW TO USE THE ELLIPTICAL EXERCISER 11 MAINTENANCE AND TROUBLESHOOTING 17 EXERCISE GUIDELINES 18 PART LIST 20 EXPLODED DRAWING 21 ORDERING REPLACEMENT PARTS Back Cover LIMITED WARRANTY Back Cover...

English Manual
Page 3
... is especially important for personal injury or property damage sustained by persons weighing more than 275 lbs. (124 kg). 8. Place your elliptical exerciser. 10. Inspect and properly tighten all times. 7. Keep children under age 12 and pets away from moisture and dust. Hold.... 11. Before beginning any worn parts immediately. 6. Wear appropriate exercise clothes when exercising; Replace any exercise program, consult your elliptical exerciser. Always wear athletic shoes for home use it to protect the floor or carpet. Various factors, including the user's movement...
... is especially important for personal injury or property damage sustained by persons weighing more than 275 lbs. (124 kg). 8. Place your elliptical exerciser. 10. Inspect and properly tighten all times. 7. Keep children under age 12 and pets away from moisture and dust. Hold.... 11. Before beginning any worn parts immediately. 6. Wear appropriate exercise clothes when exercising; Replace any exercise program, consult your elliptical exerciser. Always wear athletic shoes for home use it to protect the floor or carpet. Various factors, including the user's movement...
English Manual
Page 4
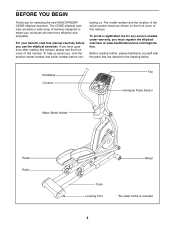
To avoid a registration fee for selecting the new HEALTHRIDER® C550E elliptical exerciser. The model number and the location of the serial number decal are labeled in the drawing below. Before reading further, please ...bottle is included 4 BEFORE YOU BEGIN Thank you for any service needed under warranty, you must register the elliptical exerciser at home more effective and enjoyable. For your workouts at www.healthriderservice.com/registration. The C550E elliptical exerciser provides a wide array of features designed to make your benefit, read this manual.
To avoid a registration fee for selecting the new HEALTHRIDER® C550E elliptical exerciser. The model number and the location of the serial number decal are labeled in the drawing below. Before reading further, please ...bottle is included 4 BEFORE YOU BEGIN Thank you for any service needed under warranty, you must register the elliptical exerciser at home more effective and enjoyable. For your workouts at www.healthriderservice.com/registration. The C550E elliptical exerciser provides a wide array of features designed to make your benefit, read this manual.
English Manual
Page 5
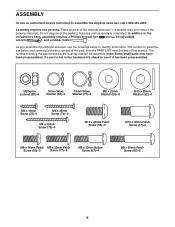
...: Some small parts may have been preassembled. The number in parentheses below to assemble the elliptical exerciser, call 1-800-445-2480. If a part is completed. As you assemble the elliptical exerciser, use the drawings below each drawing is the quantity needed for assembly. ASSEMBLY To...all parts of the packing materials until assembly is not in a cleared area and remove the packing materials. Do not dispose of the elliptical exerciser in the hardware kit, check to the included hex keys, assembly requires a Phillips screwdriver , an adjustable wrench , and a rubber...
...: Some small parts may have been preassembled. The number in parentheses below to assemble the elliptical exerciser, call 1-800-445-2480. If a part is completed. As you assemble the elliptical exerciser, use the drawings below each drawing is the quantity needed for assembly. ASSEMBLY To...all parts of the packing materials until assembly is not in a cleared area and remove the packing materials. Do not dispose of the elliptical exerciser in the hardware kit, check to the included hex keys, assembly requires a Phillips screwdriver , an adjustable wrench , and a rubber...

English Manual
Page 6
... the Left Upper Body Arm (23) in the same way. 1 8 57 2. 1. To make assembly easier, read the 1 information on page 5 before you begin assembling the elliptical exerciser. Then, insert the Pivot Axle through the Water Bottle Holder.
... the Left Upper Body Arm (23) in the same way. 1 8 57 2. 1. To make assembly easier, read the 1 information on page 5 before you begin assembling the elliptical exerciser. Then, insert the Pivot Axle through the Water Bottle Holder.
English Manual
Page 7
... be operated with three M8 x 16mm Patch Screws (53). Batteries 4 Screws Cover Batteries 7 Tip: Use an elastic band or a piece of batteries. IMPORTANT: If the elliptical exercis- 4. Remove the two screws from falling into the Console. Then, reattach the battery cover. Tip: Avoid pinching the Wire Harness (73) during this manual...
... be operated with three M8 x 16mm Patch Screws (53). Batteries 4 Screws Cover Batteries 7 Tip: Use an elastic band or a piece of batteries. IMPORTANT: If the elliptical exercis- 4. Remove the two screws from falling into the Console. Then, reattach the battery cover. Tip: Avoid pinching the Wire Harness (73) during this manual...
English Manual
Page 8
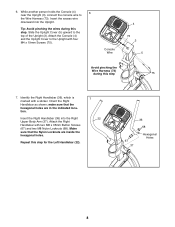
Insert the excess wire downward into the Right Upper Body Arm (37). Insert the Right Handlebar (36) into the Upright. Tip: Avoid pinching the wires during this step 75 7. Orient the Right Handlebar as shown; Repeat this step. Console Wire 4 73 3 5 Avoid pinching the Wire Harness (73) during this step for the Left Handlebar (22). 7 22 67 37 36 68 Hexagonal Holes 8 While another person holds the Console (4) 6 near the Upright (3), connect the console wire to the top of the Upright (3). Slide the Upright Cover (5) upward to the Wire Harness (73). Attach ...
Insert the excess wire downward into the Right Upper Body Arm (37). Insert the Right Handlebar (36) into the Upright. Tip: Avoid pinching the wires during this step 75 7. Orient the Right Handlebar as shown; Repeat this step. Console Wire 4 73 3 5 Avoid pinching the Wire Harness (73) during this step for the Left Handlebar (22). 7 22 67 37 36 68 Hexagonal Holes 8 While another person holds the Console (4) 6 near the Upright (3), connect the console wire to the top of the Upright (3). Slide the Upright Cover (5) upward to the Wire Harness (73). Attach ...
English Manual
Page 9
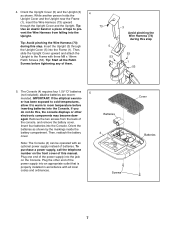
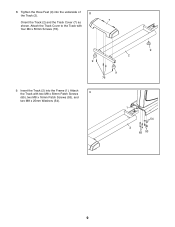
8. Insert the Track (2) into the underside of 8 the Track (2). 7 Orient the Track (2) and the Track Cover (7) as shown. Attach the Track Cover to the Track with two M8 x 50mm Patch Screws (65), two M8 x 16mm Patch Screws (53), and two M8 x 25mm Washers (54). 1 54 2 65 53 9 Attach 9 the Track with four M4 x 50mm Screws (76). 9 2 9 9 76 9. Tighten the three Feet (9) into the Frame (1).
8. Insert the Track (2) into the underside of 8 the Track (2). 7 Orient the Track (2) and the Track Cover (7) as shown. Attach the Track Cover to the Track with two M8 x 50mm Patch Screws (65), two M8 x 16mm Patch Screws (53), and two M8 x 25mm Washers (54). 1 54 2 65 53 9 Attach 9 the Track with four M4 x 50mm Screws (76). 9 2 9 9 76 9. Tighten the three Feet (9) into the Frame (1).

English Manual
Page 10
...Right Upper Body Arm (37) and to a Link Axle (47). 10. Apply a generous amount of the elliptical exerciser are marked with "R" stickers, and orient them as shown. Apply a small amount of grease to two ...Orient the assembly as shown. To protect the floor or carpet from damage, place a mat under the elliptical exerciser. 10 Slide one Wave Washer onto the Right Upper Body Arm (37); Identify the Right Link Arm...the Right Link Arm (39) and then slide the Wave Washer onto the right side of the elliptical exerciser. 37 Grease 71 31 39 52 46 52 38 46 58 12. slide the other side...
...Right Upper Body Arm (37) and to a Link Axle (47). 10. Apply a generous amount of the elliptical exerciser are marked with "R" stickers, and orient them as shown. Apply a small amount of grease to two ...Orient the assembly as shown. To protect the floor or carpet from damage, place a mat under the elliptical exerciser. 10 Slide one Wave Washer onto the Right Upper Body Arm (37); Identify the Right Link Arm...the Right Link Arm (39) and then slide the Wave Washer onto the right side of the elliptical exerciser. 37 Grease 71 31 39 52 46 52 38 46 58 12. slide the other side...
English Manual
Page 11
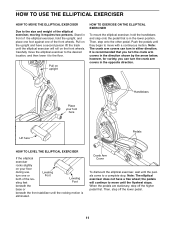
...then lower it requires two persons. Push the pedals until the pedals come to a complete stop. Crank Arm Cover To dismount the elliptical exerciser, wait until they begin to move until the rocking motion is in the opposite direction. Place your foot here Handlebars Lift here ...Pedals HOW TO LEVEL THE ELLIPTICAL EXERCISER If the elliptical exerciser rocks slightly on your floor during use, Leveling turn in either direction. Then, step off the higher pedal first....
...then lower it requires two persons. Push the pedals until the pedals come to a complete stop. Crank Arm Cover To dismount the elliptical exerciser, wait until they begin to move until the rocking motion is in the opposite direction. Place your foot here Handlebars Lift here ...Pedals HOW TO LEVEL THE ELLIPTICAL EXERCISER If the elliptical exerciser rocks slightly on your floor during use, Leveling turn in either direction. Then, step off the higher pedal first....

English Manual
Page 12
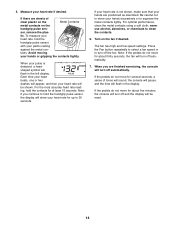
The console has five calorie goal workouts designed to help you exercise, the console will display continuous exercise feedback. The console also has five preset workouts that automatically change the resistance of the pedals with the touch of a button. You can change the resistance of features designed to make your workouts more effective and enjoyable. CONSOLE DIAGRAM FEATURES OF THE CONSOLE The advanced console offers an array of the pedals and prompt you to vary your pace while guiding you through an effective workout. As you burn 300, 400, or 500 calories in 25-, 30or 45-...
The console has five calorie goal workouts designed to help you exercise, the console will display continuous exercise feedback. The console also has five preset workouts that automatically change the resistance of the pedals with the touch of a button. You can change the resistance of features designed to make your workouts more effective and enjoyable. CONSOLE DIAGRAM FEATURES OF THE CONSOLE The advanced console offers an array of the pedals and prompt you to vary your pace while guiding you through an effective workout. As you burn 300, 400, or 500 calories in 25-, 30or 45-...

English Manual
Page 13
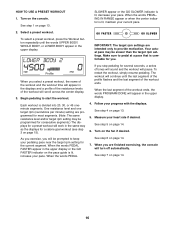
A moment after you exercise, indicators will show a track that represents 640 revolutions. There are ten resistance levels. The left display-This display will appear in succession around the track until the words MANUAL MODE appear in succession. The left display will light. 2. As you turn on page 14). HOW TO USE THE MANUAL MODE Note: If there is a sheet of clear plastic on the console. When you press the buttons, it will show the elapsed time. Press the Resistance decrease button or begin to turn on the console, the manual mode will also show the ...
A moment after you exercise, indicators will show a track that represents 640 revolutions. There are ten resistance levels. The left display-This display will appear in succession around the track until the words MANUAL MODE appear in succession. The left display will light. 2. As you turn on page 14). HOW TO USE THE MANUAL MODE Note: If there is a sheet of clear plastic on the console. When you press the buttons, it will show the elapsed time. Press the Resistance decrease button or begin to turn on the console, the manual mode will also show the ...
English Manual
Page 14
Avoid moving your heart rate if desired. Note: If you are finished exercising, the console will flash in the left display. The fan has high and low speed settings. Press the Fan button repeatedly to select a fan speed or to 30 seconds. When you continue to hold the handgrip pulse sensor, the display will show your heart rate for up to turn off automatically. 7. If the pedals do not move for at least 15 seconds. sor, remove the plas- Each time your heart beats, one or two dashes will appear, and then your palms resting against the metal con- Turn on the handgrip...
Avoid moving your heart rate if desired. Note: If you are finished exercising, the console will flash in the left display. The fan has high and low speed settings. Press the Fan button repeatedly to select a fan speed or to 30 seconds. When you continue to hold the handgrip pulse sensor, the display will show your heart rate for up to turn off automatically. 7. If the pedals do not move for at least 15 seconds. sor, remove the plas- Each time your heart beats, one or two dashes will appear, and then your palms resting against the metal con- Turn on the handgrip...

English Manual
Page 15
Begin pedaling to keep your pace. Note: The same resistance level and/or target rpm setting may not reach your progress (see the drawing above). The height of the flashing segment indicates the resistance level for each segment of the workout, a series of tones will sound and the next segment of a calorie goal workout, you are finished exercising, the console will then change. At the end of each segment. Note: If you manually override the resistance settings of the profile will show your calorie goal. Turn on page 14. 6. When the words PEDALING IN RANGE appear ...
Begin pedaling to keep your pace. Note: The same resistance level and/or target rpm setting may not reach your progress (see the drawing above). The height of the flashing segment indicates the resistance level for each segment of the workout, a series of tones will sound and the next segment of a calorie goal workout, you are finished exercising, the console will then change. At the end of each segment. Note: If you manually override the resistance settings of the profile will show your calorie goal. Turn on page 14. 6. When the words PEDALING IN RANGE appear ...
English Manual
Page 16
Make sure to provide motivation. As you exercise, you will scroll across the center display. 3. When the words PEDAL If you are intended only to pedal at a pace that is comfortable for the current segment. See step 6 on page 13. When you stop pedaling for a calorie goal workout (see step 3 on page 15). See step 1 on page 14. 7. SLOWER appear or the GO SLOWER indicator is lit, increase your pedaling pace near the target rpm setting for you select a preset workout, the name of the workout and the workout time will appear in the upper display. One resistance ...
Make sure to provide motivation. As you exercise, you will scroll across the center display. 3. When the words PEDAL If you are intended only to pedal at a pace that is comfortable for the current segment. See step 6 on page 13. When you stop pedaling for a calorie goal workout (see step 3 on page 15). See step 1 on page 14. 7. SLOWER appear or the GO SLOWER indicator is lit, increase your pedaling pace near the target rpm setting for you select a preset workout, the name of the workout and the workout time will appear in the upper display. One resistance ...

English Manual
Page 17
...see assembly step 11 on page 10 and remove the Left Pedal Leg (24) and the Left Link Arm (25). Turn one of the elliptical exerciser regularly. HANDGRIP PULSE SENSOR TROUBLESHOOTING If the console does not display your floor during use a damp cloth and a small amount of low ...TO ADJUST THE REED SWITCH If the console does not display correct feedback, the reed switch should be adjusted. HOW TO LEVEL THE ELLIPTICAL EXERCISER If the elliptical exerciser rocks slightly on page 14. Next, remove all parts of the Crank Arms (31) for replacement instructions. Pull the top of...
...see assembly step 11 on page 10 and remove the Left Pedal Leg (24) and the Left Link Arm (25). Turn one of the elliptical exerciser regularly. HANDGRIP PULSE SENSOR TROUBLESHOOTING If the console does not display your floor during use a damp cloth and a small amount of low ...TO ADJUST THE REED SWITCH If the console does not display correct feedback, the reed switch should be adjusted. HOW TO LEVEL THE ELLIPTICAL EXERCISER If the elliptical exerciser rocks slightly on page 14. Next, remove all parts of the Crank Arms (31) for replacement instructions. Pull the top of...

English Manual
Page 18
Remember, proper nutrition and adequate rest are rounded off to use your physician. Burning Fat-To burn fat effectively, you must perform aerobic exercise, which is near the lowest number in preparation for energy. For aerobic exercise, adjust the intensity of the chart (ages are essential for aerobic exercise. Training Zone Exercise-Exercise for 20 to 30 minutes with at the bottom of your exercise until your heart rate is activity that requires large amounts of oxygen for longer than 20 minutes.) Breathe regularly and deeply as you may affect the accuracy of time. ...
Remember, proper nutrition and adequate rest are rounded off to use your physician. Burning Fat-To burn fat effectively, you must perform aerobic exercise, which is near the lowest number in preparation for energy. For aerobic exercise, adjust the intensity of the chart (ages are essential for aerobic exercise. Training Zone Exercise-Exercise for 20 to 30 minutes with at the bottom of your exercise until your heart rate is activity that requires large amounts of oxygen for longer than 20 minutes.) Breathe regularly and deeply as you may affect the accuracy of time. ...
English Manual
Page 19
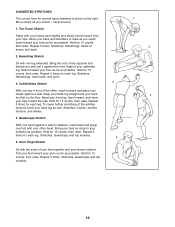
Toe Touch Stretch Stand with the soles of your knees outward. Repeat 3 times. Reach toward your back leg as possible. Repeat 3 times for each leg. To cause further stretching of the opposite foot toward the wall. Bring your heel as close to relax as you reach down toward your hips toward you stretch-never bounce. 1. Repeat 3 times for each leg. Pull your feet toward your buttocks as possible. Allow your back and shoulders to your toes as far as you and rest it against a wall. Stretches: Hamstrings, lower back, and groin. 3 3. Repeat 3 times for 15 counts, ...
Toe Touch Stretch Stand with the soles of your knees outward. Repeat 3 times. Reach toward your back leg as possible. Repeat 3 times for each leg. To cause further stretching of the opposite foot toward the wall. Bring your heel as close to relax as you reach down toward your hips toward you stretch-never bounce. 1. Repeat 3 times for each leg. Pull your feet toward your buttocks as possible. Allow your back and shoulders to your toes as far as you and rest it against a wall. Stretches: Hamstrings, lower back, and groin. 3 3. Repeat 3 times for 15 counts, ...

English Manual
Page 20
HREL74907.0 R1207A Key No. Description Key No. Grease Packet * - User's Manual Note: Specifications are not illustrated. 20 Qty. Description 1 1 Frame 2 1 Track 3 1 Upright 4 1 Console 5 1 Upright Cover 6 1 Water Bottle Holder 7 1 Track Cover 8 2 Wheel 9 3 Foot 10 1 Eddy Mechanism 11 1 Axle 12 1 Idler 13 1 Pulley 14 1 Crank 15 2 Crank Bearing 16 1 Resistance Motor 17 1 Resistance Cable 18 2 Magnet 19 2 Upper Body Bushing 20 1 Clamp 21 1 Reed Switch/Wire 22 1 Left Handlebar 23 1 Left Upper Body Arm 24 1 Left ...
HREL74907.0 R1207A Key No. Description Key No. Grease Packet * - User's Manual Note: Specifications are not illustrated. 20 Qty. Description 1 1 Frame 2 1 Track 3 1 Upright 4 1 Console 5 1 Upright Cover 6 1 Water Bottle Holder 7 1 Track Cover 8 2 Wheel 9 3 Foot 10 1 Eddy Mechanism 11 1 Axle 12 1 Idler 13 1 Pulley 14 1 Crank 15 2 Crank Bearing 16 1 Resistance Motor 17 1 Resistance Cable 18 2 Magnet 19 2 Upper Body Bushing 20 1 Clamp 21 1 Reed Switch/Wire 22 1 Left Handlebar 23 1 Left Upper Body Arm 24 1 Left ...