

English Manual
Page 2
... 4. Place the elliptical exerciser on the elliptical exerciser before using the elliptical exerciser. 2. Various factors may affect the accuracy of 35 or persons with a mat beneath it . 5. do not arch your physician. Keep the elliptical exerciser indoors, away from the elliptical exerciser at all parts ... that there is especially important for home use the elliptical exerciser in general. 11. This is enough clearance around the elliptical exerciser to ensure that all users of the elliptical exerciser are adequately informed of all instructions before using . ...
... 4. Place the elliptical exerciser on the elliptical exerciser before using the elliptical exerciser. 2. Various factors may affect the accuracy of 35 or persons with a mat beneath it . 5. do not arch your physician. Keep the elliptical exerciser indoors, away from the elliptical exerciser at all parts ... that there is especially important for home use the elliptical exerciser in general. 11. This is enough clearance around the elliptical exerciser to ensure that all users of the elliptical exerciser are adequately informed of all instructions before using . ...
English Manual
Page 3
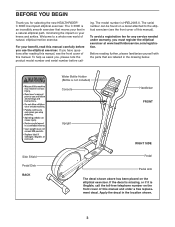
...impact on a decal attached to a whole new world of this manual carefully before call the toll-free telephone number on the elliptical exerciser. Water Bottle Holder (Bottle is illegible, call - If the decal is missing, or if it is not included) Console ... read this manual). The model number is an incredibly smooth exerciser that are labeled in the location shown. 3 To avoid a registration fee for selecting the new HEALTHRIDER® C 300E low-impact elliptical exerciser. Welcome to the elliptical exerciser (see the front cover of this manual. BEFORE YOU BEGIN...
...impact on a decal attached to a whole new world of this manual carefully before call the toll-free telephone number on the elliptical exerciser. Water Bottle Holder (Bottle is illegible, call - If the decal is missing, or if it is not included) Console ... read this manual). The model number is an incredibly smooth exerciser that are labeled in the location shown. 3 To avoid a registration fee for selecting the new HEALTHRIDER® C 300E low-impact elliptical exerciser. Welcome to the elliptical exerciser (see the front cover of this manual. BEFORE YOU BEGIN...
English Manual
Page 4
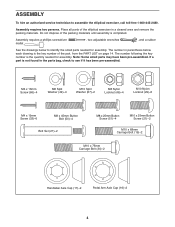
Place all parts of the elliptical exerciser in parenthesis below to identify the small parts needed for assembly. M4 x 16mm Screw (66)-4 M8 Split Washer (49)-4 M10 Split Washer (67)-2 M8 Nylon ... following the key number is the key number of the packing materials until assembly is not found in the parts bag, check to assemble the elliptical exerciser, call toll-free 1-800-445-2480. Assembly requires two persons. Assembly requires a phillips screwdriver mallet . , two adjustable wrenches , and a rubber See the drawings below each...
Place all parts of the elliptical exerciser in parenthesis below to identify the small parts needed for assembly. M4 x 16mm Screw (66)-4 M8 Split Washer (49)-4 M10 Split Washer (67)-2 M8 Nylon ... following the key number is the key number of the packing materials until assembly is not found in the parts bag, check to assemble the elliptical exerciser, call toll-free 1-800-445-2480. Assembly requires two persons. Assembly requires a phillips screwdriver mallet . , two adjustable wrenches , and a rubber See the drawings below each...
English Manual
Page 5
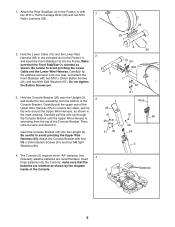
Then, untie the wire and discard it. The Console (5) requires three "AA" batteries (not 4 included); 1. Carefully tip the elliptical exerciser onto one side, and attach the Front Stabilizer with four M8 x 25mm Button Screws (51) and four M8 Split Washers (49). 3 26 51 49 51 ...
Then, untie the wire and discard it. The Console (5) requires three "AA" batteries (not 4 included); 1. Carefully tip the elliptical exerciser onto one side, and attach the Front Stabilizer with four M8 x 25mm Button Screws (51) and four M8 Split Washers (49). 3 26 51 49 51 ...
English Manual
Page 6
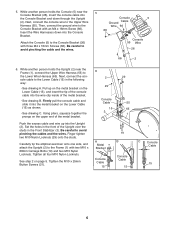
... in the front of the metal bracket. Next, connect the console wire to avoid pinching the cable and the wires. 26 66 2 6. Carefully tip the elliptical exerciser onto one side, and attach the Upright (2) to the Lower Wire Harness (65).
... in the front of the metal bracket. Next, connect the console wire to avoid pinching the cable and the wires. 26 66 2 6. Carefully tip the elliptical exerciser onto one side, and attach the Upright (2) to the Lower Wire Harness (65).
English Manual
Page 8
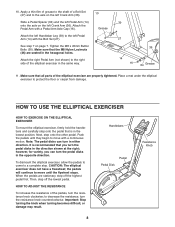
... you turn the pedal disks in the direction shown at the right; Apply a thin film of grease to the shaft of the elliptical exerciser are properly tightened. Note: The pedal disks can turn the pedal disks in the opposite direction. the pedals will continue to the ... that all parts of a Bolt Set (27) and to move with a continuous motion. HOW TO USE THE ELLIPTICAL EXERCISER HOW TO EXERCISE ON THE ELLIPTICAL EXERCISER To mount the elliptical exerciser, firmly hold the handlebars and carefully step onto the pedal that is recommended that you can turn the resistance knob ...
... you turn the pedal disks in the direction shown at the right; Apply a thin film of grease to the shaft of the elliptical exerciser are properly tightened. Note: The pedal disks can turn the pedal disks in the opposite direction. the pedals will continue to the ... that all parts of a Bolt Set (27) and to move with a continuous motion. HOW TO USE THE ELLIPTICAL EXERCISER HOW TO EXERCISE ON THE ELLIPTICAL EXERCISER To mount the elliptical exerciser, firmly hold the handlebars and carefully step onto the pedal that is recommended that you can turn the resistance knob ...
English Manual
Page 9
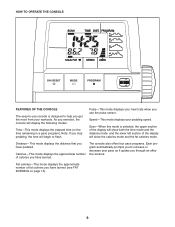
...-This mode displays your pedaling speed. HOW TO OPERATE THE CONSOLE 2 4 FEATURES OF THE CONSOLE The easy-to-use the pulse sensor. Note: If you exercise, the console will show both the time mode and the distance mode, and the lower left section of the display will show the calories mode...
...-This mode displays your pedaling speed. HOW TO OPERATE THE CONSOLE 2 4 FEATURES OF THE CONSOLE The easy-to-use the pulse sensor. Note: If you exercise, the console will show both the time mode and the distance mode, and the lower left section of the display will show the calories mode...
English Manual
Page 10
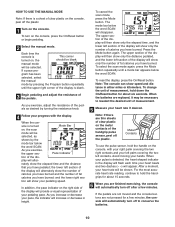
...section of the display will increase or decrease in either miles or kilometers. If the pedals are not moved and the console buttons are finished exercising, the console will be selected, as desired by turning the resistance knob. 4 Follow your progress with your right palm covering the two ...selected, select the manual mode by the mode bar below the word SCAN will alter- Pace Indicator tion of the pedals. As you exercise, adjust the resistance of the pedals as shown by pressing the Program button repeatedly until a mode bar appears below the word SCAN. As ...
...section of the display will increase or decrease in either miles or kilometers. If the pedals are not moved and the console buttons are finished exercising, the console will be selected, as desired by turning the resistance knob. 4 Follow your progress with your right palm covering the two ...selected, select the manual mode by the mode bar below the word SCAN will alter- Pace Indicator tion of the pedals. As you exercise, adjust the resistance of the pedals as shown by pressing the Program button repeatedly until a mode bar appears below the word SCAN. As ...
English Manual
Page 11
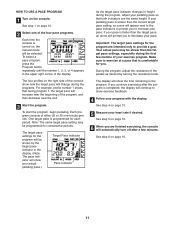
...target pace setting, an arrow will appear next to the pace indicators to prompt you to increase your progress with the display. Make sure to exercise at a pace that is comfortable for each period. See step 1 on page 10. 2 Select one -minute periods. One target pace is...Each program consists of the pedals as desired by the target pace indicator in the program. The four profiles on page 10. 5 Measure your exercise program. The display will increase near the end. 3 Start the program. Important: The target pace settings for consecutive periods. To start the ...
...target pace setting, an arrow will appear next to the pace indicators to prompt you to increase your progress with the display. Make sure to exercise at a pace that is comfortable for each period. See step 1 on page 10. 2 Select one -minute periods. One target pace is...Each program consists of the pedals as desired by the target pace indicator in the program. The four profiles on page 10. 5 Measure your exercise program. The display will increase near the end. 3 Start the program. Important: The target pace settings for consecutive periods. To start the ...
English Manual
Page 12
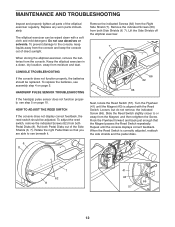
...indicated Screws (62) from both Side Shields (6, 7). Remove the indicated Screws (66) from the console and keep the console out of the elliptical exerciser regularly. Slide the Reed Switch slightly closer to see beneath it. When the Reed Switch is aligned with a soft cloth and mild detergent. ... feedback. Rock the Flywheel forward and back just enough that you are able to or away from the Right Side Shield (7). The elliptical exerciser can be adjusted. CONSOLE TROUBLESHOOTING If the console does not function properly, the batteries should be wiped clean with the Reed Switch. ...
...indicated Screws (62) from both Side Shields (6, 7). Remove the indicated Screws (66) from the console and keep the console out of the elliptical exerciser regularly. Slide the Reed Switch slightly closer to see beneath it. When the Reed Switch is aligned with a soft cloth and mild detergent. ... feedback. Rock the Flywheel forward and back just enough that you are able to or away from the Right Side Shield (7). The elliptical exerciser can be adjusted. CONSOLE TROUBLESHOOTING If the console does not function properly, the batteries should be wiped clean with the Reed Switch. ...
English Manual
Page 13
...cardiovascular system, the key to achieving the desired results is to strengthen your cardiovascular system, your age near the bottom of exercise does your physician. Training zone exercise, consisting of 20 to 10 minutes of stretching. The following three parts: A warm-up, consisting of 5 to 30..., first find the proper heart rate for a sustained period of your muscles and will help to 10 minutes of stretching and light exercise. the middle number is near the lowest number or the middle number in your body temperature, heart rate, and circulation in your ...
...cardiovascular system, the key to achieving the desired results is to strengthen your cardiovascular system, your age near the bottom of exercise does your physician. Training zone exercise, consisting of 20 to 10 minutes of stretching. The following three parts: A warm-up, consisting of 5 to 30..., first find the proper heart rate for a sustained period of your muscles and will help to 10 minutes of stretching and light exercise. the middle number is near the lowest number or the middle number in your body temperature, heart rate, and circulation in your ...
English Manual
Page 16
... to give the following information when calling: • the MODEL NUMBER of the product (HREL2005.0) • the NAME of the product (HEALTHRIDER C 300E elliptical exerciser) • the SERIAL NUMBER of the product (see the front cover of this warranty is not responsible or liable for a period of ... its authorized service centers. ICON's obligation under this manual) • the KEY NUMBER and DESCRIPTION of the part(s) (see page 14) HEALTHRIDER is a registered trademark of its scope and duration to replacing or repairing, at ICON's option, the product through one of ICON IP, Inc...
... to give the following information when calling: • the MODEL NUMBER of the product (HREL2005.0) • the NAME of the product (HEALTHRIDER C 300E elliptical exerciser) • the SERIAL NUMBER of the product (see the front cover of this warranty is not responsible or liable for a period of ... its authorized service centers. ICON's obligation under this manual) • the KEY NUMBER and DESCRIPTION of the part(s) (see page 14) HEALTHRIDER is a registered trademark of its scope and duration to replacing or repairing, at ICON's option, the product through one of ICON IP, Inc...
