

Uk Manual
Page 2
HealthRider is a registered trademark of this manual. TABLE OF CONTENTS IMPORTANT PRECAUTIONS 3 BEFORE YOU BEGIN 5 ASSEMBLY 6 HOW TO USE THE CHEST PULSE SENSOR 10 OPERATION AND ADJUSTMENT 11 HOW TO FOLD AND MOVE THE TREADMILL 23 TROUBLESHOOTING 25 CONDITIONING GUIDELINES 28 ORDERING REPLACEMENT PARTS Back Cover Note: A n EXPLODED DRAWING and a PART LIST are attached in the centre of ICON IP, Inc. 2
HealthRider is a registered trademark of this manual. TABLE OF CONTENTS IMPORTANT PRECAUTIONS 3 BEFORE YOU BEGIN 5 ASSEMBLY 6 HOW TO USE THE CHEST PULSE SENSOR 10 OPERATION AND ADJUSTMENT 11 HOW TO FOLD AND MOVE THE TREADMILL 23 TROUBLESHOOTING 25 CONDITIONING GUIDELINES 28 ORDERING REPLACEMENT PARTS Back Cover Note: A n EXPLODED DRAWING and a PART LIST are attached in the centre of ICON IP, Inc. 2

Uk Manual
Page 3
... of heart rate readings. Always hold the handrails whilst using the treadmill. The pulse sensors are intended only as described in a garage or covered patio, or near water. 16. Athletic support clothes are adequately informed of the on a surface that blocks any opening. 3 This treadmill is properly assembled. (See ASSEMBLY on page 6, and HOW TO FOLD AND MOVE THE TREADMILL on each side. Never move the treadmill. 20...
... of heart rate readings. Always hold the handrails whilst using the treadmill. The pulse sensors are intended only as described in a garage or covered patio, or near water. 16. Athletic support clothes are adequately informed of the on a surface that blocks any opening. 3 This treadmill is properly assembled. (See ASSEMBLY on page 6, and HOW TO FOLD AND MOVE THE TREADMILL on each side. Never move the treadmill. 20...

Uk Manual
Page 4
DANGER: 27. Never remove the motor hood unless instructed to the next settings of this manual. If a decal is missing, or if it is not legible, please call our Customer Service Department (see the back cover of the CD or video program. In some instances, the speed and/or incline may change to do so by pressing the speed and incline buttons. However, when the next "chirp" is...
DANGER: 27. Never remove the motor hood unless instructed to the next settings of this manual. If a decal is missing, or if it is not legible, please call our Customer Service Department (see the back cover of the CD or video program. In some instances, the speed and/or incline may change to do so by pressing the speed and incline buttons. However, when the next "chirp" is...

Uk Manual
Page 5
... included) Pulse Sensor Latch Knob LEFT SIDE Book Holder Console Handrail Key/Clip RIGHT SIDE Circuit Breaker On/Off Switch Foot Rail Walking Belt Rear Roller Adjustment Bolts Power Cord Front Wheel Cushioned Walking Platform 5 The 875 P treadmill combines advanced technology with the parts that are labelled. To help you get the most from your exercise program in the convenience of your benefit, read this manual, please call our Customer Service Department...
... included) Pulse Sensor Latch Knob LEFT SIDE Book Holder Console Handrail Key/Clip RIGHT SIDE Circuit Breaker On/Off Switch Foot Rail Walking Belt Rear Roller Adjustment Bolts Power Cord Front Wheel Cushioned Walking Platform 5 The 875 P treadmill combines advanced technology with the parts that are labelled. To help you get the most from your exercise program in the convenience of your benefit, read this manual, please call our Customer Service Department...
Uk Manual
Page 6
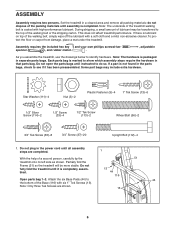
... top of the walking belt or the shipping carton. Set the treadmill in the power cord until assembly is completely assembled. 13 44 116 Open parts bag 1-2. do so. Assembly requires the included hex key and your own phillips screwdriver spanner , and rubber mallet . , adjustable As you assemble the treadmill, use the drawings below to the top of the walking belt, simply wipe off the lubricant with a soft cloth...
... top of the walking belt or the shipping carton. Set the treadmill in the power cord until assembly is completely assembled. 13 44 116 Open parts bag 1-2. do so. Assembly requires the included hex key and your own phillips screwdriver spanner , and rubber mallet . , adjustable As you assemble the treadmill, use the drawings below to the top of the walking belt, simply wipe off the lubricant with a soft cloth...
Uk Manual
Page 7
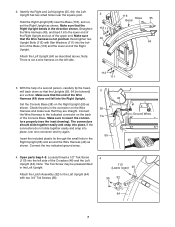
... the lower end of the Right Upright and out of the Right Upright. Straighten the Wire Harness (49), and feed it into place, turn one connector and try again. Attach the Left Upright (64) as shown. Check the pins in the direction shown. Open parts bag 4-5. Hand tighten two Upright Bolts (112) with two 3/4" Tek Screws (35). 4 113 (Leave loose) 46 35 32 64 7 Connect the Wire...
... the lower end of the Right Upright and out of the Right Upright. Straighten the Wire Harness (49), and feed it into place, turn one connector and try again. Attach the Left Upright (64) as shown. Check the pins in the direction shown. Open parts bag 4-5. Hand tighten two Upright Bolts (112) with two 3/4" Tek Screws (35). 4 113 (Leave loose) 46 35 32 64 7 Connect the Wire...

Uk Manual
Page 10
... the chest pulse sensor to work with people who have normal heart rhythms. Heart rate reading problems may be within arm's length of time; Return the sensor unit to a position against your chest and attach the other container that you walk or run on the chest strap. the chest pulse sensor shuts off when it is designed to direct sunlight for extended periods of the console. • The chest pulse sensor is removed and...
... the chest pulse sensor to work with people who have normal heart rhythms. Heart rate reading problems may be within arm's length of time; Return the sensor unit to a position against your chest and attach the other container that you walk or run on the chest strap. the chest pulse sensor shuts off when it is designed to direct sunlight for extended periods of the console. • The chest pulse sensor is removed and...
Uk Manual
Page 11
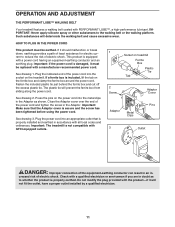
... secure and the screw has been tightened before using the power cord. Press the pins on the power cord into the socket on treadmill Ferrite Box Plastic Tie Tab 2 Screw Adaptor Cover Pins Adaptor Metal Clips 3 Outlet DANGER: Improper connection of electric shock. This product is not compatible with PERFORMANT LUBE™, a high-performance lubricant. OPERATION AND ADJUSTMENT THE PERFORMANT LUBE™ WALKING BELT Your treadmill features a walking belt coated with...
... secure and the screw has been tightened before using the power cord. Press the pins on the power cord into the socket on treadmill Ferrite Box Plastic Tie Tab 2 Screw Adaptor Cover Pins Adaptor Metal Clips 3 Outlet DANGER: Improper connection of electric shock. This product is not compatible with PERFORMANT LUBE™, a high-performance lubricant. OPERATION AND ADJUSTMENT THE PERFORMANT LUBE™ WALKING BELT Your treadmill features a walking belt coated with...
Uk Manual
Page 12
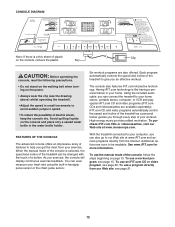
... or video program, see page 15. Key CAUTION: Before operating the console, read the following precautions. • Do not stand on the walking belt when turning on the console and place only a sealed water bottle in handgrip pulse sensor or the chest pulse sensor. You can be available. With the treadmill connected to your workout. To use a program directly from the internet. Using the included audio cable, you can connect the treadmill to be changed...
... or video program, see page 15. Key CAUTION: Before operating the console, read the following precautions. • Do not stand on the walking belt when turning on the console and place only a sealed water bottle in handgrip pulse sensor or the chest pulse sensor. You can be available. With the treadmill connected to your workout. To use a program directly from the internet. Using the included audio cable, you can connect the treadmill to be changed...
Uk Manual
Page 13
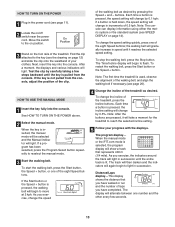
... distance that represents 400 m (1/4 mile). HOW TO TURN ON THE POWER 1 Plug in the power cord (see page 26). 4 Change the incline of the treadmill as desired by 0.1 kph; Move the switch to reselect the manual mode. 3 Start the walking belt. Note: The console can display information using either the metric system or the standard system (see the drawing on /off switch near the power cord. Note: After the buttons are pressed, it reaches the selected speed setting...
... distance that represents 400 m (1/4 mile). HOW TO TURN ON THE POWER 1 Plug in the power cord (see page 26). 4 Change the incline of the treadmill as desired by 0.1 kph; Move the switch to reselect the manual mode. 3 Start the walking belt. Note: The console can display information using either the metric system or the standard system (see the drawing on /off switch near the power cord. Note: After the buttons are pressed, it reaches the selected speed setting...
Uk Manual
Page 14
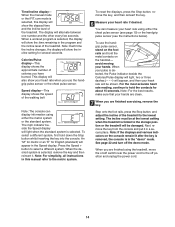
... /off switch near the power cord to the metric system. The mph indicator beside the Speed display will show the elapsed time and the incline level of the walking belt Note: The console can measure your heart rate if desired. To use the handgrip pulse sensor or the chest pulse sensor. For the most accurate heart rate reading, continue to select a different system. When you are finished using the treadmill, move the...
... /off switch near the power cord to the metric system. The mph indicator beside the Speed display will show the elapsed time and the incline level of the walking belt Note: The console can measure your heart rate if desired. To use the handgrip pulse sensor or the chest pulse sensor. For the most accurate heart rate reading, continue to select a different system. When you are finished using the treadmill, move the...
Uk Manual
Page 15
... incline of the treadmill is pressed, an additional indicator will light or darken in the Time/Incline display. Every few times a Speed button is about to the left . ment. (The same speed setting and/or incline set- Hold the handrails and begin walking. ments of the workout programs. To select a workout program, press the Program Select button repeatedly until the speed setting for six seconds. The walking belt will sound. See HOW TO TURN...
... incline of the treadmill is pressed, an additional indicator will light or darken in the Time/Incline display. Every few times a Speed button is about to the left . ment. (The same speed setting and/or incline set- Hold the handrails and begin walking. ments of the workout programs. To select a workout program, press the Program Select button repeatedly until the speed setting for six seconds. The walking belt will sound. See HOW TO TURN...
Uk Manual
Page 16
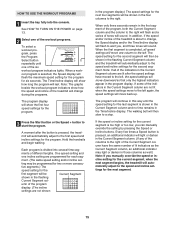
... end the program, press the Stop button, remove the key, and then reinsert the key. 4 Follow your heart rate if desired. Next, remove the key from the console. See page 22 and turn off position and unplug the power cord. 16 To restart the program, press the Start button or the Speed + button. When you are finished using the treadmill, move at the lowest setting. See step 6 on the console remain lit after the key is removed, the console is...
... end the program, press the Stop button, remove the key, and then reinsert the key. 4 Follow your heart rate if desired. Next, remove the key from the console. See page 22 and turn off position and unplug the power cord. 16 To restart the program, press the Start button or the Speed + button. When you are finished using the treadmill, move at the lowest setting. See step 6 on the console remain lit after the key is removed, the console is...

Uk Manual
Page 20
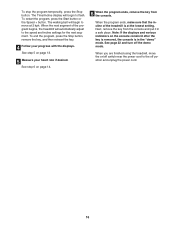
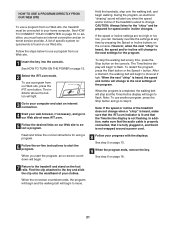
... too low, the console may change before the personal trainer describes the change to 19. Follow the steps below to the next settings of the treadmill does not change . If the Time/Incline display is flashing, press the Start button or the Speed + button on the console. When the next "chirp" is heard, the speed and incline will change . HOW TO USE IFIT.COM CD AND VIDEO PROGRAMS To use an iFIT.com CD or...
... too low, the console may change before the personal trainer describes the change to 19. Follow the steps below to the next settings of the treadmill does not change . If the Time/Incline display is flashing, press the Start button or the Speed + button on the console. When the next "chirp" is heard, the speed and incline will change . HOW TO USE IFIT.COM CD AND VIDEO PROGRAMS To use an iFIT.com CD or...
Uk Manual
Page 21
... low, you start the program, an on the console. The Time/Incline display will begin to start an internet connection. 4 Start your web browser, if necessary, and go to the next settings of the treadmill does not change when a "chirp" is heard, make sure that the audio cable is properly connected, that it is completed, the walking belt will stop the walking belt at any time, press the Stop button on -screen...
... low, you start the program, an on the console. The Time/Incline display will begin to start an internet connection. 4 Start your web browser, if necessary, and go to the next settings of the treadmill does not change when a "chirp" is heard, make sure that the audio cable is properly connected, that it is completed, the walking belt will stop the walking belt at any time, press the Stop button on -screen...
Uk Manual
Page 25
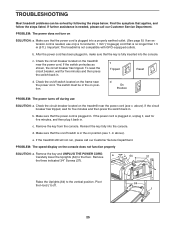
... breaker located on the treadmill near the power cord. Reinsert the key fully into the console. d. above ). If the treadmill still will not run, please call our Customer Service Department. PROBLEM: The speed display on SOLUTION: a. The switch must be solved by following the steps below. c Tripped Reset Tripped d On Position Reset PROBLEM: The power turns off . 64 1 25 Make sure that applies, and follow the steps listed. d. e. Remove the key and...
... breaker located on the treadmill near the power cord. Reinsert the key fully into the console. d. above ). If the treadmill still will not run, please call our Customer Service Department. PROBLEM: The speed display on SOLUTION: a. The switch must be solved by following the steps below. c Tripped Reset Tripped d On Position Reset PROBLEM: The power turns off . 64 1 25 Make sure that applies, and follow the steps listed. d. e. Remove the key and...

Uk Manual
Page 26
..., loosen 18 101 the Screw (24), move the Reed Switch slightly, and then retighten the Screw. Remove the key and UNPLUG THE POWER CORD. Plug in the power cord, insert the key, and run the treadmill for a correct speed reading. b 7-10 cm Rear Roller Adjustment Bolts c. PROBLEM: The walking belt is no longer than 1.5 m (5 ft.). If the walking belt is about 3mm (1/8 in.). Plug in the power cord, insert the key, and run the treadmill for a few minutes to...
..., loosen 18 101 the Screw (24), move the Reed Switch slightly, and then retighten the Screw. Remove the key and UNPLUG THE POWER CORD. Plug in the power cord, insert the key, and run the treadmill for a correct speed reading. b 7-10 cm Rear Roller Adjustment Bolts c. PROBLEM: The walking belt is no longer than 1.5 m (5 ft.). If the walking belt is about 3mm (1/8 in.). Plug in the power cord, insert the key, and run the treadmill for a few minutes to...
Uk Manual
Page 28
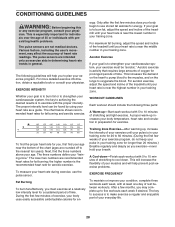
... the treadmill until your cardiovascular system, the key to the nearest ten years). Training Zone Exercise-After warming up to five workouts each week, with preexisting health problems. The pulse sensors are intended only as you may affect the accuracy of the treadmill until your heart rate is especially important for individuals over the age of your exercise program, do not keep your pulse in...
... the treadmill until your cardiovascular system, the key to the nearest ten years). Training Zone Exercise-After warming up to five workouts each week, with preexisting health problems. The pulse sensors are intended only as you may affect the accuracy of the treadmill until your heart rate is especially important for individuals over the age of your exercise program, do not keep your pulse in...
Uk Manual
Page 32
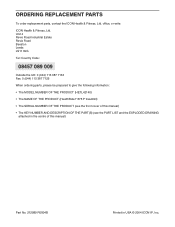
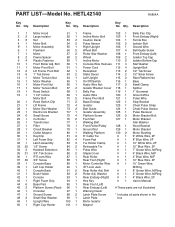
...; The NAME OF THE PRODUCT (HealthRider® 875 P treadmill) • The SERIAL NUMBER OF THE PRODUCT (see the front cover of this manual) • The KEY NUMBER AND DESCRIPTION OF THE PART(S) (see the PART LIST and the EXPLODED DRAWING attached in the centre of this manual) Part No. 212989 R0804B Printed in USA © 2004 ICON IP, Inc. ORDERING REPLACEMENT PARTS To order replacement parts, contact the ICON Health & Fitness, Ltd.
...; The NAME OF THE PRODUCT (HealthRider® 875 P treadmill) • The SERIAL NUMBER OF THE PRODUCT (see the front cover of this manual) • The KEY NUMBER AND DESCRIPTION OF THE PART(S) (see the PART LIST and the EXPLODED DRAWING attached in the centre of this manual) Part No. 212989 R0804B Printed in USA © 2004 ICON IP, Inc. ORDERING REPLACEMENT PARTS To order replacement parts, contact the ICON Health & Fitness, Ltd.
Uk Manual
Page 34
...1 Frame Incline Motor Bolt Caution Decal Pulse Sensor Right Upright Wheel Bolt Roller Star Washer Wheel Incline Motor Console Wire Harness Power Cord Receptical Static Decal Left Upright On/Off Switch Audio Wire Nut Isolator Bracket Cover Belly Pan Audio Wire Frame Pivot Bolt Base Endcap Isolator Belt Guide Isolator Assembly Platform Screw Foot Rail Walking Belt Front Roller/Pulley Ground Nut Walking Platform 8" Cable Tie Foam Pad Tie Holder Clamp Releasable Tie Pulse Wire Staple Cover Rear Roller Rear Foot (Right) Motor Controller Wire iFIT.com Jack Rear Roller Adj. HETL42140 R0804A Key No...
...1 Frame Incline Motor Bolt Caution Decal Pulse Sensor Right Upright Wheel Bolt Roller Star Washer Wheel Incline Motor Console Wire Harness Power Cord Receptical Static Decal Left Upright On/Off Switch Audio Wire Nut Isolator Bracket Cover Belly Pan Audio Wire Frame Pivot Bolt Base Endcap Isolator Belt Guide Isolator Assembly Platform Screw Foot Rail Walking Belt Front Roller/Pulley Ground Nut Walking Platform 8" Cable Tie Foam Pad Tie Holder Clamp Releasable Tie Pulse Wire Staple Cover Rear Roller Rear Foot (Right) Motor Controller Wire iFIT.com Jack Rear Roller Adj. HETL42140 R0804A Key No...


