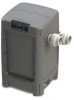
Hayward 004952001000 Support and Manuals
Get Help and Manuals for this Hayward item
View All Support Options Below
Free Hayward 004952001000 manuals!
Problems with Hayward 004952001000?
Ask a Question
Free Hayward 004952001000 manuals!
Problems with Hayward 004952001000?
Ask a Question
Hayward 004952001000 Videos

Hayward HydraPure UVo3 Canada www.poolproductscanada.ca 004952001000
Duration: 2:49
Total Views: 42
Duration: 2:49
Total Views: 42
Popular Hayward 004952001000 Manual Pages
HydraPure Technical Training Guide - Page 2
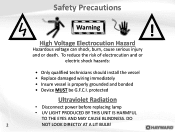
... HARMFUL
TO THE EYES AND MAY CAUSE BLINDNESS. To reduce the risk of electrocution and or
electric shock hazards:
• Only qualified technicians should install the vessel • Replace damaged wiring immediately • Insure vessel is properly grounded and bonded • Device MUST be G.F.C.I. High Voltage Electrocution Hazard
Hazardous voltage can shock...
HydraPure Technical Training Guide - Page 3
...
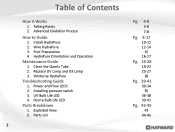
28
Pg. 29-41
30-34 35
36-38 39-41
Pg. 42-45
43 44-45 Wire HydraPure 3. Replace UV Lamp and O3 Lamp 3. UV Bulb Life LED 4. Clean the Quartz Tube 2. Installing pressure switch 3. Ozone Bulb Life LED
Parts Breakdown
1. Talking Points 2. Advanced Oxidation Process
How to Guide
1. Winterize HydraPure
Troubleshooting Guide
1. Exploded View 2.
HydraPure Technical Training Guide - Page 19
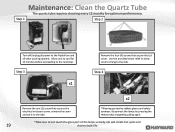
... that secures the electrical enclosure cover, remove the cover and set it to the side.
*Wearing protective rubber gloves and safety eyewear, disconnect the lamps by pressing the release tabs and gently pulling apart.
*Take care to not touch the glass part of the lamps as body oils will create hot spots...
HydraPure Technical Training Guide - Page 20

... Quartz Tube (cont.)
Step 5
Step 6
Spring Clip
Lamp Assy. Remove the spring clip and carefully lift the lamp assembly from the quartz tube. Do not set it
down on lamp wires.
Set aside in a safe place.
HydraPure Technical Training Guide - Page 21
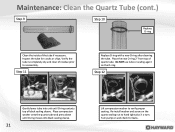
... down until O-ring moves into unit until O-ring contacts top of the tube if necessary. Re-install washer and screw on the O-ring.
Turn pump on and check for cracks or chips. Step ... sealing sleeve.
21
Lift compression washer to hand tight plus ½ a turn. Step 11
Replace O-ring with a new O-ring after cleaning the tube. Inspect the tube for leaks. Maintenance: Clean the Quartz...
HydraPure Technical Training Guide - Page 22

Carefully re-install lamp assembly, and spring clip. Turn on .
Step 15
Step 16
x2
Re-connect both UV lamp wires to the UV Ballast.
22
Re-install electrical cover and Lid cover and turn the pump back on the filter pump and confirm there are no leaks then turn pump off.
Maintenance: Clean the Quartz Tube (cont.)
Step 13
Step 14
Spring Clip
Sealing Nut
Lamp Assy.
HydraPure Technical Training Guide - Page 23
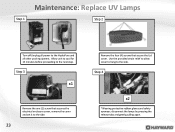
Allow unit to cool for 15 minutes before proceeding to the HydraPure and all power to the next step. Maintenance: Replace UV Lamps
Step 1
Step 2
Turn off/unplug all other pool equipment. Step 3
x1
Remove the one (1) screw that secure the Lid cover... hang to the side.
23
Remove the four (4) screws that secures the electrical enclosure cover, remove the cover and set it to the side.
HydraPure Technical Training Guide - Page 24

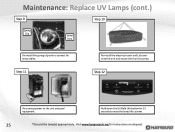
... ceramic end of the lamp. Carefully lower the lamp assembly into lower lamp boot. Do not pull on lamp wires. Insert lamps into lamp holder. Set aside in a safe place. Step 7
*Carefully remove the new lamp assembly from the quartz tube.
Maintenance: Replace UV Lamps (cont.)
Step 5
Step 6
Spring Clip
Lamp Assy.
HydraPure Technical Training Guide - Page 25
Hold down the UV Bulb Life button for instructions on disposal. Step 12
Re-connect power to reset the lamp life counter.
25
*Discard the lamp(s) appropriately. Re-install the spring clip and re-connect he lamp cables.
Step 11
Re-install the electrical cover and Lid cover onto the unit and secure the...
HydraPure Technical Training Guide - Page 26
....
Step 3
x1
Remove the one (1) screw that secures the electrical enclosure cover, remove the cover and set it to the side. Use the provided strain relief to allow cover to hang to the side.
26
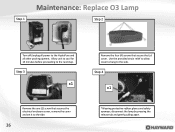
...Remove the four (4) screws that secure the Lid cover. Maintenance: Replace O3 Lamp
Step 1
Step 2
Turn off/unplug all power to the next step.
Allow unit to cool ...
HydraPure Technical Training Guide - Page 27
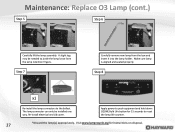
... button for instructions on disposal. Maintenance: Replace O3 Lamp (cont.)
Step 5
Step 6
Carefully lift the lamp assembly. Make sure lamp is aligned and seated properly. Apply power to reset the lamp life counter.
27
*Discard the lamp(s) appropriately. Step 7
Carefully remove new lamp from the lamp retention fingers.
Step 8
x1
Re-install the...
HydraPure Technical Training Guide - Page 28

... to the HydraPure and all power to completely drain. Step 3
Remove the winterizing drain plug near the bottom of water once plug is drained, re-install the drain plug hand tight only. Maintenance: Winterize HydraPure
Step 1
Step 2
Turn off/unplug all other pool equipment. This process can take up to two...
HydraPure Technical Training Guide - Page 30
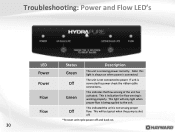
... working properly.
This will only light when proper flow is receiving power correctly. Note: this light is always on .
30 Power
The unit is connected. Troubleshooting: Power and Flow LED's
LED
Status
Description
Power
Green
The unit is being applied to power check the ribbon cable
connections. Flow
Green
This indicates...
HydraPure Technical Training Guide - Page 36
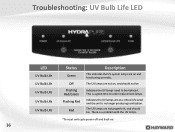
... to order replacement lamps. The UV lamps are not properly lit, and should not be.
The UV lamps are not on and functioning correctly.
This is no longer producing sanitization. Troubleshooting: UV Bulb... lamps are on , and should be replaced. Indicates the UV lamps are at a critical Life Level and the unit is a good time to be . There is a problem with the UV lamps.
*To reset ...
HydraPure Technical Training Guide - Page 39

...Life Level and the unit is a problem with the Ozone lamp.
There is no longer producing Ozone. The Ozone lamp not on, and should be. See troubleshooting section.
*To reset unit cycle power...Red
Indicates the Ozone lamp needs to order a replacement lamp. The Ozone lamp is not functioning properly, and should not be replaced. Troubleshooting: Ozone Bulb Life LED
LED
Ozone Bulb Life ...
Hayward 004952001000 Reviews
We have not received any reviews for Hayward yet.