
Owners Manual
Page 1
harman/kardon FLOATING SUSPENSION AUTO LIFT TURNTABLE owner's manual
harman/kardon FLOATING SUSPENSION AUTO LIFT TURNTABLE owner's manual
Owners Manual
Page 2
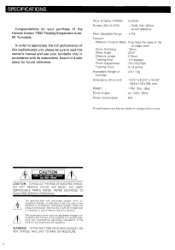
....10oz. (8kg) Power Supply : AC 120V, 60Hz Power Consumption : 8W All specifications and features subject to change without notice. The exclamation point within the product's enclosure; WARNING: TO PREVENT FIRE OR SHOCK HAZARD, DO NOT EXPOSE THIS UNIT TO RAIN OR MOISTURE. 1 that may be sure to read this owner's manual and use your purchase of the Harman Kardon T65C Floating Suspension...
....10oz. (8kg) Power Supply : AC 120V, 60Hz Power Consumption : 8W All specifications and features subject to change without notice. The exclamation point within the product's enclosure; WARNING: TO PREVENT FIRE OR SHOCK HAZARD, DO NOT EXPOSE THIS UNIT TO RAIN OR MOISTURE. 1 that may be sure to read this owner's manual and use your purchase of the Harman Kardon T65C Floating Suspension...

Owners Manual
Page 3
... prevent shock and consult an authorized Harman Kardon service station. Used in the direct draft from being transmitted to the base at the center of time, disconnect the plug from the AC outlet to excessive vibration or dust. ►Poorly ventilated places. Handle the Power Cord Gently • Do not disconnect the plug from the AC outlet and disconnect...
... prevent shock and consult an authorized Harman Kardon service station. Used in the direct draft from being transmitted to the base at the center of time, disconnect the plug from the AC outlet to excessive vibration or dust. ►Poorly ventilated places. Handle the Power Cord Gently • Do not disconnect the plug from the AC outlet and disconnect...
Owners Manual
Page 4
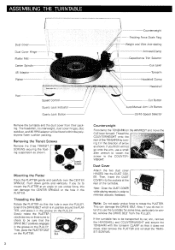
..., and 45 RPM adaptor will not go onto the arm, use undue force, this can damage the DRIVE BELT. Then, place...playing records in position around the PLAT- ER. TER, and place it will be transported by turning it does not move the CUE lever forward. Thread the COUNTERWEIGHT onto the rear...Center Spindle 45 Adaptor '. . Speed Control Quartz Lock Indicator I Quartz Lock Button Counterweight Tracking Force Scale Ring -Weight and Wire Anti-skating Armrest/Clamp Capacitance Trim Selector Cue Lever Tonearm Headshell Clamp Headshell Cut Button \ Auto/Manual Arm Lift Button...
..., and 45 RPM adaptor will not go onto the arm, use undue force, this can damage the DRIVE BELT. Then, place...playing records in position around the PLAT- ER. TER, and place it will be transported by turning it does not move the CUE lever forward. Thread the COUNTERWEIGHT onto the rear...Center Spindle 45 Adaptor '. . Speed Control Quartz Lock Indicator I Quartz Lock Button Counterweight Tracking Force Scale Ring -Weight and Wire Anti-skating Armrest/Clamp Capacitance Trim Selector Cue Lever Tonearm Headshell Clamp Headshell Cut Button \ Auto/Manual Arm Lift Button...
Owners Manual
Page 5
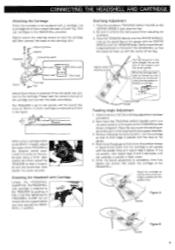
...the parallel lines. Without changing the stylus position, turn the cartridge so that it is parallel with the CENTER SPINDLE and the TONEARM base. Adjust the cartridge so that the stylus tip comes precisely over the CENTER SPINDLE. Be sure to ...center post using a cartridge which has a weight between 4.5 and 13 g. Slightly secure the retaining screws to hold the cartridge and then connect the leads to remove the stylus guard when adjusting the overhang. 3. reen Lead Blue Lead Nut Above figure shows an example of the cartridge and connect the leads accordingly. The TON FARM is set...
...the parallel lines. Without changing the stylus position, turn the cartridge so that it is parallel with the CENTER SPINDLE and the TONEARM base. Adjust the cartridge so that the stylus tip comes precisely over the CENTER SPINDLE. Be sure to ...center post using a cartridge which has a weight between 4.5 and 13 g. Slightly secure the retaining screws to hold the cartridge and then connect the leads to remove the stylus guard when adjusting the overhang. 3. reen Lead Blue Lead Nut Above figure shows an example of the cartridge and connect the leads accordingly. The TON FARM is set...
Owners Manual
Page 6
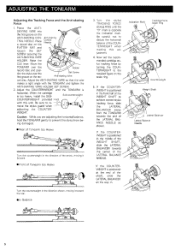
...Turn the counterweight in the direction of the arrow, moving it toward the rear. • In Balance O 3. move the stylus guard when AjJ adjusting the COUNTER- Adjust the ANTI-SKATING WIRE so that the wire makes a right angle with this adjustment. 4. Sub-counterweight COUNTERWEIGHT provided with the TONEARM and tighten the ANTI-SKATING WIRE HOLDER SET...over the first groove on the ANTI-SKATING CON- Turn the stylus TRACKING FORCE SCALE RING until the TONEARM is too heavy, install the SUB- Holder Set Screw Anti-skating Wire ord disc. Anti-skating TROL NEEDLE. When the...
...Turn the counterweight in the direction of the arrow, moving it toward the rear. • In Balance O 3. move the stylus guard when AjJ adjusting the COUNTER- Adjust the ANTI-SKATING WIRE so that the wire makes a right angle with this adjustment. 4. Sub-counterweight COUNTERWEIGHT provided with the TONEARM and tighten the ANTI-SKATING WIRE HOLDER SET...over the first groove on the ANTI-SKATING CON- Turn the stylus TRACKING FORCE SCALE RING until the TONEARM is too heavy, install the SUB- Holder Set Screw Anti-skating Wire ord disc. Anti-skating TROL NEEDLE. When the...
Owners Manual
Page 7
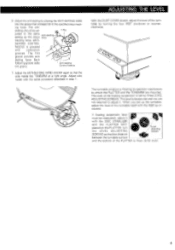
... placed on the PLATTER: turn the LEVEL ADJUSTING / tevei / Adjusting Scie\,vs SCREWS so that the wire meets the TONEARM at a right angle. ing force. This level is factory-set and you set up the turntable, adjust the level of the floating suspension is 4mm (5/32 inch). 6 Adjust the anti-skating by three LEVEL ADJUSTING SCREWS. If floating suspension level is provided with the FEET...
... placed on the PLATTER: turn the LEVEL ADJUSTING / tevei / Adjusting Scie\,vs SCREWS so that the wire meets the TONEARM at a right angle. ing force. This level is factory-set and you set up the turntable, adjust the level of the floating suspension is 4mm (5/32 inch). 6 Adjust the anti-skating by three LEVEL ADJUSTING SCREWS. If floating suspension level is provided with the FEET...
Owners Manual
Page 8
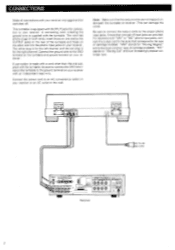
... one supplied with the turntable, be sure to connect the GND terminal on one pair of cartridge available. "MC" stands for the left channel and the red plug is the most common type of input jacks are not trapped underneath the turntable or receiver. Connect the power cord to the type of cartridge installed. For receivers with "MM" or "MC" phono input jacks, connect the output cord...
... one supplied with the turntable, be sure to connect the GND terminal on one pair of cartridge available. "MC" stands for the left channel and the red plug is the most common type of input jacks are not trapped underneath the turntable or receiver. Connect the power cord to the type of cartridge installed. For receivers with "MM" or "MC" phono input jacks, connect the output cord...
Owners Manual
Page 9
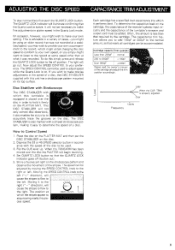
... required by moving marks the pre- It will illuminate confirming that the QUARTZ LOCK indicator goes off position. On occasion, however, you might wish to make your preference. The light will begin revolving. 4. If you wish to Control Speed 1 . Set QUARTZ LOCK button so that the Quartz Lock is properly adjusted. The DISC STABILIZER is on...
... required by moving marks the pre- It will illuminate confirming that the QUARTZ LOCK indicator goes off position. On occasion, however, you might wish to make your preference. The light will begin revolving. 4. If you wish to Control Speed 1 . Set QUARTZ LOCK button so that the Quartz Lock is properly adjusted. The DISC STABILIZER is on...
Owners Manual
Page 10
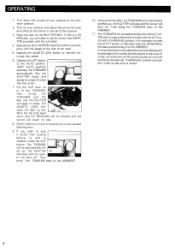
... up red. Turn on the PLATTER MAT. Depress the QUARTZ LOCK button to the ARMREST. Pt,IrKwa a bolo 7. Then bring the TONEARM back to play . 8. Depress the 33 or 45 SPEED selector button in the auto-lift mode, since the arm will lift and the power will stop atthe end of your desired listening level. 9. cator will light up , the...
... up red. Turn on the PLATTER MAT. Depress the QUARTZ LOCK button to the ARMREST. Pt,IrKwa a bolo 7. Then bring the TONEARM back to play . 8. Depress the 33 or 45 SPEED selector button in the auto-lift mode, since the arm will lift and the power will stop atthe end of your desired listening level. 9. cator will light up , the...
Owners Manual
Page 11
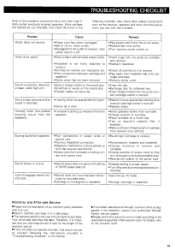
... wire. •Incorrect headshell connection. •Magnetic interference is being picked up from the receiver transformer. •Output cord from headshell fully onto car- Sound tempo is distorted. sult cartridge owner's manual). •Reset to a more appropriate tracking force (consult cartridge owner's manual). •Replace stylus. •Move speakers farther from turntable. •Change location of turntable. •Place turntable on a firmer rest. •Turn on receiver...
... wire. •Incorrect headshell connection. •Magnetic interference is being picked up from the receiver transformer. •Output cord from headshell fully onto car- Sound tempo is distorted. sult cartridge owner's manual). •Reset to a more appropriate tracking force (consult cartridge owner's manual). •Replace stylus. •Move speakers farther from turntable. •Change location of turntable. •Place turntable on a firmer rest. •Turn on receiver...


