
Owners Manual
Page 2
The wires in this owner's manual and use your turntable only in accordance with the letter L or coloured red. This apparatus has been produced to comply with the coloured markings identifying the terminals in your ... Capacitance Tracking Force 11c (plus the mass of the cartridge used) : 18mm 25.5 ° : 216mm : ±2 degrees : 1 60 pF : 0-3 grams Acceptable Weight of the Harman Kardon T25 Semi-automatic Turntable. IMPORTANT. The wire which is coloured brown must be connected to the terminal in the plug which is marked with arrowhead symbol, within an...
The wires in this owner's manual and use your turntable only in accordance with the letter L or coloured red. This apparatus has been produced to comply with the coloured markings identifying the terminals in your ... Capacitance Tracking Force 11c (plus the mass of the cartridge used) : 18mm 25.5 ° : 216mm : ±2 degrees : 1 60 pF : 0-3 grams Acceptable Weight of the Harman Kardon T25 Semi-automatic Turntable. IMPORTANT. The wire which is coloured brown must be connected to the terminal in the plug which is marked with arrowhead symbol, within an...
Owners Manual
Page 4
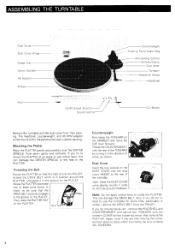
...the CENTER SPINDLE. Dust Cover Insert the two sockets or, the DUST COVER into the dust cover HINGES at an angle or use the turntable for some time, particularly it does not move the CUE lever forward. Push down gently and vertically. Mounting the Platter Place the PLATTER gently... --Tracking Force Scale Ring Anti-skating Control Armrest/Clamp Cue Lever Tonearm Headshell Clamp • Headshell 33/45 Speed Selector Speed Cant of the turntable. Rotate the PLATTER clockwise two or three turns slowly to check to use undue force, this can damage the DRIVE BELT. Again, even if...
...the CENTER SPINDLE. Dust Cover Insert the two sockets or, the DUST COVER into the dust cover HINGES at an angle or use the turntable for some time, particularly it does not move the CUE lever forward. Push down gently and vertically. Mounting the Platter Place the PLATTER gently... --Tracking Force Scale Ring Anti-skating Control Armrest/Clamp Cue Lever Tonearm Headshell Clamp • Headshell 33/45 Speed Selector Speed Cant of the turntable. Rotate the PLATTER clockwise two or three turns slowly to check to use undue force, this can damage the DRIVE BELT. Again, even if...
Owners Manual
Page 5
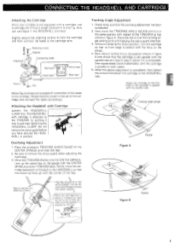
... changing the stylus position, turn the cartridge so that the overhang adjustment has been completed. 2. CONNECTING THE HEADSHELL AND CARTRIDGE Attaching the Cartridge Since this turntable is parallel in both cases. 5. Do not j I you have secured the HEAD- Move the TONEARM directly over the tracking angle setting point with the corner...
... changing the stylus position, turn the cartridge so that the overhang adjustment has been completed. 2. CONNECTING THE HEADSHELL AND CARTRIDGE Attaching the Cartridge Since this turntable is parallel in both cases. 5. Do not j I you have secured the HEAD- Move the TONEARM directly over the tracking angle setting point with the corner...
Owners Manual
Page 7
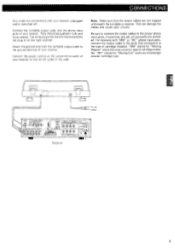
...phono input jacks, if more than one pair of your receiver or into the phono input jacks of input jacks are not trapped underneath the turntable or receiver. This can damage the cables and cause open circuits. Be sure to connect the output cables to an AC convenience outlet of cartridge..." and is the most common type of your receiver unplugged and/or switched off. Connect the turntable output cable into an AC outlet in fully and firmly seated. Attach the ground wire from the turntable output cable to the type of your receiver. saW=iiii Receiver To AC outlet r.It tI...
...phono input jacks, if more than one pair of your receiver or into the phono input jacks of input jacks are not trapped underneath the turntable or receiver. This can damage the cables and cause open circuits. Be sure to connect the output cables to an AC convenience outlet of cartridge..." and is the most common type of your receiver unplugged and/or switched off. Connect the turntable output cable into an AC outlet in fully and firmly seated. Attach the ground wire from the turntable output cable to the type of your receiver. saW=iiii Receiver To AC outlet r.It tI...
Owners Manual
Page 8
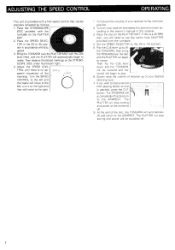
.... ADJUSTING THE SPEED CONTROL OPERATING This unit is provided with a fine speed control that can be switched off . Place the STROBOSCOPE DISC provided with the turntable on the STROBOSCOPE DISC under fluorescent light. 4. Place the SPEED SELECTOR in the 33 or 45 position in accordance with the...
.... ADJUSTING THE SPEED CONTROL OPERATING This unit is provided with a fine speed control that can be switched off . Place the STROBOSCOPE DISC provided with the turntable on the STROBOSCOPE DISC under fluorescent light. 4. Place the SPEED SELECTOR in the 33 or 45 position in accordance with the...
Owners Manual
Page 9
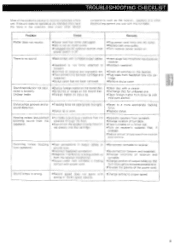
...ground wire. •Incorrect headshell connection. •Magnetic interference is being transmitred directly into the cartridge. •Separate speakers from turntable. •Change location of pass boost from headshell fully into AC outlet on receiver, main power switch is brought to its... on receiver. •Reattach headshell. •Check all switches on receiver's subsonic filter, if available. •Reduce amount of turntable. •Place turntable on a firmer rest. •Turn on the receiver. •Plug leads from receiver tone contras. Howling noises (low-pitched...
...ground wire. •Incorrect headshell connection. •Magnetic interference is being transmitred directly into the cartridge. •Separate speakers from turntable. •Change location of pass boost from headshell fully into AC outlet on receiver, main power switch is brought to its... on receiver. •Reattach headshell. •Check all switches on receiver's subsonic filter, if available. •Reduce amount of turntable. •Place turntable on a firmer rest. •Turn on the receiver. •Plug leads from receiver tone contras. Howling noises (low-pitched...
