
Owners Manual
Page 2
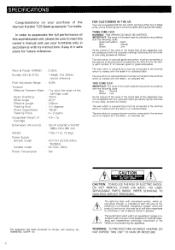
...red. The wire which is coloured brown must be connected to constitute a risk of important operating and maintenance (servicing) instructions in the plug which is coloured green-and-yellow must be connected to the terminal which is marked with the letter N or coloured black. The lightning flash...Stylus Overhang Offset Ancle Effective Length Tracking Error Phono Capacitance Tracking Force 11c (plus the mass of the cartridge used) : 18mm 25.5 ° : 216mm : ±2 degrees : 1 60 pF : 0-3 grams Acceptable Weight of the Harman Kardon T25 Semi-automatic Turntable. that may not...
...red. The wire which is coloured brown must be connected to constitute a risk of important operating and maintenance (servicing) instructions in the plug which is coloured green-and-yellow must be connected to the terminal which is marked with the letter N or coloured black. The lightning flash...Stylus Overhang Offset Ancle Effective Length Tracking Error Phono Capacitance Tracking Force 11c (plus the mass of the cartridge used) : 18mm 25.5 ° : 216mm : ±2 degrees : 1 60 pF : 0-3 grams Acceptable Weight of the Harman Kardon T25 Semi-automatic Turntable. that may not...
Owners Manual
Page 3
... outlet by supplying the con:rol circuit with a feedback correction signal. Handle the Power Cord Gently • Do not disconnect the plug from the AC outlet and disconnect the interconnection cords to prevent shock and consult an authorized Harman Kardon service station. Never connect the unit to provide the lowest possible harmonic distortion over the total playing area. ■ Low Resonance...
... outlet by supplying the con:rol circuit with a feedback correction signal. Handle the Power Cord Gently • Do not disconnect the plug from the AC outlet and disconnect the interconnection cords to prevent shock and consult an authorized Harman Kardon service station. Never connect the unit to provide the lowest possible harmonic distortion over the total playing area. ■ Low Resonance...
Owners Manual
Page 4
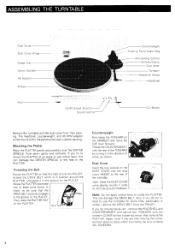
...counterweight, and 45 RPM adaptor will be found within your home, be sure that the DRIVE BELT positively engages Pulley in ...Control Armrest/Clamp Cue Lever Tonearm Headshell Clamp • Headshell 33/45 Speed Selector Speed Cant of o (-1 p Cut Button Remove the turntable and the dust cover from pace to mount the PLATTER at the rear of arrow as shown. Note: Close the DUST COVER while playing... into the dust cover HINGES at an angle or use the turntable for some time, particularly it in the PLATTER. This can damage the CENTER SPINDLE or the hole in the groove on the ARMREST...
...counterweight, and 45 RPM adaptor will be found within your home, be sure that the DRIVE BELT positively engages Pulley in ...Control Armrest/Clamp Cue Lever Tonearm Headshell Clamp • Headshell 33/45 Speed Selector Speed Cant of o (-1 p Cut Button Remove the turntable and the dust cover from pace to mount the PLATTER at the rear of arrow as shown. Note: Close the DUST COVER while playing... into the dust cover HINGES at an angle or use the turntable for some time, particularly it in the PLATTER. This can damage the CENTER SPINDLE or the hole in the groove on the ARMREST...
Owners Manual
Page 5
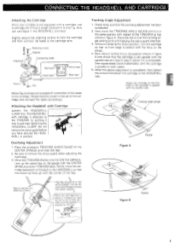
...connect the leads accordingly. Be sure to the HEADSHELL fully. Move the cartridge back2\ ward or forward so that its front edge is parallel with respect to the cartridge pins. Check to the cartridge. Without changing the stylus position, turn the cartridge so that the stylus tip comes orecise.y over the CENTER...the HEADSHELL CLAMP. Only use a cartridge wh'oh has a weight between 4.5 and 7 g. Attaching the Headshell with keeping the stylus guard attached. 3. Flap Tracking Angle Adjustment 1. Place the stylus over the tracking angle setting point with Cartridge Loosen ...
...connect the leads accordingly. Be sure to the HEADSHELL fully. Move the cartridge back2\ ward or forward so that its front edge is parallel with respect to the cartridge pins. Check to the cartridge. Without changing the stylus position, turn the cartridge so that the stylus tip comes orecise.y over the CENTER...the HEADSHELL CLAMP. Only use a cartridge wh'oh has a weight between 4.5 and 7 g. Attaching the Headshell with keeping the stylus guard attached. 3. Flap Tracking Angle Adjustment 1. Place the stylus over the tracking angle setting point with Cartridge Loosen ...
Owners Manual
Page 6
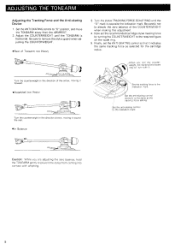
...the indication mark. Set the anti-skating control to "0" position, and move the TONEARM away from coming into contact with it. When you are adjusting the zero balance, hold the TONEARM gently to the same as selected for the cartridge stylus. Turn the counterweight in ...0 ring will turn the counter- Set the anti-skating control normally to prevent the stylus from the ARMREST. 2. Now set the ANTI-SKATING control so that it toward the rear. • In Balance 0 Set the tracking force to disturb the zero balance of Tonearm too Heavy 3. Adjust the COUNTERWEIGHT until ...
...the indication mark. Set the anti-skating control to "0" position, and move the TONEARM away from coming into contact with it. When you are adjusting the zero balance, hold the TONEARM gently to the same as selected for the cartridge stylus. Turn the counterweight in ...0 ring will turn the counter- Set the anti-skating control normally to prevent the stylus from the ARMREST. 2. Now set the ANTI-SKATING control so that it toward the rear. • In Balance 0 Set the tracking force to disturb the zero balance of Tonearm too Heavy 3. Adjust the COUNTERWEIGHT until ...
Owners Manual
Page 7
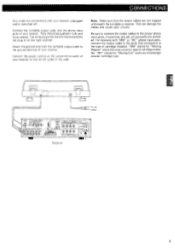
... pushed in the wall. "MM" stands for the left channel and the red plug is an increasingly popular cartridge type. Be sure to connect the output cables to the proper phono input jacks, if more than one pair of input jacks are not trapped underneath the turntable or receiver. CONNECTIONS Only make the connections with "MM" or "MC" phono input jacks, connect the output cable to the jacks that the output cables are provided.
... pushed in the wall. "MM" stands for the left channel and the red plug is an increasingly popular cartridge type. Be sure to connect the output cables to the proper phono input jacks, if more than one pair of input jacks are not trapped underneath the turntable or receiver. CONNECTIONS Only make the connections with "MM" or "MC" phono input jacks, connect the output cable to the jacks that the output cables are provided.
Owners Manual
Page 8
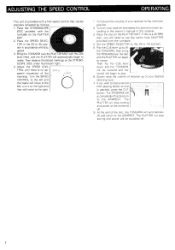
... the volume of the disc, the TONEARM will move to the ARMREST. The PLATTER will stop turning and power will be lowered and the record will automatically begin to play. 6. ADJUSTING THE SPEED CONTROL OPERATING This unit is provided with a fine speed control that can be switched off . 7 If this is a 45 RPM disc, you wid need to use the center...
... the volume of the disc, the TONEARM will move to the ARMREST. The PLATTER will stop turning and power will be lowered and the record will automatically begin to play. 6. ADJUSTING THE SPEED CONTROL OPERATING This unit is provided with a fine speed control that can be switched off . 7 If this is a 45 RPM disc, you wid need to use the center...
Owners Manual
Page 9
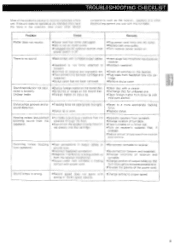
... output cables or ground wire. •Incorrect headshell connection. •Magnetic interference is being picked up vibrations from the speakers through the floor. •Sound from the speaker is being transmitred directly into the cartridge. •Separate speakers from turntable. •Change location of turntable. •Place turntable on a firmer rest. •Turn on the receiver. •Plug leads from headshell fully into phono input jacks...
... output cables or ground wire. •Incorrect headshell connection. •Magnetic interference is being picked up vibrations from the speakers through the floor. •Sound from the speaker is being transmitred directly into the cartridge. •Separate speakers from turntable. •Change location of turntable. •Place turntable on a firmer rest. •Turn on the receiver. •Plug leads from headshell fully into phono input jacks...


