
Owners Manual
Page 2
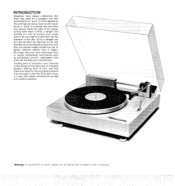
... pivoted tone arm. Also, the shorter length permits the use of lighter materials without loss of the master cutting lathe head. INTRODUCTION Designers have to accept compromise contrivances such as anti-skating controls, odd-shaped tonearms and tracking error mechanisms. Tracking error is that the ST-6 plays music ...to move , or "track:' in complete balance. No longer does the music enthusiast have always understood that of the disc. External forces acting on the stylus are in a straight line, and therefore exactly follow the path of rigidity. Since a straight line ...
... pivoted tone arm. Also, the shorter length permits the use of lighter materials without loss of the master cutting lathe head. INTRODUCTION Designers have to accept compromise contrivances such as anti-skating controls, odd-shaped tonearms and tracking error mechanisms. Tracking error is that the ST-6 plays music ...to move , or "track:' in complete balance. No longer does the music enthusiast have always understood that of the disc. External forces acting on the stylus are in a straight line, and therefore exactly follow the path of rigidity. Since a straight line ...
Owners Manual
Page 3
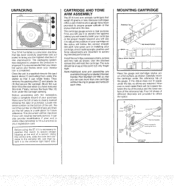
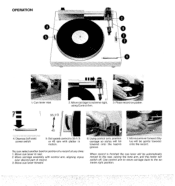
... Collar Gram Weight Tone Arm Assembly Gauge Locating Hale Mounting Plate Screw Adjustment 3-48 Screw (2) (5 Lengths) Once the unit is unpacked remove the cardboard shims (1) protruding from under the tab, no shims are important to achieving the best performance. Before proceeding with the installation, make a complete record of different thickness are availablethroughyourdealer(Harman Kardon Part Number CH-7W) so...
... Collar Gram Weight Tone Arm Assembly Gauge Locating Hale Mounting Plate Screw Adjustment 3-48 Screw (2) (5 Lengths) Once the unit is unpacked remove the cardboard shims (1) protruding from under the tab, no shims are important to achieving the best performance. Before proceeding with the installation, make a complete record of different thickness are availablethroughyourdealer(Harman Kardon Part Number CH-7W) so...
Owners Manual
Page 4
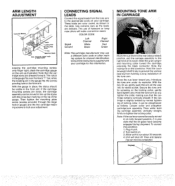
... your cartridge. The use a different color code or other marking system for this condition: 1. Consult the instructions supplied with the cross-hair marking on . 3. Move the cue lever toward the cartridge, exposing the black connector. Introduce the tone arm under its travel. If the cartridge is slightly twisted by screwing on your adjustment. Then while holding...
... your cartridge. The use a different color code or other marking system for this condition: 1. Consult the instructions supplied with the cross-hair marking on . 3. Move the cue lever toward the cartridge, exposing the black connector. Introduce the tone arm under its travel. If the cartridge is slightly twisted by screwing on your adjustment. Then while holding...
Owners Manual
Page 5
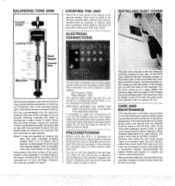
..., the arm neither falls nor returns to the rear of the signal output cable. Never use . Return cue lever to technical manual parts location diagram). Note: If it with the angle of the ST-6 case. The connectors are at the rear of the hinges, the cover will be separated. On first operation the set on. When the brackets align with a drop of...
..., the arm neither falls nor returns to the rear of the signal output cable. Never use . Return cue lever to technical manual parts location diagram). Note: If it with the angle of the ST-6 case. The connectors are at the rear of the hinges, the cover will be separated. On first operation the set on. When the brackets align with a drop of...
Owners Manual
Page 6
... the rear, raising the tone arm, and the motor will switch off. When record is finished the cue lever will be lowered onto the lead-in motion. Move carriage to 33-1/3 or 45 rpm with control arm, aligning stylus over desired part of a record at any time: 1. Depress (left side) power switch 5. Set speed control to extreme right, using Control Arm...
... the rear, raising the tone arm, and the motor will switch off. When record is finished the cue lever will be lowered onto the lead-in motion. Move carriage to 33-1/3 or 45 rpm with control arm, aligning stylus over desired part of a record at any time: 1. Depress (left side) power switch 5. Set speed control to extreme right, using Control Arm...
Owners Manual
Page 7
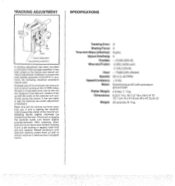
... and readjust. However, to a record turning at the factory and should not require adjustment. After adjusting, lower tone arm on to travel about one inch on to ensure the most precise operation of the carriage assembly. D Weight: 20 pounds, 9.1 kg. Energize your home the following checkout procedure may be used. Tracking Error: 0' Skating Force: 0 Tone Arm Mass (effective): 6 gms. Stylus...
... and readjust. However, to a record turning at the factory and should not require adjustment. After adjusting, lower tone arm on to travel about one inch on to ensure the most precise operation of the carriage assembly. D Weight: 20 pounds, 9.1 kg. Energize your home the following checkout procedure may be used. Tracking Error: 0' Skating Force: 0 Tone Arm Mass (effective): 6 gms. Stylus...


