
Owners Manual
Page 2
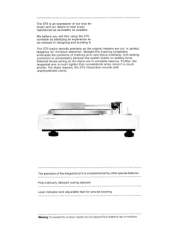
... problems of the tangential arm is complemented by other special features: Pneumatically damped cueing descent. Anti-skating correction is much shorter. External forces acting on the stylus are cut: in complete balance. Level indicator and adjustable feet for precise leveling.... Further, the tangential arm is much lighter than conventional arms, since it . The precision of tracking error and stylus overhang. The ST5 tracks records precisely as the original masters are in perfect tangency for minimum distortion. The ST5...
... problems of the tangential arm is complemented by other special features: Pneumatically damped cueing descent. Anti-skating correction is much shorter. External forces acting on the stylus are cut: in complete balance. Level indicator and adjustable feet for precise leveling.... Further, the tangential arm is much lighter than conventional arms, since it . The precision of tracking error and stylus overhang. The ST5 tracks records precisely as the original masters are in perfect tangency for minimum distortion. The ST5...
Owners Manual
Page 3
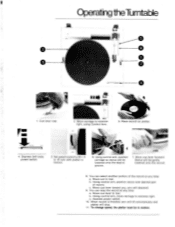
Cue lever rear. 2. Depress (left side) power switch 5. Move cue to extreme right. Depress power switch. 10. Move cue lever forward. Using control arm, move carriage to rear. c. When record is finished, arm will lift automatically and platter will be gently lowered onto the record. 8. b. b. To change speed, the platter must be lowered onto the lead-in groove. 7. Operating theTurntable - Stylus...
Cue lever rear. 2. Depress (left side) power switch 5. Move cue to extreme right. Depress power switch. 10. Move cue lever forward. Using control arm, move carriage to rear. c. When record is finished, arm will lift automatically and platter will be gently lowered onto the record. 8. b. b. To change speed, the platter must be lowered onto the lead-in groove. 7. Operating theTurntable - Stylus...
Owners Manual
Page 4
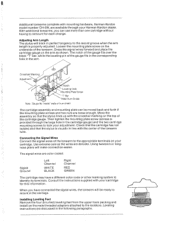
... install on the arm as the wires are color coded: Signal Ground Left Channel WHITE BLACK Right Channel RED GREEN The cartridge may have connected the signal wires, the tonearm will make connection easier. Connecting the Signal Wires Connect the signal wires of hum shield. Move the assembly so that the stylus is provided through your cartridge for each change. The signal wires are delicate. Leveling instructions...
... install on the arm as the wires are color coded: Signal Ground Left Channel WHITE BLACK Right Channel RED GREEN The cartridge may have connected the signal wires, the tonearm will make connection easier. Connecting the Signal Wires Connect the signal wires of hum shield. Move the assembly so that the stylus is provided through your cartridge for each change. The signal wires are delicate. Leveling instructions...
Owners Manual
Page 5
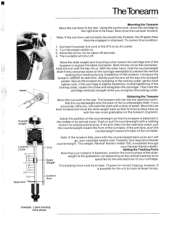
...Connect the power line cord of the counterweight shaft. Turn the power switch on the connector. Introduce the tonearm UNDER its keyed socket. Then hold the counterweight shaft firmly and press down on the tonearm (0 grams). If you re-tighten the locking collar. Adjust the position of the tonearm. Note the key rib on . 3. to the rear...tonearm to the rear. Setting the Tracking Force Now that the tonearm is balanced, position the front surface of the turntable. Control Arm Example: 1 gram tracking force shown The turntable will go, your Harman Kardon dealer. If...
...Connect the power line cord of the counterweight shaft. Turn the power switch on the connector. Introduce the tonearm UNDER its keyed socket. Then hold the counterweight shaft firmly and press down on the tonearm (0 grams). If you re-tighten the locking collar. Adjust the position of the tonearm. Note the key rib on . 3. to the rear...tonearm to the rear. Setting the Tracking Force Now that the tonearm is balanced, position the front surface of the turntable. Control Arm Example: 1 gram tracking force shown The turntable will go, your Harman Kardon dealer. If...
Owners Manual
Page 6
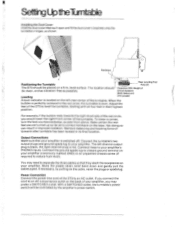
... red circle, the turntable is level. The left -rear corner of the red circle, you may need to your amplifier's PHONO inputs. Connect these to your amplifier. SettingUp theTurntable Installing the Dust Cover Hold the dust cover tilted as if open and fit the dust cover's brackets onto the turntable's hinges, as shown. 0 Hardware Rear Leveling Foot Positioning the Turntable Assy (2) The ST5...
... red circle, the turntable is level. The left -rear corner of the red circle, you may need to your amplifier's PHONO inputs. Connect these to your amplifier. SettingUp theTurntable Installing the Dust Cover Hold the dust cover tilted as if open and fit the dust cover's brackets onto the turntable's hinges, as shown. 0 Hardware Rear Leveling Foot Positioning the Turntable Assy (2) The ST5...
Owners Manual
Page 7
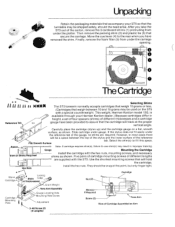
... Tone Arm Assembly Gauge Locating Hole Mounting Plate Screw Adjustment Nut (2) Cartridge Shim(s) If Required Screw (2) Tone Arm View of the gauge, no shims are supplied with the ST5. Five pairs of cartridge mounting screws of the reference tab. Use the shortest mounting screws that will track at this space. Unpacking Retain the packaging materials that accompany your Harman Kardon...
... Tone Arm Assembly Gauge Locating Hole Mounting Plate Screw Adjustment Nut (2) Cartridge Shim(s) If Required Screw (2) Tone Arm View of the gauge, no shims are supplied with the ST5. Five pairs of cartridge mounting screws of the reference tab. Use the shortest mounting screws that will track at this space. Unpacking Retain the packaging materials that accompany your Harman Kardon...

Owners Manual
Page 8
...center of the record-turn the knob slightly counterclockwise. Tracking Adjustment Screw Cleaning the ST5 ST5 maintenance is not in U.S.A. The stainless steel parts of the turntable will help keep your dealer). Keep the dust cover closed when the ST5 is limited to the rear. HK Part # CH-5W 15-G Item Tone... harman/kardon 55 Ames Court, Plainview, N.Y. 11803 All specifications and features are subject to change without notice. 2/79 Printed in use to expose the stainless steel slide rod. If the arm is not, rotate the platter one inch of its travel . Part Number ...
...center of the record-turn the knob slightly counterclockwise. Tracking Adjustment Screw Cleaning the ST5 ST5 maintenance is not in U.S.A. The stainless steel parts of the turntable will help keep your dealer). Keep the dust cover closed when the ST5 is limited to the rear. HK Part # CH-5W 15-G Item Tone... harman/kardon 55 Ames Court, Plainview, N.Y. 11803 All specifications and features are subject to change without notice. 2/79 Printed in use to expose the stainless steel slide rod. If the arm is not, rotate the platter one inch of its travel . Part Number ...


