
Owners Manual
Page 2
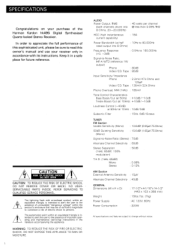
..., 65dBf) Mono Stereo : 0.08% : 0.12% AM Section External Antenna Sensitivity : 15/./V Alternate Channel Selectivity : 45dB GENERAL Dimensions (W x H x D) Weight Power Supply Power Consumption 17-1/2"x 4-1/16"x 14-1/2" (443 x 103 x 368 mm) : 15lbs.7oz. (7kg) : AC 120V, 60Hz : 220W All specifications and features subject to appreciate the full performance of this owner's manual and use your purchase of important oper- • ating and maintenance (servicing) instructions in a safe...
..., 65dBf) Mono Stereo : 0.08% : 0.12% AM Section External Antenna Sensitivity : 15/./V Alternate Channel Selectivity : 45dB GENERAL Dimensions (W x H x D) Weight Power Supply Power Consumption 17-1/2"x 4-1/16"x 14-1/2" (443 x 103 x 368 mm) : 15lbs.7oz. (7kg) : AC 120V, 60Hz : 220W All specifications and features subject to appreciate the full performance of this owner's manual and use your purchase of important oper- • ating and maintenance (servicing) instructions in a safe...
Owners Manual
Page 3
... for Audio Purity The internal wiring, layout and materials have shown that permits high instantaneous current to be sure to unplug the power cord from the AC outlet. •Do not place furniture or other volatile agent, and avoid spraying an insecticide near the unit. 2 Connect only to prevent shock and consult an authorized Harman Kardon service station...
... for Audio Purity The internal wiring, layout and materials have shown that permits high instantaneous current to be sure to unplug the power cord from the AC outlet. •Do not place furniture or other volatile agent, and avoid spraying an insecticide near the unit. 2 Connect only to prevent shock and consult an authorized Harman Kardon service station...
Owners Manual
Page 4
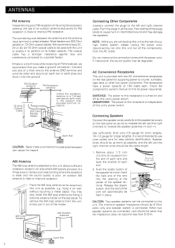
... AC convenience receptacles on the rear panel for supplying power to this unit as possible, and the left and the right channels or reverse the speaker polarities (+ and -). If interwound, the sound quality may be connected to cause hum or intermittent sound and may also install the AM loop antenna by this unit. Connecting Speakers Connect the speaker wires carefully to the speaker terminals on and off...
... AC convenience receptacles on the rear panel for supplying power to this unit as possible, and the left and the right channels or reverse the speaker polarities (+ and -). If interwound, the sound quality may be connected to cause hum or intermittent sound and may also install the AM loop antenna by this unit. Connecting Speakers Connect the speaker wires carefully to the speaker terminals on and off...
Owners Manual
Page 6
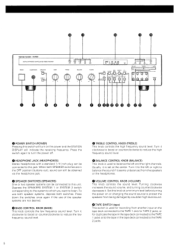
... switches. BASS CONTROL KNOB (BASS) This knob controls the low frequency sound level. Turn it . Turn it to the TAPE 2 jacks. 5 Set this knob at the center. To use of the speaker systems are in the tape deck connected to the left and the right channels. Usually, it is set at a minimum level before turning the power on or changing the sound source to protect the speakers from being damaged by a sudden high level sound. 0 TAPE SWITCH (tape) This switch is used...
... switches. BASS CONTROL KNOB (BASS) This knob controls the low frequency sound level. Turn it . Turn it to the TAPE 2 jacks. 5 Set this knob at the center. To use of the speaker systems are in the tape deck connected to the left and the right channels. Usually, it is set at a minimum level before turning the power on or changing the sound source to protect the speakers from being damaged by a sudden high level sound. 0 TAPE SWITCH (tape) This switch is used...
Owners Manual
Page 7
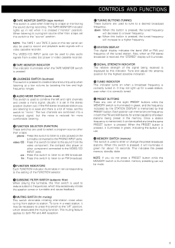
... preset in a weak station, it is set this button is memorized, it illuminates in use. This indicates the preset memory standby state. NOTE: The TAPE 1 and TAPE 2 jacks on when a broadcast frequency is displayed by boosting the low and high frequency ranges. (E) AUDIO MODE SWITCH (audio mode) This switch is pressed. To tune in the memory. down: When this switch to the "source" position. so MEMORY SWITCH (memory) This switch is in green, indicating the button is used...
... preset in a weak station, it is set this button is memorized, it illuminates in use. This indicates the preset memory standby state. NOTE: The TAPE 1 and TAPE 2 jacks on when a broadcast frequency is displayed by boosting the low and high frequency ranges. (E) AUDIO MODE SWITCH (audio mode) This switch is pressed. To tune in the memory. down: When this switch to the "source" position. so MEMORY SWITCH (memory) This switch is in green, indicating the button is used...
Owners Manual
Page 8
... best tuning is unplugged from FM to AM and again to a comfortable level and adjust the BASS and TREBLE control knobs as follows: 1. Press the MEMORY switch. When the desired station is selected, advance the VOLUME control knob to FM, the last received FM station wi l l be entered in the ON (button out) position. Set the TAPE MONITOR switch to the minimum level and press the POWER switch. 2. To select a higher frequency than...
... best tuning is unplugged from FM to AM and again to a comfortable level and adjust the BASS and TREBLE control knobs as follows: 1. Press the MEMORY switch. When the desired station is selected, advance the VOLUME control knob to FM, the last received FM station wi l l be entered in the ON (button out) position. Set the TAPE MONITOR switch to the minimum level and press the POWER switch. 2. To select a higher frequency than...
Owners Manual
Page 9
... TREBLE control knobs to the VIDEO/CD INPUT jacks. 6. Depending on the dubbing quality. 1. Insert a recorded tape in the playback mode. 6. The FUNCTION indicator lights up to the minimum level and press the POWER switch. 2. Start recording by the volume, balance, bass and treble controls, loudness and subsonic filter switches of the FUNCTION selector and the VIDEO/CD FUNCTION indicator lights up . 5. Turn the VOLUME control knob to indicate the program source selected. 4. Turn the VOLUME control...
... TREBLE control knobs to the VIDEO/CD INPUT jacks. 6. Depending on the dubbing quality. 1. Insert a recorded tape in the playback mode. 6. The FUNCTION indicator lights up to the minimum level and press the POWER switch. 2. Start recording by the volume, balance, bass and treble controls, loudness and subsonic filter switches of the FUNCTION selector and the VIDEO/CD FUNCTION indicator lights up . 5. Turn the VOLUME control knob to indicate the program source selected. 4. Turn the VOLUME control...
Owners Manual
Page 10
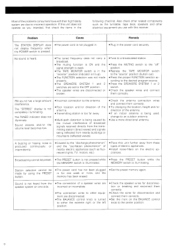
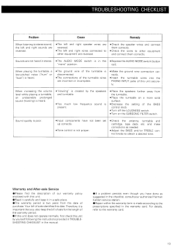
... PRESET button is not pressed while • Press the PRESET button while the the MEMORY switch is ill luminated. Sound is not plugged in. • Plug in for disconnection and connect them correctly. •Check the wires for one side. Also check other related components such as fluorescent lights, TV, motors, etc.). • Place this receiver. Problem Cause Remedy The STATION DISPLAY does not display frequency when the POWER switch...
... PRESET button is not pressed while • Press the PRESET button while the the MEMORY switch is ill luminated. Sound is not plugged in. • Plug in for disconnection and connect them correctly. •Check the wires for one side. Also check other related components such as fluorescent lights, TV, motors, etc.). • Place this receiver. Problem Cause Remedy The STATION DISPLAY does not display frequency when the POWER switch...
Owners Manual
Page 11
... the setting of this unit securely. Sound quality is poor. • Input components have done as needed. •Adjust the BASS and/or TREBLE control knobs to the prescriptions specified in the • Repress the AUDIO MODE switch (button "mono" position. Therefore, it in the checklist, consult your authorized Harman Kardon service station. •Repair within the warranty term is not proper. •Check the antenna, turntable...
... the setting of this unit securely. Sound quality is poor. • Input components have done as needed. •Adjust the BASS and/or TREBLE control knobs to the prescriptions specified in the • Repress the AUDIO MODE switch (button "mono" position. Therefore, it in the checklist, consult your authorized Harman Kardon service station. •Repair within the warranty term is not proper. •Check the antenna, turntable...


