
Owners Manual
Page 1
a FL8400 Compact Disc Changer harman/ kardon OPERATING INSTRUCTIONS harman/kardon FL,9460 , ,, ; , , r o , , n , , , 6 6 6 6 6 ,,,,,,ID,,, L., I , a.,,,,.... O-
a FL8400 Compact Disc Changer harman/ kardon OPERATING INSTRUCTIONS harman/kardon FL,9460 , ,, ; , , r o , , n , , , 6 6 6 6 6 ,,,,,,ID,,, L., I , a.,,,,.... O-
Owners Manual
Page 2
... of heating vents, in direct sun light, or in the literature accompanying the appliance. Please unpack your Multi Compact Disc Player and help a trouble free installation. To avoid early damage, never place the unit near radiators, in front of important operating and maintenance (servicing) instructions in excessively humid or dusty location. CLASS 1 LASER PRODUCT CAUTION Invisible laser radiation when the unit...
... of heating vents, in direct sun light, or in the literature accompanying the appliance. Please unpack your Multi Compact Disc Player and help a trouble free installation. To avoid early damage, never place the unit near radiators, in front of important operating and maintenance (servicing) instructions in excessively humid or dusty location. CLASS 1 LASER PRODUCT CAUTION Invisible laser radiation when the unit...

Owners Manual
Page 3
CAUTION: TO PREVENT ELECTRIC SHOCK DO NOT USE THIS (POLARIZED) PLUG WITH AN EXTENSION CORD, RECEPTACLE OR OTHER OUTLET UNLESS THE BLADES CAN BE FULLY INSERTED TO PREVENT BLADE EXPOSURE. 4 However, some products may be supplied with a nonpolarized plug. and Canada 120V FOR YOUR SAFETY Units shipped to the U.S.A and Canada are designed for a Polarized AC plug. Safety precaution for operation on 120V AC only. Read this Before Operating Your Unit For the U.S.A.
CAUTION: TO PREVENT ELECTRIC SHOCK DO NOT USE THIS (POLARIZED) PLUG WITH AN EXTENSION CORD, RECEPTACLE OR OTHER OUTLET UNLESS THE BLADES CAN BE FULLY INSERTED TO PREVENT BLADE EXPOSURE. 4 However, some products may be supplied with a nonpolarized plug. and Canada 120V FOR YOUR SAFETY Units shipped to the U.S.A and Canada are designed for a Polarized AC plug. Safety precaution for operation on 120V AC only. Read this Before Operating Your Unit For the U.S.A.

Owners Manual
Page 4
... discs can be played only on the inside to the outside of the disc. Wipe straight from its storage case, press down on the center of the case and...use such chemicals as record sprays, antistatic sprays or fluid, benzine or thinner to direct sunlight or high humidity and temperature for extended periods. Concerning Compact Discs • Only Compact discs bearing this mark can be reproduced. COMPACT DOM DIGITAL AUDIO... to high temperature can be reproduced. Small dust particles and light stains will remove most particles completely. No other discs can warp the disc. &#...
... discs can be played only on the inside to the outside of the disc. Wipe straight from its storage case, press down on the center of the case and...use such chemicals as record sprays, antistatic sprays or fluid, benzine or thinner to direct sunlight or high humidity and temperature for extended periods. Concerning Compact Discs • Only Compact discs bearing this mark can be reproduced. COMPACT DOM DIGITAL AUDIO... to high temperature can be reproduced. Small dust particles and light stains will remove most particles completely. No other discs can warp the disc. &#...
Owners Manual
Page 5
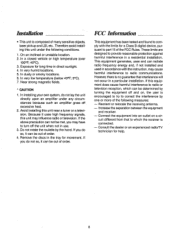
... for a Class B digital device, pursuant to provide reasonable protection against harmful interference in direct sunlight. 4. If this unit may have to radio or television reception, which the receiver is composed of the FCC Rules. Installation • This unit is connected. - Exposure for movement. If you do not lay the unit directly upon an amplifier under the following...
... for a Class B digital device, pursuant to provide reasonable protection against harmful interference in direct sunlight. 4. If this unit may have to radio or television reception, which the receiver is composed of the FCC Rules. Installation • This unit is connected. - Exposure for movement. If you do not lay the unit directly upon an amplifier under the following...
Owners Manual
Page 6
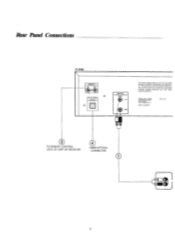
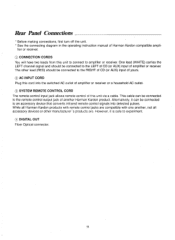
TO REMOTE CONTROL JACK OF AMP OR RECEIVER FIBER OPTICAL CONNECTOR O L 7 Operation is subject to the following two conditions: (1) This device may cause undesired operation MODEL NO.: ELM0° HARMAN KAROGN NOR IIIIDGE CALIFORNIA U.S .A MADE IN KOREA SER. Rear Panel Connections FL-8400 REMOTE iN OUT S e® CPTCAL MTN_ OTPUT OUTPUT FIXED LEFT RIGHT This device complies with part 15 of the FCC Rules. NO. including interference that may not cause harmlul interferon., and (2) this device must accept any interference received.
TO REMOTE CONTROL JACK OF AMP OR RECEIVER FIBER OPTICAL CONNECTOR O L 7 Operation is subject to the following two conditions: (1) This device may cause undesired operation MODEL NO.: ELM0° HARMAN KAROGN NOR IIIIDGE CALIFORNIA U.S .A MADE IN KOREA SER. Rear Panel Connections FL-8400 REMOTE iN OUT S e® CPTCAL MTN_ OTPUT OUTPUT FIXED LEFT RIGHT This device complies with part 15 of the FCC Rules. NO. including interference that may not cause harmlul interferon., and (2) this device must accept any interference received.
Owners Manual
Page 10
... Optical connector. 11 Alternatively, it is safe to amplifier or receiver. While all Harman Kardon products with remote control jacks are compatible with one another Harman Kardon product. One lead (WHITE) carries the LEFT channel signal and should be connected to the LEFT of CD (or AUX) input of Harman Kardon compatible ampli- Rear Panel Connections * Before making connections, first turn off the unit. * See the connecting diagram in the operating instruction manual of amplifier or receiver. This cable can be connected to the remote control output jack...
... Optical connector. 11 Alternatively, it is safe to amplifier or receiver. While all Harman Kardon products with remote control jacks are compatible with one another Harman Kardon product. One lead (WHITE) carries the LEFT channel signal and should be connected to the LEFT of CD (or AUX) input of Harman Kardon compatible ampli- Rear Panel Connections * Before making connections, first turn off the unit. * See the connecting diagram in the operating instruction manual of amplifier or receiver. This cable can be connected to the remote control output jack...
Owners Manual
Page 11
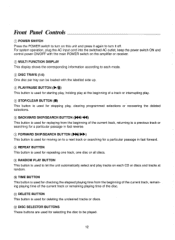
... up. ® PLAY/PAUSE BUTTON (MI) This button is used for starting play, holding play at the beginning of a track or interrupting play. ® STOP/CLEAR BUTTON (IN) This button is used for stopping play tracks on each mode. ® DISC TRAYS (1-5) One disc per tray can be played. 12 Front Panel Controls ® POWER SWITCH Press the POWER switch to turn on the amplifier or receiver. ® MULTI FUNCTION DISPLAY This display shows the corresponding...
... up. ® PLAY/PAUSE BUTTON (MI) This button is used for starting play, holding play at the beginning of a track or interrupting play. ® STOP/CLEAR BUTTON (IN) This button is used for stopping play tracks on each mode. ® DISC TRAYS (1-5) One disc per tray can be played. 12 Front Panel Controls ® POWER SWITCH Press the POWER switch to turn on the amplifier or receiver. ® MULTI FUNCTION DISPLAY This display shows the corresponding...
Owners Manual
Page 12
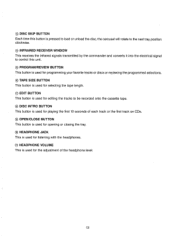
is PROGRAM/REVIEW BUTTON This button is used for programming your favorite tracks or discs or reviewing the programmed selections. ® TAPE SIZE BUTTON This button is used for selecting the tape length. ® EDIT BUTTON This button is used for editing the tracks to the next tray position clockwise. g HEADPHONE JACK This is used for playing the first 10 seconds of the headphone level. 13 C) INFRARED RECEIVER WINDOW This receives the infrared signals transmitted...
is PROGRAM/REVIEW BUTTON This button is used for programming your favorite tracks or discs or reviewing the programmed selections. ® TAPE SIZE BUTTON This button is used for selecting the tape length. ® EDIT BUTTON This button is used for editing the tracks to the next tray position clockwise. g HEADPHONE JACK This is used for playing the first 10 seconds of the headphone level. 13 C) INFRARED RECEIVER WINDOW This receives the infrared signals transmitted...
Owners Manual
Page 13
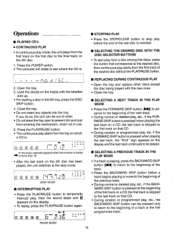
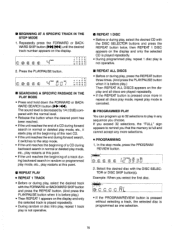
... programmed track. Press the POWER switch. • The carousel will rotate to see where the CD is. • STOPPING PLAY • Press the STOP/CLEAR button to stop mode. 12 94 6 C ® 11-1-7-n:.-3 7.5 6 7 8 9 IC 11 12 18 14 STOP MODE II INTERRUPTING PLAY • Press the PLAY/PAUSE button to temporarily interrupt play, then the sound stops and II appears on the display...
... programmed track. Press the POWER switch. • The carousel will rotate to see where the CD is. • STOPPING PLAY • Press the STOP/CLEAR button to stop mode. 12 94 6 C ® 11-1-7-n:.-3 7.5 6 7 8 9 IC 11 12 18 14 STOP MODE II INTERRUPTING PLAY • Press the PLAY/PAUSE button to temporarily interrupt play, then the sound stops and II appears on the display...
Owners Manual
Page 14
... SKIP button and press the REPEAT button. (And press the PLAY/PAUSE button when it switches to remind you that the memory is full and cannot accept any sequence you select the first disc. \ / c}ccccRL • If the PROGRAM/REVIEW button is pressed without selecting a track, the selected disc is before play.) Then REPEAT ALL DISCS appears on the display. EEEME4120 c- Press the PLAY/PAUSE button...
... SKIP button and press the REPEAT button. (And press the PLAY/PAUSE button when it switches to remind you that the memory is full and cannot accept any sequence you select the first disc. \ / c}ccccRL • If the PROGRAM/REVIEW button is pressed without selecting a track, the selected disc is before play.) Then REPEAT ALL DISCS appears on the display. EEEME4120 c- Press the PLAY/PAUSE button...
Owners Manual
Page 15
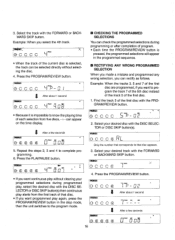
... PROGRAM/REVIEW button is pressed, the programmed selections will appear in the stop mode, then the unit switches to program the track 7 of the 5th disc instead of the track 5 of the first disc are programmed, if you want programmed play again, press the PROGRAM/REVIEW button in the programmed sequence. • RECTIFYING ANY WRONG PROGRAMMED SELECTION When you made a mistake and programmed any wrong selection, you want continuous play starts...
... PROGRAM/REVIEW button is pressed, the programmed selections will appear in the stop mode, then the unit switches to program the track 7 of the 5th disc instead of the track 5 of the first disc are programmed, if you want programmed play again, press the PROGRAM/REVIEW button in the programmed sequence. • RECTIFYING ANY WRONG PROGRAMMED SELECTION When you made a mistake and programmed any wrong selection, you want continuous play starts...
Owners Manual
Page 16
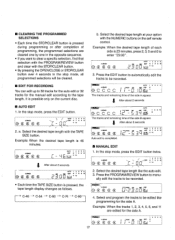
...; 12 8 8 4 6 9 10 oj Auto edit is pressed, the tape length display changes as follows. Press the PROGRAM/REVIEW button to enter "23:00". ""C' s n cATT, C-46 -> C-54 C-60 C-74 4. Example: When the tracks 1, 2, 3, 4, 5, 6, and 11 are cleared one by one in the opposite sequence. • If you want to clear a specific selection, find that selection with the PROGRAM/REVIEW button and clear with...
...; 12 8 8 4 6 9 10 oj Auto edit is pressed, the tape length display changes as follows. Press the PROGRAM/REVIEW button to enter "23:00". ""C' s n cATT, C-46 -> C-54 C-60 C-74 4. Example: When the tracks 1, 2, 3, 4, 5, 6, and 11 are cleared one by one in the opposite sequence. • If you want to clear a specific selection, find that selection with the PROGRAM/REVIEW button and clear with...
Owners Manual
Page 17
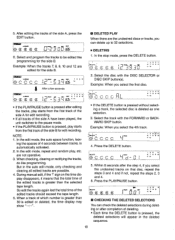
...If the DELETE button is pressed without selecting a track, the selected disc is pressed, the deleted selections will appear in the auto edit mode, only checking and clearing all tracks of the side A have been played, the unit switches to 32 selections. • DELETING 1. Press the DELETE button. After editing...PLAY/PAUSE button is pressed after editing the tracks, play starts from the first track of the side A for edit recording. In the edit mode, repeat and random play starts from the first track of which number is greater than 30 is greater than the selected tape length. Select...
...If the DELETE button is pressed without selecting a track, the selected disc is pressed, the deleted selections will appear in the auto edit mode, only checking and clearing all tracks of the side A have been played, the unit switches to 32 selections. • DELETING 1. Press the DELETE button. After editing...PLAY/PAUSE button is pressed after editing the tracks, play starts from the first track of the side A for edit recording. In the edit mode, repeat and random play starts from the first track of which number is greater than 30 is greater than the selected tape length. Select...
Owners Manual
Page 18
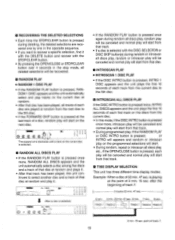
... that track. ■ TIME DISPLAY SELECTION This unit has three different time display modes. ■ RECOVERING THE DELETED SELECTIONS • Each time the STOP/CLEAR button is pressed during random or introscan all discs play, random or introscan play will be canceled and normal play will start from that disc. ■ INTROSCAN PLAY • INTROSCAN 1 DISC PLAY • If the DISC INTRO...
... that track. ■ TIME DISPLAY SELECTION This unit has three different time display modes. ■ RECOVERING THE DELETED SELECTIONS • Each time the STOP/CLEAR button is pressed during random or introscan all discs play, random or introscan play will be canceled and normal play will start from that disc. ■ INTROSCAN PLAY • INTROSCAN 1 DISC PLAY • If the DISC INTRO...
Owners Manual
Page 20
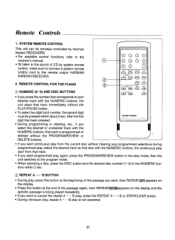
... track with the NUMERIC buttons, the continuous play start from that track immediately without the PLAY/PAUSE button. • To select two digit track number, the second digit must be remotely controlled by system remote control, make sure to connect a system remote control cord to the remote output HARMAN KARDON RECEIVER. 0 0 0 0 0 0 0 9 00 6 Intro Prop/Rae 0 =1 Repeat I/All Tape Stye 0 Random Edit 0 Delete 2. harman/kardon Compact Oi se Change r • During programming or deleting, etc., if...
... track with the NUMERIC buttons, the continuous play start from that track immediately without the PLAY/PAUSE button. • To select two digit track number, the second digit must be remotely controlled by system remote control, make sure to connect a system remote control cord to the remote output HARMAN KARDON RECEIVER. 0 0 0 0 0 0 0 9 00 6 Intro Prop/Rae 0 =1 Repeat I/All Tape Stye 0 Random Edit 0 Delete 2. harman/kardon Compact Oi se Change r • During programming or deleting, etc., if...
Owners Manual
Page 21
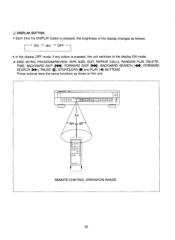
... 300 30° O 000 O0 0 REMOTE CONTROL OPERATION RANGE 22 ® DISPLAY BUTTON • Each time the DISPLAY button is pressed, the brightness of the display changes as follows: ON -> dim OFF • In the display OFF mode, if any button is pressed, the unit switches to the display ON mode. * DISC INTRO, PROGRAM/REVIEW, TAPE SIZE, EDIT, REPEAT (1/ALL), RANDOM PLAY, DELETE, TIME, BACKWARD SKIP (44), FORWARD...
... 300 30° O 000 O0 0 REMOTE CONTROL OPERATION RANGE 22 ® DISPLAY BUTTON • Each time the DISPLAY button is pressed, the brightness of the display changes as follows: ON -> dim OFF • In the display OFF mode, if any button is pressed, the unit switches to the display ON mode. * DISC INTRO, PROGRAM/REVIEW, TAPE SIZE, EDIT, REPEAT (1/ALL), RANDOM PLAY, DELETE, TIME, BACKWARD SKIP (44), FORWARD...
Owners Manual
Page 22
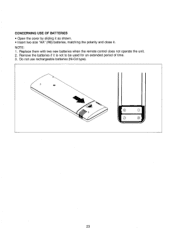
Do not use rechargeable batteries (Ni-Cd type). 0 CZ) 0 0 a a 23 Replace them with two new batteries when the remote control does not operate the unit. 2. Remove the batteries if it . NOTE: 1. CONCERNING USE OF BATTERIES • Open the cover by sliding it as shown. • Insert two size "AA" (R6) batteries, matching the polarity and close it is not to be used for an extended period of time. 3.
Do not use rechargeable batteries (Ni-Cd type). 0 CZ) 0 0 a a 23 Replace them with two new batteries when the remote control does not operate the unit. 2. Remove the batteries if it . NOTE: 1. CONCERNING USE OF BATTERIES • Open the cover by sliding it as shown. • Insert two size "AA" (R6) batteries, matching the polarity and close it is not to be used for an extended period of time. 3.
Owners Manual
Page 23
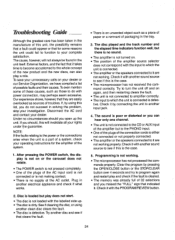
...; The amplifier or the speakers connected to the PHONO input. • One of the plugs of troubles. The disc played and the track number and the elapsed time indicators function well, but to it are easily overlooked as a piece of paper or a remnant of a system, check your dealer. Check it with power connection, may perhaps seem excessive. Clear the program by using another input jack...
...; The amplifier or the speakers connected to the PHONO input. • One of the plugs of troubles. The disc played and the track number and the elapsed time indicators function well, but to it are easily overlooked as a piece of paper or a remnant of a system, check your dealer. Check it with power connection, may perhaps seem excessive. Clear the program by using another input jack...
Owners Manual
Page 24
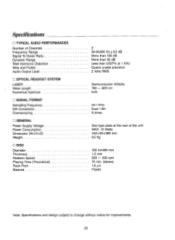
... Dynamic Range Total Harmonic Distortion Wow and Flutter Audio Output Level u OPTICAL READOUT SYSTEM LASER Wave Length Numerical Aperture u SIGNAL FORMAT Sampling Frequency D/A Conversion Oversampling u GENERAL Power Supply Voltage Power Consumption Dimension (Wx H x D) Weight u DISC Diameter Thickness Rotation Speed Playing Time (Theoretical) Track Pitch Material 2 20-20,000 Hz +05 dB More than 100 dB. Specifications u TYPICAL AUDIO PERFORMANCES Number of the unit...
... Dynamic Range Total Harmonic Distortion Wow and Flutter Audio Output Level u OPTICAL READOUT SYSTEM LASER Wave Length Numerical Aperture u SIGNAL FORMAT Sampling Frequency D/A Conversion Oversampling u GENERAL Power Supply Voltage Power Consumption Dimension (Wx H x D) Weight u DISC Diameter Thickness Rotation Speed Playing Time (Theoretical) Track Pitch Material 2 20-20,000 Hz +05 dB More than 100 dB. Specifications u TYPICAL AUDIO PERFORMANCES Number of the unit...


