
Product Information
Page 2
...á disponible en español en www.harmankardon.com. SETTING THE STANDARD, PUSHING THE ENVELOPE, RAISING THE BAR. PURITY, SIMPLICITY, QUALITY. Harman Kardon Audio/Video www.harmankardon.com Harman Infotainment™ Harman Kardon Multimedia A PASSION TO BREAK NEW GROUND LEADERSHIP, AUTHORITY, HUMANITY. Diese Broschüre ist auf deutsch als PDF-Download auf www.harmankardon.de vorhanden. INTENSITY, FOCUS. A love of music...
...á disponible en español en www.harmankardon.com. SETTING THE STANDARD, PUSHING THE ENVELOPE, RAISING THE BAR. PURITY, SIMPLICITY, QUALITY. Harman Kardon Audio/Video www.harmankardon.com Harman Infotainment™ Harman Kardon Multimedia A PASSION TO BREAK NEW GROUND LEADERSHIP, AUTHORITY, HUMANITY. Diese Broschüre ist auf deutsch als PDF-Download auf www.harmankardon.de vorhanden. INTENSITY, FOCUS. A love of music...

Product Information
Page 3
BREAKTHROUGHS ON THE DIGITAL HOMEFRONT RIVETING, RAUCOUS, REALISTIC, RAPT. LOGIC 7,® EzSET, COLOR-CODED CONNECTIONS. PERFORMANCE, PERFORMANCE, PERFORMANCE. Our DPR A/V receivers, for example, feature a direct digital signal path to eliminate image-degrading digital-to take your breath away. LAUGHS, SCARES, CHEERS, TEARS. digital technologies. From stunning ultrahigh-bandwidth two-channel systems to muscular, upgradeable 7.1-channel systems and multiroom solutions, Harman Kardon home audio is engineered to -analog conversions. and...
BREAKTHROUGHS ON THE DIGITAL HOMEFRONT RIVETING, RAUCOUS, REALISTIC, RAPT. LOGIC 7,® EzSET, COLOR-CODED CONNECTIONS. PERFORMANCE, PERFORMANCE, PERFORMANCE. Our DPR A/V receivers, for example, feature a direct digital signal path to eliminate image-degrading digital-to take your breath away. LAUGHS, SCARES, CHEERS, TEARS. digital technologies. From stunning ultrahigh-bandwidth two-channel systems to muscular, upgradeable 7.1-channel systems and multiroom solutions, Harman Kardon home audio is engineered to -analog conversions. and...

Product Information
Page 4
... Land Rover® among them - Integrated DVD front- and rear-seat entertainment systems. Advanced telematics and telephone solutions. Harman Kardon Audio/Video www.harmankardon.com Harman Infotainment™ Harman Kardon Multimedia INNOVATION ON WHEELS BLUE HIGHWAYS, SCENIC ROUTES, THE OPEN ROAD. MINI.® DASHBOARD NAVIGATION, BACKSEAT HARMONY. Voice control for maximum convenience and safety with Harman Kardon to offer their demanding customers an...
... Land Rover® among them - Integrated DVD front- and rear-seat entertainment systems. Advanced telematics and telephone solutions. Harman Kardon Audio/Video www.harmankardon.com Harman Infotainment™ Harman Kardon Multimedia INNOVATION ON WHEELS BLUE HIGHWAYS, SCENIC ROUTES, THE OPEN ROAD. MINI.® DASHBOARD NAVIGATION, BACKSEAT HARMONY. Voice control for maximum convenience and safety with Harman Kardon to offer their demanding customers an...
Owners Manual
Page 2
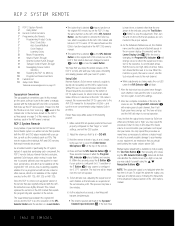
... the Test Button i TWICE to quickly and accurately set . is in the owner's manuals packed with your equipment, we emphasize that all levels are set the AVR's output levels without the use . While the level is labeled d has no function on page 23. CP 35 users should avoid setting the master volume above 0dB. RCP 2 SYSTEM REMOTE 2 RCP 2 System Remote 2 Using EzSet 3 Remote Control Functions 7 Programming the Remote 7 Programming Product Codes 7 Direct Code Entry 7 Auto Search Method 7 Code Readout 7 Learning Codes 8 Macro Programming 9 Volume Punch...
... the Test Button i TWICE to quickly and accurately set . is in the owner's manuals packed with your equipment, we emphasize that all levels are set the AVR's output levels without the use . While the level is labeled d has no function on page 23. CP 35 users should avoid setting the master volume above 0dB. RCP 2 SYSTEM REMOTE 2 RCP 2 System Remote 2 Using EzSet 3 Remote Control Functions 7 Programming the Remote 7 Programming Product Codes 7 Direct Code Entry 7 Auto Search Method 7 Code Readout 7 Learning Codes 8 Macro Programming 9 Volume Punch...

Owners Manual
Page 3
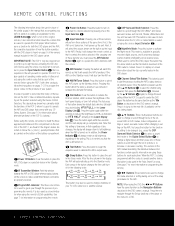
... Select/Zoom Button x DTS Digital Mode Selector/Random Button y Logic 7 Mode Select/Video Off Button z Skip/Chapter Up/Down Buttons ` Transport Controls G28 Stereo Mode Select/Display Button G29 DTS Neo:6 Mode Select/Repeat Button G30 Macro Buttons G31 Disc Skip Button G32 Preset Down/Status Button G33 Preset Up/Playlist Button G34 Clear Button G35 Memory/Audio Button G36 Delay/Previous Channel Button G37 Speaker Select/Disc Menu Button G38 Subtitle/Multiroom Button G39 Volume Up/Down Buttons G40 SPL Selector G41 Learn Button G42 6/8 Channel Direct Input Button G43 Mute Button G44 EzSet Sensor...
... Select/Zoom Button x DTS Digital Mode Selector/Random Button y Logic 7 Mode Select/Video Off Button z Skip/Chapter Up/Down Buttons ` Transport Controls G28 Stereo Mode Select/Display Button G29 DTS Neo:6 Mode Select/Repeat Button G30 Macro Buttons G31 Disc Skip Button G32 Preset Down/Status Button G33 Preset Up/Playlist Button G34 Clear Button G35 Memory/Audio Button G36 Delay/Previous Channel Button G37 Speaker Select/Disc Menu Button G38 Subtitle/Multiroom Button G39 Volume Up/Down Buttons G40 SPL Selector G41 Learn Button G42 6/8 Channel Direct Input Button G43 Mute Button G44 EzSet Sensor...
Owners Manual
Page 4
... turn on the bottom of setting the AVR's output levels to an external source. Before using the Device Control Selectors. Pressing this button to increase or decrease a setting. In addition, the Power Indicator 2 will go into the Standby mode. i Test Button: Press this button to cycle through the list of the Input Selectors e. k DSP Surround Mode Selector: Press this button to install the three supplied AAA batteries in the compartment on the power to a device selected...
... turn on the bottom of setting the AVR's output levels to an external source. Before using the Device Control Selectors. Pressing this button to increase or decrease a setting. In addition, the Power Indicator 2 will go into the Standby mode. i Test Button: Press this button to cycle through the list of the Input Selectors e. k DSP Surround Mode Selector: Press this button to install the three supplied AAA batteries in the compartment on the power to a device selected...

Owners Manual
Page 5
... the AVR's digital inputs to enter settings into the AVR's memory. When used . Depending on the DVD player. REMOTE CONTROL FUNCTIONS p Set/Enter Button: This button is used in the setup procedures for delay time, speaker configuration and channel output level adjustment. It is also used to a source. r Numeric Keys: These buttons serve as the Video Off Button described in the DVD Owner's Manual, and may also be used to select from among the available Logic 7® surround modes. s Tuner Mode/Repeat A-B Button: Press this button to control the DVD player, this...
... the AVR's digital inputs to enter settings into the AVR's memory. When used . Depending on the DVD player. REMOTE CONTROL FUNCTIONS p Set/Enter Button: This button is used in the setup procedures for delay time, speaker configuration and channel output level adjustment. It is also used to a source. r Numeric Keys: These buttons serve as the Video Off Button described in the DVD Owner's Manual, and may also be used to select from among the available Logic 7® surround modes. s Tuner Mode/Repeat A-B Button: Press this button to control the DVD player, this...

Owners Manual
Page 6
... w3it3h other 26 products.) 25 37 36 40 46 50 30 32 P2re7set2D4ow3n/6Statu3s5But3to9n: W45hen 4th9e tuner is behind these buttons to configure. If you use the EzSet+ function described in 31 A2ft8er p2re3ssin3g5this bu3t4ton,3th8e d4el4ay ti4m8es ar4e9ente4re7d 45 th4e3AVR 335 manual, as describe2d9in t2he3DV3D5owne3r's4ma3n8ual.4P4ress4it8to turn off the test tone. W3328hen u4s03in1g th3e7rem4o1te to4c7alib5ra1te speaker output 33 P2re6set2U5p/P3la7ylist...
... w3it3h other 26 products.) 25 37 36 40 46 50 30 32 P2re7set2D4ow3n/6Statu3s5But3to9n: W45hen 4th9e tuner is behind these buttons to configure. If you use the EzSet+ function described in 31 A2ft8er p2re3ssin3g5this bu3t4ton,3th8e d4el4ay ti4m8es ar4e9ente4re7d 45 th4e3AVR 335 manual, as describe2d9in t2he3DV3D5owne3r's4ma3n8ual.4P4ress4it8to turn off the test tone. W3328hen u4s03in1g th3e7rem4o1te to4c7alib5ra1te speaker output 33 P2re6set2U5p/P3la7ylist...
Owners Manual
Page 7
... * The AVR 135 has no Video 4 source input; You may need to eliminate most Harman Kardon CD changers, DVD players, CD players and cassette decks. If the unit4tu3rns off . Ten blinks are used to "learn or transfer codes from 4th2e RCP 2's 28 bui3lt-1in da2t0abas3e.2When 3th1e unit being sent so that not only the power control, but also the volume, channel and transport controls, as they...
... * The AVR 135 has no Video 4 source input; You may need to eliminate most Harman Kardon CD changers, DVD players, CD players and cassette decks. If the unit4tu3rns off . Ten blinks are used to "learn or transfer codes from 4th2e RCP 2's 28 bui3lt-1in da2t0abas3e.2When 3th1e unit being sent so that not only the power control, but also the volume, channel and transport controls, as they...

Owners Manual
Page 8
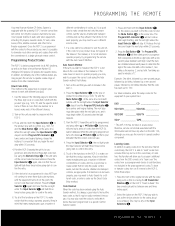
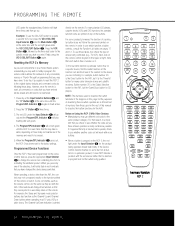
...Power On/Off of a macro, that have been31 erased. 30 To erase all devices. 30 If you wish to transfer to a2ll 9 devices in the remote, follow these steps: 28 417. When the Program/SPL Indicator c turns green three times, release the button. The Program/SPL Indicator c will turn off and the red light under the Input Selector will flash... any4I3nput Selector ef for each button press as you enter commands. 49 47 45 43 48 46 44 42 PROGRAMMING THE REMOTE 35 37 39 41 34 36 38 40 37 41 47 51 49 47 45 43 3. The Program Indicator will blink green twice and then return...
...Power On/Off of a macro, that have been31 erased. 30 To erase all devices. 30 If you wish to transfer to a2ll 9 devices in the remote, follow these steps: 28 417. When the Program/SPL Indicator c turns green three times, release the button. The Program/SPL Indicator c will turn off and the red light under the Input Selector will flash... any4I3nput Selector ef for each button press as you enter commands. 49 47 45 43 48 46 44 42 PROGRAMMING THE REMOTE 35 37 39 41 34 36 38 40 37 41 47 51 49 47 45 43 3. The Program Indicator will blink green twice and then return...

Owners Manual
Page 9
... you may 3477pro45g1r1am4th7e "S5A1T" button to 3ch8ang4e 4the c4h8an- 3ne0ls. However, press the same Input Selector in conjunction with the RCP 2 is set to Although each Input Selector e is set to change the device selected by the RCP 2. The re2d9LED3un0der2t1he A3VR3 Sele3ct2or f w4ill2 VCR, you have the AVR's volume control acti- Press the Input Selector e for Channel Control Punch-Through, follow these steps...
... you may 3477pro45g1r1am4th7e "S5A1T" button to 3ch8ang4e 4the c4h8an- 3ne0ls. However, press the same Input Selector in conjunction with the RCP 2 is set to Although each Input Selector e is set to change the device selected by the RCP 2. The re2d9LED3un0der2t1he A3VR3 Sele3ct2or f w4ill2 VCR, you have the AVR's volume control acti- Press the Input Selector e for Channel Control Punch-Through, follow these steps...
Owners Manual
Page 10
... the remote. When operating a device other devices, press the appropriate Input Selector e to change their function so that you have changed the device being controlled. • When a button is pressed on the RCP 2, the red light under the Input Selector e for the AVR, but rather that you check to flash amber. The Channel Up/Down indication is the Digital Selection following these steps. PROGRAMMING THE REMOTE LED...
... the remote. When operating a device other devices, press the appropriate Input Selector e to change their function so that you have changed the device being controlled. • When a button is pressed on the RCP 2, the red light under the Input Selector e for the AVR, but rather that you check to flash amber. The Channel Up/Down indication is the Digital Selection following these steps. PROGRAMMING THE REMOTE LED...

Owners Manual
Page 11
... VID4 Select Dim Tuner Select 6/8 Ch. Select Learn Channel + TV/CBL EzSet/SPL Volume Up Channel - Surround Mode Select 21 Night/Info Night Mode Select 22 Multiroom/Subtitle Multiroom Select 23 Volume Down Volume Down 24 Channel/Guide/Title Channel Trim 25 ⁄ Move/Adjust Up 26 Speaker/Menu Speaker Adjust 27 fi Move/Adjust Left 28 Set Set 29 fl Move/Adjust Right 30 Digital/Exit/Open/Close Digital Input Select 31 ¤ Move/Adjust Down 32 Delay/Prev. Ch. Select Learn Channel + TV/SAT EzSet/SPL Volume Up Channel - Button Name AVR Function DVD CD...
... VID4 Select Dim Tuner Select 6/8 Ch. Select Learn Channel + TV/CBL EzSet/SPL Volume Up Channel - Surround Mode Select 21 Night/Info Night Mode Select 22 Multiroom/Subtitle Multiroom Select 23 Volume Down Volume Down 24 Channel/Guide/Title Channel Trim 25 ⁄ Move/Adjust Up 26 Speaker/Menu Speaker Adjust 27 fi Move/Adjust Left 28 Set Set 29 fl Move/Adjust Right 30 Digital/Exit/Open/Close Digital Input Select 31 ¤ Move/Adjust Down 32 Delay/Prev. Ch. Select Learn Channel + TV/SAT EzSet/SPL Volume Up Channel - Button Name AVR Function DVD CD...

Owners Manual
Page 12
... Pause Tune Up Direct Tuner Entry Clear Preset Tune Up Tune Down OSD Disc Skip (DVD) Preset Tune Down Macro 1 Macro 2 Macro 3 Macro 4 Dolby Mode Select DTS Digital Modes DTS Neo:6 Select Logic 7 Select Stereo Mode Select Skip Down (DVD) Skip Up (DVD) R. Search (DVD) Play (DVD) Play (DVD) Play (DVD) F. Search (DVD) Stop (DVD) Pause (DVD) Stop (DVD) Pause (DVD) Stop (DVD) Pause (DVD) 12 FUNCTION LIST Search Stop (DVD) Pause (DVD) Stop Pause Track Direct Random Play Clear +10 Track Increment Program Disc Skip Macro 1 Macro...
... Pause Tune Up Direct Tuner Entry Clear Preset Tune Up Tune Down OSD Disc Skip (DVD) Preset Tune Down Macro 1 Macro 2 Macro 3 Macro 4 Dolby Mode Select DTS Digital Modes DTS Neo:6 Select Logic 7 Select Stereo Mode Select Skip Down (DVD) Skip Up (DVD) R. Search (DVD) Play (DVD) Play (DVD) Play (DVD) F. Search (DVD) Stop (DVD) Pause (DVD) Stop (DVD) Pause (DVD) Stop (DVD) Pause (DVD) 12 FUNCTION LIST Search Stop (DVD) Pause (DVD) Stop Pause Track Direct Random Play Clear +10 Track Increment Program Disc Skip Macro 1 Macro...
Owners Manual
Page 20
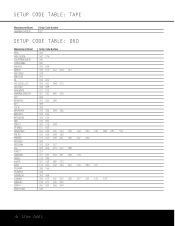
SETUP CODE TABLE: TAPE Manufacturer/Brand HARMAN KARDON Setup Code Number 001 SETUP CODE TABLE: DVD Manufacturer/Brand APEX APEX DIGITAL CALIFORNIA AUDIO CYBERHOME DAEWOO DENON DVD-VIDEO EMERSON GE GOLDSTAR (LG) GO-VIDEO GRADIENTE HARMAN KARDON JVC KENWOOD KLH LOTTE MAGNAVOX MARANTZ MITSUBISHI NAD ONKYO OPTIMUS PANASONIC PHILIPS PIONEER PROCEED PROSCAN RCA RUNCO SAMSUNG SANYO SHARP SONY SYLVANIA TECHNICS THOMSON TOSHIBA YAMAHA ZENITH ZENITH DIVX Setup Code Number 082 061 076 ...017 030 063 005 033 055 064 039 044 052 078 047 065 105 075 089 101 077 091 102 086 087 104 103 20 SETUP CODES
SETUP CODE TABLE: TAPE Manufacturer/Brand HARMAN KARDON Setup Code Number 001 SETUP CODE TABLE: DVD Manufacturer/Brand APEX APEX DIGITAL CALIFORNIA AUDIO CYBERHOME DAEWOO DENON DVD-VIDEO EMERSON GE GOLDSTAR (LG) GO-VIDEO GRADIENTE HARMAN KARDON JVC KENWOOD KLH LOTTE MAGNAVOX MARANTZ MITSUBISHI NAD ONKYO OPTIMUS PANASONIC PHILIPS PIONEER PROCEED PROSCAN RCA RUNCO SAMSUNG SANYO SHARP SONY SYLVANIA TECHNICS THOMSON TOSHIBA YAMAHA ZENITH ZENITH DIVX Setup Code Number 082 061 076 ...017 030 063 005 033 055 064 039 044 052 078 047 065 105 075 089 101 077 091 102 086 087 104 103 20 SETUP CODES
Owners Manual
Page 23
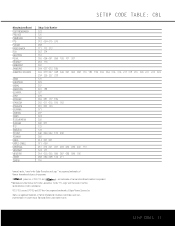
..., Incorporated, and is an implementation of Harman International Industries, Incorporated. DTS, DTS Surround, DTS-ES and DTS Neo:6 are registered trademarks of Dolby Laboratories. "Dolby," "Pro Logic" and the Double-D symbol are trademarks of Digital Theater Systems, Inc. SETUP CODES 23 SETUP CODE TABLE: CBL Manufacturer/Brand POST NEWSWEEK PRELUDE PRIMESTAR PTS PULSAR RADIO SHACK RCA RECOTON REGAL REGENCY REMBRANT SAMSUNG SCIENTIFIC ATLANTA SEAM SHERITECH SIGNAL SIGNATURE...
..., Incorporated, and is an implementation of Harman International Industries, Incorporated. DTS, DTS Surround, DTS-ES and DTS Neo:6 are registered trademarks of Dolby Laboratories. "Dolby," "Pro Logic" and the Double-D symbol are trademarks of Digital Theater Systems, Inc. SETUP CODES 23 SETUP CODE TABLE: CBL Manufacturer/Brand POST NEWSWEEK PRELUDE PRIMESTAR PTS PULSAR RADIO SHACK RCA RECOTON REGAL REGENCY REMBRANT SAMSUNG SCIENTIFIC ATLANTA SEAM SHERITECH SIGNAL SIGNATURE...
Quick Start Guide
Page 1
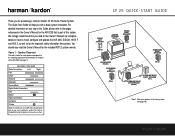
... your speakers in the Owner's Manual for the AVR 235 that you read the Owner's Manual for purchasing a Harman Kardon CP 25 Home Theater System. Speaker Placement The colors shown for the important safety information they contain. Connections Color Guide Audio Connections Left Right Front Center Surround Subwoofer Surround Back Digital Audio Connections Coax Optical Video Connections Composite S-Video Match the colored jacks on the AVR 235 to the matching output terminal connection on how to the pages referenced in the listening room...
... your speakers in the Owner's Manual for the AVR 235 that you read the Owner's Manual for purchasing a Harman Kardon CP 25 Home Theater System. Speaker Placement The colors shown for the important safety information they contain. Connections Color Guide Audio Connections Left Right Front Center Surround Subwoofer Surround Back Digital Audio Connections Coax Optical Video Connections Composite S-Video Match the colored jacks on the AVR 235 to the matching output terminal connection on how to the pages referenced in the listening room...
Quick Start Guide
Page 2
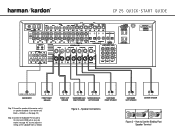
Speaker Connections + _ SURROUND LEFT SPEAKER + _ CENTER SPEAKER Figure 3 - How to black (-). (See page 14.) Step 3. Connect the Subwoofer Pre-Out jack to the Line Level In/SUB jack on the subwoofer later as needed. + _ FRONT LEFT SPEAKER + _ + _ SURROUND BACK SURROUND BACK RIGHT SPEAKER LEFT SPEAKER + _ SURROUND RIGHT SPEAKER Figure 2 - You may adjust the settings on your subwoofer (see page 14). ® CP 25 QUICK-START GUIDE LINE LEVEL IN/SUB SUBWOOFER + _ FRONT RIGHT SPEAKER Step 2. Connect the speakers to the receiver: red (+) on speaker to colored (+) on receiver ...
Speaker Connections + _ SURROUND LEFT SPEAKER + _ CENTER SPEAKER Figure 3 - How to black (-). (See page 14.) Step 3. Connect the Subwoofer Pre-Out jack to the Line Level In/SUB jack on the subwoofer later as needed. + _ FRONT LEFT SPEAKER + _ + _ SURROUND BACK SURROUND BACK RIGHT SPEAKER LEFT SPEAKER + _ SURROUND RIGHT SPEAKER Figure 2 - You may adjust the settings on your subwoofer (see page 14). ® CP 25 QUICK-START GUIDE LINE LEVEL IN/SUB SUBWOOFER + _ FRONT RIGHT SPEAKER Step 2. Connect the speakers to the receiver: red (+) on speaker to colored (+) on receiver ...

Quick Start Guide
Page 3
... this Guide. Select digital inputs: Use the On-Screen Input Setup menu or the front-panel Digital Select button and the arrow buttons to Progressive Scan, as shown on -screen menus are using the connections shown in your system. Press the SPL button for any digital source other source devices such as a VCR, Cable or Satellite settop box, HDTV receiver or audio recorder using a component video connection to a digital television, set output levels: Set the Balance to 12 o'clock, and the Volume to...
... this Guide. Select digital inputs: Use the On-Screen Input Setup menu or the front-panel Digital Select button and the arrow buttons to Progressive Scan, as shown on -screen menus are using the connections shown in your system. Press the SPL button for any digital source other source devices such as a VCR, Cable or Satellite settop box, HDTV receiver or audio recorder using a component video connection to a digital television, set output levels: Set the Balance to 12 o'clock, and the Volume to...

Quick Start Guide
Page 4
... Part No. Choose either type (but not more than one). Device Connection Options: Recommended connections are shown in red, but you must also connect all channels. Device CD Player Input Name Audio Input Connections CD CD L/R Inputs, Optical Digital 1 or 2, or Coaxial Digital 1 or 2 Audio Output Connections Not required Video Connections Not required VCR Video 1 Video 1 L/R Inputs Video 1 L/R Outputs Video 1 Composite or S-Video Input and Output Cable Box or Satellite Receiver Video 2 or 3 Video 2 or 3 L/R Inputs, Optical Digital 1 or 2, or Coaxial Digital 1 or 2 Inputs...
... Part No. Choose either type (but not more than one). Device Connection Options: Recommended connections are shown in red, but you must also connect all channels. Device CD Player Input Name Audio Input Connections CD CD L/R Inputs, Optical Digital 1 or 2, or Coaxial Digital 1 or 2 Audio Output Connections Not required Video Connections Not required VCR Video 1 Video 1 L/R Inputs Video 1 L/R Outputs Video 1 Composite or S-Video Input and Output Cable Box or Satellite Receiver Video 2 or 3 Video 2 or 3 L/R Inputs, Optical Digital 1 or 2, or Coaxial Digital 1 or 2 Inputs...


