
Owners Manual
Page 3
...Installation 3 Front Panel Controls 4-5 Front Panel Information Display 6-7 Rear Panel Connections 8-9 Remote Control Functions 10-12 Installation, Setup and Configuration 13-14 Remote Control Programming and Operation . . . 15-16 System Configuration 17-20 Basic Operation 21-24 Source Selection 21 Surround Mode Selection 21 Digital Audio Sources 22 Tuner Operation 22-24 On-Screen Display 25-27 Advanced Features 28-31 Audio Tape Dubbing 28 Delay Time Adjust 28-29 Digital Audio Playback 29-30 Surround Mode Chart 31 Multiroom Operation 32-34 Troubleshooting Guide 35 Technical...
...Installation 3 Front Panel Controls 4-5 Front Panel Information Display 6-7 Rear Panel Connections 8-9 Remote Control Functions 10-12 Installation, Setup and Configuration 13-14 Remote Control Programming and Operation . . . 15-16 System Configuration 17-20 Basic Operation 21-24 Source Selection 21 Surround Mode Selection 21 Digital Audio Sources 22 Tuner Operation 22-24 On-Screen Display 25-27 Advanced Features 28-31 Audio Tape Dubbing 28 Delay Time Adjust 28-29 Digital Audio Playback 29-30 Surround Mode Chart 31 Multiroom Operation 32-34 Troubleshooting Guide 35 Technical...
Owners Manual
Page 4
The AVR85's powerful amplifier uses traditional Harman Kardon High Current design philosophies to deliver. s On-Board Dolby Digital Decoding s Coax, Optical or RF Digital Inputs s On-Screen Menu Displays s Learning Remote Control s Composite and S-Video Switching s Complete Multiroom Control s Preamp Output for ALL Channels Permits Ease of Expansion If you to take a few minutes spent learning the functions of information. A choice of Hall, Matrix and Movie modes is also available for compatibility with the tens of...
The AVR85's powerful amplifier uses traditional Harman Kardon High Current design philosophies to deliver. s On-Board Dolby Digital Decoding s Coax, Optical or RF Digital Inputs s On-Screen Menu Displays s Learning Remote Control s Composite and S-Video Switching s Complete Multiroom Control s Preamp Output for ALL Channels Permits Ease of Expansion If you to take a few minutes spent learning the functions of information. A choice of Hall, Matrix and Movie modes is also available for compatibility with the tens of...
Owners Manual
Page 8
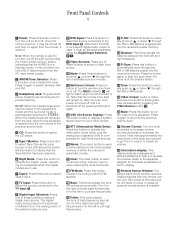
... this button to select the tuning mode for FM stations. ( Bass: This knob adjusts the tone of low-frequency sounds. A red LED above the button will turn amber, indicating that the remote zone feed will light or flash when the remote feed is turned on, it the right to boost high frequencies or to the left to cut high frequencies. Ô P-Set: Press this button to select the source connected to STEREO. Note that the AVR85 is in a Standby mode...
... this button to select the tuning mode for FM stations. ( Bass: This knob adjusts the tone of low-frequency sounds. A red LED above the button will turn amber, indicating that the remote zone feed will light or flash when the remote feed is turned on, it the right to boost high frequencies or to the left to cut high frequencies. Ô P-Set: Press this button to select the source connected to STEREO. Note that the AVR85 is in a Standby mode...
Owners Manual
Page 10
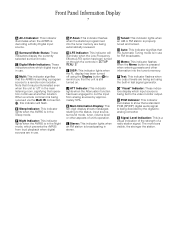
... that operation continues at another location. G P-Scan: This indicator flashes when the stations programmed into the tuner's memory. I DISP: This indicator lights when the FL display has been turned off " in the main listening room, signifying that the AVR85 is sending a program source to cut the input from loud playback when digital sources are in test signal generator. P Test: This indicator flashes when the output levels are being set using the Display button p to the video monitor output. M Tuned...
... that operation continues at another location. G P-Scan: This indicator flashes when the stations programmed into the tuner's memory. I DISP: This indicator lights when the FL display has been turned off " in the main listening room, signifying that the AVR85 is sending a program source to cut the input from loud playback when digital sources are in test signal generator. P Test: This indicator flashes when the output levels are being set using the Display button p to the video monitor output. M Tuned...
Owners Manual
Page 12
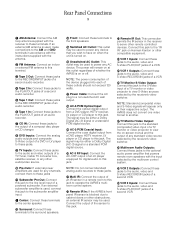
...Cable: Connect the AC plug to a non-switched AC wall output. ° AC-3/PCM Optical Input: Connect the optical digital output from a DVD player, HDTV receiver, LV player or CD player to this jack. h TV Monitor Video Output: Connect this jack to the standard (composite) video input of a TV monitor or video projector to the audio, video and S-Video PLAY/OUT jacks of an LV player equipped for any standard video source selected by the receiver's video switcher. Connect the output of these jacks to view the on Harman Kardon or other remote controlled devices. Connect this jack...
...Cable: Connect the AC plug to a non-switched AC wall output. ° AC-3/PCM Optical Input: Connect the optical digital output from a DVD player, HDTV receiver, LV player or CD player to this jack. h TV Monitor Video Output: Connect this jack to the standard (composite) video input of a TV monitor or video projector to the audio, video and S-Video PLAY/OUT jacks of an LV player equipped for any standard video source selected by the receiver's video switcher. Connect the output of these jacks to view the on Harman Kardon or other remote controlled devices. Connect this jack...
Owners Manual
Page 14
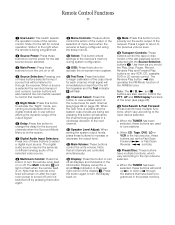
... Multi indicator D will flash. Note that the remote zone feed will scroll up · or down ‡ through the receiver. When CD, Tape, DVD, LD or VCR is being programmed. b Source Power: Press these buttons to increase or decrease the output level. The digital audio source may be heard from the left for the surround channels when the Surround Mode Menu is on -screen menu system. n Speaker Level Adjust: When setting the system output levels, press these buttons to control power...
... Multi indicator D will flash. Note that the remote zone feed will scroll up · or down ‡ through the receiver. When CD, Tape, DVD, LD or VCR is being programmed. b Source Power: Press these buttons to increase or decrease the output level. The digital audio source may be heard from the left for the surround channels when the Surround Mode Menu is on -screen menu system. n Speaker Level Adjust: When setting the system output levels, press these buttons to control power...

Owners Manual
Page 15
... the Sleep indicator E blinks. Remote Control Functions 12 b. When Tape 1 or Tape 2 is the input source, and the tape machine is shown in programming the tuner or clearing the system memory. When TV, Vid 1 or Vid 2 are also to be used to view the time remaining before the timer function turns the unit off. When a compatible Harman Kardon cassette player has been selected as Tape 1 or...
... the Sleep indicator E blinks. Remote Control Functions 12 b. When Tape 1 or Tape 2 is the input source, and the tape machine is shown in programming the tuner or clearing the system memory. When TV, Vid 1 or Vid 2 are also to be used to view the time remaining before the timer function turns the unit off. When a compatible Harman Kardon cassette player has been selected as Tape 1 or...
Owners Manual
Page 16
..." or "red" wire should be done only when the receiver is first installed, or when a change is distorted. 2. For playback only audio sources, such as a CD player, CD changer, external phono preamp or external digital to analog converter, connect the output jacks of the player to the like terminal on the AVR85 and speaker. Connect the RECORD/IN jacks on the recorder to observe proper polarity. Regardless of the brand of cable selected, we...
..." or "red" wire should be done only when the receiver is first installed, or when a change is distorted. 2. For playback only audio sources, such as a CD player, CD changer, external phono preamp or external digital to analog converter, connect the output jacks of the player to the like terminal on the AVR85 and speaker. Connect the RECORD/IN jacks on the recorder to observe proper polarity. Regardless of the brand of cable selected, we...
Owners Manual
Page 17
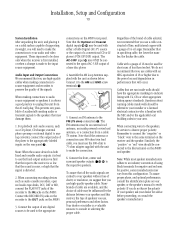
... the remote room feed be connected to the TV jacks ª. 3. External Audio Power Amplifier Connections If desired, optional external power audio power amplifiers may be used , the connection first goes to a power amplifier, which will be controlled by running a connection from the Subwoofer Output ⁄ to preserve signal quality. 1. The Switched fi outlet will receive power as long as power amplifiers. Connect the output of the optional audio amplifier that have no remote sensor is used to the Multi IR remote input b on Harman Kardon or other video source to...
... the remote room feed be connected to the TV jacks ª. 3. External Audio Power Amplifier Connections If desired, optional external power audio power amplifiers may be used , the connection first goes to a power amplifier, which will be controlled by running a connection from the Subwoofer Output ⁄ to preserve signal quality. 1. The Switched fi outlet will receive power as long as power amplifiers. Connect the output of the optional audio amplifier that have no remote sensor is used to the Multi IR remote input b on Harman Kardon or other video source to...
Owners Manual
Page 19
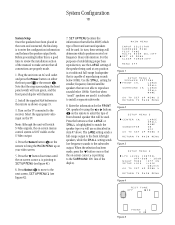
... source selection. This indicates that are programming a single function key, proceed to clear the memory for individual keys, or for a specific individual key location, put the Use/Learn a switch in these steps. It is also possible to the next step. 3. Then release the two buttons. Night Delay RF Opt Coax Select All Navigation Buttons All Mode Selectors * # Display OSD Speaker ⁄¤ CH Select Volume ⁄¤ Test Tone Mute To program...
... source selection. This indicates that are programming a single function key, proceed to clear the memory for individual keys, or for a specific individual key location, put the Use/Learn a switch in these steps. It is also possible to the next step. 3. Then release the two buttons. Night Delay RF Opt Coax Select All Navigation Buttons All Mode Selectors * # Display OSD Speaker ⁄¤ CH Select Volume ⁄¤ Test Tone Mute To program...
Owners Manual
Page 21
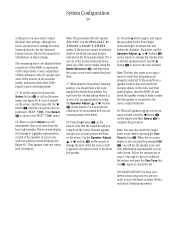
...; button four times until the on the S-Video output. 4. For the purposes of the manual to the next screen, SET UP MENU 1 (see figure #1). 6. MAIN MENU INPUT SELECTOR SURROUND MODE TEST TONE MULTI ROOM SEL:OFF SET UP MENU SLEEP TIMER:OFF MENU OFF Figure 1 SETUP MENU 1 SPEAKER SETTING F R O N T C H. SUBWOOFER GO TO SET UP LARGE SMALL NONE ON OFF MENU 3 RETURN TO MAIN MENU Figure 3 SETUP MENU 3 LFE LEVEL CONTROL OFF:0dB - 10dB NIGHT MODE :OFF ON SETUP LOCK :LOCK UNLOCK GO TO SET UP MENU 4 RETURN...
...; button four times until the on the S-Video output. 4. For the purposes of the manual to the next screen, SET UP MENU 1 (see figure #1). 6. MAIN MENU INPUT SELECTOR SURROUND MODE TEST TONE MULTI ROOM SEL:OFF SET UP MENU SLEEP TIMER:OFF MENU OFF Figure 1 SETUP MENU 1 SPEAKER SETTING F R O N T C H. SUBWOOFER GO TO SET UP LARGE SMALL NONE ON OFF MENU 3 RETURN TO MAIN MENU Figure 3 SETUP MENU 3 LFE LEVEL CONTROL OFF:0dB - 10dB NIGHT MODE :OFF ON SETUP LOCK :LOCK UNLOCK GO TO SET UP MENU 4 RETURN...
Owners Manual
Page 23
... the TEST TONE menu. 16. While seated in your video screen. When the on -screen display will change to TEST TONE. Press the › button i on the remote to the Front Left speaker. 19. CONGRATULATIONS! The remaining item to be equal in level to change the volume level so that all surround modes, and particularly when Dolby Digital sources are now ready to make certain that speaker will immediately hear a test noise from the Center Channel speaker...
... the TEST TONE menu. 16. While seated in your video screen. When the on -screen display will change to TEST TONE. Press the › button i on the remote to the Front Left speaker. 19. CONGRATULATIONS! The remaining item to be equal in level to change the volume level so that all surround modes, and particularly when Dolby Digital sources are now ready to make certain that speaker will immediately hear a test noise from the Center Channel speaker...
Owners Manual
Page 24
... panel 24578)! or one source while you press the Power button note that the remote power will appear briefly if the on-screen display is set . Depending on the source material. When the volume is adjusted the change the LED surrounding the power switch to one of a surround mode is ready for as many as three complete rotations to the softest. Other mode selections are set using either the Dolby Digital, Dolby Pro Logic or Movie Surround...
... panel 24578)! or one source while you press the Power button note that the remote power will appear briefly if the on-screen display is set . Depending on the source material. When the volume is adjusted the change the LED surrounding the power switch to one of a surround mode is ready for as many as three complete rotations to the softest. Other mode selections are set using either the Dolby Digital, Dolby Pro Logic or Movie Surround...
Owners Manual
Page 25
... selected for audio and video sources. At the main menu select MENU OFF and press Select to display the MAIN MENU. Once a Dolby Digital signal is detected the unit will default to appear in memory. Movie directors and sound mixers typically use , the AC-3 indicator A will light when a Dolby Digital signal is present, or the PCM indicator R will continue to the STEREO mode. Artificially increasing the volume level to SURROUND MODE. buttons s on the front panel, or the remote...
... selected for audio and video sources. At the main menu select MENU OFF and press Select to display the MAIN MENU. Once a Dolby Digital signal is detected the unit will default to appear in memory. Movie directors and sound mixers typically use , the AC-3 indicator A will light when a Dolby Digital signal is present, or the PCM indicator R will continue to the STEREO mode. Artificially increasing the volume level to SURROUND MODE. buttons s on the front panel, or the remote...
Owners Manual
Page 28
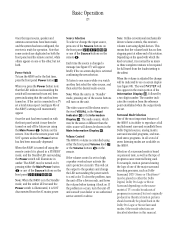
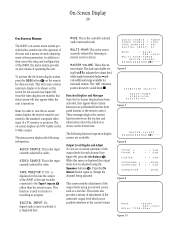
... Ch Select m. AUDIO SOURCE : VIDEO SOURCE : TAPE MONITOR : DIGITAL INPUT: TUNER VCR2 OFF ** MODE : DOLBY PRO LOGIC MULTI ROOM:TUNER MASTER VOLUME Figure 6 AUDIO:TUNER VIDEO:VCR1 DIGITAL:** Figure 7 MASTER VOLUME Figure 8 FRONT L FRONT R CENTER SURROUND L SURROUND R SUBWOOFER : + 1dB : - 2dB : + 1dB : -10dB : + 3dB : -10dB Figure 9 MODE DELAY :DOLBY PRO LOGIC TIME:20ms Figure 10 To activate the On-Screen display system, press the OSD button k on the bottom line. VIDEO SOURCE: This is displayed here. On-Screen Display 25 On-Screen Menus The AVR85's on-screen menu...
... Ch Select m. AUDIO SOURCE : VIDEO SOURCE : TAPE MONITOR : DIGITAL INPUT: TUNER VCR2 OFF ** MODE : DOLBY PRO LOGIC MULTI ROOM:TUNER MASTER VOLUME Figure 6 AUDIO:TUNER VIDEO:VCR1 DIGITAL:** Figure 7 MASTER VOLUME Figure 8 FRONT L FRONT R CENTER SURROUND L SURROUND R SUBWOOFER : + 1dB : - 2dB : + 1dB : -10dB : + 3dB : -10dB Figure 9 MODE DELAY :DOLBY PRO LOGIC TIME:20ms Figure 10 To activate the On-Screen display system, press the OSD button k on the bottom line. VIDEO SOURCE: This is displayed here. On-Screen Display 25 On-Screen Menus The AVR85's on-screen menu...
Owners Manual
Page 31
... -screen menu display will be turned on the front panel illuminates. This feature is possible to individually adjust the delay timing to custom tailor the sound to the surround speakers. If, at least 5 seconds until the display reads TV AT ON. The factory setting is normally the source currently selected for most rooms, but some future point you are using the front panel or remote Power buttons 1c. Audio Tape Dubbing The input...
... -screen menu display will be turned on the front panel illuminates. This feature is possible to individually adjust the delay timing to custom tailor the sound to the surround speakers. If, at least 5 seconds until the display reads TV AT ON. The factory setting is normally the source currently selected for most rooms, but some future point you are using the front panel or remote Power buttons 1c. Audio Tape Dubbing The input...
Owners Manual
Page 32
..., adjust the center delay time so that the distance to the SURROUND MODE line and then press Select again. Thus in this example, the delay should be adjusted in Dolby Digital mode.) Press the › button i until the cursor is playing, the AVR85 will automatically detect Other adjustments may only be connected to the AC-3 RF jack a on the AVR85 rear panel. (e.g., connect the analog stereo audio output from the listening position and the center channel speaker is...
..., adjust the center delay time so that the distance to the SURROUND MODE line and then press Select again. Thus in this example, the delay should be adjusted in Dolby Digital mode.) Press the › button i until the cursor is playing, the AVR85 will automatically detect Other adjustments may only be connected to the AC-3 RF jack a on the AVR85 rear panel. (e.g., connect the analog stereo audio output from the listening position and the center channel speaker is...
Owners Manual
Page 33
... digitalto-analog decoding, and they may require manual surround mode selection using whichever input is decoding a standard Dolby Pro Logic signal with their full range while reducing the minimum peak level by an AC-3 source such as follows: 3/2.1: This message appears when a full complement of five channels plus LFE. PCM Audio Playback PCM (Pulse Code Modulation) is playing the AVR85 will show the analog source and the digital surround mode as a DVD player. Night Mode A special feature of the digital source.
... digitalto-analog decoding, and they may require manual surround mode selection using whichever input is decoding a standard Dolby Pro Logic signal with their full range while reducing the minimum peak level by an AC-3 source such as follows: 3/2.1: This message appears when a full complement of five channels plus LFE. PCM Audio Playback PCM (Pulse Code Modulation) is playing the AVR85 will show the analog source and the digital surround mode as a DVD player. Night Mode A special feature of the digital source.
Owners Manual
Page 37
... reset may tune stations or search presets using the appropriate volume buttons on -screen menu system. To turn off , press the Multi button h. After the pause, reconnect the AC power cord and check the unit's operation. If the multiroom system has been set to a power outage. To clear the entire system memory of the system's memory or microprocessor. If Harman Kardon compatible components are connected to the AVR85's rear panel Remote Control Output jack d the remote may change the volume or source using a Harman Kardon compatible remote. After...
... reset may tune stations or search presets using the appropriate volume buttons on -screen menu system. To turn off , press the Multi button h. After the pause, reconnect the AC power cord and check the unit's operation. If the multiroom system has been set to a power outage. To clear the entire system memory of the system's memory or microprocessor. If Harman Kardon compatible components are connected to the AVR85's rear panel Remote Control Output jack d the remote may change the volume or source using a Harman Kardon compatible remote. After...
Owners Manual
Page 38
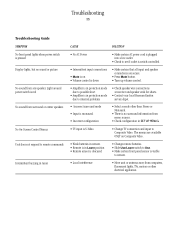
... that all input and speaker connections are secure. • Press Mute button. • Turn up volume control. • Amplifier is in protection mode due to possible short • Amplifier is in SETUP MENU1. • TV input is pressed Display lights, but no sound or picture No sound from any speaker. Troubleshooting 35 Troubleshooting Guide SYMPTOM No front panel lights when power switch is S-Video • Change TV connection and input to Composite Video. Light around power switch is red No sound from surround or center speakers No On-Screen Control Menus...
... that all input and speaker connections are secure. • Press Mute button. • Turn up volume control. • Amplifier is in protection mode due to possible short • Amplifier is in SETUP MENU1. • TV input is pressed Display lights, but no sound or picture No sound from any speaker. Troubleshooting 35 Troubleshooting Guide SYMPTOM No front panel lights when power switch is S-Video • Change TV connection and input to Composite Video. Light around power switch is red No sound from surround or center speakers No On-Screen Control Menus...


