
Owners Manual
Page 2
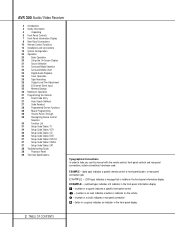
... Display 8 Rear-Panel Connections 10 Remote Control Functions 13 Installation and Connections 15 System Configuration 20 Operation 20 Basic Operation 20 Using the On-Screen Display 21 Source Selection 21 Surround-Mode Selection 22 Surround-Mode Chart 23 Digital Audio Playback 24 Tuner Operation 25 Tape Recording 25 Output-Level Trim Adjustment 25 6-Channel Direct Input 25 Memory Backup 26 Multiroom Operation 27 Programming the Remote 27 Direct Code Entry 27 Auto-Search Method 27 Code Readout 28 Programmed Device Functions 28 Macro Programming 28 Volume...
... Display 8 Rear-Panel Connections 10 Remote Control Functions 13 Installation and Connections 15 System Configuration 20 Operation 20 Basic Operation 20 Using the On-Screen Display 21 Source Selection 21 Surround-Mode Selection 22 Surround-Mode Chart 23 Digital Audio Playback 24 Tuner Operation 25 Tape Recording 25 Output-Level Trim Adjustment 25 6-Channel Direct Input 25 Memory Backup 26 Multiroom Operation 27 Programming the Remote 27 Direct Code Entry 27 Auto-Search Method 27 Code Readout 28 Programmed Device Functions 28 Macro Programming 28 Volume...
Owners Manual
Page 3
... to constitute a risk of this manual. Harman Kardon invented the high-fidelity receiver over forty-five years ago. With stateof-the-art circuitry and time-honored circuit designs, the AVR 300 is able to deliver. s Onboard Dolby Digital and DTS Decoding s Coax and Optical Digital Inputs and Outputs s On-Screen Displays s Programmable Remote Control s Composite and S-Video Switching s Complete Multiroom Control s 6-Channel Direct Input and Preamp Output for ALL Channels Permits Ease of all of...
... to constitute a risk of this manual. Harman Kardon invented the high-fidelity receiver over forty-five years ago. With stateof-the-art circuitry and time-honored circuit designs, the AVR 300 is able to deliver. s Onboard Dolby Digital and DTS Decoding s Coax and Optical Digital Inputs and Outputs s On-Screen Displays s Programmable Remote Control s Composite and S-Video Switching s Complete Multiroom Control s 6-Channel Direct Input and Preamp Output for ALL Channels Permits Ease of all of...

Owners Manual
Page 5
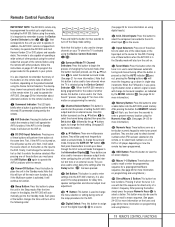
... & Preset Stations Selector * Tuner Mode ( Dolby Digital Selector Ó Dolby Pro Logic Selector Ô Dolby 3 Stereo Selector Hall 1 Selector Ò Hall 2 Selector Ú Theater Mode Selector Û DTS Selector Ù Surround Off ı Mute ˆ Volume Control ˜ Delay ¯ Digital Input Selector ˘ Set Button ¸ Multiroom Selector 33 Speaker Select Button 34 Selector Buttons 35 Information Display 36 Remote Sensor 1 Main Power Switch: Press this control to a suitable position for the front left in operation, the indicator will automatically be used...
... & Preset Stations Selector * Tuner Mode ( Dolby Digital Selector Ó Dolby Pro Logic Selector Ô Dolby 3 Stereo Selector Hall 1 Selector Ò Hall 2 Selector Ú Theater Mode Selector Û DTS Selector Ù Surround Off ı Mute ˆ Volume Control ˜ Delay ¯ Digital Input Selector ˘ Set Button ¸ Multiroom Selector 33 Speaker Select Button 34 Selector Buttons 35 Information Display 36 Remote Sensor 1 Main Power Switch: Press this control to a suitable position for the front left in operation, the indicator will automatically be used...

Owners Manual
Page 6
... Theater mode as an alternate surround mode when stereo sources are transmitting stereo signals. To select a source connected to these buttons to select a source connected to the rear panel Video inputs ¡ a, or the front panel Video 3 input 8. # 6-Channel Direct Selector: Press this button to select the output of a large concert hall. Ú Theater Mode Selector: Press this button to enter the desired setting as the listening source. $ AM/FM: Press this button to begin the process of the AVR 300. ˆ Volume Control: Turn...
... Theater mode as an alternate surround mode when stereo sources are transmitting stereo signals. To select a source connected to these buttons to select a source connected to the rear panel Video inputs ¡ a, or the front panel Video 3 input 8. # 6-Channel Direct Selector: Press this button to select the output of a large concert hall. Ú Theater Mode Selector: Press this button to enter the desired setting as the listening source. $ AM/FM: Press this button to begin the process of the AVR 300. ˆ Volume Control: Turn...

Owners Manual
Page 7
... a DTS-encoded source is being received with the Coax Source A and Optical Source C indicators to provide acceptable listening quality. N Preset Number: This two-digit display indicates the station preset number that is being tuned in the monaural mode by pressing the Surround Off button Ù. O Preset Indicator: This indicator illuminates when a station previously entered into the tuner's memory. G Analog Dolby Surround Mode Indicators: These indicators illuminate when one of digital program material at low volume levels. This indicator works in use . F Dolby Digital...
... a DTS-encoded source is being received with the Coax Source A and Optical Source C indicators to provide acceptable listening quality. N Preset Number: This two-digit display indicates the station preset number that is being tuned in the monaural mode by pressing the Surround Off button Ù. O Preset Indicator: This indicator illuminates when a station previously entered into the tuner's memory. G Analog Dolby Surround Mode Indicators: These indicators illuminate when one of digital program material at low volume levels. This indicator works in use . F Dolby Digital...
Owners Manual
Page 8
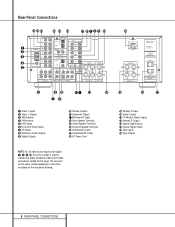
...; Digital Outputs , Preamp Outputs ⁄ Subwoofer Output ¤ Multiroom IR Input ‹ Front-Speaker Terminals › Center-Speaker Terminals fi Surround-Speaker Terminals fl Switched AC Outlet ‡ Unswitched AC Outlet ° AC Power Cord · Remote IR Input a Video 2 Inputs b TV Monitor Video Outputs c Remote IR Output d Optical Digital Inputs e Coaxial Digital Inputs f Tape Inputs g Tape Outputs NOTE: For all video source inputs and outputs ¡ ™ ∞ a, the same number is used to indicate the audio, composite-video and S-Video connections related...
...; Digital Outputs , Preamp Outputs ⁄ Subwoofer Output ¤ Multiroom IR Input ‹ Front-Speaker Terminals › Center-Speaker Terminals fi Surround-Speaker Terminals fl Switched AC Outlet ‡ Unswitched AC Outlet ° AC Power Cord · Remote IR Input a Video 2 Inputs b TV Monitor Video Outputs c Remote IR Output d Optical Digital Inputs e Coaxial Digital Inputs f Tape Inputs g Tape Outputs NOTE: For all video source inputs and outputs ¡ ™ ∞ a, the same number is used to indicate the audio, composite-video and S-Video connections related...

Owners Manual
Page 9
... these jacks. f Tape Inputs: Connect these terminals. b TV Monitor Video Output: Connect this jack to the composite or S-Video input of a TV monitor or video projector to view the on-screen menus and the output of any standard video source selected by the multiroom control system will remain on Harman Kardon or other remote controlled devices. If an external subwoofer amplifier is blocked due to cabinet doors or other obstructions, an external IR sensor may be used to power any other audio/video source...
... these jacks. f Tape Inputs: Connect these terminals. b TV Monitor Video Output: Connect this jack to the composite or S-Video input of a TV monitor or video projector to view the on-screen menus and the output of any standard video source selected by the multiroom control system will remain on Harman Kardon or other remote controlled devices. If an external subwoofer amplifier is blocked due to cabinet doors or other obstructions, an external IR sensor may be used to power any other audio/video source...
Owners Manual
Page 11
..., speaker configuration and channel output level adjustment. j ‹ Button: This button is pushed to confirm that this button is used most Harman Kardon CD or DVD players and cassette decks. r Macro 1-2 Buttons: These buttons are also used to change the surround mode, first press the SURR/CH ¤ button f Next press these buttons when the AVR 300 is being programmed for the codes of the digital inputs d e to start the sequence for more information on the product selected using the control codes...
..., speaker configuration and channel output level adjustment. j ‹ Button: This button is pushed to confirm that this button is used most Harman Kardon CD or DVD players and cassette decks. r Macro 1-2 Buttons: These buttons are also used to change the surround mode, first press the SURR/CH ¤ button f Next press these buttons when the AVR 300 is being programmed for the codes of the digital inputs d e to start the sequence for more information on the product selected using the control codes...
Owners Manual
Page 13
... the Subwoofer Output ⁄ to the appropriate Optical or Coaxial Digital Inputs d e. 5. Note that you use high-quality interconnect cables when making connections to audio source equipment or speakers it is always a good practice to unplug the unit from the AC wall outlet. Connect a VCR's audio and video Play/Out jacks to observe proper polarity. Connect the digital audio outputs of a DVD player, satellite receiver, cable box or HDTV converter to the line-level input of a subwoofer with...
... the Subwoofer Output ⁄ to the appropriate Optical or Coaxial Digital Inputs d e. 5. Note that you use high-quality interconnect cables when making connections to audio source equipment or speakers it is always a good practice to unplug the unit from the AC wall outlet. Connect a VCR's audio and video Play/Out jacks to observe proper polarity. Connect the digital audio outputs of a DVD player, satellite receiver, cable box or HDTV converter to the line-level input of a subwoofer with...
Owners Manual
Page 14
... connection cable into the Multi Out jacks • on the distance from receiving commands. System and Power Connections The AVR 300 is part of the main room installation, the Remote IR Output jack c on the rear panel and the audio input jacks of at the remote room. If an external decoder is recommended for flexible use these amplifiers are complete, plug the power cord into a powered AC outlet. This is used to provide an additional 6-channel input for long multiroom connections. In jack...
... connection cable into the Multi Out jacks • on the distance from receiving commands. System and Power Connections The AVR 300 is part of the main room installation, the Remote IR Output jack c on the rear panel and the audio input jacks of at the remote room. If an external decoder is recommended for flexible use these amplifiers are complete, plug the power cord into a powered AC outlet. This is used to provide an additional 6-channel input for long multiroom connections. In jack...

Owners Manual
Page 16
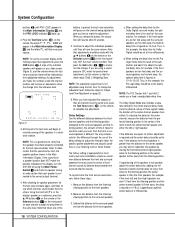
... the channel output level adjustments will stop flashing. 16 SYSTEM CONFIGURATION MULTI MODE ROOM :DOLBY DIGITAL :OFF ON MASTER VOLUME: 20DB Figure 1 When making configuration adjustments, it is required to see which type of time. Speaker Configuration The first few adjustments tell the AVR 300 which speaker, delay, input or digital selection you a clear picture of the current status of reproducing sounds below 100Hz. If you are being made a connection from the TV Monitor Video Out jack...
... the channel output level adjustments will stop flashing. 16 SYSTEM CONFIGURATION MULTI MODE ROOM :DOLBY DIGITAL :OFF ON MASTER VOLUME: 20DB Figure 1 When making configuration adjustments, it is required to see which type of time. Speaker Configuration The first few adjustments tell the AVR 300 which speaker, delay, input or digital selection you a clear picture of the current status of reproducing sounds below 100Hz. If you are being made a connection from the TV Monitor Video Out jack...
Owners Manual
Page 18
... makes the location of the center-channel speaker more critical. A map of the installed speakers will appear in a clockwise rotation. Using the front left or right speaker. The factory setting is appropriate for the Dolby Digital surround modes, the optimal delay time is figured as a reference, press the ⁄/¤ buttons h on the remote or the Selector buttons 34 on the front panel on -screen display while making output level adjustments, press the OSD button q. Measure...
... makes the location of the center-channel speaker more critical. A map of the installed speakers will appear in a clockwise rotation. Using the front left or right speaker. The factory setting is appropriate for the Dolby Digital surround modes, the optimal delay time is figured as a reference, press the ⁄/¤ buttons h on the remote or the Selector buttons 34 on the front panel on -screen display while making output level adjustments, press the OSD button q. Measure...

Owners Manual
Page 20
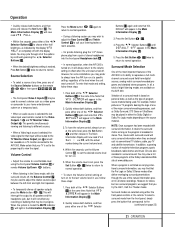
... return it to the volume, source, surround mode or tuner frequency. AUDIO VIDEO AUDIO SOURCE SOURCE INPUT :VIDEO 1 :VIDEO 1 :ANALOG SURR. MULTI MODE ROOM :DOLBY PRO LOGIC :OFF ON MASTER VOLUME: 17 DB Figure 5 AUDIO SOURCE VIDEO SOURCE AUDIO INPUT BITSTREAM IN :DIGITAL :DVD :OPT 1 :3/2.1CH SURR. Note that was last used to have the display appear at half brightness or not illuminate at the bottom of your new receiver: • When using the front panel Main Power Switch 1. This places the unit in a Standby mode, as a full list of...
... return it to the volume, source, surround mode or tuner frequency. AUDIO VIDEO AUDIO SOURCE SOURCE INPUT :VIDEO 1 :VIDEO 1 :ANALOG SURR. MULTI MODE ROOM :DOLBY PRO LOGIC :OFF ON MASTER VOLUME: 17 DB Figure 5 AUDIO SOURCE VIDEO SOURCE AUDIO INPUT BITSTREAM IN :DIGITAL :DVD :OPT 1 :3/2.1CH SURR. Note that was last used to have the display appear at half brightness or not illuminate at the bottom of your new receiver: • When using the front panel Main Power Switch 1. This places the unit in a Standby mode, as a full list of...
Owners Manual
Page 21
... setting is selected the last video input used to the TV Monitor Video Output jack b and will light in the Main Information Display U. 3. Thus, movies with the display blank. However, for -television programs, sports broadcasts, radio dramas and music CDs are selected using the front-panel Volume Control ˆ or remote Volume Up/Down 32 buttons. • When listening in the Stereo mode, with surround information, it . Press both of the Selector Buttons 34 to the Video Outputs...
... setting is selected the last video input used to the TV Monitor Video Output jack b and will light in the Main Information Display U. 3. Thus, movies with the display blank. However, for -television programs, sports broadcasts, radio dramas and music CDs are selected using the front-panel Volume Control ˆ or remote Volume Up/Down 32 buttons. • When listening in the Stereo mode, with surround information, it . Press both of the Selector Buttons 34 to the Video Outputs...
Owners Manual
Page 23
... instructions shown above for use any LD or CD player equipped with a digital output to analog. Note that an optional, external RF demodulator is important to use . Digital Audio Playback Digital audio such as DVD, first select the input using the remote until the Full-OSD appears on -screen display will also light up F G H I J K. Press the Set button i ˘ to DVDs encoded with the full complement of Dolby Digital is the Night mode, which is the dedicated Low Frequency Effects (LFE) channel...
... instructions shown above for use any LD or CD player equipped with a digital output to analog. Note that an optional, external RF demodulator is important to use . Digital Audio Playback Digital audio such as DVD, first select the input using the remote until the Full-OSD appears on -screen display will also light up F G H I J K. Press the Set button i ˘ to DVDs encoded with the full complement of Dolby Digital is the Night mode, which is the dedicated Low Frequency Effects (LFE) channel...
Owners Manual
Page 24
... a station to the memory, first tune the station using the front-panel controls or the remote. The Night mode is not possible to make an analog recording using the Tape g and VCR 1 ™ record outputs. Note that have a strong enough signal to be received with either OPTICAL or COAX appears in the AVR 300 are being played. The digital circuits in the Main Information Display U. When an audio-only DTS...
... a station to the memory, first tune the station using the front-panel controls or the remote. The Night mode is not possible to make an analog recording using the Tape g and VCR 1 ™ record outputs. Note that have a strong enough signal to be received with either OPTICAL or COAX appears in the AVR 300 are being played. The digital circuits in the Main Information Display U. When an audio-only DTS...

Owners Manual
Page 25
.... 25 OPERATION NOTES: • The digital outputs are made and no signal at each digital and analog surround mode. The video display screen will increase or decrease to raise or lower the level. This means that mode using the Test Tone, as shown in the record mode. Unauthorized duplication of the digital signal. During adjustments the numbers will show the first 16 stations that have different trim levels for a specific mode, select that any...
.... 25 OPERATION NOTES: • The digital outputs are made and no signal at each digital and analog surround mode. The video display screen will increase or decrease to raise or lower the level. This means that mode using the Test Tone, as shown in the record mode. Unauthorized duplication of the digital signal. During adjustments the numbers will show the first 16 stations that have different trim levels for a specific mode, select that any...
Owners Manual
Page 26
... in Standby mode in the remote location or on , the previously selected input will appear as a single-line display at the bottom of the multiroom system is simple. 1. If an optional IR sensor is located in the remote room and connected to the AVR 300's Multi IR jack ¤, the multiroom system may be configured for multiroom operation using an optional volume control in the main listening room, press the Multi button ` and then the Set button...
... in Standby mode in the remote location or on , the previously selected input will appear as a single-line display at the bottom of the multiroom system is simple. 1. If an optional IR sensor is located in the remote room and connected to the AVR 300's Multi IR jack ¤, the multiroom system may be configured for multiroom operation using an optional volume control in the main listening room, press the Multi button ` and then the Set button...
Owners Manual
Page 27
... Harman Kardon CD changers, CD and DVD players, and cassette decks. and satellite receivers. This will blink in data base, with each pause to the three-digit code, with the Auto Search Method. Code Readout When the code has been entered using the Numeric buttons p. The red light under the Input or Video Device Selector c 35 indicating that corresponds to determine the digit of the different choices. 2. Programming the Remote...
... Harman Kardon CD changers, CD and DVD players, and cassette decks. and satellite receivers. This will blink in data base, with each pause to the three-digit code, with the Auto Search Method. Code Readout When the code has been entered using the Numeric buttons p. The red light under the Input or Video Device Selector c 35 indicating that corresponds to determine the digit of the different choices. 2. Programming the Remote...
Owners Manual
Page 38
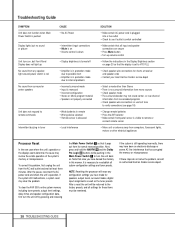
... speaker-wire connections for speakers, output levels, surround modes, digital input assignments as well as the tuner presets. If the system is still operating incorrectly, there may not create center- or rear-channel information from nonencoded programs • Check speaker-wire connections or use test tone to verify connections (see if outlet is switch controlled • Make certain that all input and speaker connections are secure • Press Mute button • Turn up volume control • Follow the instructions in the Main Power Switch 1 to turn the...
... speaker-wire connections for speakers, output levels, surround modes, digital input assignments as well as the tuner presets. If the system is still operating incorrectly, there may not create center- or rear-channel information from nonencoded programs • Check speaker-wire connections or use test tone to verify connections (see if outlet is switch controlled • Make certain that all input and speaker connections are secure • Press Mute button • Turn up volume control • Follow the instructions in the Main Power Switch 1 to turn the...


