
Owners Manual
Page 2
... L or coloured red. The wire which is coloured brown must be connected to the terminal which is marked with the letter N or coloured black. The wires in this mains lead are coloured in accordance with the following code: Green-and-yellow...plug, proceed as follows: The wire which is coloured green-and-yellow must be connected to the terminal which is marked with the letter N or coloured black. OWNER'S MANUAL English Pages 1 - 10 MANUEL D'UTILISATION Francais Pages 11 - 20 BEDIENUNGSANLEITUNG Deutsch Seiten 21 - 30 MANUALE DIISTRUZIONI Italiano Pagine 31 - 40 MANUAL...
... L or coloured red. The wire which is coloured brown must be connected to the terminal which is marked with the letter N or coloured black. The wires in this mains lead are coloured in accordance with the following code: Green-and-yellow...plug, proceed as follows: The wire which is coloured green-and-yellow must be connected to the terminal which is marked with the letter N or coloured black. OWNER'S MANUAL English Pages 1 - 10 MANUEL D'UTILISATION Francais Pages 11 - 20 BEDIENUNGSANLEITUNG Deutsch Seiten 21 - 30 MANUALE DIISTRUZIONI Italiano Pagine 31 - 40 MANUAL...
Owners Manual
Page 3
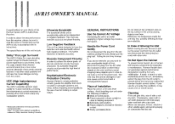
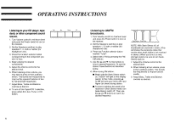
... INSTRUCTIONS Use the Correct AC Voltage Connecting the unit to an outlet supplying a higher voltage may the cord be sure to precisely drive and control nearly any modification. "Dolby", "Pro Logic" and the double-D symbol On are trademarks of this high level of time, disconnect the plug from shortcircuited or damaged speakers and wires, without high negative feedback. Sophisticated Electronic Protection Circuitry Harman Kardon...
... INSTRUCTIONS Use the Correct AC Voltage Connecting the unit to an outlet supplying a higher voltage may the cord be sure to precisely drive and control nearly any modification. "Dolby", "Pro Logic" and the double-D symbol On are trademarks of this high level of time, disconnect the plug from shortcircuited or damaged speakers and wires, without high negative feedback. Sophisticated Electronic Protection Circuitry Harman Kardon...

Owners Manual
Page 4
... used to connect your receiver's REMOTE OUT jack to the REMOTE IN jack on the back panel. If reception is supplied with an external infrared remote sensor, connect the wire from contact with an AM loop antenna which may improve reception by looking on the back of speakers simultaneously except as recommended above. Connecting Speakers 1. All Harman Kardon products with "Remote In" and "Remote Out" jacks are located in the event the unit ever needs repair...
... used to connect your receiver's REMOTE OUT jack to the REMOTE IN jack on the back panel. If reception is supplied with an external infrared remote sensor, connect the wire from contact with an AM loop antenna which may improve reception by looking on the back of speakers simultaneously except as recommended above. Connecting Speakers 1. All Harman Kardon products with "Remote In" and "Remote Out" jacks are located in the event the unit ever needs repair...
Owners Manual
Page 5
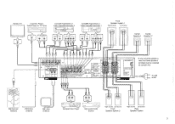
... Level Audio Source Right channel Left channel Front Speaker System 2 r_ rI Right channel Left channel Rear Speaker System 3 A 110, oar momsonssucEsssocouo. l0nr AWN. 4t0 OLOWEL PATENTS U NUN... ...PR0L00r,M0 THE I, irk sr ICENSIVG[OPOWION / "If only one center speaker is FR used, the Center Speaker 2 00 0 00 IIII 0 F terminals must be connected by a jumper wire. 00 OC), C) CE 0 MUM. NO,NIXIS MARMAX14,111.1 To wall outlet FM External Antenna...
... Level Audio Source Right channel Left channel Front Speaker System 2 r_ rI Right channel Left channel Rear Speaker System 3 A 110, oar momsonssucEsssocouo. l0nr AWN. 4t0 OLOWEL PATENTS U NUN... ...PR0L00r,M0 THE I, irk sr ICENSIVG[OPOWION / "If only one center speaker is FR used, the Center Speaker 2 00 0 00 IIII 0 F terminals must be connected by a jumper wire. 00 OC), C) CE 0 MUM. NO,NIXIS MARMAX14,111.1 To wall outlet FM External Antenna...
Owners Manual
Page 6
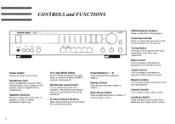
... desired input source by pressing the corresponding button. Treble Control Turn to increase or decrease the proportion of low frequency sound. Seek-Stereo Switch Press to your system at low volume. 4 Loudness Switch Press to improve sound quality when listening to select Seek tuning in stereo, or manual tuning in mono. Tuning Button Press A to tune to access 30 pre-selected stations. Preset Buttons (1 - 0) Press to stations with higher frequencies; CONTROLS and FUNCTIONS harman/kardon AVR15 Audio/Video Power Receiver Speakers Pro Logic Level H 2 Mode fleee/Center...
... desired input source by pressing the corresponding button. Treble Control Turn to increase or decrease the proportion of low frequency sound. Seek-Stereo Switch Press to your system at low volume. 4 Loudness Switch Press to improve sound quality when listening to select Seek tuning in stereo, or manual tuning in mono. Tuning Button Press A to tune to access 30 pre-selected stations. Preset Buttons (1 - 0) Press to stations with higher frequencies; CONTROLS and FUNCTIONS harman/kardon AVR15 Audio/Video Power Receiver Speakers Pro Logic Level H 2 Mode fleee/Center...

Owners Manual
Page 7
... the Speaker System" on and stereo reception is possible.% Indicates that power cord is switched off. The control unit is being received. Flashes during the period when a station can be heard. Also avoid blocking the line of the tape deck connected to the TAPE 2 jacks can be unused for the Test Tone button. STEREO .., TUNED1 N/I /V4 /V4N/I \TAPE 2 REPRO LOGIC 11'/'',SEEK PRESET EM I ) ) harman/kardon A/V Receiver RW103 2 Independent Remote Control...
... the Speaker System" on and stereo reception is possible.% Indicates that power cord is switched off. The control unit is being received. Flashes during the period when a station can be heard. Also avoid blocking the line of the tape deck connected to the TAPE 2 jacks can be unused for the Test Tone button. STEREO .., TUNED1 N/I /V4 /V4N/I \TAPE 2 REPRO LOGIC 11'/'',SEEK PRESET EM I ) ) harman/kardon A/V Receiver RW103 2 Independent Remote Control...
Owners Manual
Page 8
... when weak stations are received in Seek-Stereo mode, turn on the receiver. 2. This boosts low frequencies to play speakers 1, 2, both or neither (for headphone use the station Preset buttons as desired. 6 Adjust Bass, Treble and Balance controls as described below. 6. Set the Speakers switches to improve sound quality. 9. Or use ). 3. Adjust Bass, Treble and Balance controls as desired. 8. To turn SeekStereo back on the display panel.) In this mode, pressing A (or V) will tune your CD player, tape deck, or other component sound source. 1. Select AM...
... when weak stations are received in Seek-Stereo mode, turn on the receiver. 2. This boosts low frequencies to play speakers 1, 2, both or neither (for headphone use the station Preset buttons as desired. 6 Adjust Bass, Treble and Balance controls as described below. 6. Set the Speakers switches to improve sound quality. 9. Or use ). 3. Adjust Bass, Treble and Balance controls as desired. 8. To turn SeekStereo back on the display panel.) In this mode, pressing A (or V) will tune your CD player, tape deck, or other component sound source. 1. Select AM...

Owners Manual
Page 9
... play a source encoded with Dolby Surround on your receiver. Dolby Pro Logic mode is also entered. Using the Preset Buttons Your receiver allows you to store 30 station settings and quickly access them, using a Preset button, the tuner automatically switches to the original Seek-Stereo setting for that allows monitoring of commercially available video cassettes and video discs as your sound source, recordings may be made on Tape/VCR 1 or 2, or both simultaneously. With "PRESET" flashing, press the desired numbered Preset button...
... play a source encoded with Dolby Surround on your receiver. Dolby Pro Logic mode is also entered. Using the Preset Buttons Your receiver allows you to store 30 station settings and quickly access them, using a Preset button, the tuner automatically switches to the original Seek-Stereo setting for that allows monitoring of commercially available video cassettes and video discs as your sound source, recordings may be made on Tape/VCR 1 or 2, or both simultaneously. With "PRESET" flashing, press the desired numbered Preset button...

Owners Manual
Page 10
This mode directs the center channel audio signals to the REAR speaker terminals. Press the Test Tone button on the Rear/Center Level control and adjust the center level so that will hear a test tone (pink noise) that the sound from Phantom to 3-Stereo, and "3-ST" is pressed, the display indicates the current mode setting for 10 seconds and then changes back to indicating the input source. Pull out on the Remote Control. 2. If the Pro Logic Mode button is pressed while...
This mode directs the center channel audio signals to the REAR speaker terminals. Press the Test Tone button on the Rear/Center Level control and adjust the center level so that will hear a test tone (pink noise) that the sound from Phantom to 3-Stereo, and "3-ST" is pressed, the display indicates the current mode setting for 10 seconds and then changes back to indicating the input source. Pull out on the Remote Control. 2. If the Pro Logic Mode button is pressed while...
Owners Manual
Page 11
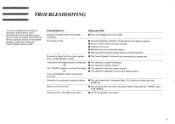
... Harman Kardon service center. Intermittent or continuous buzzing or hissing. ■ The unit is away from the center speaker (only 1 center speaker is used). ■ The Center Speaker 2 terminals are connected by a jumper wire. Tuner sound has a large amount of interference. OR The "STEREO" display is not possible. Stations cannot be preset. ■ After pressing Memory switch, the preset button is set in the proper direction. ■ The antenna is adequate to receive the desired station. most problems users...
... Harman Kardon service center. Intermittent or continuous buzzing or hissing. ■ The unit is away from the center speaker (only 1 center speaker is used). ■ The Center Speaker 2 terminals are connected by a jumper wire. Tuner sound has a large amount of interference. OR The "STEREO" display is not possible. Stations cannot be preset. ■ After pressing Memory switch, the preset button is set in the proper direction. ■ The antenna is adequate to receive the desired station. most problems users...
Owners Manual
Page 12
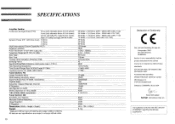
... channels driven @ 2ch stereo): Front (both channels driven @ 2ch stereo): Center (@ Dolby Pro Logic Normal mode): Rear (@ Dolby Pro Logic Normal mode): Dynamic Power (IHF, 1kHz tone burst) 8 Ohms: 4 Ohms: 2 Ohms: High Instantaneous Current Capability (HCC): Negative Feedback: Power Bandwidth @ half-rated output, 852: Frequency Response @ 1W (+01-3dB): Slew Rate*: Rise Time: Transient Intermodulation Distortion (TIM): Damping Factor: Signal-to-Noise Ratio (reference rated power output, A-Wtd.): Input Sensitivity/Impedance: Tone Control Range, Bass @ 50Hz/Treble...
... channels driven @ 2ch stereo): Front (both channels driven @ 2ch stereo): Center (@ Dolby Pro Logic Normal mode): Rear (@ Dolby Pro Logic Normal mode): Dynamic Power (IHF, 1kHz tone burst) 8 Ohms: 4 Ohms: 2 Ohms: High Instantaneous Current Capability (HCC): Negative Feedback: Power Bandwidth @ half-rated output, 852: Frequency Response @ 1W (+01-3dB): Slew Rate*: Rise Time: Transient Intermodulation Distortion (TIM): Damping Factor: Signal-to-Noise Ratio (reference rated power output, A-Wtd.): Input Sensitivity/Impedance: Tone Control Range, Bass @ 50Hz/Treble...


