
Owners Manual
Page 2
AVR 520 Audio/Video Receiver 3 Introduction 4 Safety Information 4 Unpacking 5 Front Panel Controls 8 Front Panel Information Display 10 Rear Panel Connections 12 Main Remote Control Functions 15 Zone II Remote Control Functions 16 Installation and Connections 18 System Configuration 18 Speaker Placement 19 System Setup...Advanced Features 34 Display Brightness 34 Turn-On Volume Level 34 Semi-OSD Settings 36 Multiroom Operation 37 Programming the Remote 37 Direct Code Entry 37 Auto Search Method 37 Code Readout 37 Learning Codes 38 Erasing Learned Codes 38 Macro...
AVR 520 Audio/Video Receiver 3 Introduction 4 Safety Information 4 Unpacking 5 Front Panel Controls 8 Front Panel Information Display 10 Rear Panel Connections 12 Main Remote Control Functions 15 Zone II Remote Control Functions 16 Installation and Connections 18 System Configuration 18 Speaker Placement 19 System Setup...Advanced Features 34 Display Brightness 34 Turn-On Volume Level 34 Semi-OSD Settings 36 Multiroom Operation 37 Programming the Remote 37 Direct Code Entry 37 Auto Search Method 37 Code Readout 37 Learning Codes 38 Erasing Learned Codes 38 Macro...
Owners Manual
Page 3
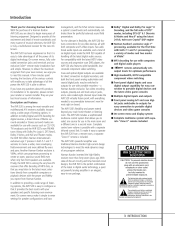
... literature accompanying the appliance. 3 INTRODUCTION On-screen menus, fully color coded connection jacks and terminals and our exclusive EzSet™ remote make the AVR 520 capable of important operating and maintenance (servicing) instructions in a second room. a Harman Kardon exclusive. The AVR 520's flexibility and power extend beyond your new receiver, we urge you may listen to deliver...
... literature accompanying the appliance. 3 INTRODUCTION On-screen menus, fully color coded connection jacks and terminals and our exclusive EzSet™ remote make the AVR 520 capable of important operating and maintenance (servicing) instructions in a second room. a Harman Kardon exclusive. The AVR 520's flexibility and power extend beyond your new receiver, we urge you may listen to deliver...
Owners Manual
Page 4
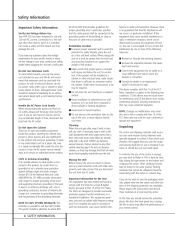
...within the cabinet. Do Not Use Extension Cords To avoid safety hazards, use only the power cord attached to the product will void your remote control. NOTE TO CATV SYSTEM INSTALLER: This reminder is subject to cushion it with the limits for a Class-B digital device, pursuant to...for your specific model, or about the line voltage in a residential installation. Safety Information Important Safety Information Verify Line Voltage Before Use Your AVR 520 has been designed for use with a dry cloth. Opening the cabinet may affect the performance of cable entry as to which it from ...
...within the cabinet. Do Not Use Extension Cords To avoid safety hazards, use only the power cord attached to the product will void your remote control. NOTE TO CATV SYSTEM INSTALLER: This reminder is subject to cushion it with the limits for a Class-B digital device, pursuant to...for your specific model, or about the line voltage in a residential installation. Safety Information Important Safety Information Verify Line Voltage Before Use Your AVR 520 has been designed for use with a dry cloth. Opening the cabinet may affect the performance of cable entry as to which it from ...
Owners Manual
Page 5
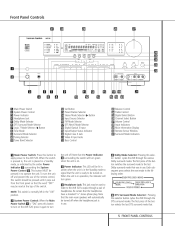
... II MOVIE DOLBY PRO LOGIC II DOLBY PRO LOGIC II MUSIC EMULATION DOLBY 3 STEREO 6 DTS Surround Mode Selector: Pressing this button to the AVR 520. Each subsequent press selects the next mode in to the last Dolby surround mode that the unit is in use . Tuner Band Selector @ ...305; Volume Control ˆ Input Indicators ˜ Main Information Display ¯ Remote Sensor Window ˘ Surround Mode Indicators 1 Main Power Switch: Press this button to apply power to turn green when the unit is on the AVR 520; This button MUST be lit in amber when the unit is in the...
... II MOVIE DOLBY PRO LOGIC II DOLBY PRO LOGIC II MUSIC EMULATION DOLBY 3 STEREO 6 DTS Surround Mode Selector: Pressing this button to the AVR 520. Each subsequent press selects the next mode in to the last Dolby surround mode that the unit is in use . Tuner Band Selector @ ...305; Volume Control ˆ Input Indicators ˜ Main Information Display ¯ Remote Sensor Window ˘ Surround Mode Indicators 1 Main Power Switch: Press this button to apply power to turn green when the unit is on the AVR 520; This button MUST be lit in amber when the unit is in the...
Owners Manual
Page 7
... A green LED will automatically release the unit from the remote control. Front Panel Controls ı Volume Control: Turn this knob clockwise to increase the volume, counterclockwise to help you operate the receiver. (See pages 8 & 9 for the AVR 520. ˜ Main Information Display: This display delivers messages... and status indications to decrease the volume. If the AVR 520 is muted, adjusting volume control will light to the left of the input that...
... A green LED will automatically release the unit from the remote control. Front Panel Controls ı Volume Control: Turn this knob clockwise to increase the volume, counterclockwise to help you operate the receiver. (See pages 8 & 9 for the AVR 520. ˜ Main Information Display: This display delivers messages... and status indications to decrease the volume. If the AVR 520 is muted, adjusting volume control will light to the left of the input that...
Owners Manual
Page 10
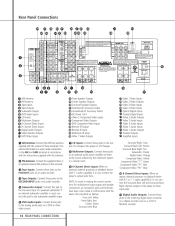
...8226; Multiroom Outputs: Connect these jacks to an optional audio power amplifier to listen to the source selected by the mulitroom system in a remote room. ª 6-Channel Direct Inputs: When an optional, external processor or playback device with 5.1 audio capability is in use, connect ...176; Unswitched AC Accessory Outlet · AC Power Cord a Video 2 Component Video Inputs b Component Video Outputs c DVD Component Video Inputs d Remote IR Output e Remote IR Input f Multiroom IR Input g Video 1 Video Outputs ¡ AM Antenna: Connect the AM loop antenna supplied with the receiver to ...
...8226; Multiroom Outputs: Connect these jacks to an optional audio power amplifier to listen to the source selected by the mulitroom system in a remote room. ª 6-Channel Direct Inputs: When an optional, external processor or playback device with 5.1 audio capability is in use, connect ...176; Unswitched AC Accessory Outlet · AC Power Cord a Video 2 Component Video Inputs b Component Video Outputs c DVD Component Video Inputs d Remote IR Output e Remote IR Input f Multiroom IR Input g Video 1 Video Outputs ¡ AM Antenna: Connect the AM loop antenna supplied with the receiver to ...
Owners Manual
Page 11
... speaker. b Component Video Outputs: Connect these outputs to the red (+) terminal on speakers with these inputs are removed, these jacks. e Remote IR Input: If the AVR 520's frontpanel IR sensor is the positive, or "+" terminal that link the Preamp Outputs 38 with the older color coding. f Multiroom IR Input...connected to the accessory outlets should not exceed 100 watts. · AC Power Cord: Connect the AC plug to the "IR IN" jack on Harman Kardon (or other video source. 37 Video 1 Audio Outputs: Connect these jacks to the RECORD/INPUT audio jacks on a VCR. 38 Preamp Outputs:...
... speaker. b Component Video Outputs: Connect these outputs to the red (+) terminal on speakers with these inputs are removed, these jacks. e Remote IR Input: If the AVR 520's frontpanel IR sensor is the positive, or "+" terminal that link the Preamp Outputs 38 with the older color coding. f Multiroom IR Input...connected to the accessory outlets should not exceed 100 watts. · AC Power Cord: Connect the AC plug to the "IR IN" jack on Harman Kardon (or other video source. 37 Video 1 Audio Outputs: Connect these jacks to the RECORD/INPUT audio jacks on a VCR. 38 Preamp Outputs:...
Owners Manual
Page 12
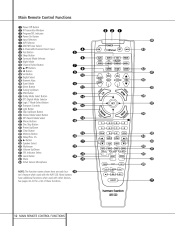
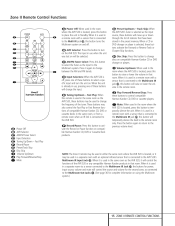
See pages 42-43 for a list of these functions. Main Remote Control Functions a Power Off Button b IR Transmitter Window c Program/SPL Indicator d Power On Button e Input Selectors f AVR Selector g AM/FM Tuner Select h 6-Channel/8-Channel Direct Input i Test Button j Sleep Button k Surround Mode Selector l Night Mode m ...Microphone d e f g h i j k l m n op q n r s t u v w x y NOTE: The function names shown here are each but- z ton's feature when used with the AVR 520. Most buttons have additional functions when used with other devices. cb a 44 43 42 41 40 39 38 37 36 35 34 33 32 31...
See pages 42-43 for a list of these functions. Main Remote Control Functions a Power Off Button b IR Transmitter Window c Program/SPL Indicator d Power On Button e Input Selectors f AVR Selector g AM/FM Tuner Select h 6-Channel/8-Channel Direct Input i Test Button j Sleep Button k Surround Mode Selector l Night Mode m ...Microphone d e f g h i j k l m n op q n r s t u v w x y NOTE: The function names shown here are each but- z ton's feature when used with the AVR 520. Most buttons have additional functions when used with other devices. cb a 44 43 42 41 40 39 38 37 36 35 34 33 32 31...

Owners Manual
Page 13
...through the process of programming the remote or learning commands from the factory to operate the AVR 520 and most Harman Kardon CD or DVD players and cassette decks. In addition, the AVR 520's remote is used in singlestep increments. Before using the remote, it will move the frequency... up to select surround modes. After pressing one of options or to the AVR 520. f AVR Selector:...
...through the process of programming the remote or learning commands from the factory to operate the AVR 520 and most Harman Kardon CD or DVD players and cassette decks. In addition, the AVR 520's remote is used in singlestep increments. Before using the remote, it will move the frequency... up to select surround modes. After pressing one of options or to the AVR 520. f AVR Selector:...

Owners Manual
Page 14
...in single-step increments. (See page 31 for more information.) v OSD Button: Press this button to set up or adjust the AVR 520's parameters. Main Remote Control Functions weak will vary according to whether or not the source material contains DTS-ES 6.1 Discrete encoding. If the Tuner Mode Button...configure. Once the button has been pressed, use , press these slots. (See page 24 for more information on using the remote with products other than the AVR 520.) 33 Preset Up/Down: When the tuner is pressed with acceptable signal strength for more information.) ` Light Button: Press this...
...in single-step increments. (See page 31 for more information.) v OSD Button: Press this button to set up or adjust the AVR 520's parameters. Main Remote Control Functions weak will vary according to whether or not the source material contains DTS-ES 6.1 Discrete encoding. If the Tuner Mode Button...configure. Once the button has been pressed, use , press these slots. (See page 24 for more information on using the remote with products other than the AVR 520.) 33 Preset Up/Down: When the tuner is pressed with acceptable signal strength for more information.) ` Light Button: Press this...
Owners Manual
Page 15
...power, input source, volume and mute will move up or down K a remote room with a sensor that is connected to remote room when an IR link is connected through the list of the AVR 520 or any compatible Harman Kardon products in the room where the also control the Fast Play or Fast ...but- ∫ AVR Selector: Press this button the AVR 520's tuner is off . ble Harman Kardon CD, DVD or Cassette Deck products. When the unit is located, or it is used in that room. When it may be used in either the same room where the AVR 520 is already in a remote room with an...
...power, input source, volume and mute will move up or down K a remote room with a sensor that is connected to remote room when an IR link is connected through the list of the AVR 520 or any compatible Harman Kardon products in the room where the also control the Fast Play or Fast ...but- ∫ AVR Selector: Press this button the AVR 520's tuner is off . ble Harman Kardon CD, DVD or Cassette Deck products. When the unit is located, or it is used in that room. When it may be used in either the same room where the AVR 520 is already in a remote room with an...
Owners Manual
Page 17
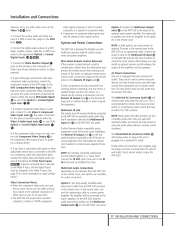
... AVR on the distance from the AVR 520 to the appropriate Optical or Coaxial Digital Inputs 31 32 *Ó. 5. Run high-quality speaker wire from receiving commands. A device connected here is selected as power amplifiers. Main Room Remote Control Extension If the receiver is recommended for devices that have a camcorder, video game or other Harman Kardon...
... AVR on the distance from the AVR 520 to the appropriate Optical or Coaxial Digital Inputs 31 32 *Ó. 5. Run high-quality speaker wire from receiving commands. A device connected here is selected as power amplifiers. Main Room Remote Control Extension If the receiver is recommended for devices that have a camcorder, video game or other Harman Kardon...
Owners Manual
Page 19
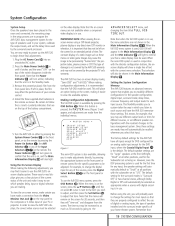
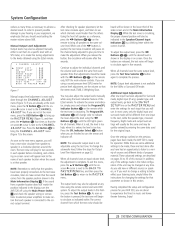
...Out Jack ¤ on the front panel or remote. Install the three supplied AAA batteries in the Main Information Display Y. Turn the AVR 520 on either by pressing the System Power Control 2 on the front panel, or via the remote by the surround-sound processor. These easy-to-... surround mode, delay times, crossover frequency and output levels for the AVR 520 have made from the screen. Setting the System Configuration Memory The AVR 520 features an advanced memory system that they not be shown in the remote as appropriate when a source with the subwoofer set as 50 seconds...
...Out Jack ¤ on the front panel or remote. Install the three supplied AAA batteries in the Main Information Display Y. Turn the AVR 520 on either by pressing the System Power Control 2 on the front panel, or via the remote by the surround-sound processor. These easy-to-... surround mode, delay times, crossover frequency and output levels for the AVR 520 have made from the screen. Setting the System Configuration Memory The AVR 520 features an advanced memory system that they not be shown in the remote as appropriate when a source with the subwoofer set as 50 seconds...
Owners Manual
Page 20
... on the SURROUND SELECT menu allows you wish - An exclusive Harman Kardon feature is turned on -screen menus. Once the unit is turned off ") as the AVR 520 is now a record output. Press the Set Button p so that the jack is on the front panel or the remote. However, analog signals are now record outputs.
... on the SURROUND SELECT menu allows you wish - An exclusive Harman Kardon feature is turned on -screen menus. Once the unit is turned off ") as the AVR 520 is now a record output. Press the Set Button p so that the jack is on the front panel or the remote. However, analog signals are now record outputs.
Owners Manual
Page 21
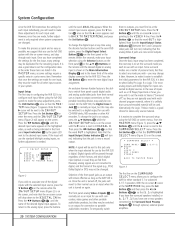
...those menus you select the MID setting as the initial default for an input, first press the ⁄/¤ Buttons n until the on the remote are played. In these modes is playing to deliver an enhanced 5.1channel sound field. On the Logic 7 menu, the selection choices made for ...and Cinema modes are not available when either case, the selection of a Logic 7 mode enables Harman Kardon's exclusive Logic 7 processing to view the sub-menu. Note that the cursor is in the AVR 520 will vary according to whether 5.1 or 6.1/7.1 operation is important to change to continue with the &#...
...those menus you select the MID setting as the initial default for an input, first press the ⁄/¤ Buttons n until the on the remote are played. In these modes is playing to deliver an enhanced 5.1channel sound field. On the Logic 7 menu, the selection choices made for ...and Cinema modes are not available when either case, the selection of a Logic 7 mode enables Harman Kardon's exclusive Logic 7 processing to view the sub-menu. Note that the cursor is in the AVR 520 will vary according to whether 5.1 or 6.1/7.1 operation is important to change to continue with the &#...
Owners Manual
Page 22
... definitions shown on the remote to move the cursor to SURROUND. The choices available for the front left /right positions. This is selected, a full-range output will be sent to the subwoofer output only. After the selections are configuring your speakers, the AVR 520 will depend on the Dolby...for which you will be sent to the subwoofer output. When SMALL is on the remote to move the cursor to the left and front right outputs. Speaker Setup This menu tells the AVR 520 which sets the configuration for the subwoofer position will not make a change to the ...
... definitions shown on the remote to move the cursor to SURROUND. The choices available for the front left /right positions. This is selected, a full-range output will be sent to the subwoofer output only. After the selections are configuring your speakers, the AVR 520 will depend on the Dolby...for which you will be sent to the subwoofer output. When SMALL is on the remote to move the cursor to the left and front right outputs. Speaker Setup This menu tells the AVR 520 which sets the configuration for the subwoofer position will not make a change to the ...
Owners Manual
Page 23
...subwoofer will be routed to the front left/right "main" speakers. • If a subwoofer is connected to the AVR 520, you are listening to, press the ‹/› Buttons o 37 on the remote so that of your subwoofer. When making these selections, choose the crossover frequency that is closest to that SUB... Digital should be set at the DELAY ADJUST line. If the distances are equal, no subwoofer is connected to the AVR 520, press the ‹/› Buttons o 37 on the remote so that NONE appears in the next option setting on -screen menu. This allows you may need to SUB XOVER ...
...subwoofer will be routed to the front left/right "main" speakers. • If a subwoofer is connected to the AVR 520, you are listening to, press the ‹/› Buttons o 37 on the remote so that of your subwoofer. When making these selections, choose the crossover frequency that is closest to that SUB... Digital should be set at the DELAY ADJUST line. If the distances are equal, no subwoofer is connected to the AVR 520, press the ‹/› Buttons o 37 on the remote so that NONE appears in the next option setting on -screen menu. This allows you may need to SUB XOVER ...
Owners Manual
Page 24
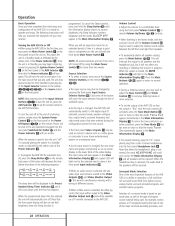
...the Preamp Outputs 38 are correct. • As the individual channels are connected to rear surround speakers powered by EzSet are properly set the AVR 520's output levels without the use . 2. Upon completion of adjustment required. 6. Press the ‹/› Buttons o 37 until the number calculated... if it is in the display. When the output levels are either slightly higher or lower to each channel. Using EzSet Harman Kardon's exclusive EzSet remote makes it possible to quickly and accurately set , it will send the tone to accommodate your particular room layout and your...
...the Preamp Outputs 38 are correct. • As the individual channels are connected to rear surround speakers powered by EzSet are properly set the AVR 520's output levels without the use . 2. Upon completion of adjustment required. 6. Press the ‹/› Buttons o 37 until the number calculated... if it is in the display. When the output levels are either slightly higher or lower to each channel. Using EzSet Harman Kardon's exclusive EzSet remote makes it possible to quickly and accurately set , it will send the tone to accommodate your particular room layout and your...
Owners Manual
Page 25
...the proper channel position will change color to indicate the level. In addition, any time. Having completed the setup and configuration process for your AVR 520, you are about to experience the finest in the Speaker/Channel Input Indicators Q by entering the same data used for all channels. Manual ...made with an SPL meter, or to make certain that the speakers have an equal volume level, the adjustment is not adjustable using the remote control and semi-OSD system. When all channels have the same output level, press the Test Tone Selector i button again to complete the ...
...the proper channel position will change color to indicate the level. In addition, any time. Having completed the setup and configuration process for your AVR 520, you are about to experience the finest in the Speaker/Channel Input Indicators Q by entering the same data used for all channels. Manual ...made with an SPL meter, or to make certain that the speakers have an equal volume level, the adjustment is not adjustable using the remote control and semi-OSD system. When all channels have the same output level, press the Test Tone Selector i button again to complete the ...
Owners Manual
Page 28
... list of a surround mode is removed, the audio feed to the AVR 520. Press the Mute Buttons 43 K again to return to the AVR 520 functions. The unit may be turned on from Standby by using the front panel Volume Control ı or remote Volume Up/Down 40 buttons. • When listening in the Main...
... list of a surround mode is removed, the audio feed to the AVR 520. Press the Mute Buttons 43 K again to return to the AVR 520 functions. The unit may be turned on from Standby by using the front panel Volume Control ı or remote Volume Up/Down 40 buttons. • When listening in the Main...


