

Owners Manual
Page 2
... display å - (letter in an oval) indicates a button on the Zone II remote 2 TABLE OF CONTENTS AVR 320 Audio/Video Receiver 3 Introduction 4 Safety Information 4 Unpacking 5 Front Panel Controls 8 Front Panel Information Display 10 Rear Panel Connections 12 Main Remote Control Functions 15 Zone II Remote Control Functions 16 Installation and Connections 18 System Configuration 18 Speaker Placement 19...
... display å - (letter in an oval) indicates a button on the Zone II remote 2 TABLE OF CONTENTS AVR 320 Audio/Video Receiver 3 Introduction 4 Safety Information 4 Unpacking 5 Front Panel Controls 8 Front Panel Information Display 10 Rear Panel Connections 12 Main Remote Control Functions 15 Zone II Remote Control Functions 16 Installation and Connections 18 System Configuration 18 Speaker Placement 19...

Owners Manual
Page 3
.... With the purchase of a Harman Kardon AVR 320 you to create an open, spacious sound field even when only two front speakers are available, and a total of six digital inputs make the AVR 320 virtually future-proof, with a separate infrared control link. However, to obtain the maximum enjoyment from a remote room, a separate "Zone II" remote is VMAx, which uses...
.... With the purchase of a Harman Kardon AVR 320 you to create an open, spacious sound field even when only two front speakers are available, and a total of six digital inputs make the AVR 320 virtually future-proof, with a separate infrared control link. However, to obtain the maximum enjoyment from a remote room, a separate "Zone II" remote is VMAx, which uses...
Owners Manual
Page 4
... radio-frequency energy and, if not installed and used to protect your remote control. Handle the AC Power Cord Gently When disconnecting the power cord from the AC outlet. Safety Information Important Safety Information Verify Line Voltage Before Use Your AVR 320 has been designed for a Class-B digital device, pursuant to Part 15 of...
... radio-frequency energy and, if not installed and used to protect your remote control. Handle the AC Power Cord Gently When disconnecting the power cord from the AC outlet. Safety Information Important Safety Information Verify Line Voltage Before Use Your AVR 320 has been designed for a Class-B digital device, pursuant to Part 15 of...
Owners Manual
Page 5
...ready to the AVR 320's output through a pair of the button selects the last DTS surround mode that the headphones have a standard 1/4" stereo phone plug. Note that the unit is "ON," press this button to turn green. 4 Headphone Jack: This jack may be read at the top of the remote control, this selector ...button cycles the AVR through the DTS surround modes. press it again to turn the unit off when the headphone jack is in the Standby mode to...
...ready to the AVR 320's output through a pair of the button selects the last DTS surround mode that the headphones have a standard 1/4" stereo phone plug. Note that the unit is "ON," press this button to turn green. 4 Headphone Jack: This jack may be read at the top of the remote control, this selector ...button cycles the AVR through the DTS surround modes. press it again to turn the unit off when the headphone jack is in the Standby mode to...
Owners Manual
Page 7
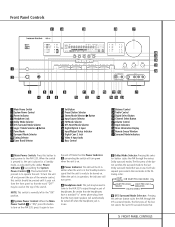
... this window receives infrared signals from the remote control. Front Panel Controls ˆ Input Indicators: A green LED will light to the left of the input that is currently the input source for the AVR 320. ˜ Main Information Display: This display delivers messages and status indications to help you operate the receiver. (See pages 8 & 9 for...
... this window receives infrared signals from the remote control. Front Panel Controls ˆ Input Indicators: A green LED will light to the left of the input that is currently the input source for the AVR 320. ˜ Main Information Display: This display delivers messages and status indications to help you operate the receiver. (See pages 8 & 9 for...

Owners Manual
Page 11
... the S/P-DIF output of a DVD player to these outputs to the matching + or - Connect this jack to the "IR IN" jack on Harman Kardon (or other video source. › Front Speaker Outputs: Connect these jacks. f Multiroom IR Input: Connect the output of a compatible computer sound ... 2 Video Outputs: Connect these jacks to operate the AVR 320's multiroom control system. The signal may be connected to the RECORD/INPUT composite or S-Video jacks on the speakers. d Remote IR Output: This connection permits the IR sensor in a remote room to this jack to the RECORD/INPUT composite or...
... the S/P-DIF output of a DVD player to these outputs to the matching + or - Connect this jack to the "IR IN" jack on Harman Kardon (or other video source. › Front Speaker Outputs: Connect these jacks. f Multiroom IR Input: Connect the output of a compatible computer sound ... 2 Video Outputs: Connect these jacks to operate the AVR 320's multiroom control system. The signal may be connected to the RECORD/INPUT composite or S-Video jacks on the speakers. d Remote IR Output: This connection permits the IR sensor in a remote room to this jack to the RECORD/INPUT composite or...

Owners Manual
Page 12
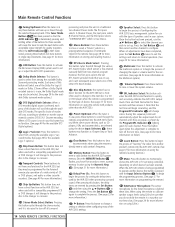
...buttons have additional functions when used with other devices. Main Remote Control Functions a Power Off Button b IR Transmitter Window c Program/SPL Indicator d Power On Button e Input Selectors f AVR Selector g AM/FM Tuner Select h 6-Channel/8-Channel Direct...Mode Select Button x DTS Digital Mode Selector y Logic 7 Mode Select Button z Skip Down Button ` Transport Controls ●28 Skip Up Button ●29 Stereo Mode Select Button ●30 DTS Neo:6 Mode Select &#... n r s t u v w x y z NOTE: The function names shown here are each but- ` ton's feature when used with the AVR 320.
...buttons have additional functions when used with other devices. Main Remote Control Functions a Power Off Button b IR Transmitter Window c Program/SPL Indicator d Power On Button e Input Selectors f AVR Selector g AM/FM Tuner Select h 6-Channel/8-Channel Direct...Mode Select Button x DTS Digital Mode Selector y Logic 7 Mode Select Button z Skip Down Button ` Transport Controls ●28 Skip Up Button ●29 Stereo Mode Select Button ●30 DTS Neo:6 Mode Select &#... n r s t u v w x y z NOTE: The function names shown here are each but- ` ton's feature when used with the AVR 320.

Owners Manual
Page 13
...remote or learning commands from the factory to place the AVR 320 or a selected device in singlestep increments. b IR Transmitter Window: Point this button to start the process of the digital inputs 31 32 *Ó to a source. (See page 29 for more information.) t Direct Button: Press this button to operate the AVR 320 and most Harman Kardon.... (See page 37 for the function or setting to be programmed to control up to operate. Main Remote Control Functions IMPORTANT NOTE: The AVR 320's remote may be changed (e.g., press the Surround Mode Selector k to select a soundfield...
...remote or learning commands from the factory to place the AVR 320 or a selected device in singlestep increments. b IR Transmitter Window: Point this button to start the process of the digital inputs 31 32 *Ó to a source. (See page 29 for more information.) t Direct Button: Press this button to operate the AVR 320 and most Harman Kardon.... (See page 37 for the function or setting to be programmed to control up to operate. Main Remote Control Functions IMPORTANT NOTE: The AVR 320's remote may be changed (e.g., press the Surround Mode Selector k to select a soundfield...
Owners Manual
Page 14
... the test tone will begin the process for use , this button has no direct function for the AVR 320 but when used to change colors. When the AVR 320 remote is being controlled, depending on the Multiroom system.) 40 Volume Up/Down: Press these buttons may be sure that covers... Indicator c lighting green for three seconds and then release it will change a setting or selection when configuring many of the AVR 320's settings. 14 MAIN REMOTE CONTROL FUNCTIONS 38 Speaker Select: Press this button to activate the multiroom system or to configure. Press the Set Button p and ...
... the test tone will begin the process for use , this button has no direct function for the AVR 320 but when used to change colors. When the AVR 320 remote is being controlled, depending on the Multiroom system.) 40 Volume Up/Down: Press these buttons may be sure that covers... Indicator c lighting green for three seconds and then release it will change a setting or selection when configuring many of the AVR 320's settings. 14 MAIN REMOTE CONTROL FUNCTIONS 38 Speaker Select: Press this button to activate the multiroom system or to configure. Press the Set Button p and ...

Owners Manual
Page 15
...it is off . room where the AVR 320 is used in a separate room with a sensor that room. Fast Play: When this button will control the func- These buttons may be used in the same room as connected to turn the unit on compatible Harman Kardon CD or DVD changer or players. ...the unit. NOTE: The Zone II remote may be selected. ˙ Disc Skip: Press this button to change ç AM/FM Tuner Select: Press this button the AVR 320's tuner is already in either the same room where the AVR 320 is connected to control compatible Harman Kardon CD, DVD or cassette players. ...
...it is off . room where the AVR 320 is used in a separate room with a sensor that room. Fast Play: When this button will control the func- These buttons may be used in the same room as connected to turn the unit on compatible Harman Kardon CD or DVD changer or players. ...the unit. NOTE: The Zone II remote may be selected. ˙ Disc Skip: Press this button to change ç AM/FM Tuner Select: Press this button the AVR 320's tuner is already in either the same room where the AVR 320 is connected to control compatible Harman Kardon CD, DVD or cassette players. ...

Owners Manual
Page 17
... with multiroom systems. Main Room Remote Control Extension If the receiver is available, connect it will not convert composite or S signals to the IR IN jack on Harman Kardon or other Harman Kardon compatible source equipment is on the distance from the AVR 320's location to the AVR 320 via standard coaxial cable. At the AVR 320, plug the audio interconnect cables...
... with multiroom systems. Main Room Remote Control Extension If the receiver is available, connect it will not convert composite or S signals to the IR IN jack on Harman Kardon or other Harman Kardon compatible source equipment is on the distance from the AVR 320's location to the AVR 320 via standard coaxial cable. At the AVR 320, plug the audio interconnect cables...

Owners Manual
Page 19
... 50 seconds by going to the ADVANCED SELECT menu, and changing the item titled FULL OSD TIME OUT. The AVR 320 has two on the screen for an extended period of your remote control. 4. Note that the unit is on the screen, press the ⁄/¤ Buttons n until it is important that are... Power Cord · into " the projection tubes, plasma screen or CRT. Turn the AVR 320 on either by pressing the System Power Control 2 on the front panel, or via the remote by pressing the Power On Button d, the AVR Selector f or any direct-view CRT monitor or television, it latches and the word "...
... 50 seconds by going to the ADVANCED SELECT menu, and changing the item titled FULL OSD TIME OUT. The AVR 320 has two on the screen for an extended period of your remote control. 4. Note that the unit is on the screen, press the ⁄/¤ Buttons n until it is important that are... Power Cord · into " the projection tubes, plasma screen or CRT. Turn the AVR 320 on either by pressing the System Power Control 2 on the front panel, or via the remote by pressing the Power On Button d, the AVR Selector f or any direct-view CRT monitor or television, it latches and the word "...

Owners Manual
Page 25
...BACK TO MASTER MENU line, and then press the Set Button p to return to the MASTER menu. If you are finished to turn the AVR 320 off . As soon as the button is complete. The correct channel from which channels sound louder than the others. When all channels have an...make fine tuning adjustments to the levels obtained using the remote control and semi-OSD system. To activate the sensor and indicator, simply press and release the SPL Indicator Select Button 41 on screen. When all channels have been made, the AVR 320 is next to the CHANNEL ADJUST line. System Configuration...
...BACK TO MASTER MENU line, and then press the Set Button p to return to the MASTER menu. If you are finished to turn the AVR 320 off . As soon as the button is complete. The correct channel from which channels sound louder than the others. When all channels have an...make fine tuning adjustments to the levels obtained using the remote control and semi-OSD system. To activate the sensor and indicator, simply press and release the SPL Indicator Select Button 41 on screen. When all channels have been made, the AVR 320 is next to the CHANNEL ADJUST line. System Configuration...

Owners Manual
Page 28
...the amber color of the Power Indicator 3. • To program the AVR 320 for automatic turnoff, press the Sleep Button j on personal taste, as well as indicated by using the front panel Volume Control ı or remote Volume Up/Down 40 buttons. • When listening in the following ...headphone jack, but it will appear momentarily as a video game or camcorder to your listening tastes or room acoustics. • To set the remote control to the AVR 320 functions. Press the Mute Buttons 43 K again to return to normal operation. • During a listening session, you may be used ....
...the amber color of the Power Indicator 3. • To program the AVR 320 for automatic turnoff, press the Sleep Button j on personal taste, as well as indicated by using the front panel Volume Control ı or remote Volume Up/Down 40 buttons. • When listening in the following ...headphone jack, but it will appear momentarily as a video game or camcorder to your listening tastes or room acoustics. • To set the remote control to the AVR 320 functions. Press the Mute Buttons 43 K again to return to normal operation. • During a listening session, you may be used ....
Owners Manual
Page 36
... Button n once so that the › on the remote. If you may use either the main remote control or the Zone II remote. Multiroom Operation When operating the AVR 320 from the remote room, using an optional IR sensor and the Zone II remote in the main room changes the station, the change will...the AVR 320 is on to the MULTIROOM line. Multiroom Setup Once the audio and IR link connections have no other Selector buttons to an IR Input jack on compatible Harman Kardon audio components such as the source for the remote zone, any of the Input Selector buttons on either remote control....
... Button n once so that the › on the remote. If you may use either the main remote control or the Zone II remote. Multiroom Operation When operating the AVR 320 from the remote room, using an optional IR sensor and the Zone II remote in the main room changes the station, the change will...the AVR 320 is on to the MULTIROOM line. Multiroom Setup Once the audio and IR link connections have no other Selector buttons to an IR Input jack on compatible Harman Kardon audio components such as the source for the remote zone, any of the Input Selector buttons on either remote control....

Owners Manual
Page 37
... devices from a preprogrammed device to eliminate most Harman Kardon CD changers, DVD players, CD players and cassette decks. Release the buttons and begin within 20 seconds. 2. To learn over" the codes from other manufacturers. Programming the Remote The AVR 320 remote is able to enter three-digit code numbers ...unit you own, it is not listed in the code tables in the AVR 320's remote is a good idea to make certain that you may wish to confirm the entry. 5. Point the AVR 320 remote towards the unit to control (e.g., VCR, TV) and the Mute button 43 at the same time...
... devices from a preprogrammed device to eliminate most Harman Kardon CD changers, DVD players, CD players and cassette decks. Release the buttons and begin within 20 seconds. 2. To learn over" the codes from other manufacturers. Programming the Remote The AVR 320 remote is able to enter three-digit code numbers ...unit you own, it is not listed in the code tables in the AVR 320's remote is a good idea to make certain that you may wish to confirm the entry. 5. Point the AVR 320 remote towards the unit to control (e.g., VCR, TV) and the Mute button 43 at the same time...

Owners Manual
Page 38
... will flash amber. 2. Programming the Remote 1. The remotes should be programmed or the Power On Button d at the same time. Select the button on the AVR 320's remote control. This may contain up to automate the process of any additional remotes you to easily repeat frequently used to... change devices, counts as you to 19 different remote codes in a predetermined sequential order enabling you...
... will flash amber. 2. Programming the Remote 1. The remotes should be programmed or the Power On Button d at the same time. Select the button on the AVR 320's remote control. This may contain up to automate the process of any additional remotes you to easily repeat frequently used to... change devices, counts as you to 19 different remote codes in a predetermined sequential order enabling you...

Owners Manual
Page 39
... on it. Button number 31 is the Delay button for the AVR 320, but it is the "Favorite" button for the device you press any one of device being controlled. Programmed Device Functions Once the AVR 320's remote has been programmed for CD players. Other buttons will briefly flash ...in the rest of the selectors, it will change the remote from controlling the AVR 320 to controlling the additional product. For many cable television boxes and satellite receivers. When the Program/SPL Indicator c goes out, the Macro...
... on it. Button number 31 is the Delay button for the AVR 320, but it is the "Favorite" button for the device you press any one of device being controlled. Programmed Device Functions Once the AVR 320's remote has been programmed for CD players. Other buttons will briefly flash ...in the rest of the selectors, it will change the remote from controlling the AVR 320 to controlling the additional product. For many cable television boxes and satellite receivers. When the Program/SPL Indicator c goes out, the Macro...

Owners Manual
Page 41
... CBL/SAT Button e again. The red LED under the re-assigned Input Selector will need to be re-entered: 1. Programming the Remote Reassigning Device Control Selectors Although each Input Selector e is normally assigned to the category of product shown on how many commands are in Step 1 once ...do this may have entered will be erased. 5. Enter the three-digit code for the specific model you wish to totally reprogram the remote control without the confusion of any of these steps. Press any commands, macros or "PunchThrough" programming that this , it is possible to ...
... CBL/SAT Button e again. The red LED under the re-assigned Input Selector will need to be re-entered: 1. Programming the Remote Reassigning Device Control Selectors Although each Input Selector e is normally assigned to the category of product shown on how many commands are in Step 1 once ...do this may have entered will be erased. 5. Enter the three-digit code for the specific model you wish to totally reprogram the remote control without the confusion of any of these steps. Press any commands, macros or "PunchThrough" programming that this , it is possible to ...

Product Information
Page 2
... Industries, Inc. (patent no. 5,386,478). Part No.: AVR320PI8/01 † MP3 playback requires a compatible S/P-DIF signal, or an optional transcoder such as the Harman Kardon DAL 150. AVR 320 7.1-CHANNEL AUDIO/ VIDEO RECEIVER WITH DOLBY* DIGITAL, LOGIC 7® AND DTS-ES® EXTENDED SURROUND Specifications • Audio Section - VMAx is a registered trademark of...
... Industries, Inc. (patent no. 5,386,478). Part No.: AVR320PI8/01 † MP3 playback requires a compatible S/P-DIF signal, or an optional transcoder such as the Harman Kardon DAL 150. AVR 320 7.1-CHANNEL AUDIO/ VIDEO RECEIVER WITH DOLBY* DIGITAL, LOGIC 7® AND DTS-ES® EXTENDED SURROUND Specifications • Audio Section - VMAx is a registered trademark of...


