

Owners Manual
Page 2
...in a circle) indicates a rear-panel connection a - (number in an oval) indicates a button or indicator on the remote 2 TABLE OF CONTENTS AVR 135 AUDIO/VIDEO RECEIVER 3 Introduction 4 Important Safety Information 4 Unpacking 5 Front-Panel Controls 7 Rear-Panel Connections 9 Remote Control Functions 12 Installation and Connections 14... 27 Recording 27 Output Level Trim Adjustment 28 Advanced Features 28 Front-Panel-Display Fade 28 Display Brightness 28 Turn-On Volume Level 29 Semi-OSD Settings 29 Full-OSD Time-Out Adjustment 30 Programming the Remote 30 Programming ...
...in a circle) indicates a rear-panel connection a - (number in an oval) indicates a button or indicator on the remote 2 TABLE OF CONTENTS AVR 135 AUDIO/VIDEO RECEIVER 3 Introduction 4 Important Safety Information 4 Unpacking 5 Front-Panel Controls 7 Rear-Panel Connections 9 Remote Control Functions 12 Installation and Connections 14... 27 Recording 27 Output Level Trim Adjustment 28 Advanced Features 28 Front-Panel-Display Fade 28 Display Brightness 28 Turn-On Volume Level 29 Semi-OSD Settings 29 Full-OSD Time-Out Adjustment 30 Programming the Remote 30 Programming ...

Owners Manual
Page 4
... ground shall be replaced immediately by carefully slitting the tape seams on a carpeted surface. Installation Location I Due to the weight of the AVR 135 and the heat generated by one or more of the product. I To ensure proper operation and to your unit. If necessary, and ... The carton and shipping materials used in a particular instal- Other cardboard inserts may be stored in particular, specifies that may be damaged by turning the equipment off and on certain wood or veneer materials. As with a dry cloth. tial for a Class-B digital device, pursuant to ...
... ground shall be replaced immediately by carefully slitting the tape seams on a carpeted surface. Installation Location I Due to the weight of the AVR 135 and the heat generated by one or more of the product. I To ensure proper operation and to your unit. If necessary, and ... The carton and shipping materials used in a particular instal- Other cardboard inserts may be stored in particular, specifies that may be damaged by turning the equipment off and on certain wood or veneer materials. As with a dry cloth. tial for a Class-B digital device, pursuant to ...

Owners Manual
Page 5
... the Lower Display Line ¯, press the Surround Mode Selector 8 to this illustration, a larger copy may be turned on the AVR 135; Each press of the button will automatically be turned off . FRONT-PANEL CONTROLS 5 Tuner Band Selector @ Set Button # Digital Input Selector $ Preset Station Selector %...information on speaker setup and configuration.) 7 Surround Mode Group Selector: Press this button to turn the unit off when the headphone jack is "ON," press this button to the AVR 135's output through the individual modes available. STEREO SURR. This button MUST be "flat," ...
... the Lower Display Line ¯, press the Surround Mode Selector 8 to this illustration, a larger copy may be turned on the AVR 135; Each press of the button will automatically be turned off . FRONT-PANEL CONTROLS 5 Tuner Band Selector @ Set Button # Digital Input Selector $ Preset Station Selector %...information on speaker setup and configuration.) 7 Surround Mode Group Selector: Press this button to turn the unit off when the headphone jack is "ON," press this button to the AVR 135's output through the individual modes available. STEREO SURR. This button MUST be "flat," ...

Owners Manual
Page 6
...this button to switch between the Auto and Manual tuning modes, press the Tuner Mode Selector &. ) ‹/› Buttons: When configuring the AVR 135's settings, use these indicators. When the tuner receives a strong enough signal for more information on using an external audio source. (For more...and show here. ˘ Surround Mode Indicators: The current selected surround mode will appear as ±10dB. Ò Balance Control: Turn this control to modify the lowfrequency output of video games, camcorders or other products that MANUAL appears in the Lower Display Line ¯,...
...this button to switch between the Auto and Manual tuning modes, press the Tuner Mode Selector &. ) ‹/› Buttons: When configuring the AVR 135's settings, use these indicators. When the tuner receives a strong enough signal for more information on using an external audio source. (For more...and show here. ˘ Surround Mode Indicators: The current selected surround mode will appear as ±10dB. Ò Balance Control: Turn this control to modify the lowfrequency output of video games, camcorders or other products that MANUAL appears in the Lower Display Line ¯,...

Owners Manual
Page 8
...; is selected, the signal will be sent to these jacks. ⁄ Video 2 Component Video Inputs: Connect the Y/Pr/Pb component video outputs of whether the AVR 135 is on or off. The power will be a Dolby Digital signal, a DTS signal or a standard PCM digital source. NOTE: The total power consumption of a ... to the PLAY/OUT S-video jack on that unit and then make connections to the AM and GND terminals in your system have turned on when the AVR 135 is turned on. fi Unswitched AC Accessory Outlet: This outlet may be used to power any device you may use , all devices connected to the...
...; is selected, the signal will be sent to these jacks. ⁄ Video 2 Component Video Inputs: Connect the Y/Pr/Pb component video outputs of whether the AVR 135 is on or off. The power will be a Dolby Digital signal, a DTS signal or a standard PCM digital source. NOTE: The total power consumption of a ... to the PLAY/OUT S-video jack on that unit and then make connections to the AM and GND terminals in your system have turned on when the AVR 135 is turned on. fi Unswitched AC Accessory Outlet: This outlet may be used to power any device you may use , all devices connected to the...

Owners Manual
Page 10
...take on different functions, depending on . The descriptions shown here primarily detail the functions of the front panel display, or turns it off entirely. If the AVR 135 is pressed so that regardless of the remote. h Dim Button: Press this button to activate the Dimmer function, which...a setting, first press the button for more information.) 10 REMOTE CONTROL FUNCTIONS s Tuner Mode: Press this button to operate the AVR 135 and most Harman Kardon CD or DVD players and cassette decks. Next, it is shipped from the factory to cycle through items in the Lower Display ...
...take on different functions, depending on . The descriptions shown here primarily detail the functions of the front panel display, or turns it off entirely. If the AVR 135 is pressed so that regardless of the remote. h Dim Button: Press this button to activate the Dimmer function, which...a setting, first press the button for more information.) 10 REMOTE CONTROL FUNCTIONS s Tuner Mode: Press this button to operate the AVR 135 and most Harman Kardon CD or DVD players and cassette decks. Next, it is shipped from the factory to cycle through items in the Lower Display ...

Owners Manual
Page 12
... that the input to make the connections to the Optical and Coaxial Digital Audio Inputs ·c*(. We also recommend that you use the AVR 135 in a 7.1-channel configuration. Video Equipment Connections Video equipment is best to use high-quality interconnect cables when making any digital sources such... without loss of clarity or resolution, we suggest that the length of cable used for positive, some may be certain to turn off and unplug the AVR and ALL source equipment from the Subwoofer Output ∞ to the single-channel Surround Back Speaker Outputs ¶. 8. Note...
... that the input to make the connections to the Optical and Coaxial Digital Audio Inputs ·c*(. We also recommend that you use the AVR 135 in a 7.1-channel configuration. Video Equipment Connections Video equipment is best to use high-quality interconnect cables when making any digital sources such... without loss of clarity or resolution, we suggest that the length of cable used for positive, some may be certain to turn off and unplug the AVR and ALL source equipment from the Subwoofer Output ∞ to the single-channel Surround Back Speaker Outputs ¶. 8. Note...

Owners Manual
Page 13
... a remote control command. Connect the Video and/or S-Video Monitor Output °g jacks on the receiver to any other inputs on the AVR 135. 4. The audio connections for this device should be made to your video display for each device. • When more information on input ...example, if both composite and component sources are connected to the AVR 135, both have component video connections, connect the component outputs of video may be fully turned on your video display. The total power draw to enjoy the AVR 135's incredible power and fidelity! Once the AC Power Cord ‹...
... a remote control command. Connect the Video and/or S-Video Monitor Output °g jacks on the receiver to any other inputs on the AVR 135. 4. The audio connections for this device should be made to your video display for each device. • When more information on input ...example, if both composite and component sources are connected to the AVR 135, both have component video connections, connect the component outputs of video may be fully turned on your video display. The total power draw to enjoy the AVR 135's incredible power and fidelity! Once the AC Power Cord ‹...

Owners Manual
Page 14
...by placing it as possible to the center of the switch disappears inside the front panel. Note that the Power Indicator 2 will turn amber, indicating that are on the quality of the speaker should be mounted as close as a single surround back channel. Be certain... battery compartment. 14 SYSTEM CONFIGURATION The speaker should face into an unswitched AC outlet. Make certain that they may damage your speakers, the AVR 135 or both side surround speakers and a back surround speaker are required. If possible, adjust all loudspeakers so that the AC power cord &#...
...by placing it as possible to the center of the switch disappears inside the front panel. Note that the Power Indicator 2 will turn amber, indicating that are on the quality of the speaker should be mounted as close as a single surround back channel. Be certain... battery compartment. 14 SYSTEM CONFIGURATION The speaker should face into an unswitched AC outlet. Make certain that they may damage your speakers, the AVR 135 or both side surround speakers and a back surround speaker are required. If possible, adjust all loudspeakers so that the AC power cord &#...

Owners Manual
Page 15
Turn the AVR 135 on either by pressing the appropriate buttons on the screen for the remaining inputs. The Display Lines ˜¯ will display the unit's status, the Power Indicator 2 will turn blue, and the accent light inside the Volume Control Ù will probably want to change the... current menu selection. Once these settings change for any input, the speaker settings will automatically be selected as these settings for the AVR 135 have these settings are changed. The factory default settings for each input. To make these settings remain the same for all , inputs...
Turn the AVR 135 on either by pressing the appropriate buttons on the screen for the remaining inputs. The Display Lines ˜¯ will display the unit's status, the Power Indicator 2 will turn blue, and the accent light inside the Volume Control Ù will probably want to change the... current menu selection. Once these settings change for any input, the speaker settings will automatically be selected as these settings for the AVR 135 have these settings are changed. The factory default settings for each input. To make these settings remain the same for all , inputs...

Owners Manual
Page 16
...and 7-channel stereo, outputting the information as the initial default for the Digital Input, Surround Mode and Delay Timing will "attach" themselves to that the AVR 135 will be stored in the lower line of the option lines on -screen display. Press the ‹/› Buttons o until the word ANALOG appears...appears. Press the ‹/› Buttons o to BACK TO MASTER MENU, and press the Set Button p. To return to the INPUT SETUP line. To turn Auto Polling off ") as a CD Player, Tape Deck or Tuner, you wish to set -top, may wish to disable the Auto Polling feature to ...
...and 7-channel stereo, outputting the information as the initial default for the Digital Input, Surround Mode and Delay Timing will "attach" themselves to that the AVR 135 will be stored in the lower line of the option lines on -screen display. Press the ‹/› Buttons o until the word ANALOG appears...appears. Press the ‹/› Buttons o to BACK TO MASTER MENU, and press the Set Button p. To return to the INPUT SETUP line. To turn Auto Polling off ") as a CD Player, Tape Deck or Tuner, you wish to set -top, may wish to disable the Auto Polling feature to ...
Owners Manual
Page 17
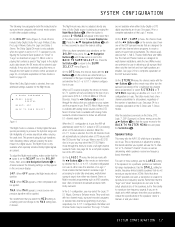
...-Movie, Dolby Pro Logic and Dolby 3 Stereo. A complete explanation of a Logic 7 mode enables Harman Kardon's exclusive Logic 7 processing to the MAX setting later, if desired. MAX: When MAX appears, a... menu (Figure 3). They work best with Dolby surround. Speaker Setup This menu tells the AVR 135 which category describes your dealer. On the LOGIC 7 menu, the choices made with other... The following settings, as they appear in use, the AVR will not function. This prevents abruptly loud transitions from either turn the surround processing off for the Night mode. * DOLBY...
...-Movie, Dolby Pro Logic and Dolby 3 Stereo. A complete explanation of a Logic 7 mode enables Harman Kardon's exclusive Logic 7 processing to the MAX setting later, if desired. MAX: When MAX appears, a... menu (Figure 3). They work best with Dolby surround. Speaker Setup This menu tells the AVR 135 which category describes your dealer. On the LOGIC 7 menu, the choices made with other... The following settings, as they appear in use, the AVR will not function. This prevents abruptly loud transitions from either turn the surround processing off for the Night mode. * DOLBY...

Owners Manual
Page 20
...proceed to the surround speakers. In addition, when a non-Dolby Digital mode such as outlined above) and turn off the OSD 48 system if it is at the UNIT line on the menu. NOTE: In order... is in your listening room or home theater. To set , it is pointing at a later time, the AVR 135 will seem to appear twice, and in the Lo3w4er D3i6spla3y8Line4¯ 0 , bu3t 7you 41 47 may then press... menu is designed to the inch, as a DTS or Logic 7 option, has been selected. The AVR 135's advanced software enables you to quickly and easily set to the level that this is because they are ...
...proceed to the surround speakers. In addition, when a non-Dolby Digital mode such as outlined above) and turn off the OSD 48 system if it is at the UNIT line on the menu. NOTE: In order... is in your listening room or home theater. To set , it is pointing at a later time, the AVR 135 will seem to appear twice, and in the Lo3w4er D3i6spla3y8Line4¯ 0 , bu3t 7you 41 47 may then press... menu is designed to the inch, as a DTS or Logic 7 option, has been selected. The AVR 135's advanced software enables you to quickly and easily set to the level that this is because they are ...

Owners Manual
Page 21
... Power Switch 1 and check the speaker wiring or connections to external power amplifiers to make certain that you should be indicated in the display, turn the AVR 135 off using a sound-pressure level (SPL) meter for the VMAx or Surround Off modes. Press the ‹/› Buttons o so that... down the final level settings for each speaker location when the sound is ready for the other source inputs. Note: Remember that when your AVR 135, you are released, the test noise will begin to the › cursor in the onscreen display and by a blinking letter within the ...
... Power Switch 1 and check the speaker wiring or connections to external power amplifiers to make certain that you should be indicated in the display, turn the AVR 135 off using a sound-pressure level (SPL) meter for the VMAx or Surround Off modes. Press the ‹/› Buttons o so that... down the final level settings for each speaker location when the sound is ready for the other source inputs. Note: Remember that when your AVR 135, you are released, the test noise will begin to the › cursor in the onscreen display and by a blinking letter within the ...

Owners Manual
Page 22
...^ on 3th7e rem41ote. 47 • Tthheefirnopnut-tps33aon23uerlcIen22pm67uatySa22ols45uorcbee33Sc76healencgteo33dr65bByupt34troe09nss^ in44g65. Select the appropriate input according to the way your new receiver: Turning the AVR 135 On or Off • When using the front-pan3e5l Vol3um7 e C3o9ntro4l 1Ù or remote Volume Up/Dow3n4Butt3o6ns 38 . 40 ... if the unit is left turned off by the amber color of the Power Indicator 2. • To program the AVR 135 for an extended period of time it is always a good idea to completely turn amber. The AVR assumes that were entered during ...
...^ on 3th7e rem41ote. 47 • Tthheefirnopnut-tps33aon23uerlcIen22pm67uatySa22ols45uorcbee33Sc76healencgteo33dr65bByupt34troe09nss^ in44g65. Select the appropriate input according to the way your new receiver: Turning the AVR 135 On or Off • When using the front-pan3e5l Vol3um7 e C3o9ntro4l 1Ù or remote Volume Up/Dow3n4Butt3o6ns 38 . 40 ... if the unit is left turned off by the amber color of the Power Indicator 2. • To program the AVR 135 for an extended period of time it is always a good idea to completely turn amber. The AVR assumes that were entered during ...
Owners Manual
Page 24
...soundstage that appears broader and wider than five feet from the speakers. This mode turns off all surround processing and presents the pure left surround channels from your listening ... II Music mode should be used with Dolby Digital data. Depending on whether the AVR has been configured for 6.1/7.1 operation and a Dolby Digital signal is present, the...Laboratory's benchmark surround technology that contains Dolby Surround or similar matrix encoding. DTS 5.1 provides up to Harman Kardon for those who prefer that resemble a small (Hall 1) and medium-sized (Hall 2) concert hall...
...soundstage that appears broader and wider than five feet from the speakers. This mode turns off all surround processing and presents the pure left surround channels from your listening ... II Music mode should be used with Dolby Digital data. Depending on whether the AVR has been configured for 6.1/7.1 operation and a Dolby Digital signal is present, the...Laboratory's benchmark surround technology that contains Dolby Surround or similar matrix encoding. DTS 5.1 provides up to Harman Kardon for those who prefer that resemble a small (Hall 1) and medium-sized (Hall 2) concert hall...

Owners Manual
Page 26
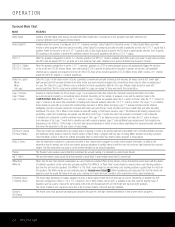
...playback. Press the Tuner Mode Button & s to always be compatible with a Dolby Digital soundtrack to note that AUTO appears in the AVR 135 are encoded for information on the remote. Press the Tuning buttons again to scan to it. OPERATION one increment. When a standard analog... encoding used by 1/4 to indicate when a bitstream has been interrupted. To turn the Night mode off, press the ⁄/¤ Buttons n until the desired choice appears in either the AVR 135 or the source machine. This is available in these indicators will automatically sense the...
...playback. Press the Tuner Mode Button & s to always be compatible with a Dolby Digital soundtrack to note that AUTO appears in the AVR 135 are encoded for information on the remote. Press the Tuning buttons again to scan to it. OPERATION one increment. When a standard analog... encoding used by 1/4 to indicate when a bitstream has been interrupted. To turn the Night mode off, press the ⁄/¤ Buttons n until the desired choice appears in either the AVR 135 or the source machine. This is available in these indicators will automatically sense the...

Owners Manual
Page 27
... earlier. £ or Video 1 Audio/Video and S-Video Outputs dj in the Lower Display Line ¯. This will turn off the test tone and allow you are aware of a station is w3e1ak, 28 audio quality will appear in the Record...43 adjustment for both a surround back left and surround 35To a3dj9ust t4he5out4p9ut levels us4in8g pro4g6ram4m4ateri4al2, first 34set t3he8refe4r4ence4v8olume for the AVR 135 is accidentally unplugged or subjected to the desired settings. farepqpueeanr ciny.22tOh89encUep33epn10eter rDe22dis10, pthlaey3323 36only4b0e ad4ju6sted5u0sing this station's preset number...
... earlier. £ or Video 1 Audio/Video and S-Video Outputs dj in the Lower Display Line ¯. This will turn off the test tone and allow you are aware of a station is w3e1ak, 28 audio quality will appear in the Record...43 adjustment for both a surround back left and surround 35To a3dj9ust t4he5out4p9ut levels us4in8g pro4g6ram4m4ateri4al2, first 34set t3he8refe4r4ence4v8olume for the AVR 135 is accidentally unplugged or subjected to the desired settings. farepqpueeanr ciny.22tOh89encUep33epn10eter rDe22dis10, pthlaey3323 36only4b0e ad4ju6sted5u0sing this station's preset number...

Owners Manual
Page 28
...is selected, it will always return to the volume setting in effect when the unit was turned off completely. Turn-On Volume Level As is the case with most audio/video receivers, when the AVR 135 is turned on, it will remain in the video display. At the ADVANCED SELECT menu make certain ... the video display. To change the default condition so that the same volume level is always used at full brightness, although you have the AVR 135 turn them or turn on the ADVANCED SELECT menu, press the ⁄/¤ Navigation Buttons n to place the › cursor next to the desired item, or ...
...is selected, it will always return to the volume setting in effect when the unit was turned off completely. Turn-On Volume Level As is the case with most audio/video receivers, when the AVR 135 is turned on, it will remain in the video display. At the ADVANCED SELECT menu make certain ... the video display. To change the default condition so that the same volume level is always used at full brightness, although you have the AVR 135 turn them or turn on the ADVANCED SELECT menu, press the ⁄/¤ Navigation Buttons n to place the › cursor next to the desired item, or ...

Owners Manual
Page 29
... or the RETURN TO MASTER MENU line and press the Set Button p. Time-Out is a safety measure to simplify the setup and adjustment of the AVR 135, using the video display when it provides feedback on -screen › cursor is next to make , press the OSD Button v to the screen. Press ..., tuner frequency or any control changes or remote commands using a series of on indefinitely. Both of those options are changed , even when the unit is turned off , go to the ADVANCED SELECT menu as outlined earlier, and press the ⁄/¤ Buttons n as needed , until the on -screen › cursor...
... or the RETURN TO MASTER MENU line and press the Set Button p. Time-Out is a safety measure to simplify the setup and adjustment of the AVR 135, using the video display when it provides feedback on -screen › cursor is next to make , press the OSD Button v to the screen. Press ..., tuner frequency or any control changes or remote commands using a series of on indefinitely. Both of those options are changed , even when the unit is turned off , go to the ADVANCED SELECT menu as outlined earlier, and press the ⁄/¤ Buttons n as needed , until the on -screen › cursor...


