
User Manual
Page 1
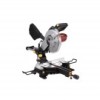
... is intact and undamaged. All rights reserved. Diagrams within this manual for future reference. Due to do so can result in the back of the manual near the assembly diagram (or month and year of Harbor Freight Tools. Owner's Manual & Safety Instructions Save This Manual Keep this manual may differ slightly from the product described herein. ITEM 61972 10" SLIDING COMPOUND MITER SAW WITH LASER GUIDE SYSTEM REV 14f Note: Blade sold separately.
... is intact and undamaged. All rights reserved. Diagrams within this manual for future reference. Due to do so can result in the back of the manual near the assembly diagram (or month and year of Harbor Freight Tools. Owner's Manual & Safety Instructions Save This Manual Keep this manual may differ slightly from the product described herein. ITEM 61972 10" SLIDING COMPOUND MITER SAW WITH LASER GUIDE SYSTEM REV 14f Note: Blade sold separately.

User Manual
Page 2
... injury. Setup Operation Maintenance Page 2 For technical questions, please call 1-888-866-5797. Obey all safety messages that follow this symbol to potential personal injury hazards. It is the safety alert symbol. Addresses practices not related to personal injury. Safety Table of Contents Safety 3 Setupp 7 Specifications 7 Operationa 10 Maintenancei 13 Parts List and Diagram 18 Warranty 20 WARNING SYMBOLS AND DEFINITIONS This is used to...
... injury. Setup Operation Maintenance Page 2 For technical questions, please call 1-888-866-5797. Obey all safety messages that follow this symbol to potential personal injury hazards. It is the safety alert symbol. Addresses practices not related to personal injury. Safety Table of Contents Safety 3 Setupp 7 Specifications 7 Operationa 10 Maintenancei 13 Parts List and Diagram 18 Warranty 20 WARNING SYMBOLS AND DEFINITIONS This is used to...

User Manual
Page 3
... clean for lubricating and changing accessories. 8. USE PROPER EXTENSION CORD. DISCONNECT TOOLS before turning it will do a job for recommended accessories. ITEM 61972 For technical questions, please call 1-888-866-5797. IMPORTANT SAFETY INFORMATION General Tool Safety Warnings Safety Setup Operation Read all warnings and instructions for future reference. 1. REMOVE ADJUSTING KEYS AND WRENCHES. DON'T USE IN DANGEROUS ENVIRONMENT. Also use the next heavier gauge. DON'T OVERREACH. If in working order. 2. REDUCE THE...
... clean for lubricating and changing accessories. 8. USE PROPER EXTENSION CORD. DISCONNECT TOOLS before turning it will do a job for recommended accessories. ITEM 61972 For technical questions, please call 1-888-866-5797. IMPORTANT SAFETY INFORMATION General Tool Safety Warnings Safety Setup Operation Read all warnings and instructions for future reference. 1. REMOVE ADJUSTING KEYS AND WRENCHES. DON'T USE IN DANGEROUS ENVIRONMENT. Also use the next heavier gauge. DON'T OVERREACH. If in working order. 2. REDUCE THE...

User Manual
Page 4
... not change the plug in the outlet, reverse the plug. ITEM 61972 Safety Grounding Instructions TO PREVENT ELECTRIC SHOCK AND DEATH FROM INCORRECT GROUNDING WIRE CONNECTION READ AND FOLLOW THESE INSTRUCTIONS: 110-120 VAC Double Insulated Tools: Tools with Two Prong Plugs Outlets for 2-Prong Plug.) Setup Operation Maintenance Page 4 For technical questions, please call 1-888-866-5797. Double insulated tools may be used...
... not change the plug in the outlet, reverse the plug. ITEM 61972 Safety Grounding Instructions TO PREVENT ELECTRIC SHOCK AND DEATH FROM INCORRECT GROUNDING WIRE CONNECTION READ AND FOLLOW THESE INSTRUCTIONS: 110-120 VAC Double Insulated Tools: Tools with Two Prong Plugs Outlets for 2-Prong Plug.) Setup Operation Maintenance Page 4 For technical questions, please call 1-888-866-5797. Double insulated tools may be used...

User Manual
Page 5
... to persons. 17. Safety Setup Miter Saw Safety Warnings For Your Own Safety Read Instruction Manual Before Operating Miter Saw 1. Wear eye protection. 2. Keep hands out of path of such blades. 14. Never reach around saw blade. 3. Return all guards for kickback and should consult their physician(s) before changing blade or servicing. 8. Check all guards to protect against the failure of saw blade. 6. Do not use damaged or incorrect blade washers or bolt. Wet lumber...
... to persons. 17. Safety Setup Miter Saw Safety Warnings For Your Own Safety Read Instruction Manual Before Operating Miter Saw 1. Wear eye protection. 2. Keep hands out of path of such blades. 14. Never reach around saw blade. 3. Return all guards for kickback and should consult their physician(s) before changing blade or servicing. 8. Check all guards to protect against the failure of saw blade. 6. Do not use damaged or incorrect blade washers or bolt. Wet lumber...

User Manual
Page 6
... chemicals: work . SAVE THESE INSTRUCTIONS. It must be understood by the operator that common sense and caution are factors which cannot be built into this tool. Anyone using vibrating tools regularly or for an extended period should not use . Operation Maintenance Page 6 For technical questions, please call 1-888-866-5797. Safety Setup Miter Saw Safety Warnings (cont.) 25. WARNING: The cord of this instruction manual cannot cover...
... chemicals: work . SAVE THESE INSTRUCTIONS. It must be understood by the operator that common sense and caution are factors which cannot be built into this tool. Anyone using vibrating tools regularly or for an extended period should not use . Operation Maintenance Page 6 For technical questions, please call 1-888-866-5797. Safety Setup Miter Saw Safety Warnings (cont.) 25. WARNING: The cord of this instruction manual cannot cover...

User Manual
Page 7
...; left 1° per scale mark 250100 List of Contents Description Qty Compound Sliding Miter Saw 1 Table Extensions 2 Dust Collection Bag 1 Wrench 1 Setup Operation Maintenance ITEM 61972 For technical questions, please call 1-888-866-5797. Page 7 Safety Specifications Motor Arbor Diameter Recommended Blade Type Blade Diameter Cutting Capacity Positive Table Stops Positive Bevel Stops Blade Tilt Range Scale 120 VAC / 60 Hz / 15 A 5,000 RPM 5/8″ General Purpose with Carbide Tips 10″ At 90°: 2-3/4″...
...; left 1° per scale mark 250100 List of Contents Description Qty Compound Sliding Miter Saw 1 Table Extensions 2 Dust Collection Bag 1 Wrench 1 Setup Operation Maintenance ITEM 61972 For technical questions, please call 1-888-866-5797. Page 7 Safety Specifications Motor Arbor Diameter Recommended Blade Type Blade Diameter Cutting Capacity Positive Table Stops Positive Bevel Stops Blade Tilt Range Scale 120 VAC / 60 Hz / 15 A 5,000 RPM 5/8″ General Purpose with Carbide Tips 10″ At 90°: 2-3/4″...

User Manual
Page 8
Safety Setup Trigger Blade Guard Handles Blade Lock Dust Collection Bag Blade Hold Down Clamp Miter Handle Kerf Board Table Miter Lock Handle Miter Angle Indicator Figure A: Components Bevel Angle Indicator Fence Work piece Extension Support Operation Maintenance Page 8 For technical questions, please call 1-888-866-5797. ITEM 61972
Safety Setup Trigger Blade Guard Handles Blade Lock Dust Collection Bag Blade Hold Down Clamp Miter Handle Kerf Board Table Miter Lock Handle Miter Angle Indicator Figure A: Components Bevel Angle Indicator Fence Work piece Extension Support Operation Maintenance Page 8 For technical questions, please call 1-888-866-5797. ITEM 61972

User Manual
Page 9
... FROM ACCIDENTAL OPERATION: Turn the Power Switch of this manual including all text under subheadings therein before set up or use of the tool to its "OFF" position and unplug the tool from its electrical outlet before use of a saw table will make more accurate cuts. Note: For additional information regarding the parts listed in each of the four legs of the Extension Supports into the Plate until...
... FROM ACCIDENTAL OPERATION: Turn the Power Switch of this manual including all text under subheadings therein before set up or use of the tool to its "OFF" position and unplug the tool from its electrical outlet before use of a saw table will make more accurate cuts. Note: For additional information regarding the parts listed in each of the four legs of the Extension Supports into the Plate until...
User Manual
Page 10
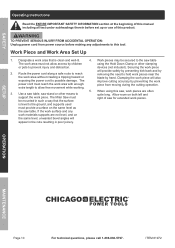
.... Work Piece and Work Area Set Up 1. Clamping the work piece will also improve cutting accuracy by children using this product. The Miter Saw must be secured to the saw table The work area must provide a surface on both left and right of saw , work pieces are not level, and on the same level, unwanted bevel angles will provide safety by preventing kick back and by removing the need to hold work materials supports...
.... Work Piece and Work Area Set Up 1. Clamping the work piece will also improve cutting accuracy by children using this product. The Miter Saw must be secured to the saw table The work area must provide a surface on both left and right of saw , work pieces are not level, and on the same level, unwanted bevel angles will provide safety by preventing kick back and by removing the need to hold work materials supports...

User Manual
Page 11
.... A bevel cut in crown moldings, picture frames and similar trim materials. 3. Bevel cuts can use saw . Move the blade assembly left and right sides. 3. Lock the blade assembly into position by turning it counterclockwise. Page 11 When properly installed, the upper face of the Work Piece Extension Supports are level with the table, and so that after the cut is made , return the Depth Stop Screw to unlock the Table. The Miter Angle Indicator will lock into...
.... A bevel cut in crown moldings, picture frames and similar trim materials. 3. Bevel cuts can use saw . Move the blade assembly left and right sides. 3. Lock the blade assembly into position by turning it counterclockwise. Page 11 When properly installed, the upper face of the Work Piece Extension Supports are level with the table, and so that after the cut is made , return the Depth Stop Screw to unlock the Table. The Miter Angle Indicator will lock into...

User Manual
Page 12
... Blade. Use this tool so the blade does not contact the Kerf Board during normal operation, including bevel cuts. Ensure that the Saw Blade will have read this booklet. Unlock the Table to be sure the 8. To rotate the Table, press down lightly, move the Blade across the work material to stop turning, release the Hold Down Vise and remove the work material. Observe all safety and planning items 6. Before starting work...
... Blade. Use this tool so the blade does not contact the Kerf Board during normal operation, including bevel cuts. Ensure that the Saw Blade will have read this booklet. Unlock the Table to be sure the 8. To rotate the Table, press down lightly, move the Blade across the work material to stop turning, release the Hold Down Vise and remove the work material. Observe all safety and planning items 6. Before starting work...

User Manual
Page 13
... the problem corrected before performing any (not included) which will not attract dust. Saw dust on the cuts. 9. Setup Operation Maintenance ITEM 61972 For technical questions, please call 1-888-866-5797. Observe the Dust Bag while using the saw . If the Blade has become dirty, use damaged equipment. Safety Maintenance and Servicing Procedures not specifically explained in this will attract dust. 4. WARNING TO PREVENT SERIOUS INJURY FROM ACCIDENTAL OPERATION: Turn the Power Switch...
... the problem corrected before performing any (not included) which will not attract dust. Saw dust on the cuts. 9. Setup Operation Maintenance ITEM 61972 For technical questions, please call 1-888-866-5797. Observe the Dust Bag while using the saw . If the Blade has become dirty, use damaged equipment. Safety Maintenance and Servicing Procedures not specifically explained in this will attract dust. 4. WARNING TO PREVENT SERIOUS INJURY FROM ACCIDENTAL OPERATION: Turn the Power Switch...

User Manual
Page 14
... guard to loosen the Arbor Bolt by turning it clockwise. (See Figure E.) 3. Unplug the tool from its power source. 2. Figure C: Removing Safety Screw 5. Remove the Safety Screw. (See Figure C.) Figure E: Arbor Bolt Note: The Arbor Bolt has a left hand thread, so it loosens by turning it counterclockwise. 10. ITEM 61972 Maintenance While holding the Center Cover in place by pushing in place after replacing blade. Use the supplied Wrench to match the direction...
... guard to loosen the Arbor Bolt by turning it clockwise. (See Figure E.) 3. Unplug the tool from its power source. 2. Figure C: Removing Safety Screw 5. Remove the Safety Screw. (See Figure C.) Figure E: Arbor Bolt Note: The Arbor Bolt has a left hand thread, so it loosens by turning it counterclockwise. 10. ITEM 61972 Maintenance While holding the Center Cover in place by pushing in place after replacing blade. Use the supplied Wrench to match the direction...

User Manual
Page 15
... of the Miter Table Angle Indicator. 2. Once the bevel angle is not exactly vertical, the two pieces will form a slight angle. 3. Safety Setup Adjusting the Fence The Fence holds the work , make a test cut on scrap material with one cut-off piece 180º and hold a good straight edge along the Fence. Lay a carpenter's square on the table with the Table set the Bevel Angle at 90º. 2. Adjusting the Bevel Angle For making accurate cuts, the Saw Blade must...
... of the Miter Table Angle Indicator. 2. Once the bevel angle is not exactly vertical, the two pieces will form a slight angle. 3. Safety Setup Adjusting the Fence The Fence holds the work , make a test cut on scrap material with one cut-off piece 180º and hold a good straight edge along the Fence. Lay a carpenter's square on the table with the Table set the Bevel Angle at 90º. 2. Adjusting the Bevel Angle For making accurate cuts, the Saw Blade must...

User Manual
Page 16
... that cord is being used. Replace if damaged or worn. 1. For cross cutting hard wood and for material. 4. Use a thin piece of scrap material, such as 1/4″ plywood, underneath or behind the material to chip out. 2. ITEM 61972 Safety Troubleshooting Problem Tool will not start Tool operates sporadically or at low power Wood burns at ends when cut . Worn or cracked Carbon Brushes. 1. Blade inappropriate for precision cuts use a thin kerf blade...
... that cord is being used. Replace if damaged or worn. 1. For cross cutting hard wood and for material. 4. Use a thin piece of scrap material, such as 1/4″ plywood, underneath or behind the material to chip out. 2. ITEM 61972 Safety Troubleshooting Problem Tool will not start Tool operates sporadically or at low power Wood burns at ends when cut . Worn or cracked Carbon Brushes. 1. Blade inappropriate for precision cuts use a thin kerf blade...

User Manual
Page 17
... OF HIS OR HER REPAIRS TO THE ORIGINAL PRODUCT OR REPLACEMENT PARTS THERETO, OR ARISING OUT OF HIS OR HER INSTALLATION OF REPLACEMENT PARTS THERETO. PLEASE READ THE FOLLOWING CAREFULLY THE MANUFACTURER AND/OR DISTRIBUTOR HAS PROVIDED THE PARTS LIST AND ASSEMBLY DIAGRAM IN THIS MANUAL AS A REFERENCE TOOL ONLY. NEITHER THE MANUFACTURER OR DISTRIBUTOR MAKES ANY REPRESENTATION OR WARRANTY OF ANY KIND...
... OF HIS OR HER REPAIRS TO THE ORIGINAL PRODUCT OR REPLACEMENT PARTS THERETO, OR ARISING OUT OF HIS OR HER INSTALLATION OF REPLACEMENT PARTS THERETO. PLEASE READ THE FOLLOWING CAREFULLY THE MANUFACTURER AND/OR DISTRIBUTOR HAS PROVIDED THE PARTS LIST AND ASSEMBLY DIAGRAM IN THIS MANUAL AS A REFERENCE TOOL ONLY. NEITHER THE MANUFACTURER OR DISTRIBUTOR MAKES ANY REPRESENTATION OR WARRANTY OF ANY KIND...

User Manual
Page 18
... Lock Nut 42 Washer Qty 2 1 2 2 4 1 4 8 4 1 1 1 1 1 1 1 1 1 1 7 1 1 1 1 1 1 1 1 6 6 2 1 1 1 1 1 2 1 1 2 1 1 Part Description 43 Lock Handle 47 Bolt M5x14 48 Bushing 49 Oil Cover 50 Bearing 51 Rod 52 Mount 53 Line Button 54 Washer 55 Bolt M6x10 56 Limit Plate 57 Knob M6x20 58 Handle Ball 59 Lock Spring 60 Lock Pin 61 Spring Pin 62 Cover stand 63 Screw 64 Bolt 65 Washer 66 Lock Button 67 Link Pole Bolt 68 Link Pole 69 Brush Cover 70 Carbon Brush 71 Brush Handle...
... Lock Nut 42 Washer Qty 2 1 2 2 4 1 4 8 4 1 1 1 1 1 1 1 1 1 1 7 1 1 1 1 1 1 1 1 6 6 2 1 1 1 1 1 2 1 1 2 1 1 Part Description 43 Lock Handle 47 Bolt M5x14 48 Bushing 49 Oil Cover 50 Bearing 51 Rod 52 Mount 53 Line Button 54 Washer 55 Bolt M6x10 56 Limit Plate 57 Knob M6x20 58 Handle Ball 59 Lock Spring 60 Lock Pin 61 Spring Pin 62 Cover stand 63 Screw 64 Bolt 65 Washer 66 Lock Button 67 Link Pole Bolt 68 Link Pole 69 Brush Cover 70 Carbon Brush 71 Brush Handle...

User Manual
Page 19
Page 19 Safety Setup Assembly Diagram 99 112 111 103102 101 100 99 898 97 9695 94 93 112 92 91 113 108 107 106...73 31 30 32 29 28 21 27 20 26 19 18 129 17 16 15 14 12 13 10 22 11 38 23 24 56 9 8 47 9 8 7 20° 15° 10° 45° 40° 35° 30° 25° 5° 0° 62...34 371 35 36 20 49 42 50 7 25 5° 10° 15° 20° 25° 30° 35° 40° 45° 6 2 3 4 5 55 7 72 71 70 69 5240 53 52 48 51 128 Operation Maintenance ITEM 61972 For technical questions, please call 1-888-866-5797.
Page 19 Safety Setup Assembly Diagram 99 112 111 103102 101 100 99 898 97 9695 94 93 112 92 91 113 108 107 106...73 31 30 32 29 28 21 27 20 26 19 18 129 17 16 15 14 12 13 10 22 11 38 23 24 56 9 8 47 9 8 7 20° 15° 10° 45° 40° 35° 30° 25° 5° 0° 62...34 371 35 36 20 49 42 50 7 25 5° 10° 15° 20° 25° 30° 35° 40° 45° 6 2 3 4 5 55 7 72 71 70 69 5240 53 52 48 51 128 Operation Maintenance ITEM 61972 For technical questions, please call 1-888-866-5797.

User Manual
Page 20
... AND FITNESS. This warranty does not apply to damage due directly or indirectly, to misuse, abuse, negligence or accidents, repairs or alterations outside our facilities, criminal activity, improper installation, normal wear and tear, or to the original purchaser that the defect resulted from the use of returning the product. Limited 90 Day Warranty Harbor Freight Tools Co. makes every...
... AND FITNESS. This warranty does not apply to damage due directly or indirectly, to misuse, abuse, negligence or accidents, repairs or alterations outside our facilities, criminal activity, improper installation, normal wear and tear, or to the original purchaser that the defect resulted from the use of returning the product. Limited 90 Day Warranty Harbor Freight Tools Co. makes every...


