User Manual
Page 2
... Safety 2 Specifications 8 Setup 8 Operation 9 Maintenance 12 Parts List and Diagram 14 Warranty 16 SAFETy SETUp OpERATION WARNING SyMBOLS AND DEFINITIONS This is used to alert you to potential personal injury hazards. Do not operate power tools in explosive atmospheres, such as in the warnings refers to personal injury. Distractions can cause you to lose control. Obey all safety messages that follow the warnings and instructions may ignite the dust...
... Safety 2 Specifications 8 Setup 8 Operation 9 Maintenance 12 Parts List and Diagram 14 Warranty 16 SAFETy SETUp OpERATION WARNING SyMBOLS AND DEFINITIONS This is used to alert you to potential personal injury hazards. Do not operate power tools in explosive atmospheres, such as in the warnings refers to personal injury. Distractions can cause you to lose control. Obey all safety messages that follow the warnings and instructions may ignite the dust...
User Manual
Page 3
... use any adjusting key or wrench before turning the power tool on invites accidents. 4. Do not expose power tools to power source, picking up or carrying the tool. Do not abuse the cord. Keep cord away from heat, oil, sharp edges or moving parts. 7. Do not use safety equipment that have the Trigger on . Remove any adapter plugs with grounded power tools. A wrench or a key left attached to operate the power tool. Keep your body is grounded. 3. Only use a power tool...
... use any adjusting key or wrench before turning the power tool on invites accidents. 4. Do not expose power tools to power source, picking up or carrying the tool. Do not abuse the cord. Keep cord away from heat, oil, sharp edges or moving parts. 7. Do not use safety equipment that have the Trigger on . Remove any adapter plugs with grounded power tools. A wrench or a key left attached to operate the power tool. Keep your body is grounded. 3. Only use a power tool...
User Manual
Page 4
... starting torque. 9. DO NOT OpERATE WITH THE BASE OR ANy OTHER GUARD DISABLED, DAMAGED, OR REMOVED. Wash hands after handling. (California Health & Safety Code § 25249.5, et seq.) 15. it . When using only identical replacement parts. REV 02d; 04b; 10b Page 4 For technical questions, please call 1-800-444-3353. 5. Keep cutting tools sharp and clean. WARNING: Some dust created by hand or against your power tool serviced by poorly maintained power tools...
... starting torque. 9. DO NOT OpERATE WITH THE BASE OR ANy OTHER GUARD DISABLED, DAMAGED, OR REMOVED. Wash hands after handling. (California Health & Safety Code § 25249.5, et seq.) 15. it . When using only identical replacement parts. REV 02d; 04b; 10b Page 4 For technical questions, please call 1-800-444-3353. 5. Keep cutting tools sharp and clean. WARNING: Some dust created by hand or against your power tool serviced by poorly maintained power tools...
User Manual
Page 5
... work . 7. If you feel any abnormal vibration occurs, stop use . Include vibration-free periods each day of vibration-related injury. 3. Grip tool as lightly as possible (while still keeping safe control of vibration-related injury: 1. If any symptoms related to the hand, past hand injuries, nervous system disorders, diabetes, or Raynaud's Disease should not use this manual. SAVE THESE INSTRUcTIONS. Anyone using...
... work . 7. If you feel any abnormal vibration occurs, stop use . Include vibration-free periods each day of vibration-related injury. 3. Grip tool as lightly as possible (while still keeping safe control of vibration-related injury: 1. If any symptoms related to the hand, past hand injuries, nervous system disorders, diabetes, or Raynaud's Disease should not use this manual. SAVE THESE INSTRUcTIONS. Anyone using...
User Manual
Page 6
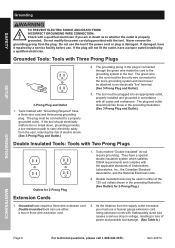
... cords 1. Item 44914 The plug must use . Do not modify the power cord plug provided with a qualified electrician if you must be used in either a two or three wire extension cord. 2. SAFETy SETUp Grounding TO pREVENT ELEcTRIc SHOcK AND DEATH FROM INcORREcT GROUNDING WIRE cONNEcTION: check with the tool. Never remove the grounding prong from the user, reducing the risk of power and possible tool damage. (See Table A.) OpERATION MAINTENANcE...
... cords 1. Item 44914 The plug must use . Do not modify the power cord plug provided with a qualified electrician if you must be used in either a two or three wire extension cord. 2. SAFETy SETUp Grounding TO pREVENT ELEcTRIc SHOcK AND DEATH FROM INcORREcT GROUNDING WIRE cONNEcTION: check with the tool. Never remove the grounding prong from the user, reducing the risk of power and possible tool damage. (See Table A.) OpERATION MAINTENANcE...
User Manual
Page 7
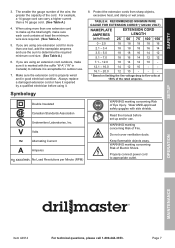
... power cord to determine the required minimum cord size. (See Table A.) 6. SAFETy SETUp 3. Symbology Double Insulated Canadian Standards Association Underwriters Laboratories, Inc. OpERATION MAINTENANcE Item 44914 For technical questions, please call 1-800-444-3353. Read the manual before using an extension cord outdoors, make sure each cord contains at 150% of the rated amperes. Keep flammable objects away. If you are using more than a 16 gauge cord...
... power cord to determine the required minimum cord size. (See Table A.) 6. SAFETy SETUp 3. Symbology Double Insulated Canadian Standards Association Underwriters Laboratories, Inc. OpERATION MAINTENANcE Item 44914 For technical questions, please call 1-800-444-3353. Read the manual before using an extension cord outdoors, make sure each cord contains at 150% of the rated amperes. Keep flammable objects away. If you are using more than a 16 gauge cord...
User Manual
Page 8
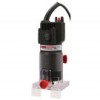
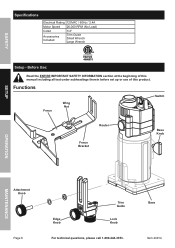
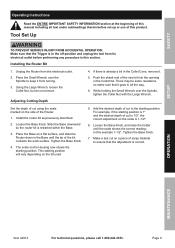
... Fence Wing Nut Switch Router Fence Bracket Base Knob SETUp OpERATION MAINTENANcE Attachment Knob Page 8 Edge Knob Trim Guide Lock Knob For technical questions, please call 1-800-444-3353. Base Item 44914 Before Use: 4006675 Read the ENTIRE IMpORTANT SAFETy INFORMATION section at the beginning of this manual including all text under subheadings therein before set up or use of this product. SAFETy Specifications Electrical Rating 120VAC / 60Hz / 2.4A Motor Speed 26,000 RPM (No Load) Collet 1/4" Accessories Included Trim Guide Small Wrench Large Wrench Setup...
... Fence Wing Nut Switch Router Fence Bracket Base Knob SETUp OpERATION MAINTENANcE Attachment Knob Page 8 Edge Knob Trim Guide Lock Knob For technical questions, please call 1-800-444-3353. Base Item 44914 Before Use: 4006675 Read the ENTIRE IMpORTANT SAFETy INFORMATION section at the beginning of this manual including all text under subheadings therein before set up or use of this product. SAFETy Specifications Electrical Rating 120VAC / 60Hz / 2.4A Motor Speed 26,000 RPM (No Load) Collet 1/4" Accessories Included Trim Guide Small Wrench Large Wrench Setup...
User Manual
Page 9
... the bit used. 5. Place the Small Wrench over the Spindle, tighten the Collet Nut with the Large Wrench. Adjusting cutting Depth 4. Tighten the Base Knob. 4. For example, if the starting position. Tighten the Base Knob. 7. SETUp OpERATION MAINTENANcE Item 44914 For technical questions, please call 1-800-444-3353. SAFETy Operating Instructions Read the ENTIRE IMpORTANT SAFETy INFORMATION section at the beginning of this manual including all the way. 6. Push the shank end of the bit contacts the work...
... the bit used. 5. Place the Small Wrench over the Spindle, tighten the Collet Nut with the Large Wrench. Adjusting cutting Depth 4. Tighten the Base Knob. 4. For example, if the starting position. Tighten the Base Knob. 7. SETUp OpERATION MAINTENANcE Item 44914 For technical questions, please call 1-800-444-3353. SAFETy Operating Instructions Read the ENTIRE IMpORTANT SAFETy INFORMATION section at the beginning of this manual including all the way. 6. Push the shank end of the bit contacts the work...
User Manual
Page 10
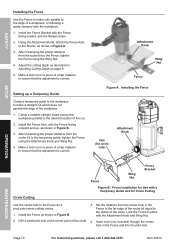
.... Item 44914 Setting up , as a pivot point when cutting circles. 1. After measuring the proper distance from the router bit to the temporary guide, tighten the Fence using the Wing Nut. 4. After measuring the proper distance from the router bit to the Fence, tighten the Fence using the Attachment Knob and Wing Nut. 4. Attachment Knob Wing Nut Fence Figure A: Installing the Fence hole (for circle cuts) Attachment Knob SETUp OpERATION MAINTENANcE circle cutting Fence Wing Nut Fence Bracket Figure B: Fence Installation for circle cutting Use the center...
.... Item 44914 Setting up , as a pivot point when cutting circles. 1. After measuring the proper distance from the router bit to the temporary guide, tighten the Fence using the Wing Nut. 4. After measuring the proper distance from the router bit to the Fence, tighten the Fence using the Attachment Knob and Wing Nut. 4. Attachment Knob Wing Nut Fence Figure A: Installing the Fence hole (for circle cuts) Attachment Knob SETUp OpERATION MAINTENANcE circle cutting Fence Wing Nut Fence Bracket Figure B: Fence Installation for circle cutting Use the center...

User Manual
Page 11
... be adjusted to the Router Base. 2. When using Attachment Knob. 4. Workpiece and Work Area Set Up 1. Tighten Lock Knob. When making a circle cut accurately in the pilot hole, plunge the router bit into position. To prevent accidents, turn off -position, then plug in the tool. 2. The power cord must not allow free movement while working . SAFETy SETUp Installing the Trim Guide Asm. Use the Trim Guide to trim in Figure c, and attach to cut : With the pin located in two dimensions...
... be adjusted to the Router Base. 2. When using Attachment Knob. 4. Workpiece and Work Area Set Up 1. Tighten Lock Knob. When making a circle cut accurately in the pilot hole, plunge the router bit into position. To prevent accidents, turn off -position, then plug in the tool. 2. The power cord must not allow free movement while working . SAFETy SETUp Installing the Trim Guide Asm. Use the Trim Guide to trim in Figure c, and attach to cut : With the pin located in two dimensions...
User Manual
Page 12
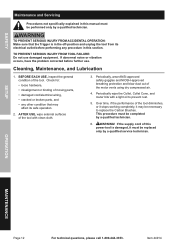
... and blow dust out of the tool with a light oil to replace the Carbon Brushes. Item 44914 cleaning, Maintenance, and Lubrication 1. Periodically wipe the Collet, Collet Cone, and router bits with clean cloth. 3. TO pREVENT SERIOUS INJURy FROM AccIDENTAL OpERATION: Make sure that may be performed only by a qualified technician. AFTER USE, wipe external surfaces of the motor vents using dry compressed air. 4. BEFORE EAcH USE, inspect...
... and blow dust out of the tool with a light oil to replace the Carbon Brushes. Item 44914 cleaning, Maintenance, and Lubrication 1. Periodically wipe the Collet, Collet Cone, and router bits with clean cloth. 3. TO pREVENT SERIOUS INJURy FROM AccIDENTAL OpERATION: Make sure that may be performed only by a qualified technician. AFTER USE, wipe external surfaces of the motor vents using dry compressed air. 4. BEFORE EAcH USE, inspect...
User Manual
Page 13
... bits. Check and correct accessory to work at its length and load. Replace as needed , use one with the proper diameter for its own rate. 2. Check that cord is needed . 4. Have qualified technician replace brushes. 2. Have technician service tool. 1. If an extension cord is plugged in Grounding section on page 6. If outlet is unpowered, turn off tool and allow to work too fast. 2. Disconnect power supply before service. SETUp OpERATION MAINTENANcE Item 44914...
... bits. Check and correct accessory to work at its length and load. Replace as needed , use one with the proper diameter for its own rate. 2. Check that cord is needed . 4. Have qualified technician replace brushes. 2. Have technician service tool. 1. If an extension cord is plugged in Grounding section on page 6. If outlet is unpowered, turn off tool and allow to work too fast. 2. Disconnect power supply before service. SETUp OpERATION MAINTENANcE Item 44914...
User Manual
Page 14
... Trim Guide Asm. (420~430) Link Countersunk Head Screw Outer Tooth Washer (not shown) Set Plate Edge Knob Screw Guide Wheel Guide Block Flat Washer Wave Washer Lock Knob Pin (not shown) Fence Asm. (440~445) Carriage Bolt Fence Bracket Fence Flat Washer Spring Washer Wing Nut Flat Washer (not shown) Pan Head Screw (not shown) Flat Washer Base Knob Terminal Snap Ring Small Wrench Large Wrench OpERATION MAINTENANcE Record product's Serial Number Here: Note: If product has no serial number, record month and year of purchase instead. Item 44914...
... Trim Guide Asm. (420~430) Link Countersunk Head Screw Outer Tooth Washer (not shown) Set Plate Edge Knob Screw Guide Wheel Guide Block Flat Washer Wave Washer Lock Knob Pin (not shown) Fence Asm. (440~445) Carriage Bolt Fence Bracket Fence Flat Washer Spring Washer Wing Nut Flat Washer (not shown) Pan Head Screw (not shown) Flat Washer Base Knob Terminal Snap Ring Small Wrench Large Wrench OpERATION MAINTENANcE Record product's Serial Number Here: Note: If product has no serial number, record month and year of purchase instead. Item 44914...
User Manual
Page 15
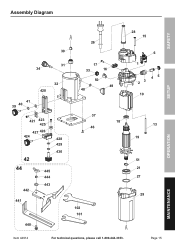
Page 15 MAINTENANcE Assembly Diagram SAFETy SETUp OpERATION 26 30 31 34 39 40 41 32 420 421 423 425 427 426 424 428 429 430 42 44 445 444 443 442 441 440 17 33 16 50 49 48 37 18 46 102 101 28 15 6 1 23 45 10 13 19 51 21 27 29 Item 44914 For technical questions, please call 1-800-444-3353.
Page 15 MAINTENANcE Assembly Diagram SAFETy SETUp OpERATION 26 30 31 34 39 40 41 32 420 421 423 425 427 426 424 428 429 430 42 44 445 444 443 442 441 440 17 33 16 50 49 48 37 18 46 102 101 28 15 6 1 23 45 10 13 19 51 21 27 29 Item 44914 For technical questions, please call 1-800-444-3353.

User Manual
Page 16
... not apply to damage due directly or indirectly, to misuse, abuse, negligence or accidents, repairs or alterations outside our facilities, criminal activity, improper installation, normal wear and tear, or to us with a replacement. This warranty gives you specific legal rights and you . makes every effort to ... use of exclusion may not apply to you may elect to state. 3491 Mission Oaks Blvd. • PO Box 6009 • Camarillo, CA 93011 • (800) 444-3353 Proof of purchase date and an explanation of maintenance. Limited 90 Day Warranty Harbor Freight Tools Co. THIS WARRANTY ...
... not apply to damage due directly or indirectly, to misuse, abuse, negligence or accidents, repairs or alterations outside our facilities, criminal activity, improper installation, normal wear and tear, or to us with a replacement. This warranty gives you specific legal rights and you . makes every effort to ... use of exclusion may not apply to you may elect to state. 3491 Mission Oaks Blvd. • PO Box 6009 • Camarillo, CA 93011 • (800) 444-3353 Proof of purchase date and an explanation of maintenance. Limited 90 Day Warranty Harbor Freight Tools Co. THIS WARRANTY ...


