
User Manual
Page 1
...Viewing Photos 10 Setting Photo Display Mode 12 Configuring Photo Display Settings 12 Configuring Sildeshow Settings 13 Video 14 Playing Videos 14 Music 15 Playing Music 15 Calendar 16 Displaying Calendar 16 Setting Calendar Display Mode 16 Setting Date & Time 17 Setting the Alarm 18 Turning the Alarm On/Off 18 File Manager 19 Deleting Files...19 Other Settings 20 Setting the Language 20 Setting Auto-Power 20 Turning On/Off Auto-Power 21 Adjusting Brightness 21 Adjusting Contrast 21 Adjusting Saturation 21 Formating ...21 Resetting ...21 Troubleshooting 22 Specifications...
...Viewing Photos 10 Setting Photo Display Mode 12 Configuring Photo Display Settings 12 Configuring Sildeshow Settings 13 Video 14 Playing Videos 14 Music 15 Playing Music 15 Calendar 16 Displaying Calendar 16 Setting Calendar Display Mode 16 Setting Date & Time 17 Setting the Alarm 18 Turning the Alarm On/Off 18 File Manager 19 Deleting Files...19 Other Settings 20 Setting the Language 20 Setting Auto-Power 20 Turning On/Off Auto-Power 21 Adjusting Brightness 21 Adjusting Contrast 21 Adjusting Saturation 21 Formating ...21 Resetting ...21 Troubleshooting 22 Specifications...

User Manual
Page 2
... in conformity with the instructions, may not cause harmful interference, and (2) this equipment does cause harmful interference to radio or television reception, which can radiate radio frequency energy and, if not installed and used in a particular installation. CE Conformity Statement2 This device is connected • Consult the dealer or an experienced technician for help Warning: The Federal...
... in conformity with the instructions, may not cause harmful interference, and (2) this equipment does cause harmful interference to radio or television reception, which can radiate radio frequency energy and, if not installed and used in a particular installation. CE Conformity Statement2 This device is connected • Consult the dealer or an experienced technician for help Warning: The Federal...
User Manual
Page 3
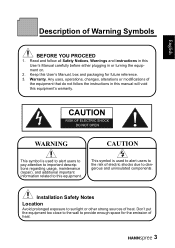
... used to alert users to the risk of electric shocks due to this User's Manual, box and packaging for the emission of the equipment that do not follow all Safety Notices, Warnings and instructions in this User's Manual carefully before either plugging in this manual will void this equipment's warranty. Read and follow the instructions in or turning the equipment on. 2. Installation...
... used to alert users to the risk of electric shocks due to this User's Manual, box and packaging for the emission of the equipment that do not follow all Safety Notices, Warnings and instructions in this User's Manual carefully before either plugging in this manual will void this equipment's warranty. Read and follow the instructions in or turning the equipment on. 2. Installation...
User Manual
Page 4
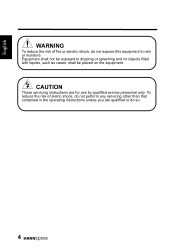
English WARNING To reduce the risk of eletric shock, do so. 4 Equipment shall not be placed on the equipment. CAUTION These servicing instructions are qualified to do not perform any servicing other than that contained in the operating instructions unless you are for use by qualified service personnel only. To reduce the risk of fire or electric shock, do not expose this equipment to dripping or splashing and no objects filled with liquids, such as vases, shall be exposed to rain or moisture.
English WARNING To reduce the risk of eletric shock, do so. 4 Equipment shall not be placed on the equipment. CAUTION These servicing instructions are qualified to do not perform any servicing other than that contained in the operating instructions unless you are for use by qualified service personnel only. To reduce the risk of fire or electric shock, do not expose this equipment to dripping or splashing and no objects filled with liquids, such as vases, shall be exposed to rain or moisture.

User Manual
Page 5
... coupler is used as power-supply cord or plug is damaged, liquid has been spilled or objects have fallen into your safety. Keep these instructions. 2. Do not use attachments/accessories specified by the manufacturer. 12. NOTE: Applies to qualified service personnel. The apparatus should be used for long periods of the obsolete outlet. CAUTION • If the remote control is...
... coupler is used as power-supply cord or plug is damaged, liquid has been spilled or objects have fallen into your safety. Keep these instructions. 2. Do not use attachments/accessories specified by the manufacturer. 12. NOTE: Applies to qualified service personnel. The apparatus should be used for long periods of the obsolete outlet. CAUTION • If the remote control is...
User Manual
Page 6
... used batteries according to manufacturer's instructions. • Refer to your remote control has two batteries, do not place magnetic sensitive items such as the right to distribute or reproduce the copyrighted software. Hannspree (or other third parties). All other third parties). This manual is incorrectly replaced....or trademarks of Hannspree, except for copyrighted software, such as watches, credit cards, or flash media close to the cover. • Do not use that arises by operation of law in the sale of the new battery will be deemed to grant, either directly or by ...
... used batteries according to manufacturer's instructions. • Refer to your remote control has two batteries, do not place magnetic sensitive items such as the right to distribute or reproduce the copyrighted software. Hannspree (or other third parties). All other third parties). This manual is incorrectly replaced....or trademarks of Hannspree, except for copyrighted software, such as watches, credit cards, or flash media close to the cover. • Do not use that arises by operation of law in the sale of the new battery will be deemed to grant, either directly or by ...
User Manual
Page 7
... or omission in this manual throughout before setting up and using or operating your DPF. The information in this manual is designed to the correctness of such damages in this manual has been carefully checked for purchasing a Hannspree Digital Photo Frame. The information in this manual are followed. Your new DPF will allow you for accuracy; English Preface Thank you to view your lifestyle with...
... or omission in this manual throughout before setting up and using or operating your DPF. The information in this manual is designed to the correctness of such damages in this manual has been carefully checked for purchasing a Hannspree Digital Photo Frame. The information in this manual are followed. Your new DPF will allow you for accuracy; English Preface Thank you to view your lifestyle with...
User Manual
Page 8
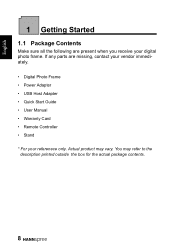
English 1 Getting Started 1.1 Package Contents Make sure all the following are missing, contact your vendor immediately. • Digital Photo Frame • Power Adapter • USB Host Adapter • Quick Start Guide • User Manual • Warranty Card • Remote Controller • Stand * For your digital photo frame. If any parts are present when you receive your referenece only. You may vary. Actual product may refer to the description printed outside the box for the actual package contents. 8
English 1 Getting Started 1.1 Package Contents Make sure all the following are missing, contact your vendor immediately. • Digital Photo Frame • Power Adapter • USB Host Adapter • Quick Start Guide • User Manual • Warranty Card • Remote Controller • Stand * For your digital photo frame. If any parts are present when you receive your referenece only. You may vary. Actual product may refer to the description printed outside the box for the actual package contents. 8
User Manual
Page 9
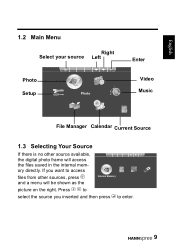
English 1.2 Main Menu Right Select your source Left Photo Setup Photo Enter Video Music File Manager Calendar Current Source 1.3 Selecting Your Source If there is no other sources, press and a menu will access the files saved in the internal memory directly. Press to select the source you want to enter. 9 If you inserted and then press to access files from other source available, the digital photo frame will be shown as the Internal Memory picture on the right.
English 1.2 Main Menu Right Select your source Left Photo Setup Photo Enter Video Music File Manager Calendar Current Source 1.3 Selecting Your Source If there is no other sources, press and a menu will access the files saved in the internal memory directly. Press to select the source you want to enter. 9 If you inserted and then press to access files from other source available, the digital photo frame will be shown as the Internal Memory picture on the right.

User Manual
Page 10
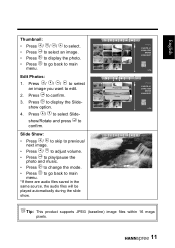
The Photos are displayed in the display mode as what is already set in Photo Setup/Display Mode. (If there is no instruction given, the photos will be displayed automatically in a sequence of slide show.) Browse: • Press / to browse images. • Press to rotate. • Press to play photo slide show. • Press to change the display mode. 13:57:02 • Press to go back to main menu. • Press to zoom an image. 200% • Press / / / to enter. English 2 Photo 2.1 Viewing Photos In the main menu, press / to select Photo and press to move the image. 10
The Photos are displayed in the display mode as what is already set in Photo Setup/Display Mode. (If there is no instruction given, the photos will be displayed automatically in a sequence of slide show.) Browse: • Press / to browse images. • Press to rotate. • Press to play photo slide show. • Press to change the display mode. 13:57:02 • Press to go back to main menu. • Press to zoom an image. 200% • Press / / / to enter. English 2 Photo 2.1 Viewing Photos In the main menu, press / to select Photo and press to move the image. 10
User Manual
Page 11
... image. • Press to display the photo. • Press to go back to main menu. *If there are audio files saved in the same source, the audio files will be played automatically during the slide show /Rotate and press to confirm. Photo Edit Slideshow Rotate Photo PHOTO 01 2048x1536 803KB 2008/05/27 1/15 Photo PHOTO 01 2048x1536 803KB 2008/05/27 1/15 Tip: This product supports JPEG (baseline) image files...
... image. • Press to display the photo. • Press to go back to main menu. *If there are audio files saved in the same source, the audio files will be played automatically during the slide show /Rotate and press to confirm. Photo Edit Slideshow Rotate Photo PHOTO 01 2048x1536 803KB 2008/05/27 1/15 Photo PHOTO 01 2048x1536 803KB 2008/05/27 1/15 Tip: This product supports JPEG (baseline) image files...
User Manual
Page 12
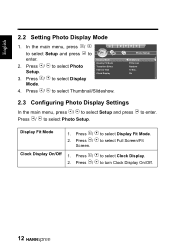
Press / Setup. Photo Setup Slideshow Fit Screen Random 10 Sec. On 2.3 Configuring Photo Display Settings In the main menu, press / to select Setup and press Press / to enter. to select Photo Setup. Press / Screen. 1. Press / 2. Press / to turn Clock Display On/Off. 12 to select Display Fit Mode. to enter. 2. Press / 2. In the main menu, press / to select Setup and press to select Photo Display Mode Display Fit Mode Transition Effect Interval Time Clock Display 3. Display Fit Mode Clock Display On/Off 1. to select...
Press / Setup. Photo Setup Slideshow Fit Screen Random 10 Sec. On 2.3 Configuring Photo Display Settings In the main menu, press / to select Setup and press Press / to enter. to select Photo Setup. Press / Screen. 1. Press / 2. Press / to turn Clock Display On/Off. 12 to select Display Fit Mode. to enter. 2. Press / 2. In the main menu, press / to select Setup and press to select Photo Display Mode Display Fit Mode Transition Effect Interval Time Clock Display 3. Display Fit Mode Clock Display On/Off 1. to select...

User Manual
Page 13
English 2.4 Configuring Sildeshow Settings In the main menu, press / to select Setup and press Press / to select 5 Sec./10 Sec./15 Sec./30 Sec./ 1 Min/3 Min./Off. 1. Press / to select Photo Setup. Press / to select Repeat. 2. Press / to select Transition Effect. 2. Press / Off. Press / 2. to select Random/Fade-in Fade-out/Block 9/Block 8/Block 7/Block 6/ Block 5/Block 4/Block...
English 2.4 Configuring Sildeshow Settings In the main menu, press / to select Setup and press Press / to select 5 Sec./10 Sec./15 Sec./30 Sec./ 1 Min/3 Min./Off. 1. Press / to select Photo Setup. Press / to select Repeat. 2. Press / to select Transition Effect. 2. Press / Off. Press / 2. to select Random/Fade-in Fade-out/Block 9/Block 8/Block 7/Block 6/ Block 5/Block 4/Block...

User Manual
Page 16
... display mode. • Press to be back to select Display Mode. 4. Press / to select Monthly Calendar/Calendar. 16 Press / to select Calendar Setup. 3. The Calendar is displayed in the display mode as what is already set in Calendar Setup/Display Mode. Calendar: • Press / to browse images. • Press / to adjust volume. • Press to play /pause photos and music. • Press to change the display mode. • Press to go back to main menu. 5 Calendar English 5.1 Displaying Calendar...
... display mode. • Press to be back to select Display Mode. 4. Press / to select Monthly Calendar/Calendar. 16 Press / to select Calendar Setup. 3. The Calendar is displayed in the display mode as what is already set in Calendar Setup/Display Mode. Calendar: • Press / to browse images. • Press / to adjust volume. • Press to play /pause photos and music. • Press to change the display mode. • Press to go back to main menu. 5 Calendar English 5.1 Displaying Calendar...
User Manual
Page 17
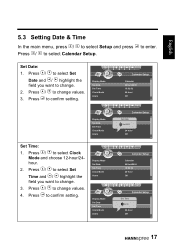
to confirm setting. Press to enter. English 5.3 Setting Date & Time In the main menu, press / to select Setup and press Press / to select Clock Mode and choose 12-hour/24hour. 2. Display Mode Set Date Set Time Clock Mode Alarm Calendar Setup Calendar 24/Jun/2008 15:52:52 24-hour Off Display Mode Set Date Set Time Clock Mode Alarm Set Time: 1. Display Mode Set Date Set Time Clock Mode Alarm Display Mode Set Date Set Time Clock Mode Alarm Calendar Setup Set DCaatleendar 24/Jun/2008 24:/Jun/2008 15:52:52 24-hour Off Calendar Setup Calendar 24/Jun...
to confirm setting. Press to enter. English 5.3 Setting Date & Time In the main menu, press / to select Setup and press Press / to select Clock Mode and choose 12-hour/24hour. 2. Display Mode Set Date Set Time Clock Mode Alarm Calendar Setup Calendar 24/Jun/2008 15:52:52 24-hour Off Display Mode Set Date Set Time Clock Mode Alarm Set Time: 1. Display Mode Set Date Set Time Clock Mode Alarm Display Mode Set Date Set Time Clock Mode Alarm Calendar Setup Set DCaatleendar 24/Jun/2008 24:/Jun/2008 15:52:52 24-hour Off Calendar Setup Calendar 24/Jun...
User Manual
Page 18
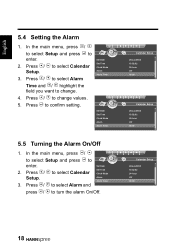
... select Calendar Clock Mode Setup. 3. Set Date Set Time 2. Set Date Set Time Clock Mode Alarm Alarm Time 5.5 Turning the Alarm On/Off 1. Press / to confirm setting. In the main menu, press / to select Setup and press to turn the alarm On/Off. Set Date Set Time 2. Press / to change values. 5. Press / to select Alarm and Alarm Alarm Time press / to enter. English 5.4 Setting the Alarm 1. In the main menu, press / to select Setup and press to select Calendar Clock Mode Setup. 3. Press / to enter. Press / to select Alarm Alarm Alarm Time Time...
... select Calendar Clock Mode Setup. 3. Set Date Set Time 2. Set Date Set Time Clock Mode Alarm Alarm Time 5.5 Turning the Alarm On/Off 1. Press / to confirm setting. In the main menu, press / to select Setup and press to turn the alarm On/Off. Set Date Set Time 2. Press / to change values. 5. Press / to select Alarm and Alarm Alarm Time press / to enter. English 5.4 Setting the Alarm 1. In the main menu, press / to select Setup and press to select Calendar Clock Mode Setup. 3. Press / to enter. Press / to select Alarm Alarm Alarm Time Time...
User Manual
Page 19
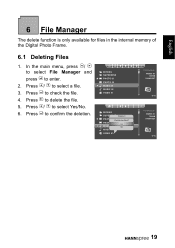
... 19 In the main menu, press / to select File Manager and press to check the file. 4. Press / to delete the file. 5. Press to select Yes/No. 6. Press to select a file. 3. MOVIES SUPERBIKE PHOTO 01 PHOTO 02 MUSIC 01 MUSIC 02 VIDEO 01 MOVIES SUPERBIKE Delete it PHOTO 01 Delete the files? English 6 File Manager The delete function is only available for files in the internal memory of the Digital Photo Frame. 6.1 Deleting Files 1. Press / to confirm the...
... 19 In the main menu, press / to select File Manager and press to check the file. 4. Press / to delete the file. 5. Press to select Yes/No. 6. Press to select a file. 3. MOVIES SUPERBIKE PHOTO 01 PHOTO 02 MUSIC 01 MUSIC 02 VIDEO 01 MOVIES SUPERBIKE Delete it PHOTO 01 Delete the files? English 6 File Manager The delete function is only available for files in the internal memory of the Digital Photo Frame. 6.1 Deleting Files 1. Press / to confirm the...

User Manual
Page 22
...memory card. • Compatible Photo format: JPEG. • Compatible Music format: MP3. • Compatible Video format: MPEG-1, MPEG-2, MPEG-4. • Incompatible file format. • No picture file is on the memory card. • Make sure there is at least one supported picture file stored on . 8 Troubleshooting English Problem Cause and/or Corrective Actions The power of the memory card is compatible with the JPEG file format only. Make sure the front label of Digital Photo Frame doesn't turn on the memory card. • Compatible Photo format: JPEG. • The digital frame...
...memory card. • Compatible Photo format: JPEG. • Compatible Music format: MP3. • Compatible Video format: MPEG-1, MPEG-2, MPEG-4. • Incompatible file format. • No picture file is on the memory card. • Make sure there is at least one supported picture file stored on . 8 Troubleshooting English Problem Cause and/or Corrective Actions The power of the memory card is compatible with the JPEG file format only. Make sure the front label of Digital Photo Frame doesn't turn on the memory card. • Compatible Photo format: JPEG. • The digital frame...
User Manual
Page 23
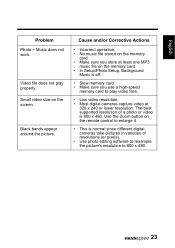
... normal since different digital cameras take pictures in varieties of a photo or video is off. • Slow memory card. • Make sure you store at 320 x 240 or lower resolution. Video file does not play video files. • Low video resolution. • Most digital cameras capture video at least one MP3 music file on the memory card. • Make sure you use a high-speed memory card to play properly. English Problem Photo + Music does not work. Use the Zoom button on the screen.
... normal since different digital cameras take pictures in varieties of a photo or video is off. • Slow memory card. • Make sure you store at 320 x 240 or lower resolution. Video file does not play video files. • Low video resolution. • Most digital cameras capture video at least one MP3 music file on the memory card. • Make sure you use a high-speed memory card to play properly. English Problem Photo + Music does not work. Use the Zoom button on the screen.
User Manual
Page 24
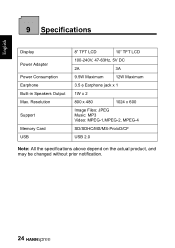
Resolution Support Memory Card USB 8" TFT LCD 10" TFT LCD 100-240V, 47-63Hz, 5V DC 2A 3A 9.5W Maximum 12W Maximum 3.5 φ Earphone jack x 1 1W x 2 800 x 480 1024 x 600 Image Files: JPEG Music: MP3 Video: MPEG-1,MPEG-2, MPEG-4 SD/SDHC/MS/MS-Pro/xD/CF USB 2.0 Note: All the specifications above depend on the actual product, and may be changed without prior notification. 24 English 9 Specifications Display Power Adapter Power Consumption Earphone Built-in Speakers Output Max.
Resolution Support Memory Card USB 8" TFT LCD 10" TFT LCD 100-240V, 47-63Hz, 5V DC 2A 3A 9.5W Maximum 12W Maximum 3.5 φ Earphone jack x 1 1W x 2 800 x 480 1024 x 600 Image Files: JPEG Music: MP3 Video: MPEG-1,MPEG-2, MPEG-4 SD/SDHC/MS/MS-Pro/xD/CF USB 2.0 Note: All the specifications above depend on the actual product, and may be changed without prior notification. 24 English 9 Specifications Display Power Adapter Power Consumption Earphone Built-in Speakers Output Max.

