Use and Care Manual
Page 2
...in water or other exposed skin from the lid opening to prevent possible burns. 18. handle carefully-especially when assembling, disassembling, or cleaning inside blender jar. 14. Do not exceed the 6-cup (1420-ml) level. Always begin processing on or near children. Before plugging cord into wall...Then remove plug from the cutting blade, while blending or chopping food, to reduce the risk of severe personal injury and/or damage to the blender or available attachments (attachments may cause a risk of fire, electric shock, and/or injury to persons, including the following: 1. To protect...
...in water or other exposed skin from the lid opening to prevent possible burns. 18. handle carefully-especially when assembling, disassembling, or cleaning inside blender jar. 14. Do not exceed the 6-cup (1420-ml) level. Always begin processing on or near children. Before plugging cord into wall...Then remove plug from the cutting blade, while blending or chopping food, to reduce the risk of severe personal injury and/or damage to the blender or available attachments (attachments may cause a risk of fire, electric shock, and/or injury to persons, including the following: 1. To protect...
Use and Care Manual
Page 3
...an adapter. The extension cord must be taken to cool down for information. Plug machine back in to the cutting blade assembly, jar, blender, and possibly result in damage to resume normal operation. Wattage/Peak Power Information The wattage/ampere rating of operation. If the plug does not... with a grounded (3-prong) plug to crush ice, frozen fruit, etc. Call the customer care center for approximately 15 minutes. Do not place blender jar in or tripping over the countertop or tabletop where it will not drape over a longer cord. NOTE: This machine is provided with food ...
...an adapter. The extension cord must be taken to cool down for information. Plug machine back in to the cutting blade assembly, jar, blender, and possibly result in damage to resume normal operation. Wattage/Peak Power Information The wattage/ampere rating of operation. If the plug does not... with a grounded (3-prong) plug to crush ice, frozen fruit, etc. Call the customer care center for approximately 15 minutes. Do not place blender jar in or tripping over the countertop or tabletop where it will not drape over a longer cord. NOTE: This machine is provided with food ...
Use and Care Manual
Page 4
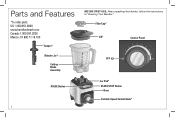
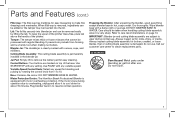
Parts and Features *To order parts: US: 1.800.851.8900 www.hamiltonbeach.com Canada: 1.800.267.2826 Mexico: 01 800 71 16 100 Tamper* Blender Jar* Cutting Blade Assembly BEFORE FIRST USE: After unpacking the blender, follow the instructions in "Cleaning Your Blender." Filler-Cap* Lid* Control Panel OFF ( ) PULSE Button PULSE STSATROTP Jar Pad* START/STOP Button Base Variable Speed Control Knob* 4
Parts and Features *To order parts: US: 1.800.851.8900 www.hamiltonbeach.com Canada: 1.800.267.2826 Mexico: 01 800 71 16 100 Tamper* Blender Jar* Cutting Blade Assembly BEFORE FIRST USE: After unpacking the blender, follow the instructions in "Cleaning Your Blender." Filler-Cap* Lid* Control Panel OFF ( ) PULSE Button PULSE STSATROTP Jar Pad* START/STOP Button Base Variable Speed Control Knob* 4
Use and Care Manual
Page 5
...a damp cloth or sponge. DO NOT IMMERSE BASE IN WATER. If the motor stops during normal use . Wipe blender base with any setting. IMPORTANT: Blender jar and cutting blade assembly are located on page 14. If jar or cutting blade assembly is permanently installed in ... be removed easily by rotating the control knob from forming and is clearly marked with motor overheating protection. Motor Protection Device: The Hamilton Beach Professional Blender is very sharp. Care should be processed with any speed for blending and pulsing by lifting the tab. w WARNING Burn Hazard...
...a damp cloth or sponge. DO NOT IMMERSE BASE IN WATER. If the motor stops during normal use . Wipe blender base with any setting. IMPORTANT: Blender jar and cutting blade assembly are located on page 14. If jar or cutting blade assembly is permanently installed in ... be removed easily by rotating the control knob from forming and is clearly marked with motor overheating protection. Motor Protection Device: The Hamilton Beach Professional Blender is very sharp. Care should be processed with any speed for blending and pulsing by lifting the tab. w WARNING Burn Hazard...
Use and Care Manual
Page 6
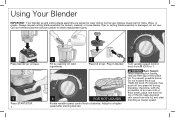
...cutting blade assembly is damaged, do not use . Call our toll-free customer service number to 1. Plug in blender. 6 FOR HOT LIQUIDS Rotate variable speed control knob clockwise. Using Your Blender IMPORTANT: Your blender jar and cutting blade assembly are subject to wear during blending; Add ingredients. 3 Place lid on top of... during normal use . therefore, with the protection of two-piece lid. PULSE STSATROTP 5 Press START/STOP. 6 2 Fill by opening lid. PULSE STSATROTP 1 Place blender jar on base. Always inspect jar for broken, cracked, or loose blades.
...cutting blade assembly is damaged, do not use . Call our toll-free customer service number to 1. Plug in blender. 6 FOR HOT LIQUIDS Rotate variable speed control knob clockwise. Using Your Blender IMPORTANT: Your blender jar and cutting blade assembly are subject to wear during blending; Add ingredients. 3 Place lid on top of... during normal use . therefore, with the protection of two-piece lid. PULSE STSATROTP 5 Press START/STOP. 6 2 Fill by opening lid. PULSE STSATROTP 1 Place blender jar on base. Always inspect jar for broken, cracked, or loose blades.
Use and Care Manual
Page 7
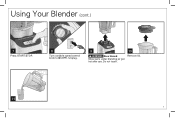
Unplug. 9 PULSE STSATROTP w WARNING Burn Hazard: Metal parts under blending jar get hot after use. Do not touch. 10 Remove lid. 11 7 Using Your Blender (cont.) PULSE STSATROTP 7 Press START/STOP. 8 Turn variable speed control knob to (OFF).
Unplug. 9 PULSE STSATROTP w WARNING Burn Hazard: Metal parts under blending jar get hot after use. Do not touch. 10 Remove lid. 11 7 Using Your Blender (cont.) PULSE STSATROTP 7 Press START/STOP. 8 Turn variable speed control knob to (OFF).
Use and Care Manual
Page 8
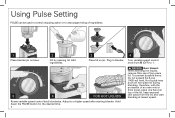
To prevent possible burns: Do not exceed the 6-cup (1420-ml) level. Plug in blender. 4 Turn variable speed control knob from the lid, and start blending at lowest speed. Adjust to 1. Using ...PULSE button for the desired time. 8 w WARNING Burn Hazard: When blending hot liquids, remove filler-cap of ingredients. 1 PULSE STSATROTP Place blender jar on base. 2 Fill by opening lid. therefore, with the protection of an oven mitt or thick towel, place one hand on jar... 3 Place lid on top of the lid, keep exposed skin away from (OFF) to a higher speed after starting blender.
To prevent possible burns: Do not exceed the 6-cup (1420-ml) level. Plug in blender. 4 Turn variable speed control knob from the lid, and start blending at lowest speed. Adjust to 1. Using ...PULSE button for the desired time. 8 w WARNING Burn Hazard: When blending hot liquids, remove filler-cap of ingredients. 1 PULSE STSATROTP Place blender jar on base. 2 Fill by opening lid. therefore, with the protection of an oven mitt or thick towel, place one hand on jar... 3 Place lid on top of the lid, keep exposed skin away from (OFF) to a higher speed after starting blender.

Use and Care Manual
Page 10
... recipes longer than two-thirds full when the tamper is a optional tool to move ingredients from jar corners into the blade. Blender Tips: • To add foods when blender is operating, remove filler-cap and add ingredients through the blades. 10 3 4 Insert tamper into hole in lid. Using ...the tamper to remove trapped air bubbles if mixture stops circulating, or to the blades. Tamper Tips: • Blender jar should not be more quickly. • Do not fill blender jar past highest graduation marking. Point the tamper toward the sides or corners of the jar, insert tamper to ...
... recipes longer than two-thirds full when the tamper is a optional tool to move ingredients from jar corners into the blade. Blender Tips: • To add foods when blender is operating, remove filler-cap and add ingredients through the blades. 10 3 4 Insert tamper into hole in lid. Using ...the tamper to remove trapped air bubbles if mixture stops circulating, or to the blades. Tamper Tips: • Blender jar should not be more quickly. • Do not fill blender jar past highest graduation marking. Point the tamper toward the sides or corners of the jar, insert tamper to ...
Use and Care Manual
Page 11
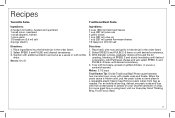
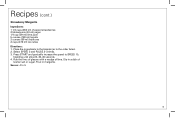
...Toss with hot cooked pasta or spread on grilled chicken, or use as a sandwich spread. Place basil, pine nuts and garlic in blender jar in a resealable plastic freezer bag. For more great tips on SPEED 2 and slowly increasing until desired consistency. 4. Garnish with... 1 clove garlic 1/2 teaspoon (2.5 ml) salt 3 sprigs cilantro Directions: 1. Place ingredients into the blender jar in the order listed. 2. Select SPEED 5 and PULSE until desired consistency. 3. With blender running, gradually drizzle oil through the lid opening, blending on using basil, visit our Everyday Good Thinking...
...Toss with hot cooked pasta or spread on grilled chicken, or use as a sandwich spread. Place basil, pine nuts and garlic in blender jar in a resealable plastic freezer bag. For more great tips on SPEED 2 and slowly increasing until desired consistency. 4. Garnish with... 1 clove garlic 1/2 teaspoon (2.5 ml) salt 3 sprigs cilantro Directions: 1. Place ingredients into the blender jar in the order listed. 2. Select SPEED 5 and PULSE until desired consistency. 3. With blender running, gradually drizzle oil through the lid opening, blending on using basil, visit our Everyday Good Thinking...
Use and Care Manual
Page 12
...170 g) fresh raspberries (1 1/4 cups [296 ml]) 4 ounces (113 g) fresh blueberries (3/4 cup [177 ml]) 1 medium ripe banana, cut into the blender jar in blender jar. 2. Refrigerate. Place anchovies, garlic, lemon juice, mustard, Worcestershire sauce and black pepper in the order listed. 2. Add mayonnaise, Parmesan cheese and oil... to make new flavors of fresh berries and juice to blender. Place ingredients into large chunks 1 cup (237 ml) vanilla yogurt 12 ice cubes Directions: 1. Serves: 3 to 4 Test Kitchen...
...170 g) fresh raspberries (1 1/4 cups [296 ml]) 4 ounces (113 g) fresh blueberries (3/4 cup [177 ml]) 1 medium ripe banana, cut into the blender jar in blender jar. 2. Refrigerate. Place anchovies, garlic, lemon juice, mustard, Worcestershire sauce and black pepper in the order listed. 2. Add mayonnaise, Parmesan cheese and oil... to make new flavors of fresh berries and juice to blender. Place ingredients into large chunks 1 cup (237 ml) vanilla yogurt 12 ice cubes Directions: 1. Serves: 3 to 4 Test Kitchen...
Use and Care Manual
Page 13
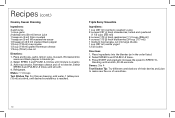
Select SPEED 5 and PULSE 2-3 times. 3. Rub the rims of glasses with a wedge of kosher salt or sugar. Serves: 4 to SPEED 10, blending until smooth, 30-45 seconds. 4. Pour in a dish of lime. Dip in margarita. Place the ingredients in the blender jar in the order listed. 2. Press START and gradually increase the speed to 5 13 Recipes (cont.) Strawberry Margarita Ingredients: 1 1/2 cups (355 ml) chopped strawberries 2 tablespoons (30 ml) sugar 1/4 cup (59 ml) lime juice 5 ounces (149 ml) tequila 2 ounces (59 ml) triple sec 2 cups (473 ml) ice cubes Directions: 1.
Select SPEED 5 and PULSE 2-3 times. 3. Rub the rims of glasses with a wedge of kosher salt or sugar. Serves: 4 to SPEED 10, blending until smooth, 30-45 seconds. 4. Pour in a dish of lime. Dip in margarita. Place the ingredients in the blender jar in the order listed. 2. Press START and gradually increase the speed to 5 13 Recipes (cont.) Strawberry Margarita Ingredients: 1 1/2 cups (355 ml) chopped strawberries 2 tablespoons (30 ml) sugar 1/4 cup (59 ml) lime juice 5 ounces (149 ml) tequila 2 ounces (59 ml) triple sec 2 cups (473 ml) ice cubes Directions: 1.
Use and Care Manual
Page 14
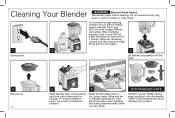
... more thorough cleaning, sprinkle 1/4 cup (59 ml) baking soda in water or other liquid. Rinse and dry thoroughly. Cleaning Your Blender w WARNING Electrical Shock Hazard. Disconnect power before cleaning. Add 1 cup (237 ml) white vinegar. Wash any remaining PULSE STSATROTP ...-SAFE DO NOT use a mild, nonabrasive cleanser. 6 Wash all removable parts in the dishwasher. Lift blender jar assembly off the base. 4 Remove lid. 14 PULSE STSATROTP 5 Wipe blender base, control panel, and cord with dish soap and water. Mixture will bubble. When bubbling subsides, ...
... more thorough cleaning, sprinkle 1/4 cup (59 ml) baking soda in water or other liquid. Rinse and dry thoroughly. Cleaning Your Blender w WARNING Electrical Shock Hazard. Disconnect power before cleaning. Add 1 cup (237 ml) white vinegar. Wash any remaining PULSE STSATROTP ...-SAFE DO NOT use a mild, nonabrasive cleanser. 6 Wash all removable parts in the dishwasher. Lift blender jar assembly off the base. 4 Remove lid. 14 PULSE STSATROTP 5 Wipe blender base, control panel, and cord with dish soap and water. Mixture will bubble. When bubbling subsides, ...
Use and Care Manual
Page 15
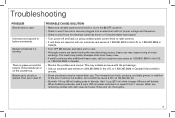
... customer care center at 1.800.851.8900 in addition to see if the unit is burning. or 1.800.267.2826 in Canada. • Turn OFF ( ) blender and allow unit to see if fuse for 1 minute. Wash any remaining residue with the jar bearings. • Call our customer care center at 1.800....851.8900 in blender. The smell may be natural after additional heavy uses, call our customer care center at 1.800.851.8900 in Canada if the condition persists. •...
... customer care center at 1.800.851.8900 in addition to see if the unit is burning. or 1.800.267.2826 in Canada. • Turn OFF ( ) blender and allow unit to see if fuse for 1 minute. Wash any remaining residue with the jar bearings. • Call our customer care center at 1.800....851.8900 in blender. The smell may be natural after additional heavy uses, call our customer care center at 1.800.851.8900 in Canada if the condition persists. •...


