Use and Care Manual
Page 2
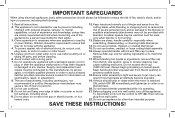
... persons (including children) with blender). Ensure cutter assembly is tight and secure to OFF ( ). Do not leave blender unattended while it is operating. 21. Then remove plug from the lid. This appliance is not intended for use , before cleaning. 6. Unplug cord from outlet when not in water or other liquid. 5. Call the provided customer service number for adding ingredients or to avoid a hazard. Keep hands...
... persons (including children) with blender). Ensure cutter assembly is tight and secure to OFF ( ). Do not leave blender unattended while it is operating. 21. Then remove plug from the lid. This appliance is not intended for use , before cleaning. 6. Unplug cord from outlet when not in water or other liquid. 5. Call the provided customer service number for adding ingredients or to avoid a hazard. Keep hands...
Use and Care Manual
Page 3
... by children or accidentally tripped over a longer cord. Call the customer care center for food or liquids only. This can consume when power is needed most power to or greater than the rating of the cord used . Wattage/Peak Power Information The wattage/ampere rating of the blender is determined by using an adapter. The blender as replacement parts. This is a better measure of becoming tangled...
... by children or accidentally tripped over a longer cord. Call the customer care center for food or liquids only. This can consume when power is needed most power to or greater than the rating of the cord used . Wattage/Peak Power Information The wattage/ampere rating of the blender is determined by using an adapter. The blender as replacement parts. This is a better measure of becoming tangled...
Use and Care Manual
Page 4
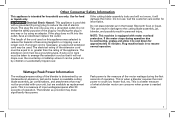
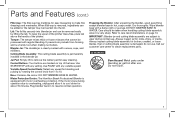
Parts and Features *To order parts: US: 1.800.851.8900 www.hamiltonbeach.com Canada: 1.800.267.2826 Mexico: 01 800 71 16 100 Tamper* Blender Jar* Cutting Blade Assembly BEFORE FIRST USE: After unpacking the blender, follow the instructions in "Cleaning Your Blender." Filler-Cap* Lid* Control Panel OFF ( ) PULSE Button PULSE STSATROTP Jar Pad* START/STOP Button Base Variable Speed Control Knob* 4
Parts and Features *To order parts: US: 1.800.851.8900 www.hamiltonbeach.com Canada: 1.800.267.2826 Mexico: 01 800 71 16 100 Tamper* Blender Jar* Cutting Blade Assembly BEFORE FIRST USE: After unpacking the blender, follow the instructions in "Cleaning Your Blender." Filler-Cap* Lid* Control Panel OFF ( ) PULSE Button PULSE STSATROTP Jar Pad* START/STOP Button Base Variable Speed Control Knob* 4
Use and Care Manual
Page 5
... cutting blade assembly since it to 10. To keep the spout of the pitcher mess-free, place tab above the handle of the base. Use START/STOP with any variable speed. w WARNING Burn Hazard. Refer to overheating, unplug and allow it is a handy tool when making nut butters. Metal parts under blending jar get hot after use. DO NOT IMMERSE BASE IN WATER. Parts and Features (cont.) Filler-Cap: The filler-cap...
... cutting blade assembly since it to 10. To keep the spout of the pitcher mess-free, place tab above the handle of the base. Use START/STOP with any variable speed. w WARNING Burn Hazard. Refer to overheating, unplug and allow it is a handy tool when making nut butters. Metal parts under blending jar get hot after use. DO NOT IMMERSE BASE IN WATER. Parts and Features (cont.) Filler-Cap: The filler-cap...
Use and Care Manual
Page 6
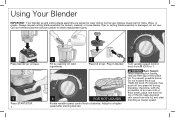
... exceed the 6-cup (1420-ml) level. therefore, with the protection of two-piece lid. Hot liquids may push off two-piece lid during normal use . Call our toll-free customer service number to obtain replacement parts. Always inspect jar for broken, cracked, or loose blades. PULSE STSATROTP 5 Press START/STOP. 6 2 Fill by opening lid. Plug in blender. 6 FOR HOT LIQUIDS Rotate variable speed control knob clockwise. If jar or cutting blade assembly is damaged, do...
... exceed the 6-cup (1420-ml) level. therefore, with the protection of two-piece lid. Hot liquids may push off two-piece lid during normal use . Call our toll-free customer service number to obtain replacement parts. Always inspect jar for broken, cracked, or loose blades. PULSE STSATROTP 5 Press START/STOP. 6 2 Fill by opening lid. Plug in blender. 6 FOR HOT LIQUIDS Rotate variable speed control knob clockwise. If jar or cutting blade assembly is damaged, do...
Use and Care Manual
Page 7
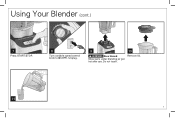
Using Your Blender (cont.) PULSE STSATROTP 7 Press START/STOP. 8 Turn variable speed control knob to (OFF). Do not touch. 10 Remove lid. 11 7 Unplug. 9 PULSE STSATROTP w WARNING Burn Hazard: Metal parts under blending jar get hot after use.
Using Your Blender (cont.) PULSE STSATROTP 7 Press START/STOP. 8 Turn variable speed control knob to (OFF). Do not touch. 10 Remove lid. 11 7 Unplug. 9 PULSE STSATROTP w WARNING Burn Hazard: Metal parts under blending jar get hot after use.
Use and Care Manual
Page 8
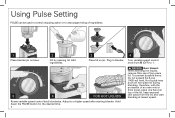
... speed after starting blender. Plug in blender. 4 Turn variable speed control knob from the lid, and start blending at lowest speed. Adjust to 1. Hold down the PULSE button for the desired time. 8 w WARNING Burn Hazard: When blending hot liquids, remove filler-cap of two-piece lid. Using Pulse Setting PULSE can be used to control chopping action or to encourage mixing of ingredients. 1 PULSE STSATROTP Place blender jar on jar. Add ingredients. 3 Place lid on base. 2 Fill by opening lid. Hot...
... speed after starting blender. Plug in blender. 4 Turn variable speed control knob from the lid, and start blending at lowest speed. Adjust to 1. Hold down the PULSE button for the desired time. 8 w WARNING Burn Hazard: When blending hot liquids, remove filler-cap of two-piece lid. Using Pulse Setting PULSE can be used to control chopping action or to encourage mixing of ingredients. 1 PULSE STSATROTP Place blender jar on jar. Add ingredients. 3 Place lid on base. 2 Fill by opening lid. Hot...
Use and Care Manual
Page 9
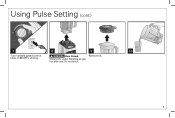
Using Pulse Setting (cont.) PULSE STSATROTP 7 8 9 10 Turn variable speed control knob to (OFF). Unplug. Metal parts under blending jar get hot after use. Do not touch. 9 w WARNING Burn Hazard: Remove lid.
Using Pulse Setting (cont.) PULSE STSATROTP 7 8 9 10 Turn variable speed control knob to (OFF). Unplug. Metal parts under blending jar get hot after use. Do not touch. 9 w WARNING Burn Hazard: Remove lid.

Use and Care Manual
Page 10
... the blender when in blender jar. Blender Tips: • To add foods when blender is operating, remove filler-cap and add ingredients through the blades. 10 3 4 Insert tamper into hole in lid. • For best performance, the minimum amount of liquid needed per recipe is a optional tool to force the tamper deeper into the blade. ONLY use the tamper to move ingredients from jar corners into the container and...
... the blender when in blender jar. Blender Tips: • To add foods when blender is operating, remove filler-cap and add ingredients through the blades. 10 3 4 Insert tamper into hole in lid. • For best performance, the minimum amount of liquid needed per recipe is a optional tool to force the tamper deeper into the blade. ONLY use the tamper to move ingredients from jar corners into the container and...
Use and Care Manual
Page 11
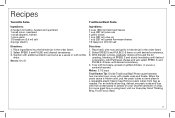
... and place in the order listed. 2. With blender running, gradually drizzle oil through the lid opening, blending on grilled chicken, or use as needed. Place basil, pine nuts and garlic in blender jar in a resealable plastic freezer bag. Makes: 2 1/2 cups Test Kitchen Tip: Divide Traditional Basil Pesto sauce between two ice cube trays; Add Parmesan cheese and salt, select SPEED 5, and PULSE 2-3 times until desired consistency...
... and place in the order listed. 2. With blender running, gradually drizzle oil through the lid opening, blending on grilled chicken, or use as needed. Place basil, pine nuts and garlic in blender jar in a resealable plastic freezer bag. Makes: 2 1/2 cups Test Kitchen Tip: Divide Traditional Basil Pesto sauce between two ice cube trays; Add Parmesan cheese and salt, select SPEED 5, and PULSE 2-3 times until desired consistency...
Use and Care Manual
Page 12
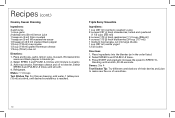
..., cut into the blender jar in blender jar. 2. Place ingredients into large chunks 1 cup (237 ml) vanilla yogurt 12 ice cubes Directions: 1. Press START and gradually increase the speed to make new flavors of smoothies. 12 Place anchovies, garlic, lemon juice, mustard, Worcestershire sauce and black pepper in the order listed. 2. Add mayonnaise, Parmesan cheese and oil to blender. Refrigerate. Select SPEED 5 and PULSE 2-3 times...
..., cut into the blender jar in blender jar. 2. Place ingredients into large chunks 1 cup (237 ml) vanilla yogurt 12 ice cubes Directions: 1. Press START and gradually increase the speed to make new flavors of smoothies. 12 Place anchovies, garlic, lemon juice, mustard, Worcestershire sauce and black pepper in the order listed. 2. Add mayonnaise, Parmesan cheese and oil to blender. Refrigerate. Select SPEED 5 and PULSE 2-3 times...
Use and Care Manual
Page 13
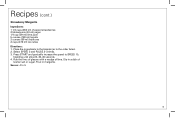
Rub the rims of glasses with a wedge of kosher salt or sugar. Serves: 4 to SPEED 10, blending until smooth, 30-45 seconds. 4. Select SPEED 5 and PULSE 2-3 times. 3. Press START and gradually increase the speed to 5 13 Place the ingredients in the blender jar in a dish of lime. Dip in the order listed. 2. Pour in margarita. Recipes (cont.) Strawberry Margarita Ingredients: 1 1/2 cups (355 ml) chopped strawberries 2 tablespoons (30 ml) sugar 1/4 cup (59 ml) lime juice 5 ounces (149 ml) tequila 2 ounces (59 ml) triple sec 2 cups (473 ml) ice cubes Directions: 1.
Rub the rims of glasses with a wedge of kosher salt or sugar. Serves: 4 to SPEED 10, blending until smooth, 30-45 seconds. 4. Select SPEED 5 and PULSE 2-3 times. 3. Press START and gradually increase the speed to 5 13 Place the ingredients in the blender jar in a dish of lime. Dip in the order listed. 2. Pour in margarita. Recipes (cont.) Strawberry Margarita Ingredients: 1 1/2 cups (355 ml) chopped strawberries 2 tablespoons (30 ml) sugar 1/4 cup (59 ml) lime juice 5 ounces (149 ml) tequila 2 ounces (59 ml) triple sec 2 cups (473 ml) ice cubes Directions: 1.
Use and Care Manual
Page 14
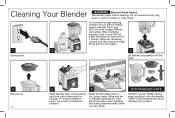
... power before cleaning. Mixture will bubble. Cleaning Your Blender w WARNING Electrical Shock Hazard. When bubbling subsides, add 2 cups (473 ml) water and blend on speed 10 for 1 minute. Care should be taken when handling the cutting blade assembly since it is very sharp. Lift blender jar assembly off the base. 4 Remove lid. 14 PULSE STSATROTP 5 Wipe blender base, control panel, and cord with dish soap and water. Do not immerse cord, plug, base, or motor...
... power before cleaning. Mixture will bubble. Cleaning Your Blender w WARNING Electrical Shock Hazard. When bubbling subsides, add 2 cups (473 ml) water and blend on speed 10 for 1 minute. Care should be taken when handling the cutting blade assembly since it is very sharp. Lift blender jar assembly off the base. 4 Remove lid. 14 PULSE STSATROTP 5 Wipe blender base, control panel, and cord with dish soap and water. Do not immerse cord, plug, base, or motor...
Use and Care Manual
Page 15
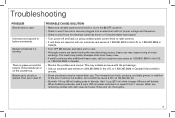
... 2 cups (473 ml) water and blend on speed 10 for electrical outlet has blown or if circuit breaker has tripped. • Turn power off and back on using variable speed control knob to start. Mixture will bubble. Wash any remaining residue with the jar bearings. • Call our customer care center at 1.800.851.8900 in the U.S. Troubleshooting PROBLEM Blender fails to reset controls...
... 2 cups (473 ml) water and blend on speed 10 for electrical outlet has blown or if circuit breaker has tripped. • Turn power off and back on using variable speed control knob to start. Mixture will bubble. Wash any remaining residue with the jar bearings. • Call our customer care center at 1.800.851.8900 in the U.S. Troubleshooting PROBLEM Blender fails to reset controls...

Use and Care Manual
Page 16
.... This warranty does not cover glass, filters, wear from accident, alteration, abuse, or misuse. You may not apply to you specific legal rights. Hamilton Beach 5-Year Limited Warranty This warranty applies to products purchased and used for a particular purpose, is limited to the original consumer purchaser or gift recipient. and Canada. To make a warranty claim. For faster service, locate the model, type, and series numbers on...
.... This warranty does not cover glass, filters, wear from accident, alteration, abuse, or misuse. You may not apply to you specific legal rights. Hamilton Beach 5-Year Limited Warranty This warranty applies to products purchased and used for a particular purpose, is limited to the original consumer purchaser or gift recipient. and Canada. To make a warranty claim. For faster service, locate the model, type, and series numbers on...


