
Use & Care
Page 1
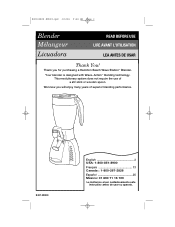
... spoon. 840143800 ENv02.qxd 1/6/06 9:24 AM Page 1 Blender Mélangeur Licuadora READ BEFORE USE LIRE AVANT L'UTILISATION LEA ANTES DE USAR Thank You! We know you for purchasing a Hamilton Beach Wave Station™ Blender. Your blender is designed with Wave~Action™ blending technology. This revolutionary system does not require the use of superior blending performance. 840143800 English 2 USA: 1-800-851-8900 Fran...
... spoon. 840143800 ENv02.qxd 1/6/06 9:24 AM Page 1 Blender Mélangeur Licuadora READ BEFORE USE LIRE AVANT L'UTILISATION LEA ANTES DE USAR Thank You! We know you for purchasing a Hamilton Beach Wave Station™ Blender. Your blender is designed with Wave~Action™ blending technology. This revolutionary system does not require the use of superior blending performance. 840143800 English 2 USA: 1-800-851-8900 Fran...

Use & Care
Page 2
... operating. 20. Call our toll-free customer service number for other than intended purpose. The use appliance for information on cutting assembly firmly. may be used but must be followed, including the following: 1. Do not use a broken, chipped, or cracked blender jar. 13. A rubber spatula may cause a risk of injury, never place cutting unit blades on or taking off parts, and before cleaning. 5. Blades are sharp; especially when assembling, disassembling or cleaning...
... operating. 20. Call our toll-free customer service number for other than intended purpose. The use appliance for information on cutting assembly firmly. may be used but must be followed, including the following: 1. Do not use a broken, chipped, or cracked blender jar. 13. A rubber spatula may cause a risk of injury, never place cutting unit blades on or taking off parts, and before cleaning. 5. Blades are sharp; especially when assembling, disassembling or cleaning...

Use & Care
Page 3
... after 30 seconds of operation. Do not use only. If the cutting blades lock and do not move, it can result in the diagram below. 3 Do not place blender jar in personal injury. Call the toll-free customer service number for household use . 840143800 ENv03.qxd 1/6/06 9:05 AM Page 3 Other Consumer Safety Information This appliance is the measure of the motor wattage during the...
... after 30 seconds of operation. Do not use only. If the cutting blades lock and do not move, it can result in the diagram below. 3 Do not place blender jar in personal injury. Call the toll-free customer service number for household use . 840143800 ENv03.qxd 1/6/06 9:05 AM Page 3 Other Consumer Safety Information This appliance is the measure of the motor wattage during the...
Use & Care
Page 4
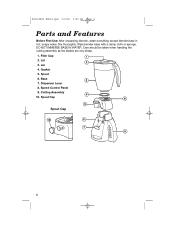
Gasket 5. Spout Cap Spout Cap 4 Dry thoroughly. Filler Cap 2. Cutting Assembly 10. DO NOT IMMERSE BASE IN WATER. Lid 3. 840143800 ENv03.qxd 1/6/06 9:05 AM Page 4 Parts and Features Before First Use: After unpacking blender, wash everything except blender base in hot, soapy water. Spout 6. Base 7. Wipe blender base with a damp cloth or sponge. Jar 4. Care should be taken when handling the cutting assembly as the blades are very sharp. 1. Speed Control Panel 9. Dispenser Lever 8.
Gasket 5. Spout Cap Spout Cap 4 Dry thoroughly. Filler Cap 2. Cutting Assembly 10. DO NOT IMMERSE BASE IN WATER. Lid 3. 840143800 ENv03.qxd 1/6/06 9:05 AM Page 4 Parts and Features Before First Use: After unpacking blender, wash everything except blender base in hot, soapy water. Spout 6. Base 7. Wipe blender base with a damp cloth or sponge. Jar 4. Care should be taken when handling the cutting assembly as the blades are very sharp. 1. Speed Control Panel 9. Dispenser Lever 8.
Use & Care
Page 5
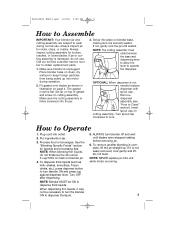
... 9:05 AM Page 5 How to Assemble IMPORTANT: Your blender jar and cutting assembly are subject to wear during operation. 2. Turn spout cap clockwise to keep foreign particles from being pulled up . Always inspect cutting assembly for nicks, chips, or cracks. Fit gasket over blades as milk- Process food or beverages. Place blender base on page 4. NOTE: The cutting assembly must lie flat. See the "Blending Specific Foods" section for speeds and processing tips.
... 9:05 AM Page 5 How to Assemble IMPORTANT: Your blender jar and cutting assembly are subject to wear during operation. 2. Turn spout cap clockwise to keep foreign particles from being pulled up . Always inspect cutting assembly for nicks, chips, or cracks. Fit gasket over blades as milk- Process food or beverages. Place blender base on page 4. NOTE: The cutting assembly must lie flat. See the "Blending Specific Foods" section for speeds and processing tips.
Use & Care
Page 6
The remaining speed buttons will operate. This is one cup (8 ounces/250 ml). Always remove the filler cap of liquid needed per recipe is a normal, FDA-approved, foodgrade lubricant used to ensure the long-life of your cutting assembly. • Processing hot foods or liquids in the blender may notice a black film inside the top of the blender base. Keep hands and other exposed skin away from the cover opening . •...
The remaining speed buttons will operate. This is one cup (8 ounces/250 ml). Always remove the filler cap of liquid needed per recipe is a normal, FDA-approved, foodgrade lubricant used to ensure the long-life of your cutting assembly. • Processing hot foods or liquids in the blender may notice a black film inside the top of the blender base. Keep hands and other exposed skin away from the cover opening . •...
Use & Care
Page 7
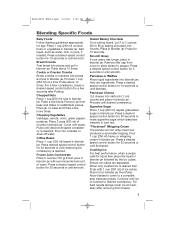
... pieces and put in blender jar. Pulse about 10 times. For a finer consistency, press a desired speed control button for 30 seconds to escape. Chopped Nuts Place 1 cup (250 ml) nuts in blender jar. Place 2 cups (500 ml) of ice cubes. Pulse until smooth. Pour into chunks. Press a desired speed control button for 10 seconds or until desired chopped consistency is reached. Place in blender jar. Remove filler cap from freezer. 7 Press a desired speed control button...
... pieces and put in blender jar. Pulse about 10 times. For a finer consistency, press a desired speed control button for 30 seconds to escape. Chopped Nuts Place 1 cup (250 ml) nuts in blender jar. Place 2 cups (500 ml) of ice cubes. Pulse until smooth. Pour into chunks. Press a desired speed control button for 10 seconds or until desired chopped consistency is reached. Place in blender jar. Remove filler cap from freezer. 7 Press a desired speed control button...
Use & Care
Page 8
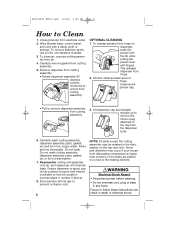
... sponge. This releases dispenser from electrical outlet. 2. Unscrew dispenser cap. • Pull to remove dispenser assembly from hinge on dispenser, push dispenser with thumb while pulling dispenser lever with lid ajar to Clean 1. Carefully wash cutting assembly, dispenser assembly parts, gasket, jar, and lid in any liquid. Do not soak. Reassemble cutting unit assembly onto jar, and replace jar onto blender base. WARNING Electrical Shock Hazard • Disconnect power before cleaning. • Do not immerse cord, plug or base in hot, soapy...
... sponge. This releases dispenser from electrical outlet. 2. Unscrew dispenser cap. • Pull to remove dispenser assembly from hinge on dispenser, push dispenser with thumb while pulling dispenser lever with lid ajar to Clean 1. Carefully wash cutting assembly, dispenser assembly parts, gasket, jar, and lid in any liquid. Do not soak. Reassemble cutting unit assembly onto jar, and replace jar onto blender base. WARNING Electrical Shock Hazard • Disconnect power before cleaning. • Do not immerse cord, plug or base in hot, soapy...
Use & Care
Page 9
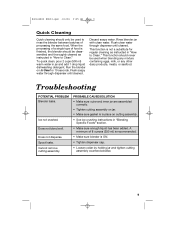
... cleaned. Troubleshooting POTENTIAL PROBLEM Blender leaks. Discard soapy water. Run the blender on cutting assembly. • See ice crushing instructions in jar and add 1 drop liquid dishwashing detergent. Ice not crushed. Does not dispense. A minimum of 8 ounces (250 ml) is recommended. • Make sure blender is finished, the blender should never be disassembled and thoroughly cleaned as instructed in "How to rinse the blender between batches of food is ON. • Tighten dispenser cap...
... cleaned. Troubleshooting POTENTIAL PROBLEM Blender leaks. Discard soapy water. Run the blender on cutting assembly. • See ice crushing instructions in jar and add 1 drop liquid dishwashing detergent. Ice not crushed. Does not dispense. A minimum of 8 ounces (250 ml) is recommended. • Make sure blender is finished, the blender should never be disassembled and thoroughly cleaned as instructed in "How to rinse the blender between batches of food is ON. • Tighten dispenser cap...

Use & Care
Page 10
...Recipes Milkshake Small Batch (16 oz/500 ml) Large Batch (40 oz/1.25 L) 8 ounces milk (250 ml) 16 ounces ice cream (500 ml) 16 ounces milk (500 ml) 24 ounces ice cream (750 ml) Select desired ice cream flavor. Blend until smooth. Blend for 45 seconds or until ice is crushed. cover. Blend.... Blend until ice is crushed. Blend for 45 seconds or until smooth. Place all ingredients in blender jar; Margaritas 1⁄2 cup (125 ml) tequila 1⁄2 cup (125 ml) Triple Sec 2 cups (500 ml) ice Juice of 16 limes 1⁄2 cup (125 ml) sugar Place all ingredients in blender....
...Recipes Milkshake Small Batch (16 oz/500 ml) Large Batch (40 oz/1.25 L) 8 ounces milk (250 ml) 16 ounces ice cream (500 ml) 16 ounces milk (500 ml) 24 ounces ice cream (750 ml) Select desired ice cream flavor. Blend until smooth. Blend for 45 seconds or until ice is crushed. cover. Blend.... Blend until ice is crushed. Blend for 45 seconds or until smooth. Place all ingredients in blender jar; Margaritas 1⁄2 cup (125 ml) tequila 1⁄2 cup (125 ml) Triple Sec 2 cups (500 ml) ice Juice of 16 limes 1⁄2 cup (125 ml) sugar Place all ingredients in blender....
Use & Care
Page 11
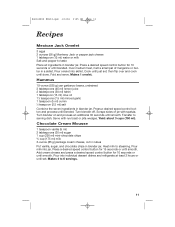
... small pat of jar with rye toast or pita wedges. Cook until blended. Fold and serve. Turn blender off. Yield: about 3 cups (750 ml). Press a desired speed control button for 10 seconds or until just set . Press a desired speed control button for 15 seconds or until set ; Hummus 19-...cup (175 ml) milk 3-ounce (85 g) package cream cheese, cut in cubes Put vanilla, sugar, and chocolate chips in blender jar. Add cream cheese and press a desired speed control button for 10 seconds or until blended. Makes 4 to 6 servings. 11 840143800 ENv03.qxd 1/6/06 9:05 AM Page 11 Recipes...
... small pat of jar with rye toast or pita wedges. Cook until blended. Fold and serve. Turn blender off. Yield: about 3 cups (750 ml). Press a desired speed control button for 10 seconds or until just set . Press a desired speed control button for 15 seconds or until set ; Hummus 19-...cup (175 ml) milk 3-ounce (85 g) package cream cheese, cut in cubes Put vanilla, sugar, and chocolate chips in blender jar. Add cream cheese and press a desired speed control button for 10 seconds or until blended. Makes 4 to 6 servings. 11 840143800 ENv03.qxd 1/6/06 9:05 AM Page 11 Recipes...
Use & Care
Page 12
... 12 Customer Service If you . LIMITED WARRANTY This product is no cost. There is warranted to be supplied with this product, including without limitation: glass parts, glass containers, cutter/strainers, blades, seals, gaskets, clutches, motor brushes, and/or agitators, etc. Some states or provinces do not allow limitations on the bottom of original purchase, except as noted below . Please call our toll-free customer service number. This warranty...
... 12 Customer Service If you . LIMITED WARRANTY This product is no cost. There is warranted to be supplied with this product, including without limitation: glass parts, glass containers, cutter/strainers, blades, seals, gaskets, clutches, motor brushes, and/or agitators, etc. Some states or provinces do not allow limitations on the bottom of original purchase, except as noted below . Please call our toll-free customer service number. This warranty...


