

Use & Care
Page 2
...cleaning. 5. When blending hot liquids, remove center-piece of lid. Check that the control is used by the appliance manufacturer may push lid off parts, and before plugging cord into wall outlet. Unplug cord from outlet when not in use a broken, chipped, or cracked blender jar. 13. Avoid...14. Do not use outdoors. 9. handle carefully - Keep hands and utensils out of blender jar while blending to blender. Always operate blender with moving parts. 6. Blades are sharp; To prevent possible burns: Do not fill blender jar beyond the 3-cup (750-ml) level. Do not let cord hang...
...cleaning. 5. When blending hot liquids, remove center-piece of lid. Check that the control is used by the appliance manufacturer may push lid off parts, and before plugging cord into wall outlet. Unplug cord from outlet when not in use a broken, chipped, or cracked blender jar. 13. Avoid...14. Do not use outdoors. 9. handle carefully - Keep hands and utensils out of blender jar while blending to blender. Always operate blender with moving parts. 6. Blades are sharp; To prevent possible burns: Do not fill blender jar beyond the 3-cup (750-ml) level. Do not let cord hang...

Use & Care
Page 3
... fit fully into a polarized outlet. Peak power is when a blender requires the most . Care must be provided with your unit, but are available as replacement parts. Wipe blender base with food or liquid. 840208401 ENv01.qxd:Layout 1 12/21/11 4:25 PM Page 3 OTHER CONSUMER SAFETY INFORMATION This appliance is based...
... fit fully into a polarized outlet. Peak power is when a blender requires the most . Care must be provided with your unit, but are available as replacement parts. Wipe blender base with food or liquid. 840208401 ENv01.qxd:Layout 1 12/21/11 4:25 PM Page 3 OTHER CONSUMER SAFETY INFORMATION This appliance is based...

Use & Care
Page 4
840208401 ENv01.qxd:Layout 1 12/21/11 4:25 PM Page 4 Parts and Features Filler-Cap Lid Dispenser Assembly Cord Stuff and Spout Cap Storage (located at bottom of blender) 4 Spout Cap Base Jar With Cutting Assembly Control Panel
840208401 ENv01.qxd:Layout 1 12/21/11 4:25 PM Page 4 Parts and Features Filler-Cap Lid Dispenser Assembly Cord Stuff and Spout Cap Storage (located at bottom of blender) 4 Spout Cap Base Jar With Cutting Assembly Control Panel

Use & Care
Page 5
Keep exposed skin away from lid. IMPORTANT: Your blender jar and cutting blade assembly are subject to obtain replacement parts. 1 2 3 4 BLENDING HOT LIQUIDS WARNING! Burn Hazard: When blending hot liquids, do not use . With the protection of an oven mitt or thick towel, place one ...
Keep exposed skin away from lid. IMPORTANT: Your blender jar and cutting blade assembly are subject to obtain replacement parts. 1 2 3 4 BLENDING HOT LIQUIDS WARNING! Burn Hazard: When blending hot liquids, do not use . With the protection of an oven mitt or thick towel, place one ...

Use & Care
Page 9
...) warm water in water or other dairy products, meats, or seafood. This function should be washed with clean water. DO NOT use a mild, nonabrasive cleanser. Parts may also be taken when handling the cutting blade assembly as instructed in "Cleaning Your Blender." 9 To remove stubborn spots, use the "SANI" setting when...
...) warm water in water or other dairy products, meats, or seafood. This function should be washed with clean water. DO NOT use a mild, nonabrasive cleanser. Parts may also be taken when handling the cutting blade assembly as instructed in "Cleaning Your Blender." 9 To remove stubborn spots, use the "SANI" setting when...
Use & Care
Page 10
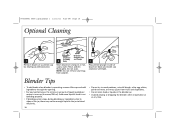
.... Blender Tips • To add foods when blender is one cup (8 ounces/250 ml). Dispenser Dispenser Assembly Cap Assembly and Plunger 2 Body Wash dispenser and parts in operation or at any time.
.... Blender Tips • To add foods when blender is one cup (8 ounces/250 ml). Dispenser Dispenser Assembly Cap Assembly and Plunger 2 Body Wash dispenser and parts in operation or at any time.


