

Use & Care
Page 2
... speed. 16. Do not use , before putting on or taking off jar during blending. Call our toll-free customer service number for other liquid. 3. Keep hands and utensils out of blender jar while blending to OFF. A rubber spatula may push lid off parts, and before plugging cord into wall outlet. Do not use broken, cracked, or loose cutting blade assembly. 14. Always operate blender with moving parts. 6. When blending hot liquids, remove center-piece of lid. To disconnect cord, turn...
... speed. 16. Do not use , before putting on or taking off jar during blending. Call our toll-free customer service number for other liquid. 3. Keep hands and utensils out of blender jar while blending to OFF. A rubber spatula may push lid off parts, and before plugging cord into wall outlet. Do not use broken, cracked, or loose cutting blade assembly. 14. Always operate blender with moving parts. 6. When blending hot liquids, remove center-piece of lid. To disconnect cord, turn...

Use & Care
Page 3
.... Wipe blender base with food or liquid. DO NOT IMMERSE BASE IN WATER. The contents may freeze and may result in damage to the cutting blades, jar, blender, and possibly result in hot, soapy water. This is needed most power to or greater than the rating of the appliance. Care must be equal to crush ice, frozen fruit, etc. Do not place blender jar in any...
.... Wipe blender base with food or liquid. DO NOT IMMERSE BASE IN WATER. The contents may freeze and may result in damage to the cutting blades, jar, blender, and possibly result in hot, soapy water. This is needed most power to or greater than the rating of the appliance. Care must be equal to crush ice, frozen fruit, etc. Do not place blender jar in any...

Use & Care
Page 4
840208401 ENv01.qxd:Layout 1 12/21/11 4:25 PM Page 4 Parts and Features Filler-Cap Lid Dispenser Assembly Cord Stuff and Spout Cap Storage (located at bottom of blender) 4 Spout Cap Base Jar With Cutting Assembly Control Panel
840208401 ENv01.qxd:Layout 1 12/21/11 4:25 PM Page 4 Parts and Features Filler-Cap Lid Dispenser Assembly Cord Stuff and Spout Cap Storage (located at bottom of blender) 4 Spout Cap Base Jar With Cutting Assembly Control Panel

Use & Care
Page 5
...: When blending hot liquids, do not use . Always inspect jar for broken, cracked, or loose blades. Always inspect cutting blade assembly for nicks, chips, or cracks. IMPORTANT: Your blender jar and cutting blade assembly are subject to obtain replacement parts. 1 2 3 4 BLENDING HOT LIQUIDS WARNING! Call our toll-free customer service number to wear during normal use . With the protection of an oven mitt or thick towel, place one hand on top of lid.
...: When blending hot liquids, do not use . Always inspect jar for broken, cracked, or loose blades. Always inspect cutting blade assembly for nicks, chips, or cracks. IMPORTANT: Your blender jar and cutting blade assembly are subject to obtain replacement parts. 1 2 3 4 BLENDING HOT LIQUIDS WARNING! Call our toll-free customer service number to wear during normal use . With the protection of an oven mitt or thick towel, place one hand on top of lid.
Use & Care
Page 6
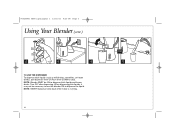
Turn OFF after dispensing. Push lever DOWN to dispense the liquid. When dispensing thin liquids, it may not be ON to dispense thick liquids and frozen drinks. NOTE: Blender MUST be necessary to turn the blender ON to stop. 840208401 ENv01.qxd:Layout 1 12/21/11 4:25 PM Page 6 Using Your Blender (cont.) 8 9 10 TO USE THE DISPENSER: To dispense thick liquids (such as milkshakes, smoothies, or frozen drinks), pull dispenser lever UP. NOTE: NEVER replace jar onto base while motor is running. 6 OR 11
Turn OFF after dispensing. Push lever DOWN to dispense the liquid. When dispensing thin liquids, it may not be ON to dispense thick liquids and frozen drinks. NOTE: Blender MUST be necessary to turn the blender ON to stop. 840208401 ENv01.qxd:Layout 1 12/21/11 4:25 PM Page 6 Using Your Blender (cont.) 8 9 10 TO USE THE DISPENSER: To dispense thick liquids (such as milkshakes, smoothies, or frozen drinks), pull dispenser lever UP. NOTE: NEVER replace jar onto base while motor is running. 6 OR 11

Use & Care
Page 7
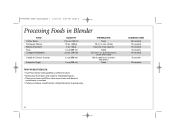
TIPS FOR BEST RESULTS: • Always place liquid in blender jar first, then remaining ingredients. • If ice or frozen fruit pieces are not blending, stop dispensing when volume gets lower than dispenser assembly. 7 Mixture will stop blender and PULSE a few times. • When using the dispenser assembly for 45 seconds or until blended. 2 (makes 2 cups [500 ml]) ICE BREAKER™ setting for 45 seconds or PULSE 5 times and blend on HIGH for...
TIPS FOR BEST RESULTS: • Always place liquid in blender jar first, then remaining ingredients. • If ice or frozen fruit pieces are not blending, stop dispensing when volume gets lower than dispenser assembly. 7 Mixture will stop blender and PULSE a few times. • When using the dispenser assembly for 45 seconds or until blended. 2 (makes 2 cups [500 ml]) ICE BREAKER™ setting for 45 seconds or PULSE 5 times and blend on HIGH for...
Use & Care
Page 8
... g) 2 oz. (50 g) 1 cup (250 ml) 2 cups (500 ml) 1 cup (250 ml) 1 cup (250 ml) PREPARATION None 1/2-in. (1-cm) chunks Coarsely chop squares None Cut into 1-in. (2.5-cm) pieces, cover with water Break cookies or crackers into pieces None TIPS FOR BEST RESULTS: • Use Pulse button with guidelines outlined in chart. • Remove jar from base and shake to redistribute pieces. • Place jar on base and Pulse a few more...
... g) 2 oz. (50 g) 1 cup (250 ml) 2 cups (500 ml) 1 cup (250 ml) 1 cup (250 ml) PREPARATION None 1/2-in. (1-cm) chunks Coarsely chop squares None Cut into 1-in. (2.5-cm) pieces, cover with water Break cookies or crackers into pieces None TIPS FOR BEST RESULTS: • Use Pulse button with guidelines outlined in chart. • Remove jar from base and shake to redistribute pieces. • Place jar on base and Pulse a few more...

Use & Care
Page 9
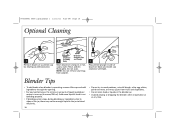
... handling the cutting blade assembly as instructed in "Cleaning Your Blender." 9 To remove stubborn spots, use the "SANI" setting when washing in "Cleaning Your Blender." Rinse with hot, soapy water. 840208401 ENv01.qxd:Layout 1 12/21/11 4:25 PM Page 9 Cleaning Your Blender w WARNING Electrical Shock Hazard. Discard soapy water. Do not immerse cord, plug, base, or motor in jar and add 1 drop liquid dishwashing detergent. Parts may also...
... handling the cutting blade assembly as instructed in "Cleaning Your Blender." 9 To remove stubborn spots, use the "SANI" setting when washing in "Cleaning Your Blender." Rinse with hot, soapy water. 840208401 ENv01.qxd:Layout 1 12/21/11 4:25 PM Page 9 Cleaning Your Blender w WARNING Electrical Shock Hazard. Discard soapy water. Do not immerse cord, plug, base, or motor in jar and add 1 drop liquid dishwashing detergent. Parts may also...
Use & Care
Page 10
... food is one cup (8 ounces/250 ml). Rinse and dry thoroughly. Blender Tips • To add foods when blender is operating, remove filler-cap and add ingredients through the opening. • For best performance, the minimum amount of liquid needed per recipe is not blending properly. • If blending action stops during blending or ingredients stick to sides of the jar, there may not be enough liquid in the jar to blend...
... food is one cup (8 ounces/250 ml). Rinse and dry thoroughly. Blender Tips • To add foods when blender is operating, remove filler-cap and add ingredients through the opening. • For best performance, the minimum amount of liquid needed per recipe is not blending properly. • If blending action stops during blending or ingredients stick to sides of the jar, there may not be enough liquid in the jar to blend...

Use & Care
Page 12
...Canada. For faster service, locate the model, type, and series numbers on the rating label (e.g., 120V ~ 60 Hz). If the product or component is used in material and workmanship for a period of three (3) years from the date of express or implied warranty. This warranty is void if the product is no longer available, we will replace... have other legal rights that vary depending on where you specific legal rights. This warranty does not cover glass, filters, wear from normal use, use or subjected to any component found to be free from defects in the U.S. Some states or provinces do ...
...Canada. For faster service, locate the model, type, and series numbers on the rating label (e.g., 120V ~ 60 Hz). If the product or component is used in material and workmanship for a period of three (3) years from the date of express or implied warranty. This warranty is void if the product is no longer available, we will replace... have other legal rights that vary depending on where you specific legal rights. This warranty does not cover glass, filters, wear from normal use, use or subjected to any component found to be free from defects in the U.S. Some states or provinces do ...


