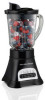

Use and Care Manual
Page 2
... operate blender with mess-free spout, and close any manner. To prevent possible burns: Do not fill blender jar beyond the 3-cup (710ml) level. Read all instructions. 2. Do not use broken, cracked, or loose cutting blade assembly. 17. When blending hot liquids, remove filler-cap of two-piece lid or open vent opening of lid with lid in any lid openings along the edge intended for pouring. Ensure collar on the blender jar that they are sharp; Supply cord replacement...
... operate blender with mess-free spout, and close any manner. To prevent possible burns: Do not fill blender jar beyond the 3-cup (710ml) level. Read all instructions. 2. Do not use broken, cracked, or loose cutting blade assembly. 17. When blending hot liquids, remove filler-cap of two-piece lid or open vent opening of lid with lid in any lid openings along the edge intended for pouring. Ensure collar on the blender jar that they are sharp; Supply cord replacement...
Use and Care Manual
Page 3
... lid is securely locked in collar or on blender base. 23. Do not use the food pusher. 34. The chopping/mixing blade and slicing/shredding disc are sharp. Never feed food into the blender as a timer, or connected to a circuit that the appliance is switched on and off by hand. If the jar should twist or rotate when the motor is OFF ( ) before operating food processor or chopper...
... lid is securely locked in collar or on blender base. 23. Do not use the food pusher. 34. The chopping/mixing blade and slicing/shredding disc are sharp. Never feed food into the blender as a timer, or connected to a circuit that the appliance is switched on and off by hand. If the jar should twist or rotate when the motor is OFF ( ) before operating food processor or chopper...

Use and Care Manual
Page 4
... cord. Call the toll-free customer service number for food or liquids only. Peak power is a better measure of operation. This is the measure of the motor wattage during the first seconds of what a blender motor ...replacement parts. Care must be taken to crush ice, frozen fruit, etc. This is necessary, an approved extension cord may not be used on available cutting blade assembly, jar combinations, and attachments that it still does not fit, have an electrician replace the outlet. This is needed most power to arrange the extension cord so that may be provided with food...
... cord. Call the toll-free customer service number for food or liquids only. Peak power is a better measure of operation. This is the measure of the motor wattage during the first seconds of what a blender motor ...replacement parts. Care must be taken to crush ice, frozen fruit, etc. This is necessary, an approved extension cord may not be used on available cutting blade assembly, jar combinations, and attachments that it still does not fit, have an electrician replace the outlet. This is needed most power to arrange the extension cord so that may be provided with food...
Use and Care Manual
Page 5
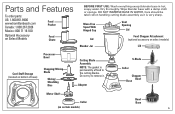
... 71 16 100 Optional Accessory on certain models) Bowl Base 5 DO NOT IMMERSE BASE IN WATER. Wipe blender base with a damp cloth or sponge. Do not try to the cutting blades. Dry thoroughly. Mess-Free Spout With Hinged Cap Lid Blender Jar Vent Opening Lid Food Chopper Attachment (optional accessory on select models) Lid Processor Bowl Cord Stuff Storage (located on bottom of base) Chopping/Mixing Blade Slicing/ Shredding Disc Cutting Blade Assembly NOTE: The gasket is permanently affixed to remove it is very sharp...
... 71 16 100 Optional Accessory on certain models) Bowl Base 5 DO NOT IMMERSE BASE IN WATER. Wipe blender base with a damp cloth or sponge. Do not try to the cutting blades. Dry thoroughly. Mess-Free Spout With Hinged Cap Lid Blender Jar Vent Opening Lid Food Chopper Attachment (optional accessory on select models) Lid Processor Bowl Cord Stuff Storage (located on bottom of base) Chopping/Mixing Blade Slicing/ Shredding Disc Cutting Blade Assembly NOTE: The gasket is permanently affixed to remove it is very sharp...
Use and Care Manual
Page 6
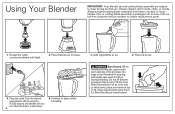
... thick towel, place one hand on base. 5. Place blender jar on top of lid and close the edge cover intended for broken, cracked, or loose blades. When blending hot liquids, open center vent opening of lid. w WARNING Burn Hazard. Using Your Blender IMPORTANT: Your blender jar and cutting blade assembly are subject to obtain replacement parts. 1. Push the desired speed button. When using the PULSE buttons, the blender will only run when the button is damaged, do not...
... thick towel, place one hand on base. 5. Place blender jar on top of lid and close the edge cover intended for broken, cracked, or loose blades. When blending hot liquids, open center vent opening of lid. w WARNING Burn Hazard. Using Your Blender IMPORTANT: Your blender jar and cutting blade assembly are subject to obtain replacement parts. 1. Push the desired speed button. When using the PULSE buttons, the blender will only run when the button is damaged, do not...
Use and Care Manual
Page 7
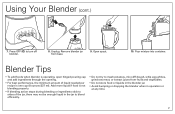
... container. Blender Tips • To add foods when blender is operating, open hinged pouring cap and add ingredients through the opening. • For best performance, the minimum amount of liquid needed per recipe is not blending properly. • If blending action stops during blending or ingredients stick to sides of the jar, there may not be enough liquid in the jar to blend efficiently. • Do not try to turn off blender. 8. Open spout...
... container. Blender Tips • To add foods when blender is operating, open hinged pouring cap and add ingredients through the opening. • For best performance, the minimum amount of liquid needed per recipe is not blending properly. • If blending action stops during blending or ingredients stick to sides of the jar, there may not be enough liquid in the jar to blend efficiently. • Do not try to turn off blender. 8. Open spout...
Use and Care Manual
Page 8
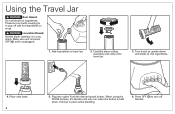
w WARNING Laceration Hazard. Hold jar in place while blending. 6. Handle blade carefully; Carefully place cutting assembly and collar onto travel jar. 2. Plug into outlet. Push the desired speed button. When using the PULSE buttons, the blender will only run when the button is held down and shake to pop off blender. Do not blend hot ingredients. Pressure may build, causing jar to mix ingredients. 4. Turn travel jar upside down . Make sure unit...
w WARNING Laceration Hazard. Hold jar in place while blending. 6. Handle blade carefully; Carefully place cutting assembly and collar onto travel jar. 2. Plug into outlet. Push the desired speed button. When using the PULSE buttons, the blender will only run when the button is held down and shake to pop off blender. Do not blend hot ingredients. Pressure may build, causing jar to mix ingredients. 4. Turn travel jar upside down . Make sure unit...
Use and Care Manual
Page 9
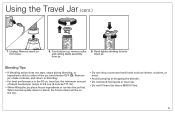
...; Hand-tighten drinking lid onto travel jar, the minimum amount of the jar, turn blender OFF ( ). travel jar. Remove travel jar above MAX fill line. 9 Blending Tips • If blending action does not start, stops during blending, or ingredients stick to blending. • For best performance in travel jar. • Do not fill travel jar from jar. 9. remove collar and cutting blade assembly from base. 8. Remove jar, shake contents, and return to sides of liquid needed per recipe is 3/4 cup (6 ounces...
...; Hand-tighten drinking lid onto travel jar, the minimum amount of the jar, turn blender OFF ( ). travel jar. Remove travel jar above MAX fill line. 9 Blending Tips • If blending action does not start, stops during blending, or ingredients stick to blending. • For best performance in travel jar. • Do not fill travel jar from jar. 9. remove collar and cutting blade assembly from base. 8. Remove jar, shake contents, and return to sides of liquid needed per recipe is 3/4 cup (6 ounces...
Use and Care Manual
Page 10
...;a Colada mix 10 ice cubes NUMBER OF SERVINGS 3 to 4 (makes 4 cups [946 ml]) BLENDER SETTING/TIME SMOOTHIE setting for 45 seconds or until blended. 2 to 3 (makes 3 cups [710 ml]) MILKSHAKE setting for 5 to 10 seconds or LOW until blended. TIPS FOR BEST RESULTS: • Always place liquid in blender jar first, then remaining ingredients. • If frozen fruit or ice are not blending, stop blender and pulse a few times...
...;a Colada mix 10 ice cubes NUMBER OF SERVINGS 3 to 4 (makes 4 cups [946 ml]) BLENDER SETTING/TIME SMOOTHIE setting for 45 seconds or until blended. 2 to 3 (makes 3 cups [710 ml]) MILKSHAKE setting for 5 to 10 seconds or LOW until blended. TIPS FOR BEST RESULTS: • Always place liquid in blender jar first, then remaining ingredients. • If frozen fruit or ice are not blending, stop blender and pulse a few times...
Use and Care Manual
Page 11
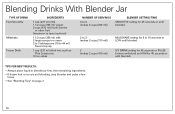
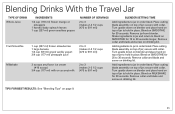
... of jar; Turn upside down on blender and place hand on drinking lid. Remove collar and blade and screw on top of jar; Add ingredients to jar in order listed. secure with collar. secure with collar. secure with collar. Place cutting blade assembly on drinking lid. Remove collar and blade and screw on top of jar to hold in place. Blending Drinks With the Travel Jar TYPE OF DRINK Whole Juice Fruit Smoothie Milkshake INGREDIENTS 1/2 cup...
... of jar; Turn upside down on blender and place hand on drinking lid. Remove collar and blade and screw on top of jar; Add ingredients to jar in order listed. secure with collar. secure with collar. secure with collar. Place cutting blade assembly on drinking lid. Remove collar and blade and screw on top of jar to hold in place. Blending Drinks With the Travel Jar TYPE OF DRINK Whole Juice Fruit Smoothie Milkshake INGREDIENTS 1/2 cup...
Use and Care Manual
Page 12
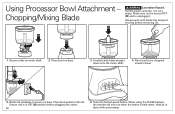
... unplugged. Hold jar in the lid. Secure collar on base. 3. Handle blade carefully; Place food pusher in place while processing. Push the desired speed button. Make sure unit is turned OFF ( ) and is in bowl. 5. Chopping/Mixing Blade w WARNING Laceration Hazard. it is held down onto the motor shaft. 4. Rotate lid clockwise to be chopped/ mixed in OFF ( ) position before removing lid. 1. Using Processor Bowl Attachment - Always wait until blade has stopped moving before...
... unplugged. Hold jar in the lid. Secure collar on base. 3. Handle blade carefully; Place food pusher in place while processing. Push the desired speed button. Make sure unit is turned OFF ( ) and is in bowl. 5. Chopping/Mixing Blade w WARNING Laceration Hazard. it is held down onto the motor shaft. 4. Rotate lid clockwise to be chopped/ mixed in OFF ( ) position before removing lid. 1. Using Processor Bowl Attachment - Always wait until blade has stopped moving before...
Use and Care Manual
Page 13
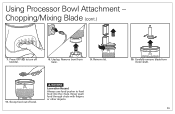
Press OFF ( ) to feed food into the chute. Scoop food out of bowl. Never push food through chute with fingers or other objects. 10. Remove lid. 11. Chopping/Mixing Blade (cont.) 7. Remove bowl from motor shaft. 13 w WARNING Laceration Hazard. Always use food pusher to turn off blender. 8. Unplug. Carefully remove blade from base. 9. Using Processor Bowl Attachment -
Press OFF ( ) to feed food into the chute. Scoop food out of bowl. Never push food through chute with fingers or other objects. 10. Remove lid. 11. Chopping/Mixing Blade (cont.) 7. Remove bowl from motor shaft. 13 w WARNING Laceration Hazard. Always use food pusher to turn off blender. 8. Unplug. Carefully remove blade from base. 9. Using Processor Bowl Attachment -
Use and Care Manual
Page 14
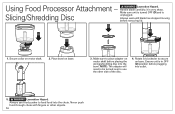
... base. 3. Make sure to use food pusher to secure on motor shaft before removing lid. 1. Rotate lid clockwise to feed food into the chute. Ensure unit is in OFF ( ) position before plugging into the bowl. Using Food Processor Attachment - w WARNING Laceration Hazard. Place bowl on motor shaft. 2. Always use the other objects. 14 Make sure unit is turned OFF ( ) and is very sharp. Handle blade carefully; NOTE: The adapter will need...
... base. 3. Make sure to use food pusher to secure on motor shaft before removing lid. 1. Rotate lid clockwise to feed food into the chute. Ensure unit is in OFF ( ) position before plugging into the bowl. Using Food Processor Attachment - w WARNING Laceration Hazard. Place bowl on motor shaft. 2. Always use the other objects. 14 Make sure unit is turned OFF ( ) and is very sharp. Handle blade carefully; NOTE: The adapter will need...
Use and Care Manual
Page 15
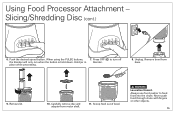
When using the PULSE buttons, 7. Remove lid. 10. Using Food Processor Attachment - Push the desired speed button. Press OFF ( ) to feed food into the chute. place while processing. 8. w WARNING Laceration Hazard. Slicing/Shredding Disc (cont.) 6. Hold jar in blender. Carefully remove disc and adapter from base. 9. Scoop food out of bowl. Always use food pusher to turn off the blender will only run when the button is held down. Never push food through chute with fingers or other objects. 15 Unplug. Remove bowl from motor shaft. 11.
When using the PULSE buttons, 7. Remove lid. 10. Using Food Processor Attachment - Push the desired speed button. Press OFF ( ) to feed food into the chute. place while processing. 8. w WARNING Laceration Hazard. Slicing/Shredding Disc (cont.) 6. Hold jar in blender. Carefully remove disc and adapter from base. 9. Scoop food out of bowl. Always use food pusher to turn off the blender will only run when the button is held down. Never push food through chute with fingers or other objects. 15 Unplug. Remove bowl from motor shaft. 11.
Use and Care Manual
Page 16
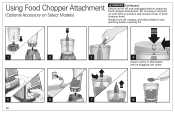
Always turn on until lid is in position and locked on Select Models) w WARNING Cut Hazard. Do not plug in and turn off, unplug, and allow blade to stop spinning before opening lid. 1 2 3 4 Ensure unit is in off and unplugged before plugging into outlet. 5 6 7 8 16 Ensure unit is off position before attaching food chopper attachment. Using Food Chopper Attachment (Optional Accessory on top of food chopper bowl.
Always turn on until lid is in position and locked on Select Models) w WARNING Cut Hazard. Do not plug in and turn off, unplug, and allow blade to stop spinning before opening lid. 1 2 3 4 Ensure unit is in off and unplugged before plugging into outlet. 5 6 7 8 16 Ensure unit is off position before attaching food chopper attachment. Using Food Chopper Attachment (Optional Accessory on top of food chopper bowl.
Use and Care Manual
Page 17
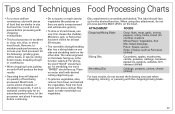
... of food being processed. ATTACHMENT FOODS Chopping/Mixing Blade Chop: Nuts, meat, garlic, onions, peppers, celery, herbs, bread (for shredding, the word "SHRED" should face up . • To julienne vegetables, slice, remove from bowl, and restack the vegetables. However, to chop, mix, slice, or shred most foods. Slice again to make matchstick-cut vegetables. or crushing ice. • When chopping foods, pulsing on motor shaft with the chopping/mixing blade...
... of food being processed. ATTACHMENT FOODS Chopping/Mixing Blade Chop: Nuts, meat, garlic, onions, peppers, celery, herbs, bread (for shredding, the word "SHRED" should face up . • To julienne vegetables, slice, remove from bowl, and restack the vegetables. However, to chop, mix, slice, or shred most foods. Slice again to make matchstick-cut vegetables. or crushing ice. • When chopping foods, pulsing on motor shaft with the chopping/mixing blade...

Use and Care Manual
Page 18
... ml) curry powder 1/2 cup (118 ml) chopped lightly salted dry-roasted peanuts 1/4 cup (59 ml) cilantro, chopped Directions: 1. Cover and refrigerate several hours. 3. Stir pineapple, orange, mango, red pepper, pineapple juice, cilantro, onion, cider vinegar, salt and pepper in a small bowl. roll to blend. Stir peanuts and cilantro together in a large bowl. 2. Serve with plastic wrap and refrigerate until well blended. 2. Place cream cheese...
... ml) curry powder 1/2 cup (118 ml) chopped lightly salted dry-roasted peanuts 1/4 cup (59 ml) cilantro, chopped Directions: 1. Cover and refrigerate several hours. 3. Stir pineapple, orange, mango, red pepper, pineapple juice, cilantro, onion, cider vinegar, salt and pepper in a small bowl. roll to blend. Stir peanuts and cilantro together in a large bowl. 2. Serve with plastic wrap and refrigerate until well blended. 2. Place cream cheese...

Use and Care Manual
Page 19
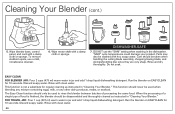
OR OR 1. Rotate the collar counterclockwise until the collar and cutting blade assembly come apart from base. Cleaning Your Blender w WARNING Electrical Shock Hazard. Disconnect power before cleaning. Remove bowl from the travel jar from the bowl. 19 Remove blender jar from the blender jar. 3. Rotate the collar clockwise until the collar and motor shaft come apart from base. Rotate the collar clockwise until the collar and cutting blade assembly come apart from base. Remove travel jar. 4. Unplug. 2. Do not immerse cord, plug, base, or motor in water or...
OR OR 1. Rotate the collar counterclockwise until the collar and cutting blade assembly come apart from base. Cleaning Your Blender w WARNING Electrical Shock Hazard. Disconnect power before cleaning. Remove bowl from the travel jar from the bowl. 19 Remove blender jar from the blender jar. 3. Rotate the collar clockwise until the collar and motor shaft come apart from base. Rotate the collar clockwise until the collar and cutting blade assembly come apart from base. Remove travel jar. 4. Unplug. 2. Do not immerse cord, plug, base, or motor in water or...
Use and Care Manual
Page 20
... should be disassembled and thoroughly cleaned as instructed in "Cleaning Your Blender." Wipe motor shaft with a damp cloth or sponge. DO NOT use a mild, nonabrasive cleanser. 6. Do not soak. Run the blender on EASYCLEAN for 10 seconds. Cleaning Your Blender (cont.) 5. When the processing of a single type of processing the same food. Rinse with clean water. Parts may also be used to rinse the blender between batches...
... should be disassembled and thoroughly cleaned as instructed in "Cleaning Your Blender." Wipe motor shaft with a damp cloth or sponge. DO NOT use a mild, nonabrasive cleanser. 6. Do not soak. Run the blender on EASYCLEAN for 10 seconds. Cleaning Your Blender (cont.) 5. When the processing of a single type of processing the same food. Rinse with clean water. Parts may also be used to rinse the blender between batches...
Use and Care Manual
Page 22
...1.800.851.8900 in Canada. This warranty does not cover glass, filters, wear from normal use, use or subjected to any voltage and waveform other than as proof of purchase is repair or replacement of this product or any component found to be free from defects in material ... Canada or visit hamiltonbeach.com in the U.S. For faster service, locate the model, type, and series numbers on where you . During this period, your appliance. 22 You may not apply to you. Limited Warranty This warranty applies to products purchased and used for other than single-family household use ...
...1.800.851.8900 in Canada. This warranty does not cover glass, filters, wear from normal use, use or subjected to any voltage and waveform other than as proof of purchase is repair or replacement of this product or any component found to be free from defects in material ... Canada or visit hamiltonbeach.com in the U.S. For faster service, locate the model, type, and series numbers on where you . During this period, your appliance. 22 You may not apply to you. Limited Warranty This warranty applies to products purchased and used for other than single-family household use ...


