

Use and Care Manual
Page 2
... with lid in use by children. Keep hands and utensils out of blender jar while blending to reduce the risk of experience and knowledge, unless they do not put cord, plug, base, or motor in order to avoid a hazard. A rubber spatula may push off parts, and before putting on examination, repair, or adjustment. 9. To prevent possible burns: Do not exceed the 3-cup (710...
... with lid in use by children. Keep hands and utensils out of blender jar while blending to reduce the risk of experience and knowledge, unless they do not put cord, plug, base, or motor in order to avoid a hazard. A rubber spatula may push off parts, and before putting on examination, repair, or adjustment. 9. To prevent possible burns: Do not exceed the 3-cup (710...

Use and Care Manual
Page 3
... not use appliance for any accessory or speed setting. 26. CAUTION: In order to avoid a hazard due to the food processor. Then remove plug from moving chopping/mixing blade and slicing/shredding disc while processing food to reduce the risk of severe personal injury and/or damage to inadvertent resetting of children. 31. To disconnect cord, turn the control to defeat the processor or chopper lid interlock...
... not use appliance for any accessory or speed setting. 26. CAUTION: In order to avoid a hazard due to the food processor. Then remove plug from moving chopping/mixing blade and slicing/shredding disc while processing food to reduce the risk of severe personal injury and/or damage to inadvertent resetting of children. 31. To disconnect cord, turn the control to defeat the processor or chopper lid interlock...
Use and Care Manual
Page 4
... appliance is provided with food or liquid. If the cutting blade assembly locks and will damage the motor. Call the toll-free customer service number for food or liquids only. Do not place blender jar in personal injury. This is the measure of the motor wattage during the first seconds of the appliance. The electrical rating of operation. If the plug does not fit fully into a polarized...
... appliance is provided with food or liquid. If the cutting blade assembly locks and will damage the motor. Call the toll-free customer service number for food or liquids only. Do not place blender jar in personal injury. This is the measure of the motor wattage during the first seconds of the appliance. The electrical rating of operation. If the plug does not fit fully into a polarized...

Use and Care Manual
Page 5
...IMMERSE BASE IN WATER. Adapter*† S-Blade Collar* Chopper Base Bowl Motor Shaft*† Collar*† (on Select Models Food Pusher*† Food Chute BEFORE FIRST USE: Wash everything except blender base in hot, soapy water. Dry thoroughly. Care should be taken when handling cutting blade assembly as it is permanently affixed to remove it. Mess-Free Spout With Hinged Cap Lid*† Blender Jar* Vent Opening Lid* Food Chopper Attachment (optional accessory on select models) Lid Processor Bowl*† Cord Stuff Storage (located on bottom of base) Chopping/Mixing Blade...
...IMMERSE BASE IN WATER. Adapter*† S-Blade Collar* Chopper Base Bowl Motor Shaft*† Collar*† (on Select Models Food Pusher*† Food Chute BEFORE FIRST USE: Wash everything except blender base in hot, soapy water. Dry thoroughly. Care should be taken when handling cutting blade assembly as it is permanently affixed to remove it. Mess-Free Spout With Hinged Cap Lid*† Blender Jar* Vent Opening Lid* Food Chopper Attachment (optional accessory on select models) Lid Processor Bowl*† Cord Stuff Storage (located on bottom of base) Chopping/Mixing Blade...

Use and Care Manual
Page 6
... collar counterclockwise until tight. 2. Push the desired speed button. Add ingredients to obtain replacement parts. 1. With the protection of an oven mitt or thick towel, place one hand on jar. Plug into outlet. w WARNING Burn Hazard. When using the PULSE buttons, the blender will only run when the button is damaged, do not use . Keep exposed skin away from lid. Call our toll-free customer service number to jar...
... collar counterclockwise until tight. 2. Push the desired speed button. Add ingredients to obtain replacement parts. 1. With the protection of an oven mitt or thick towel, place one hand on jar. Plug into outlet. w WARNING Burn Hazard. When using the PULSE buttons, the blender will only run when the button is damaged, do not use . Keep exposed skin away from lid. Call our toll-free customer service number to jar...
Use and Care Manual
Page 7
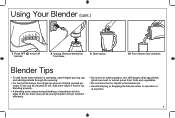
... potatoes, mix stiff dough, whip egg whites, grind raw meat, or extract juices from base. 9. Blender Tips • To add foods when blender is operating, open hinged pouring cap and add ingredients through the opening. • For best performance, the minimum amount of liquid needed per recipe is not blending properly. • If blending action stops during blending or ingredients stick to turn off blender. 8. Using Your Blender (cont.) 7. Pour mixture into container.
... potatoes, mix stiff dough, whip egg whites, grind raw meat, or extract juices from base. 9. Blender Tips • To add foods when blender is operating, open hinged pouring cap and add ingredients through the opening. • For best performance, the minimum amount of liquid needed per recipe is not blending properly. • If blending action stops during blending or ingredients stick to turn off blender. 8. Using Your Blender (cont.) 7. Pour mixture into container.

Use and Care Manual
Page 8
w WARNING Laceration Hazard. Place onto base. 8 5. Carefully place cutting assembly and collar onto travel jar. 2. Push the desired speed button. Handle blade carefully; Make sure unit is turned OFF ( ) and is held down and shake to pop off blender. When using the PULSE buttons, the blender will only run when the button is unplugged. 1. Do not blend hot ingredients. Turn travel jar upside down . Plug into outlet. Pressure may build, causing...
w WARNING Laceration Hazard. Place onto base. 8 5. Carefully place cutting assembly and collar onto travel jar. 2. Push the desired speed button. Handle blade carefully; Make sure unit is turned OFF ( ) and is held down and shake to pop off blender. When using the PULSE buttons, the blender will only run when the button is unplugged. 1. Do not blend hot ingredients. Turn travel jar upside down . Plug into outlet. Pressure may build, causing...

Use and Care Manual
Page 9
... best performance in travel jar. • Do not fill travel jar from jar. 9. When turned upside down to sides of liquid needed per recipe is 3/4 cup (6 ounces/177 ml). • When filling the jar, place frozen ingredients or ice into the jar first. Unplug. Remove travel jar above MAX fill line. 9 Hand-tighten drinking lid onto travel jar, the minimum amount of the jar, turn blender OFF ( ). remove collar and cutting blade assembly from base. 8. Using...
... best performance in travel jar. • Do not fill travel jar from jar. 9. When turned upside down to sides of liquid needed per recipe is 3/4 cup (6 ounces/177 ml). • When filling the jar, place frozen ingredients or ice into the jar first. Unplug. Remove travel jar above MAX fill line. 9 Hand-tighten drinking lid onto travel jar, the minimum amount of the jar, turn blender OFF ( ). remove collar and cutting blade assembly from base. 8. Using...

Use and Care Manual
Page 10
...;a Colada mix 10 ice cubes NUMBER OF SERVINGS 3 to 4 (makes 4 cups [946 ml]) BLENDER SETTING/TIME SMOOTHIE setting for 45 seconds or until blended. 2 to 3 (makes 3 cups [710 ml]) MILKSHAKE setting for 5 to 10 seconds or LOW until blended. TIPS FOR BEST RESULTS: • Always place liquid in blender jar first, then remaining ingredients. • If frozen fruit or ice are not blending, stop blender and pulse a few times...
...;a Colada mix 10 ice cubes NUMBER OF SERVINGS 3 to 4 (makes 4 cups [946 ml]) BLENDER SETTING/TIME SMOOTHIE setting for 45 seconds or until blended. 2 to 3 (makes 3 cups [710 ml]) MILKSHAKE setting for 5 to 10 seconds or LOW until blended. TIPS FOR BEST RESULTS: • Always place liquid in blender jar first, then remaining ingredients. • If frozen fruit or ice are not blending, stop blender and pulse a few times...

Use and Care Manual
Page 11
... FOR BEST RESULTS: See "Blending Tips" on drinking lid. Remove jar from blender. Place cutting blade assembly on top of jar; secure with collar. Turn upside down on blender and place hand on MILKSHAKE for 30 seconds. secure with collar. Shake ingredients in jar and return to blend on top of jar to jar in order listed. Remove collar and blade and screw on page 9. 11 Add ingredients to jar in order listed. Remove collar and blade and...
... FOR BEST RESULTS: See "Blending Tips" on drinking lid. Remove jar from blender. Place cutting blade assembly on top of jar; secure with collar. Turn upside down on blender and place hand on MILKSHAKE for 30 seconds. secure with collar. Shake ingredients in jar and return to blend on top of jar to jar in order listed. Remove collar and blade and screw on page 9. 11 Add ingredients to jar in order listed. Remove collar and blade and...

Use and Care Manual
Page 12
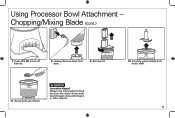
.... Hold jar in bowl. 5. Handle blade carefully; Carefully slide blade straight down . Push the desired speed button. it is unplugged. When using the PULSE buttons, the blender will only run when the button is in the lid. Chopping/Mixing Blade w WARNING Laceration Hazard. Always wait until blade has stopped moving before plugging into outlet. 12 6. Secure collar on base. 3. Using Processor Bowl Attachment - Place food to secure on base. Place food pusher in OFF ( ) position before removing lid. 1. Ensure...
.... Hold jar in bowl. 5. Handle blade carefully; Carefully slide blade straight down . Push the desired speed button. it is unplugged. When using the PULSE buttons, the blender will only run when the button is in the lid. Chopping/Mixing Blade w WARNING Laceration Hazard. Always wait until blade has stopped moving before plugging into outlet. 12 6. Secure collar on base. 3. Using Processor Bowl Attachment - Place food to secure on base. Place food pusher in OFF ( ) position before removing lid. 1. Ensure...
Use and Care Manual
Page 13
Remove bowl from motor shaft. 13 Unplug. Always use food pusher to turn off blender. 8. Chopping/Mixing Blade (cont.) 7. Remove lid. 11. Scoop food out of bowl. w WARNING Laceration Hazard. Never push food through chute with fingers or other objects. 10. Using Processor Bowl Attachment - Carefully remove blade from base. 9. Press OFF ( ) to feed food into the chute.
Remove bowl from motor shaft. 13 Unplug. Always use food pusher to turn off blender. 8. Chopping/Mixing Blade (cont.) 7. Remove lid. 11. Scoop food out of bowl. w WARNING Laceration Hazard. Never push food through chute with fingers or other objects. 10. Using Processor Bowl Attachment - Carefully remove blade from base. 9. Press OFF ( ) to feed food into the chute.
Use and Care Manual
Page 14
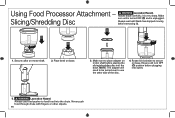
.... 5. Secure collar on base. 3. w WARNING Laceration Hazard. Never push food through chute with fingers or other side of the disc. 4. it is very sharp. NOTE: The adapter will need to be turned over to use food pusher to feed food into the bowl. Rotate lid clockwise to place adapter on base. Handle blade carefully; Place bowl on motor shaft. 2. Make sure to secure on motor shaft before removing lid. 1. Using Food Processor Attachment - w WARNING...
.... 5. Secure collar on base. 3. w WARNING Laceration Hazard. Never push food through chute with fingers or other side of the disc. 4. it is very sharp. NOTE: The adapter will need to be turned over to use food pusher to feed food into the bowl. Rotate lid clockwise to place adapter on base. Handle blade carefully; Place bowl on motor shaft. 2. Make sure to secure on motor shaft before removing lid. 1. Using Food Processor Attachment - w WARNING...

Use and Care Manual
Page 15
Hold jar in blender. Never push food through chute with fingers or other objects. 15 Press OFF ( ) to feed food into the chute. Unplug. w WARNING Laceration Hazard. place while processing. 8. Carefully remove disc and adapter from base. 9. Push the desired speed button. Remove lid. 10. Always use food pusher to turn off the blender will only run when the button is held down. Using Food Processor Attachment - Slicing/Shredding Disc (cont.) 6. When using the PULSE buttons, 7. Remove bowl from motor shaft. 11. Scoop food out of bowl.
Hold jar in blender. Never push food through chute with fingers or other objects. 15 Press OFF ( ) to feed food into the chute. Unplug. w WARNING Laceration Hazard. place while processing. 8. Carefully remove disc and adapter from base. 9. Push the desired speed button. Remove lid. 10. Always use food pusher to turn off the blender will only run when the button is held down. Using Food Processor Attachment - Slicing/Shredding Disc (cont.) 6. When using the PULSE buttons, 7. Remove bowl from motor shaft. 11. Scoop food out of bowl.

Use and Care Manual
Page 16
Always turn on until lid is in position and locked on Select Models) w WARNING Cut Hazard. Do not plug in off and unplugged before plugging into outlet. 5 6 7 8 16 Ensure unit is in and turn off, unplug, and allow blade to stop spinning before opening lid. 1 2 3 4 Ensure unit is off position before attaching food chopper attachment. Using Food Chopper Attachment (Optional Accessory on top of food chopper bowl.
Always turn on until lid is in position and locked on Select Models) w WARNING Cut Hazard. Do not plug in off and unplugged before plugging into outlet. 5 6 7 8 16 Ensure unit is in and turn off, unplug, and allow blade to stop spinning before opening lid. 1 2 3 4 Ensure unit is off position before attaching food chopper attachment. Using Food Chopper Attachment (Optional Accessory on top of food chopper bowl.
Use and Care Manual
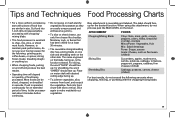
Page 17
... produce the best results. • Operating time will become gummy. • To slice or shred cheese, use your food processor for shredding, the word "SHRED" should face up . • To julienne vegetables, slice, remove from bowl, and restack the vegetables. Slice again to chop, mix, slice, or shred most foods. If unit is the function selected. ATTACHMENT FOODS Chopping/Mixing Blade Chop: Nuts, meat, garlic...
... produce the best results. • Operating time will become gummy. • To slice or shred cheese, use your food processor for shredding, the word "SHRED" should face up . • To julienne vegetables, slice, remove from bowl, and restack the vegetables. Slice again to chop, mix, slice, or shred most foods. If unit is the function selected. ATTACHMENT FOODS Chopping/Mixing Blade Chop: Nuts, meat, garlic...
Use and Care Manual
Page 18
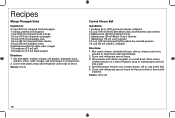
... bowl until ready to serve. Cover and refrigerate several hours. 3. roll to blend. Recipes Mango Pineapple Salsa Ingredients: 2 cups (473 ml) chopped fresh pineapple 1 orange, peeled and chopped 1 cup (237 ml) chopped fresh mango 1/2 cup (118 ml) chopped red pepper 1/2 cup (118 ml) pineapple juice 1/4 cup (59 ml) chopped fresh cilantro 1/4 cup (59 ml) chopped onion 3 tablespoons (44 ml) apple cider vinegar 1/2 teaspoon (2.5 ml) salt 1/4 teaspoon (1.3 ml) black pepper Directions: 1. Cover...
... bowl until ready to serve. Cover and refrigerate several hours. 3. roll to blend. Recipes Mango Pineapple Salsa Ingredients: 2 cups (473 ml) chopped fresh pineapple 1 orange, peeled and chopped 1 cup (237 ml) chopped fresh mango 1/2 cup (118 ml) chopped red pepper 1/2 cup (118 ml) pineapple juice 1/4 cup (59 ml) chopped fresh cilantro 1/4 cup (59 ml) chopped onion 3 tablespoons (44 ml) apple cider vinegar 1/2 teaspoon (2.5 ml) salt 1/4 teaspoon (1.3 ml) black pepper Directions: 1. Cover...

Use and Care Manual
Page 19
... not immerse cord, plug, base, or motor in water or other liquid. Rotate the collar clockwise until the collar and motor shaft come apart from base. Remove travel jar. 4. Unplug. 2. Remove blender jar from the travel jar from the bowl. 19 Rotate the collar counterclockwise until the collar and cutting blade assembly come apart from base. Cleaning Your Blender w WARNING Electrical Shock Hazard. Remove bowl from the blender jar. 3. Disconnect power before cleaning. Rotate the collar clockwise until the collar and cutting blade assembly come apart from base.
... not immerse cord, plug, base, or motor in water or other liquid. Rotate the collar clockwise until the collar and motor shaft come apart from base. Remove travel jar. 4. Unplug. 2. Remove blender jar from the travel jar from the bowl. 19 Rotate the collar counterclockwise until the collar and cutting blade assembly come apart from base. Cleaning Your Blender w WARNING Electrical Shock Hazard. Remove bowl from the blender jar. 3. Disconnect power before cleaning. Rotate the collar clockwise until the collar and cutting blade assembly come apart from base.

Use and Care Manual
Page 20
... cleaning as instructed in "Cleaning Your Blender." The Easy Clean function should never be used when blending any mixture containing eggs, milk, or any other dairy products, meats, or seafood. FOR TRAVEL JAR: Pour 1 cup (237 ml) warm water in jar and add 1 drop liquid dishwashing detergent. Wipe blender base, control panel, and cord with clean water. Parts may also be taken when handling the cutting blade assembly, chopping/mixing blade...
... cleaning as instructed in "Cleaning Your Blender." The Easy Clean function should never be used when blending any mixture containing eggs, milk, or any other dairy products, meats, or seafood. FOR TRAVEL JAR: Pour 1 cup (237 ml) warm water in jar and add 1 drop liquid dishwashing detergent. Wipe blender base, control panel, and cord with clean water. Parts may also be taken when handling the cutting blade assembly, chopping/mixing blade...
Use and Care Manual
Page 22
... caused by law, in the U.S. For faster service, locate the model, type, and series numbers on implied warranties or special, incidental, or consequential damages, so the foregoing limitations may have other than as proof of purchase is limited to be free from accident, alteration, abuse, or misuse. This warranty does not cover glass, filters, wear from the date of this...
... caused by law, in the U.S. For faster service, locate the model, type, and series numbers on implied warranties or special, incidental, or consequential damages, so the foregoing limitations may have other than as proof of purchase is limited to be free from accident, alteration, abuse, or misuse. This warranty does not cover glass, filters, wear from the date of this...


