Use & Care
Page 2
... place cutting blade assembly on examination, repair, or electrical or mechanical adjustment. 7. Then remove plug from the lid, and start blending at lowest speed. 17. Do not use of blender jar is not running. 11. Blades are sharp; Injury can result if moving parts. 6. Before plugging cord into wall outlet, turn the control to persons. 8. Close supervision is necessary when any manner. Call our toll-free customer service number for...
... place cutting blade assembly on examination, repair, or electrical or mechanical adjustment. 7. Then remove plug from the lid, and start blending at lowest speed. 17. Do not use of blender jar is not running. 11. Blades are sharp; Injury can result if moving parts. 6. Before plugging cord into wall outlet, turn the control to persons. 8. Close supervision is necessary when any manner. Call our toll-free customer service number for...
Use & Care
Page 3
.... WARNING! Call the toll-free customer service number for food or liquids only. BEFORE FIRST USE: After unpacking blender, wash everything except blender base in or tripping over the countertop or tabletop where it still does not fit, have an electrician replace the outlet. Do not defeat the safety purpose of the blender is based on available cutting blade assembly, jar combinations, and attachments that it is very...
.... WARNING! Call the toll-free customer service number for food or liquids only. BEFORE FIRST USE: After unpacking blender, wash everything except blender base in or tripping over the countertop or tabletop where it still does not fit, have an electrician replace the outlet. Do not defeat the safety purpose of the blender is based on available cutting blade assembly, jar combinations, and attachments that it is very...
Use & Care
Page 4
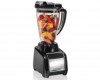
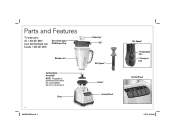
Parts and Features *To order parts: US: 1.800.851.8900 www.hamiltonbeach.com Canada: 1.800.267.2826 Mess-Free Spout With Hinged Cap Blender Jar* Cutting Blade Assembly* NOTE: The gasket is permanently affixed to remove it. Do not try to the cutting blades. Base 4 840233400 ENv04.indd 4 Filler-Cap* Lid* Stir Spoon* Collar* Control Panel Stir Spoon* 1 Tablespoon Line 1 Teaspoon Line Control Panel 9/27/13 8:54 AM
Parts and Features *To order parts: US: 1.800.851.8900 www.hamiltonbeach.com Canada: 1.800.267.2826 Mess-Free Spout With Hinged Cap Blender Jar* Cutting Blade Assembly* NOTE: The gasket is permanently affixed to remove it. Do not try to the cutting blades. Base 4 840233400 ENv04.indd 4 Filler-Cap* Lid* Stir Spoon* Collar* Control Panel Stir Spoon* 1 Tablespoon Line 1 Teaspoon Line Control Panel 9/27/13 8:54 AM
Use & Care
Page 5
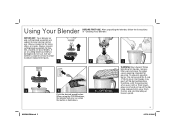
... the desired speed button. Call our toll-free customer service number to wear during blending; To prevent possible burns: Do not exceed the 3-cup (710-ml) level. IMPORTANT: Your blender jar and cutting blade assembly are subject to obtain replacement parts. 1 2 3 WARNING! If jar or cutting blade assembly is held down. 5 840233400 ENv04.indd 5 9/27/13 8:52 AM Using Your Blender BEFORE FIRST USE: After unpacking the blender, follow the instructions in "Cleaning Your Blender." therefore...
... the desired speed button. Call our toll-free customer service number to wear during blending; To prevent possible burns: Do not exceed the 3-cup (710-ml) level. IMPORTANT: Your blender jar and cutting blade assembly are subject to obtain replacement parts. 1 2 3 WARNING! If jar or cutting blade assembly is held down. 5 840233400 ENv04.indd 5 9/27/13 8:52 AM Using Your Blender BEFORE FIRST USE: After unpacking the blender, follow the instructions in "Cleaning Your Blender." therefore...

Use & Care
Page 6
... Remove filler-cap and insert stir spoon into hole in operation or at any time. • If blending action stops during blending or 11 ingredients stick to sides of the lid and use the stir spoon to add ingredients or to move the mixture around in blender jar. NOTE: Turn blender OFF before removing filler-cap and when adding the stir spoon. Blender Tips • To add foods when blender is...
... Remove filler-cap and insert stir spoon into hole in operation or at any time. • If blending action stops during blending or 11 ingredients stick to sides of the lid and use the stir spoon to add ingredients or to move the mixture around in blender jar. NOTE: Turn blender OFF before removing filler-cap and when adding the stir spoon. Blender Tips • To add foods when blender is...
Use & Care
Page 7
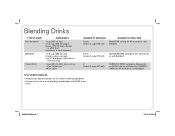
... 10 seconds or until blended. 2 (makes 2 cups [473 ml]) PURÉE/ICY DRINK setting for 45 seconds or PULSE 5 times and blend on PURÉE/ICY DRINK for 45 seconds or until blended. TIPS FOR BEST RESULTS: • Always place liquid in blender jar first, then remaining ingredients. • If frozen fruit or ice are not blending, stop blender and PULSE a few times. 840233400...
... 10 seconds or until blended. 2 (makes 2 cups [473 ml]) PURÉE/ICY DRINK setting for 45 seconds or PULSE 5 times and blend on PURÉE/ICY DRINK for 45 seconds or until blended. TIPS FOR BEST RESULTS: • Always place liquid in blender jar first, then remaining ingredients. • If frozen fruit or ice are not blending, stop blender and PULSE a few times. 840233400...
Use & Care
Page 8
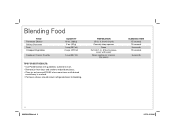
... g) 1 cup (237 ml) 2 cups (473 ml) 1 cup (237 ml) TIPS FOR BEST RESULTS: • Use PULSE button with guidelines outlined in . (2.5-cm) pieces, cover with water Break cookies or crackers into pieces BLENDING TIME 15 seconds 15 seconds 5 seconds 10 seconds 5 seconds 8 840233400 ENv04.indd 8 9/27/13 8:52 AM PREPARATION 1/2-in. (1.3-cm) chunks Coarsely chop squares None Cut into 1-in chart. • Remove jar from base...
... g) 1 cup (237 ml) 2 cups (473 ml) 1 cup (237 ml) TIPS FOR BEST RESULTS: • Use PULSE button with guidelines outlined in . (2.5-cm) pieces, cover with water Break cookies or crackers into pieces BLENDING TIME 15 seconds 15 seconds 5 seconds 10 seconds 5 seconds 8 840233400 ENv04.indd 8 9/27/13 8:52 AM PREPARATION 1/2-in. (1.3-cm) chunks Coarsely chop squares None Cut into 1-in chart. • Remove jar from base...
Use & Care
Page 9
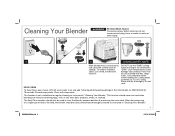
... food. To remove stubborn spots, use the "SANI" setting when washing in "Cleaning Your Blender." Parts may also be taken when handling the cutting blade assembly as it is very sharp. Discard soapy water. DO NOT use a mild, nonabrasive cleanser. Run the blender on EASYCLEAN for regular cleaning as instructed in jar and add 1 drop liquid dishwashing detergent. The Easy Clean function should be disassembled and thoroughly cleaned...
... food. To remove stubborn spots, use the "SANI" setting when washing in "Cleaning Your Blender." Parts may also be taken when handling the cutting blade assembly as it is very sharp. Discard soapy water. DO NOT use a mild, nonabrasive cleanser. Run the blender on EASYCLEAN for regular cleaning as instructed in jar and add 1 drop liquid dishwashing detergent. The Easy Clean function should be disassembled and thoroughly cleaned...
Use & Care
Page 10
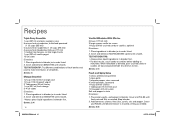
... 10 Vanilla Milkshake With Mix-Ins 3/4 cup (177 ml) milk 3 large scoops vanilla ice cream 1/4 cup (59 ml) crushed candy or cookies, optional Directions: 1. When milkshake is reached, stirring as needed . Cover and PULSE until smooth. Cover and blend on MIX/MILKSHAKE speed until smooth. *Always place liquid ingredients in blender first. • For best results, crush candy or cookies before adding to make...
... 10 Vanilla Milkshake With Mix-Ins 3/4 cup (177 ml) milk 3 large scoops vanilla ice cream 1/4 cup (59 ml) crushed candy or cookies, optional Directions: 1. When milkshake is reached, stirring as needed . Cover and PULSE until smooth. Cover and blend on MIX/MILKSHAKE speed until smooth. *Always place liquid ingredients in blender first. • For best results, crush candy or cookies before adding to make...
Use & Care
Page 12
...repair or replacement of this product or any statutory warranty or condition of merchantability or fitness for other than single-family household use not in material and workmanship for all claims for this written warranty. To make a warranty claim. For faster service, locate the model, type, and series numbers on where you . This warranty... by breach of express or implied warranty. Limited Warranty This warranty applies to the amount of the purchase price. and Canada. All liability is limited to products purchased and used for a particular purpose, is used in lieu of ...
...repair or replacement of this product or any statutory warranty or condition of merchantability or fitness for other than single-family household use not in material and workmanship for all claims for this written warranty. To make a warranty claim. For faster service, locate the model, type, and series numbers on where you . This warranty... by breach of express or implied warranty. Limited Warranty This warranty applies to the amount of the purchase price. and Canada. All liability is limited to products purchased and used for a particular purpose, is used in lieu of ...


