
Use & Care
Page 2
...a polarized outlet. A rubber spatula may cause a risk of electrical shock. Screw on or taking off parts, and before putting on cutting assembly firmly. If the jar should always be used by Hamilton Beach/Proctor-Silex, Inc. The use outdoors. 9. Keep hands and utensils out of jar while blending to reduce...hang over edge of two-piece lid. Do not fill blender jar beyond the 3-cup (750 ml) level. Injury can result if moving parts. 6. Close supervision is necessary when any appliance is used only when blender is switched ON, switch OFF immediately and tighten jar in water or...
...a polarized outlet. A rubber spatula may cause a risk of electrical shock. Screw on or taking off parts, and before putting on cutting assembly firmly. If the jar should always be used by Hamilton Beach/Proctor-Silex, Inc. The use outdoors. 9. Keep hands and utensils out of jar while blending to reduce...hang over edge of two-piece lid. Do not fill blender jar beyond the 3-cup (750 ml) level. Injury can result if moving parts. 6. Close supervision is necessary when any appliance is used only when blender is switched ON, switch OFF immediately and tighten jar in water or...
Use & Care
Page 3
... over , a longer cord. This is the measure of the motor wattage during the first seconds of liquids from your unit, but are available as replacement parts. Do not place blender jar in personal injury. NOTICE: To prevent leakage of operation. The wattage rating of the blender is determined by an Underwriter...
... over , a longer cord. This is the measure of the motor wattage during the first seconds of liquids from your unit, but are available as replacement parts. Do not place blender jar in personal injury. NOTICE: To prevent leakage of operation. The wattage rating of the blender is determined by an Underwriter...
Use & Care
Page 4
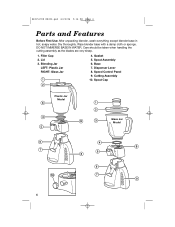
DO NOT IMMERSE BASE IN WATER. Blending Jar LEFT: Plastic Jar RIGHT: Glass Jar 4. Spout Assembly 6. Speed Control Panel 9. Wipe blender base with a damp cloth or sponge. Filler Cap 2. Lid 3. Cutting Assembly 10. Gasket 5. Dispenser Lever 8. Base 7. Dry thoroughly. Spout Cap Plastic Jar Model Glass Jar Model 4 840153700 ENv02.qxd 6/22/06 5:16 PM Page 4 Parts and Features Before First Use: After unpacking blender, wash everything except blender base in hot, soapy water. Care should be taken when handling the cutting assembly as the blades are very sharp. 1.
DO NOT IMMERSE BASE IN WATER. Blending Jar LEFT: Plastic Jar RIGHT: Glass Jar 4. Spout Assembly 6. Speed Control Panel 9. Wipe blender base with a damp cloth or sponge. Filler Cap 2. Lid 3. Cutting Assembly 10. Gasket 5. Dispenser Lever 8. Base 7. Dry thoroughly. Spout Cap Plastic Jar Model Glass Jar Model 4 840153700 ENv02.qxd 6/22/06 5:16 PM Page 4 Parts and Features Before First Use: After unpacking blender, wash everything except blender base in hot, soapy water. Care should be taken when handling the cutting assembly as the blades are very sharp. 1.
Use & Care
Page 5
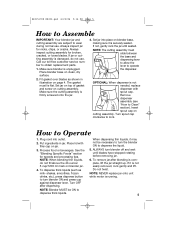
... service number to Operate 1. Set jar on top of gasket and screw on page 4. NOTE: The cutting assembly must lie flat. How to obtain replacement parts. 1. Put ingredients in illustration on cutting assembly. See the "Blending Specific Foods" section for broken, cracked, or loose blades. To dispense thick liquids (such as...
... service number to Operate 1. Set jar on top of gasket and screw on page 4. NOTE: The cutting assembly must lie flat. How to obtain replacement parts. 1. Put ingredients in illustration on cutting assembly. See the "Blending Specific Foods" section for broken, cracked, or loose blades. To dispense thick liquids (such as...
Use & Care
Page 8
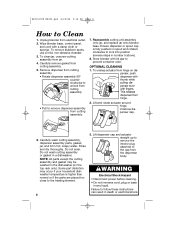
...or electrical shock. Unplug blender from hinge. 2. OPTIONAL CLEANING 1. Unscrew dispenser cap. 6. Rinse and dry thoroughly. NOTE: All parts except the cutting assembly and gasket may occur if your household dishwasher temperature is fully pushed on spout and rotated clockwise to Clean ... from cutting assembly. • Rotate dispenser assembly 90º counterclockwise to unlock from hinge on the top rack only). Some part distortion may be washed in any liquid. To unsnap actuator from cutting assembly • Pull to prevent container odor. Carefully wash...
...or electrical shock. Unplug blender from hinge. 2. OPTIONAL CLEANING 1. Unscrew dispenser cap. 6. Rinse and dry thoroughly. NOTE: All parts except the cutting assembly and gasket may occur if your household dishwasher temperature is fully pushed on spout and rotated clockwise to Clean ... from cutting assembly. • Rotate dispenser assembly 90º counterclockwise to unlock from hinge on the top rack only). Some part distortion may be washed in any liquid. To unsnap actuator from cutting assembly • Pull to prevent container odor. Carefully wash...
Use & Care
Page 12
...noted below . Before calling, please note the model, type, and series numbers and fill in conformity with this product, including without limitation: glass parts, glass containers, cutter/strainers, blades, seals, gaskets, clutches, motor brushes, and/or agitators, etc. These numbers can be found on implied..., which vary from defects in the U.S. Some states or provinces do not allow limitations on the bottom of three (3) years for Hamilton Beach products or one hundred eighty (180) days for commercial purposes, or any use not in that information below . LIMITED WARRANTY This ...
...noted below . Before calling, please note the model, type, and series numbers and fill in conformity with this product, including without limitation: glass parts, glass containers, cutter/strainers, blades, seals, gaskets, clutches, motor brushes, and/or agitators, etc. These numbers can be found on implied..., which vary from defects in the U.S. Some states or provinces do not allow limitations on the bottom of three (3) years for Hamilton Beach products or one hundred eighty (180) days for commercial purposes, or any use not in that information below . LIMITED WARRANTY This ...


